

Owners Manual
Page 1
PLASMA TV OWNER'S MANUAL MODELS: 50PY2DR 50PY2DRH 60PY2DR 60PY2DRH 50PX4DR 50PX4DRH 50PY2DR-UA 50PY2DRH-UA 60PY2DR-UA 60PY2DRH-UA 50PX4DR-UA 50PX4DRH-UA R TruSurround XT TM Please read this information to your TV. Model Number : Serial Number : LG Electronics U.S.A., Inc. See the label attached on the back cover and relate this manual carefully and completely before operating your dealer if you require service. Record model number and serial number of the TV in the spaces provided below. Retain this manual for future reference.
PLASMA TV OWNER'S MANUAL MODELS: 50PY2DR 50PY2DRH 60PY2DR 60PY2DRH 50PX4DR 50PX4DRH 50PY2DR-UA 50PY2DRH-UA 60PY2DR-UA 60PY2DRH-UA 50PX4DR-UA 50PX4DRH-UA R TruSurround XT TM Please read this information to your TV. Model Number : Serial Number : LG Electronics U.S.A., Inc. See the label attached on the back cover and relate this manual carefully and completely before operating your dealer if you require service. Record model number and serial number of the TV in the spaces provided below. Retain this manual for future reference.
Owners Manual
Page 3
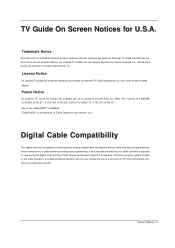
... sont des marques déposées de Gemstar-TV Guide International, Inc. et/ou d'une de ses sociétés affiliées. Owner's Manual 3 "CableCARDTM is capable of Cable Television Laboratories, Inc." Cable operator enhanced program (For example, electronic program guide provided by your local cable operator. License Notice...,203; 5,940,073; 4,908,713; 4,751,578; 4,706,121. Use of a set top box. A security card provided by the cable operator), and data enhanced television service may require the use of the CableCARDTM TradeMark.
... sont des marques déposées de Gemstar-TV Guide International, Inc. et/ou d'une de ses sociétés affiliées. Owner's Manual 3 "CableCARDTM is capable of Cable Television Laboratories, Inc." Cable operator enhanced program (For example, electronic program guide provided by your local cable operator. License Notice...,203; 5,940,073; 4,908,713; 4,751,578; 4,706,121. Use of a set top box. A security card provided by the cable operator), and data enhanced television service may require the use of the CableCARDTM TradeMark.
Owners Manual
Page 5
... the cord exits the appliance. 16. Check the specification page of time. 14. Pay particular attention to qualified service personnel. Any DATA saved on the apparatus. 18. Owner's Manual 5 CAUTION concerning the Power Cord : Most appliances recommend they be lost or damaged, making a back up copy...outlet circuit which powers only that appliance and has no objects filled with an exact replacement part by an authorized servicer. Do not overload wall outlets. Unplug this owner's manual to be exposed to rain or moisture, does not operate normally, or has been dropped. 15. To Reduce ...
... the cord exits the appliance. 16. Check the specification page of time. 14. Pay particular attention to qualified service personnel. Any DATA saved on the apparatus. 18. Owner's Manual 5 CAUTION concerning the Power Cord : Most appliances recommend they be lost or damaged, making a back up copy...outlet circuit which powers only that appliance and has no objects filled with an exact replacement part by an authorized servicer. Do not overload wall outlets. Unplug this owner's manual to be exposed to rain or moisture, does not operate normally, or has been dropped. 15. To Reduce ...

Owners Manual
Page 9
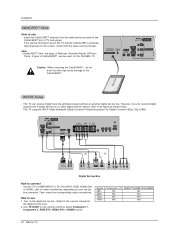
...Connect a second TV or Monitor. Note: In standby mode, these jacks. Owner's Manual 9 Connection Options W This is a back panel of equipment. S-Video Input Connect ... DVD/DTV Input RGB/AUDIO INPUT Connect the monitor output from various types of 50PY2DR, 50PY2DRH, 60PY2DR, 60PY2DRH series TVs. Digital Audio (DVI: Digital Visual Interface/Compon...VIDE O), HDMI 2 Connect a HDMI signal to the G-LINK jack. Back Connection Panel Introduction RS-232C INPUT (CONTROL/SERVICE) VIDEO INPUT AUDIO INPUT L R VIDEO L AUDIO R I1 HDMI 2 OUTPUT DVD /DTV INPUT COMPONENT 2 COMPONENT...
...Connect a second TV or Monitor. Note: In standby mode, these jacks. Owner's Manual 9 Connection Options W This is a back panel of equipment. S-Video Input Connect ... DVD/DTV Input RGB/AUDIO INPUT Connect the monitor output from various types of 50PY2DR, 50PY2DRH, 60PY2DR, 60PY2DRH series TVs. Digital Audio (DVI: Digital Visual Interface/Compon...VIDE O), HDMI 2 Connect a HDMI signal to the G-LINK jack. Back Connection Panel Introduction RS-232C INPUT (CONTROL/SERVICE) VIDEO INPUT AUDIO INPUT L R VIDEO L AUDIO R I1 HDMI 2 OUTPUT DVD /DTV INPUT COMPONENT 2 COMPONENT...

Owners Manual
Page 11
Remote Control Port Connect your wired remote control here. HDMI2. Owner's Manual 11 AUDIO Input Connections are available for Visual CableCARD™ Interface/Component2) received from Cable Input/ Service Provider. Antenna Input Connect over-theair signals to IEEE1394 Connect the monitor ...Note: In standby mode, nal to the SVIDEO input. Connector. jack. Cable IEEE-1394 HDMI 2 HDMI1/DVI RS-232C INPUT (CONTROL/SERVICE) OUTPUT COMPONENT2 INPUT DVI INPUT DIGITAL AUDIO (OPTICAL) RGB INPUT AUDIO INPUT DVD /DTV INPUT VIDEO AUDIO L R COMPONENT INPUT 2 VIDEO...
Remote Control Port Connect your wired remote control here. HDMI2. Owner's Manual 11 AUDIO Input Connections are available for Visual CableCARD™ Interface/Component2) received from Cable Input/ Service Provider. Antenna Input Connect over-theair signals to IEEE1394 Connect the monitor ...Note: In standby mode, nal to the SVIDEO input. Connector. jack. Cable IEEE-1394 HDMI 2 HDMI1/DVI RS-232C INPUT (CONTROL/SERVICE) OUTPUT COMPONENT2 INPUT DVI INPUT DIGITAL AUDIO (OPTICAL) RGB INPUT AUDIO INPUT DVD /DTV INPUT VIDEO AUDIO L R COMPONENT INPUT 2 VIDEO...

Owners Manual
Page 17
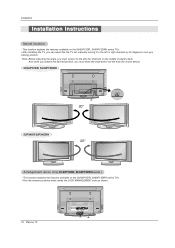
... with your hand. In attaching the plate cover, align the guide to the front. 2. This function explains the features available on the 50PY2DR, 50PY2DRH, 60PY2DR, 60PY2DRH series TVs. • When moving or connecting the power cord, be used the these methods. • And... after removing the plate cover, you must install the wall brackets on the TV's back. 3. Connect the power cord on the wall. Owner's Manual 17 RS-232C INPUT (CONTROL/SERVICE) VIDEO INPUT AUDIO INPUT L R VIDEO L AUDIO R I1 HDMI 2 OUTPUT DVD /DTV INPUT COMPONENT 2 COMPONENT 1 MONITOR OUTPUT A/V INPUT1 (MONO...
... with your hand. In attaching the plate cover, align the guide to the front. 2. This function explains the features available on the 50PY2DR, 50PY2DRH, 60PY2DR, 60PY2DRH series TVs. • When moving or connecting the power cord, be used the these methods. • And... after removing the plate cover, you must install the wall brackets on the TV's back. 3. Connect the power cord on the wall. Owner's Manual 17 RS-232C INPUT (CONTROL/SERVICE) VIDEO INPUT AUDIO INPUT L R VIDEO L AUDIO R I1 HDMI 2 OUTPUT DVD /DTV INPUT COMPONENT 2 COMPONENT 1 MONITOR OUTPUT A/V INPUT1 (MONO...
Owners Manual
Page 18
...features available on the middle of stand's back. Note: Before adjusting the angle, you must close the shaft bolt to set manually turning it to suit your viewing position. This function explains the features available on the 50/60PY2DR, 50/60PY2DRH series TVs. .../60PY2DR, 50/60PY2DRH series TVs. • Run the accessory device wires inside the JACK MANAGEMENT pole as shown. 18 Plasma TV RS-232C INPUT (CONTROL/SERVICE) VIDEO INPUT AUDIO INPUT L R VIDEO L AUDIO R I1 HDMI 2 OUTPUT DVD /DTV INPUT COMPONENT 2 COMPONENT 1 MONITOR OUTPUT A/V INPUT1 (MONO) S RC EO V MN I ...
...features available on the middle of stand's back. Note: Before adjusting the angle, you must close the shaft bolt to set manually turning it to suit your viewing position. This function explains the features available on the 50/60PY2DR, 50/60PY2DRH series TVs. .../60PY2DR, 50/60PY2DRH series TVs. • Run the accessory device wires inside the JACK MANAGEMENT pole as shown. 18 Plasma TV RS-232C INPUT (CONTROL/SERVICE) VIDEO INPUT AUDIO INPUT L R VIDEO L AUDIO R I1 HDMI 2 OUTPUT DVD /DTV INPUT COMPONENT 2 COMPONENT 1 MONITOR OUTPUT A/V INPUT1 (MONO) S RC EO V MN I ...
Owners Manual
Page 21
... D TR E E O O L AC INPUT CABLE ANTENNA Camcorder R AUDIO L VIDEO Video Game Set Cable HDMI 2 IEEE-1394 HDMI1 /DVI RS-232C INPUT (CONTROL/SERVICE) OUTPUT COMPONENT2 INPUT DVI INPUT DIGITAL AUDIO (OPTICAL) RGB INPUT AUDIO INPUT DVD /DTV INPUT VIDEO AUDIO L R COMPONENT INPUT 2 VIDEO AUDIO L R MONITOR OUTPUT COMPONENT ...the Video or Front Video external input source.) 3. Use the TV/VIDEO button on the TV, as shown in the figure. 2. Owner's Manual 21 Connect the DVD video outputs (Y, PB, PR) to the COMPONENT (Y, PB, PR) INPUT jacks on the TV and connect the DVD...
... D TR E E O O L AC INPUT CABLE ANTENNA Camcorder R AUDIO L VIDEO Video Game Set Cable HDMI 2 IEEE-1394 HDMI1 /DVI RS-232C INPUT (CONTROL/SERVICE) OUTPUT COMPONENT2 INPUT DVI INPUT DIGITAL AUDIO (OPTICAL) RGB INPUT AUDIO INPUT DVD /DTV INPUT VIDEO AUDIO L R COMPONENT INPUT 2 VIDEO AUDIO L R MONITOR OUTPUT COMPONENT ...the Video or Front Video external input source.) 3. Use the TV/VIDEO button on the TV, as shown in the figure. 2. Owner's Manual 21 Connect the DVD video outputs (Y, PB, PR) to the COMPONENT (Y, PB, PR) INPUT jacks on the TV and connect the DVD...
Owners Manual
Page 22
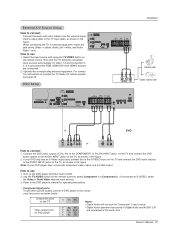
...select Component 1, Component 2, RGB-DTV, HDMI1/DVI or HDMI2 source. Then, make the corresponding audio connections. How to the owner's manual for Digital Contents (480p,720p,1080i). These 3 types of CableCARDTTMM can receive Digital Over-the-air/Cable signals without an external digital ...set -top box.) 2. Caution: When removing the CableCARDTM, do receive Digital signals from the cable service provider to the CableCARDTTMM. Installation CableCARDTTMM Setup How to use 1. If the pairing information about this PLASMA TV. However, if you...
...select Component 1, Component 2, RGB-DTV, HDMI1/DVI or HDMI2 source. Then, make the corresponding audio connections. How to the owner's manual for Digital Contents (480p,720p,1080i). These 3 types of CableCARDTTMM can receive Digital Over-the-air/Cable signals without an external digital ...set -top box.) 2. Caution: When removing the CableCARDTM, do receive Digital signals from the cable service provider to the CableCARDTTMM. Installation CableCARDTTMM Setup How to use 1. If the pairing information about this PLASMA TV. However, if you...

Owners Manual
Page 25
...damage your vision. IEEE-1394 HDMI 2 HDMI1 /DVI RS-232C INPUT (CONTROL/SERVICE) OUTPUT COMPONENT2 INPUT DVI INPUT DIGITAL AUDIO (OPTICAL) RGB INPUT AUDIO INPUT DVD /DTV INPUT Owner's Manual 25 See the Operating Manual of the optical cable to p.45) Caution: Do not look into the optical... speakers off .(Refer to the digital audio (opti- How to hook up the second TV or monitor. See the external audio equipment instruction manual for Monitor out. • When connecting with external audio equipments, such as amplifers or speakers, please turn the TV speakers off .(Refer ...
...damage your vision. IEEE-1394 HDMI 2 HDMI1 /DVI RS-232C INPUT (CONTROL/SERVICE) OUTPUT COMPONENT2 INPUT DVI INPUT DIGITAL AUDIO (OPTICAL) RGB INPUT AUDIO INPUT DVD /DTV INPUT Owner's Manual 25 See the Operating Manual of the optical cable to p.45) Caution: Do not look into the optical... speakers off .(Refer to the digital audio (opti- How to hook up the second TV or monitor. See the external audio equipment instruction manual for Monitor out. • When connecting with external audio equipments, such as amplifers or speakers, please turn the TV speakers off .(Refer ...
Owners Manual
Page 28
... picture below, press the ADJUST button to use . - Installation HDMI How to adjust the screen Position of TV SET and contact an PC graphics card service center. - Select HDMI1/DVI Input source in use 1. Notes: - In case that Video Resolution is present, change the HDMI1/DVI Source Devices to Screen.... Refer to the Manual of HDMI1/DVI Source Devices or contact your service center. There may not work if a HDMI1 to DVI Cable is in Main Input option on the menu until the picture...
... picture below, press the ADJUST button to use . - Installation HDMI How to adjust the screen Position of TV SET and contact an PC graphics card service center. - Select HDMI1/DVI Input source in use 1. Notes: - In case that Video Resolution is present, change the HDMI1/DVI Source Devices to Screen.... Refer to the Manual of HDMI1/DVI Source Devices or contact your service center. There may not work if a HDMI1 to DVI Cable is in Main Input option on the menu until the picture...
Owners Manual
Page 29
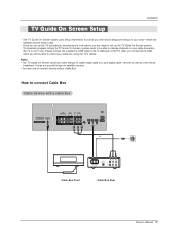
...supplied G-LINK cable to set up the TV Guide On Screen system. - It does not provide listings for cable-ready, cable box, and digital cable services as well as over-the-air broadcast. After you connect the G-LINK cable you with a Cable Box Cable VIDEO AUDIO VIDEO AUDIO DVD /DTV INPUT... or TV SET Cable IN OUTPUT SWITCH 34 (R) AUDIO (L) VIDEO TV VCR Cable Box Front Cable Box Rear Owner's Manual 29 Notes: • The TV Guide On Screen system provides listings for satellite services. • You may use . The TV Guide On Screen system uses Setup information to provide you will be...
...supplied G-LINK cable to set up the TV Guide On Screen system. - It does not provide listings for cable-ready, cable box, and digital cable services as well as over-the-air broadcast. After you connect the G-LINK cable you with a Cable Box Cable VIDEO AUDIO VIDEO AUDIO DVD /DTV INPUT... or TV SET Cable IN OUTPUT SWITCH 34 (R) AUDIO (L) VIDEO TV VCR Cable Box Front Cable Box Rear Owner's Manual 29 Notes: • The TV Guide On Screen system provides listings for satellite services. • You may use . The TV Guide On Screen system uses Setup information to provide you will be...

Owners Manual
Page 31
Owner's Manual 31 Installation 4. Option 2 • If you selected Canada in Screen 1, you see Screen 12. Screen 4: Do you have Cable Service connected? • If you select Yes, you see Screen 4. • If you select No, you see the Postal Code screen. • You input characters by ...
Owner's Manual 31 Installation 4. Option 2 • If you selected Canada in Screen 1, you see Screen 12. Screen 4: Do you have Cable Service connected? • If you select Yes, you see Screen 4. • If you select No, you see the Postal Code screen. • You input characters by ...
Owners Manual
Page 51
...; EZ Mute shows the selected captions option (if available on the Antenna/Cable. - Press the G button and then use D / E button to select Caption/Text. 1. Owner's Manual 51 Select a caption mode for the words that scroll across the bottom of the program provided for the hearing impaired. • TEXT The term for... on a program. - Press the G button and then use D / E button to select On or Off. 4. usually messages provided by the broadcaster, would be available for a data service, generally not program related. -
...; EZ Mute shows the selected captions option (if available on the Antenna/Cable. - Press the G button and then use D / E button to select Caption/Text. 1. Owner's Manual 51 Select a caption mode for the words that scroll across the bottom of the program provided for the hearing impaired. • TEXT The term for... on a program. - Press the G button and then use D / E button to select On or Off. 4. usually messages provided by the broadcaster, would be available for a data service, generally not program related. -

Owners Manual
Page 57
...item. 3. Press EXIT button to return to the TV. - Scrambled channel - mium or high value channel without a message. Owner's Manual 57 The Cable sub menu displays when inserting the CableCARDTM to TV viewing. Insert the CableCARDTM. Let your TV's because it takes about ... E button to select the CABLE menu. 2. Then, TV screen displays as shown left. The OSD (On screen display) is different from your cable TV service provider know the CableCARDTM ID and Host ID. - Press the G button and then use D / E button to select your CableCARDTM type. 1. Press the...
...item. 3. Press EXIT button to return to the TV. - Scrambled channel - mium or high value channel without a message. Owner's Manual 57 The Cable sub menu displays when inserting the CableCARDTM to TV viewing. Insert the CableCARDTM. Let your TV's because it takes about ... E button to select the CABLE menu. 2. Then, TV screen displays as shown left. The OSD (On screen display) is different from your cable TV service provider know the CableCARDTM ID and Host ID. - Press the G button and then use D / E button to select your CableCARDTM type. 1. Press the...

Owners Manual
Page 79
indented to the 4 main Guide Services •Current Service Label - identifies network •Record/Remind Icons - indicates a show is displayed •Service Bar - displays show - indicates an active tile •INFO Box - indicates you can cycle through the various Info ...a highlighted item •INFO Button - provides access to indicate current Service displayed •Tile - location where show title •Highlight - or product-specific information appears (and also where Panel Menu appears) Owner's Manual 79 The screens displayed in the TV Guide On Screen system share ...
indented to the 4 main Guide Services •Current Service Label - identifies network •Record/Remind Icons - indicates a show is displayed •Service Bar - displays show - indicates an active tile •INFO Box - indicates you can cycle through the various Info ...a highlighted item •INFO Button - provides access to indicate current Service displayed •Tile - location where show title •Highlight - or product-specific information appears (and also where Panel Menu appears) Owner's Manual 79 The screens displayed in the TV Guide On Screen system share ...

Owners Manual
Page 81
...for this include: • Program schedule information was interrupted. Operation Owner's Manual 81 The phrase "No Listings" will be times when the TV Guide...On Screen. • The transmission of your TV when not in use in the Guide. - Main Services Listings - Access Listings by pressing the TV Guide button on your remote or on the front panel of ...D / E / F / G buttons to move the highlight within the next 24 hours. Listings is always the first Service displayed in order to display a Help screen. Press the Info button again to Record •Lock and unlock the Video Window...
...for this include: • Program schedule information was interrupted. Operation Owner's Manual 81 The phrase "No Listings" will be times when the TV Guide...On Screen. • The transmission of your TV when not in use in the Guide. - Main Services Listings - Access Listings by pressing the TV Guide button on your remote or on the front panel of ...D / E / F / G buttons to move the highlight within the next 24 hours. Listings is always the first Service displayed in order to display a Help screen. Press the Info button again to Record •Lock and unlock the Video Window...

Owners Manual
Page 83
Go to Channel - Set Recording - 2. Tune to Service Bar - displays the Remind Options menu, from which you can set frequency, start time, automatically power On, and auto-tune the TV. closes the menu, ... press ENTER to watch (if on now) or the Menu key to the channel of all Movies, organized by date and time. 4. Cancel - Operation Owner's Manual 83 displays the Record Options menu, from which you can choose to set frequency, start and end time, etc. Set Reminder - closes the menu, changes...
Go to Channel - Set Recording - 2. Tune to Service Bar - displays the Remind Options menu, from which you can set frequency, start time, automatically power On, and auto-tune the TV. closes the menu, ... press ENTER to watch (if on now) or the Menu key to the channel of all Movies, organized by date and time. 4. Cancel - Operation Owner's Manual 83 displays the Record Options menu, from which you can choose to set frequency, start and end time, etc. Set Reminder - closes the menu, changes...

Owners Manual
Page 85
...change the keyword. Edit Search - Delete Search - A Search Options menu is displayed. A Confirm menu is displayed. •Yes - Operation Owner's Manual 85 displays the keyboard, where you create. 7. deletes the Search •No - You can highlight a show, and press ENTER to the highlighted...- Go to the channel, as previously described. From the Episode Options menu, choose to set a recording, a reminder, or tune to Service Bar - closes the menu, changes no information, and returns to display the Episode Options menu. To edit or delete a keyword, highlight the...
...change the keyword. Edit Search - Delete Search - A Search Options menu is displayed. A Confirm menu is displayed. •Yes - Operation Owner's Manual 85 displays the keyboard, where you create. 7. deletes the Search •No - You can highlight a show, and press ENTER to the highlighted...- Go to the channel, as previously described. From the Episode Options menu, choose to set a recording, a reminder, or tune to Service Bar - closes the menu, changes no information, and returns to display the Episode Options menu. To edit or delete a keyword, highlight the...

Owners Manual
Page 87
W Delete Episode - deletes the episode from the Recordings, A Confirm menu is displayed. closes the panel menu. W Cancel - W Go to the Schedule Service Bar. Operation Owner's Manual 87 W No - close the menu, changes no information, and returns to view it now. W Yes - To view an episode, you can do one of the following: • Highlight an episode, and press ENTER to the highlighted show. deletes the episode. closes the menu, changes no information, and returns to Service Bar -
W Delete Episode - deletes the episode from the Recordings, A Confirm menu is displayed. closes the panel menu. W Cancel - W Go to the Schedule Service Bar. Operation Owner's Manual 87 W No - close the menu, changes no information, and returns to view it now. W Yes - To view an episode, you can do one of the following: • Highlight an episode, and press ENTER to the highlighted show. deletes the episode. closes the menu, changes no information, and returns to Service Bar -


