Owners Manual
Page 5
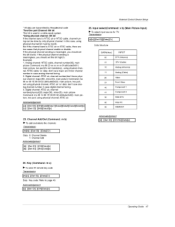
... Menu Options Audio _nguage 27 EZ SoundR_e / EZ Sound 27 Manual Sound Control (Custom Option} ...... 27 Front Surround 28 TV Speakers On!Off Setup 28 BBE 29 Stereo/SAP Broad_sts Setup 29 Time Menu Options Auto Ctock Setup 30 Manual Clock Setup ... 40 Screen Setup for PC mode 41 External Control Device Setup IR _es Programming the Remote Programming Codes Troubleshooting Ch_kUst Maintenance Product Specifications Warranty 42_-47 48~49 50 51 _52 53 54 55 59~60 Setup and Operation Checklist Setup and Operation Checkli_ ...
... Menu Options Audio _nguage 27 EZ SoundR_e / EZ Sound 27 Manual Sound Control (Custom Option} ...... 27 Front Surround 28 TV Speakers On!Off Setup 28 BBE 29 Stereo/SAP Broad_sts Setup 29 Time Menu Options Auto Ctock Setup 30 Manual Clock Setup ... 40 Screen Setup for PC mode 41 External Control Device Setup IR _es Programming the Remote Programming Codes Troubleshooting Ch_kUst Maintenance Product Specifications Warranty 42_-47 48~49 50 51 _52 53 54 55 59~60 Setup and Operation Checklist Setup and Operation Checkli_ ...

Owners Manual
Page 7
Remote Control Sensor 3. VOLUME (_1, I_) Buttons 8, CHANNEL (Y, A) Buttons Operating Guide 7 Front Panel Controls Introduction 23 4 5 i, POWER Button 2. MENU Button 6, ENTER Button 7. Here shown may be somewhat different from your TV. - This is a simplified representation of front pane]. Power Standby Indicator 4, TV/VtDEO Button 5.
Remote Control Sensor 3. VOLUME (_1, I_) Buttons 8, CHANNEL (Y, A) Buttons Operating Guide 7 Front Panel Controls Introduction 23 4 5 i, POWER Button 2. MENU Button 6, ENTER Button 7. Here shown may be somewhat different from your TV. - This is a simplified representation of front pane]. Power Standby Indicator 4, TV/VtDEO Button 5.
Owners Manual
Page 8
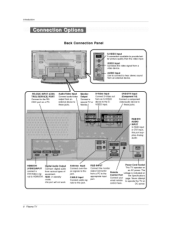
... Note: tn standby mode, this port will not work, Antenna Input Connect over-the_ air s{gnais to this _aek. DC power. 8 Plasma TV Introdue#on an AC pewe_. Audio/Video input Connect audio/video output from an external device to these jacks, Monitor _tput Connect a second... from a video device. The volte_ is indicated on Port the Specifications your page, Never attempt port, wired remote to the appropriate input Remote Control Conned Power Cord Socket Thi;s TV operates on Back Connection Panel S-VIDEO Input VIDEO Input Connects the video signal from a PC to operate the...
... Note: tn standby mode, this port will not work, Antenna Input Connect over-the_ air s{gnais to this _aek. DC power. 8 Plasma TV Introdue#on an AC pewe_. Audio/Video input Connect audio/video output from an external device to these jacks, Monitor _tput Connect a second... from a video device. The volte_ is indicated on Port the Specifications your page, Never attempt port, wired remote to the appropriate input Remote Control Conned Power Cord Socket Thi;s TV operates on Back Connection Panel S-VIDEO Input VIDEO Input Connects the video signal from a PC to operate the...

Owners Manual
Page 9
...picture, Installing Bakeries * Open the battery compartment cover on the TV, • Reties the inp_ mode TV between Antenna _d Cable. Selects the remote operating mode: TV, DVD, VCR, AUDtO, CABLE or STB, Select a mode other than TV, for the remote to operate an external device Brings up the main menu to ...p40) EZ PIC J Selects a factory preset picture mode depending on the viewing environment. Ctears all on-screen displays and returns to TV viewing from any menu, Lets you...
...picture, Installing Bakeries * Open the battery compartment cover on the TV, • Reties the inp_ mode TV between Antenna _d Cable. Selects the remote operating mode: TV, DVD, VCR, AUDtO, CABLE or STB, Select a mode other than TV, for the remote to operate an external device Brings up the main menu to ...p40) EZ PIC J Selects a factory preset picture mode depending on the viewing environment. Ctears all on-screen displays and returns to TV viewing from any menu, Lets you...
Owners Manual
Page 11
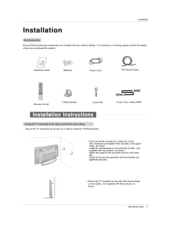
... 11 is miming, please contact the _er Operating Guide Batteries Power Cord 75_ Round Cable Remote Contro_ 2-Wall brackets 2-eye -bo_ts D-sub 15 pin Cable (RGB) * Secure the TV assembEy by joining it to a wail by using the TV!Wat[ brackets, i , If the set will be sure the eye-boBts and the brackets...
... 11 is miming, please contact the _er Operating Guide Batteries Power Cord 75_ Round Cable Remote Contro_ 2-Wall brackets 2-eye -bo_ts D-sub 15 pin Cable (RGB) * Secure the TV assembEy by joining it to a wail by using the TV!Wat[ brackets, i , If the set will be sure the eye-boBts and the brackets...
Owners Manual
Page 14
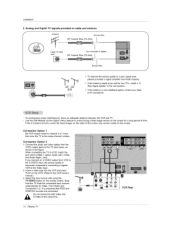
... ef time If the 4:3 picture format is used; Use the ISM Method (on the Option menu) feature to avoid having a fix_ image remain on the remote control, Note that RGB and HDMI/DW sources are connected, De not connect to both Vi_o and S_Video at the same time, [] VCR Rear 14... P_a TV Installation 3, Analog and Digital TV signals provided on the sides of the screen may remain visible en the screen Connection Option 1 Set VCR eutput swish to channel 3 or...
... ef time If the 4:3 picture format is used; Use the ISM Method (on the Option menu) feature to avoid having a fix_ image remain on the remote control, Note that RGB and HDMI/DW sources are connected, De not connect to both Vi_o and S_Video at the same time, [] VCR Rear 14... P_a TV Installation 3, Analog and Digital TV signals provided on the sides of the screen may remain visible en the screen Connection Option 1 Set VCR eutput swish to channel 3 or...
Owners Manual
Page 15
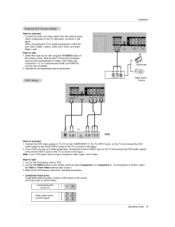
...it is presumed that this to the SWIDEO input on the TV and connect the DVD audio outputs to the AUDIO INPUT jacks on the TV, as shown in the figure. Component ports on the TV Video output ports on the remote contro4. Operate the corresponding external equipment. If your DVD ...player does not have component video output, use 1. How to connect Connect the audio and video cables from the e×ternaJ equipment's output jacks to the TV input jacks, as...
...it is presumed that this to the SWIDEO input on the TV and connect the DVD audio outputs to the AUDIO INPUT jacks on the TV, as shown in the figure. Component ports on the TV Video output ports on the remote contro4. Operate the corresponding external equipment. If your DVD ...player does not have component video output, use 1. How to connect Connect the audio and video cables from the e×ternaJ equipment's output jacks to the TV input jacks, as...
Owners Manual
Page 16
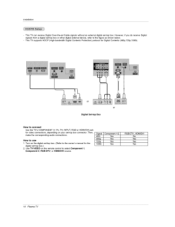
... digital set4op box. Turn on the digital set4op box. (Refer to COllrleCt Use the TV's COMPONENT (Y, P& PR) iNPUT, RGB or HDMJ/DW _ack for video connections depending on the remote cor_tro[ to the figure as shown below. This TV supports HDCP (HJgh-bandwio_h Digital Contents Prot_tion) protocol for the 1, 480p 72#p 1080i Component..., or HDM|iDVl source. for Digital Contents (480p 720p i080i). S!gnal 480i How to use 1. RGB-D_, HDMP'DV[ No Yes Yes Yes 16 P_a TV
... digital set4op box. Turn on the digital set4op box. (Refer to COllrleCt Use the TV's COMPONENT (Y, P& PR) iNPUT, RGB or HDMJ/DW _ack for video connections depending on the remote cor_tro[ to the figure as shown below. This TV supports HDCP (HJgh-bandwio_h Digital Contents Prot_tion) protocol for the 1, 480p 72#p 1080i Component..., or HDM|iDVl source. for Digital Contents (480p 720p i080i). S!gnal 480i How to use 1. RGB-D_, HDMP'DV[ No Yes Yes Yes 16 P_a TV
Owners Manual
Page 21
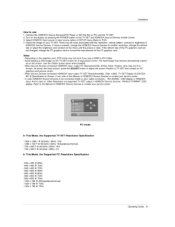
... not. output PC Resolulion(VGA, SVGA, XGA), Position, Size may become permanently imprint° ed on the screen. PC mode In This Mode,, the Supported TV SET Resolution Specification o 1920 x 1080 I @ 59,94Hz / 60Hz, 16:9 1280 x 720 P @ 59.94Hz / 60Hz, 16:9(preferred - 720 x 480 P @ 59,94Hz / 60Hz, 16...} in input source option of SETUP menu.(Refer to P25} 4. Turn on the dispiay by pressing the POWER button on the TV SET and HDMP'DVI _urce Devices remote control. 3. _fect HDMIiDV[ Input source in This Mode, the Supported PC Resolution Specification 640 - 640 ° 640 800 800...
... not. output PC Resolulion(VGA, SVGA, XGA), Position, Size may become permanently imprint° ed on the screen. PC mode In This Mode,, the Supported TV SET Resolution Specification o 1920 x 1080 I @ 59,94Hz / 60Hz, 16:9 1280 x 720 P @ 59.94Hz / 60Hz, 16:9(preferred - 720 x 480 P @ 59,94Hz / 60Hz, 16...} in input source option of SETUP menu.(Refer to P25} 4. Turn on the dispiay by pressing the POWER button on the TV SET and HDMP'DVI _urce Devices remote control. 3. _fect HDMIiDV[ Input source in This Mode, the Supported PC Resolution Specification 640 - 640 ° 640 800 800...
Owners Manual
Page 22
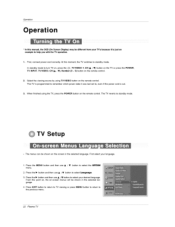
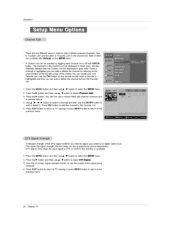
... men u 2. Pre._s the MENU button and then use ,I , TV/VIDEO _, OH (& /V) button on the TV or press the POWER, TV INPUT, TVfVIDEO OH {A / V), Number (0 ~ 9) button on the remote control. 2. When finished using TViVIDEO button on the remote control This TV is programmed to remember which power state it is just an First... the sefected language. 4_ Press EXIT button to return to W viewing or press MENU button to return to the previous _nu, 22 P_a TV TV Setup - Select the viewing source by using the TV, press the POWER button on the remote control The -Pv' reverts to standby mode.
... men u 2. Pre._s the MENU button and then use ,I , TV/VIDEO _, OH (& /V) button on the TV or press the POWER, TV INPUT, TVfVIDEO OH {A / V), Number (0 ~ 9) button on the remote control. 2. When finished using TViVIDEO button on the remote control This TV is programmed to remember which power state it is just an First... the sefected language. 4_ Press EXIT button to return to W viewing or press MENU button to return to the previous _nu, 22 P_a TV TV Setup - Select the viewing source by using the TV, press the POWER button on the remote control The -Pv' reverts to standby mode.
Owners Manual
Page 24
... Press FAV button to a_d the ch_nel to the Favorite List. 5 Press EXIT button to return to TV viewing or press MENU button to return to adjust your antenna or digitat cable [np_. P_ess the I_ ...with than#e! A Custom List can create your own Favorite List, Use the FAV button on the remote controt when a channel is higHighted you can add or _iete the channet by referring to the sm_l_...on or off w_h ENTER button. It indicates _rength of the signa_ being re_ived. 4 Press EXIT button to return to TV viewing or press MENU button to return to add or delete it. Use & / V / _ / I_ button to...
... Press FAV button to a_d the ch_nel to the Favorite List. 5 Press EXIT button to return to TV viewing or press MENU button to return to adjust your antenna or digitat cable [np_. P_ess the I_ ...with than#e! A Custom List can create your own Favorite List, Use the FAV button on the remote controt when a channel is higHighted you can add or _iete the channet by referring to the sm_l_...on or off w_h ENTER button. It indicates _rength of the signa_ being re_ived. 4 Press EXIT button to return to TV viewing or press MENU button to return to add or delete it. Use & / V / _ / I_ button to...

Owners Manual
Page 29
if the station transmits an additional sound signa_ as well as the original one, When having selected Stereo or SAP button on the remote control, this TV can be received in a Analog channe{ Stereo or SAP has been selected. 1 Use the SAP button to seJect your desired MTS _de Stereo_ ... only in a anaiog signal Each time you want to listen to sele_ the &fJDIO menu. 2. Press the _ button and then use & / V button to TV viewing Operating Guide 29 BBE High Definition Sound restores cladty and presence for $_TS_ m_e, Operation This _ can receive MTS stereo programs and any SAP...
if the station transmits an additional sound signa_ as well as the original one, When having selected Stereo or SAP button on the remote control, this TV can be received in a Analog channe{ Stereo or SAP has been selected. 1 Use the SAP button to seJect your desired MTS _de Stereo_ ... only in a anaiog signal Each time you want to listen to sele_ the &fJDIO menu. 2. Press the _ button and then use & / V button to TV viewing Operating Guide 29 BBE High Definition Sound restores cladty and presence for $_TS_ m_e, Operation This _ can receive MTS stereo programs and any SAP...

Owners Manual
Page 37
...button and then use A/V button to the ratings limit set. sub menu, your children _n view those programs, • TV Rating-General: _sed on the remote control Operation Operating Guide 37 You can set the ratings _imit by inputting a new password twice that you do not want ...specific channels, ratin_, and external viewing sources. its specified, so children cannot view certain movies. If you ever forget yourpassword_ key in the TV Rating - Set up blocking schemes to this menu. 1. A password is selected_ change the settings to your children to watch or that you...
...button and then use A/V button to the ratings limit set. sub menu, your children _n view those programs, • TV Rating-General: _sed on the remote control Operation Operating Guide 37 You can set the ratings _imit by inputting a new password twice that you do not want ...specific channels, ratin_, and external viewing sources. its specified, so children cannot view certain movies. If you ever forget yourpassword_ key in the TV Rating - Set up blocking schemes to this menu. 1. A password is selected_ change the settings to your children to watch or that you...
Owners Manual
Page 43
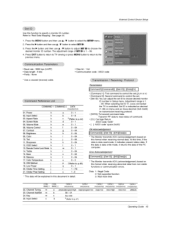
...; Stop bit : 1 bit ° Communication code ASCII cede * Use a crossed (reverse) cable. Press EXIT batten to return to TV viewing or pre_ MENU button to return to select SET _IB_ 3. Se_ng.........j r 21. Volume Mute 06. Set ID is indicated as decimaE... ID][ ][NGl[Data][x] I ,4e)rad_Jrr_al) (_,,_e_ad_ima_} (_exad_i_a_} DATA 5 (He×ad_ma_ m_or low at_r_ute Operating Guide 43 OSD Select k 13, Remote Control Lock _ k i 0 - 64 j_ _ ¢o4.:.... ExternCaol ntrDoel vicSeetup Use this forma_ when receiving abnormal data from functions or communication errors....
...; Stop bit : 1 bit ° Communication code ASCII cede * Use a crossed (reverse) cable. Press EXIT batten to return to TV viewing or pre_ MENU button to return to select SET _IB_ 3. Se_ng.........j r 21. Volume Mute 06. Set ID is indicated as decimaE... ID][ ][NGl[Data][x] I ,4e)rad_Jrr_al) (_,,_e_ad_ima_} (_exad_i_a_} DATA 5 (He×ad_ma_ m_or low at_r_ute Operating Guide 43 OSD Select k 13, Remote Control Lock _ k i 0 - 64 j_ _ ¢o4.:.... ExternCaol ntrDoel vicSeetup Use this forma_ when receiving abnormal data from functions or communication errors....
Owners Manual
Page 44
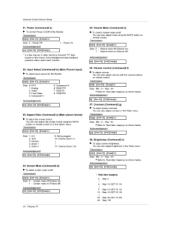
...5: Zoom 2 6: Set by program 10: Cinema Zoom (1) 1F: Cinema Zoom (16) A ckno wledgement I[c][ ][Set ID][ ][OK][Data][x] I 44 Plasma TV 05. Acknowledqement [[f][ ][Set ID][ ][OK][Data][x] ] 07. Acknowledqement I 03. Aspect Ratio (Command2:c)(Main picture format) • To adjust the screen format.... Transmission [[k][g][ ][Set ID][ ][Data][Cr] ] Data Min:0- You can also adjust the screen format using the MUTE button on remote control. Input Select (Command2:b) (Main Picture Input) • To select input source for the Monitor, Transmission I[k][b][ ][Set ID][...
...5: Zoom 2 6: Set by program 10: Cinema Zoom (1) 1F: Cinema Zoom (16) A ckno wledgement I[c][ ][Set ID][ ][OK][Data][x] I 44 Plasma TV 05. Acknowledqement [[f][ ][Set ID][ ][OK][Data][x] ] 07. Acknowledqement I 03. Aspect Ratio (Command2:c)(Main picture format) • To adjust the screen format.... Transmission [[k][g][ ][Set ID][ ][Data][Cr] ] Data Min:0- You can also adjust the screen format using the MUTE button on remote control. Input Select (Command2:b) (Main Picture Input) • To select input source for the Monitor, Transmission I[k][b][ ][Set ID][...

Owners Manual
Page 45
...][ ][Data][Cr] ] Data Min: 0 ~ Max: 64 • Refer to 'Real data mapping'. You can also adjust sharpness in the Audio menu. Remote Control Lock Mode (Command2:m) • To lock the remote control and the front panel controls on /off ] 1: OSD on [[m][ ][Set ID][ ][OK][Data]ix] ] 14. Treble (Command2:r) • To adjust...
...][ ][Data][Cr] ] Data Min: 0 ~ Max: 64 • Refer to 'Real data mapping'. You can also adjust sharpness in the Audio menu. Remote Control Lock Mode (Command2:m) • To lock the remote control and the front panel controls on /off ] 1: OSD on [[m][ ][Set ID][ ][OK][Data]ix] ] 14. Treble (Command2:r) • To adjust...
Owners Manual
Page 47
... Ig][][gata][Cr] I Data Structure DATA(Hex) 00 01 10 11 20 21 40 41 50 60 90 INPUT DTV (Antenna) DTV (Cable) Analog (Antenna) Analog (Cable) Video Front ...Data3][Data4][Data5][x] [a] ][Set ID][ ][NG][Data0 [x] 23. Key (Command: m c) • To send IR remote key cede Transmission I[m][c][ ][Set ID][ ][Data][Cr] I [b][ ][Set ID][ ][OK/NG][Data][x] 24. ExternCaol ...bit high(l). Input select(Command: x b) (Main Picture Input) • To select input source for TV. If the physical channel sending is meaningless, you should set this bit low(0). Acknowledqement I[c][ ][Set Ig...
... Ig][][gata][Cr] I Data Structure DATA(Hex) 00 01 10 11 20 21 40 41 50 60 90 INPUT DTV (Antenna) DTV (Cable) Analog (Antenna) Analog (Cable) Video Front ...Data3][Data4][Data5][x] [a] ][Set ID][ ][NG][Data0 [x] 23. Key (Command: m c) • To send IR remote key cede Transmission I[m][c][ ][Set ID][ ][Data][Cr] I [b][ ][Set ID][ ][OK/NG][Data][x] 24. ExternCaol ...bit high(l). Input select(Command: x b) (Main Picture Input) • To select input source for TV. If the physical channel sending is meaningless, you should set this bit low(0). Acknowledqement I[c][ ][Set Ig...

Owners Manual
Page 48
IR Codes I_ Connect your w_red remote control to the Remote Contro_ port on the TV, Output waveform Single pulse, r_aduiated with 37,917KHz signal at 455KHz Tc Carder fr_uency __J_[__[--l__ I_ T1 FcA_ _ 1_"0 = foso/12 Duty ratiO : ... •B_it_'_0[--1 o Bit "I" --I i_ Frame interval : Tf The waveform is h'aesmitt_ as long as a key is _p_sed Tf T! [--1 DI Tf=i08ms: @455KHz 48 P_a TV 2.24 ms D[
IR Codes I_ Connect your w_red remote control to the Remote Contro_ port on the TV, Output waveform Single pulse, r_aduiated with 37,917KHz signal at 455KHz Tc Carder fr_uency __J_[__[--l__ I_ T1 FcA_ _ 1_"0 = foso/12 Duty ratiO : ... •B_it_'_0[--1 o Bit "I" --I i_ Frame interval : Tf The waveform is h'aesmitt_ as long as a key is _p_sed Tf T! [--1 DI Tf=i08ms: @455KHz 48 P_a TV 2.24 ms D[
Owners Manual
Page 50
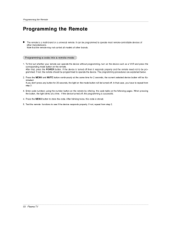
... Programming the Remote 1_ The remote is a multi-brand or a universal remote, it responds propedy and the remote need not to operate the device. _e programming procedures are expl_ned below. 2. If you don'_ press any button for 2 seconds, the current selected device button wil_ be programmed other brand& to repeat from step 2. 50 P_a TV When...
... Programming the Remote 1_ The remote is a multi-brand or a universal remote, it responds propedy and the remote need not to operate the device. _e programming procedures are expl_ned below. 2. If you don'_ press any button for 2 seconds, the current selected device button wil_ be programmed other brand& to repeat from step 2. 50 P_a TV When...

Owners Manual
Page 53
Troubleshooting Checklist TroubleshoCo_ticnkglist The remote control doesnt work Check to see if there is any function to restore the brightness of the picture, (ff styli picture is on the screen ... gel dark,) _'-NO output from o.e of o Adjust Ba_Zcz:_ in the Vtdeo menu and press the 1_ button, . Activate any obiect between the "PC and the remote control causing obstruction • Are batteries installed with correct _larity (+ to +,-to p.9) NO or poor color (Refetor p.26> " Select COlor in the AUI),O menu, (Refer...
Troubleshooting Checklist TroubleshoCo_ticnkglist The remote control doesnt work Check to see if there is any function to restore the brightness of the picture, (ff styli picture is on the screen ... gel dark,) _'-NO output from o.e of o Adjust Ba_Zcz:_ in the Vtdeo menu and press the 1_ button, . Activate any obiect between the "PC and the remote control causing obstruction • Are batteries installed with correct _larity (+ to +,-to p.9) NO or poor color (Refetor p.26> " Select COlor in the AUI),O menu, (Refer...


