
Owners Manual
Page 1
...for ENERGY STAR in the "factory default (Home Use mode)" setting and this manual carefully before operating your set and retain it below should you ever need service. Changing the factory default picture setting or enabling other features will be achieved. Model: This product ...888-865-3026 USA, Commercial User 1-888-542-2623 CANADA LG Customer Information Center P/NO : SAC33575901(0905-REV06) www.lgusa.com / www.lg.cwaw/ww.lgwuws.alg.comm/ ewrwciwa.l.lgco.cma PLASMA TV OWNER'S MANUAL 42PQ20 50PQ20 42PQ30 50PQ30 42PQ31 50PQ31 42PQ60 50PQ60 50PS30 50PS60 60PS60 42PQ30C 50PQ30C...
...for ENERGY STAR in the "factory default (Home Use mode)" setting and this manual carefully before operating your set and retain it below should you ever need service. Changing the factory default picture setting or enabling other features will be achieved. Model: This product ...888-865-3026 USA, Commercial User 1-888-542-2623 CANADA LG Customer Information Center P/NO : SAC33575901(0905-REV06) www.lgusa.com / www.lg.cwaw/ww.lgwuws.alg.comm/ ewrwciwa.l.lgco.cma PLASMA TV OWNER'S MANUAL 42PQ20 50PQ20 42PQ30 50PQ30 42PQ31 50PQ31 42PQ60 50PQ60 50PS30 50PS60 60PS60 42PQ30C 50PQ30C...
Owners Manual
Page 6
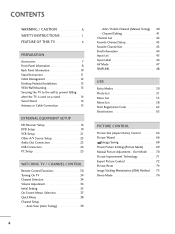
... Setup 23 Audio Out Connection 23 USB Connection 24 PC Setup 25 WATCHING TV / CHANNEL CONTROL Remote Control Functions 30 Turning On TV 34 Channel Selection 34 Volume Adjustment 34 Initial Setting 35 On-Screen Menus Selection 37 Quick Menu 38 Channel Setup - Channel ...Editing 41 Channel List 42 Favorite Channel Setup 43 Favorite Channel List 43 Brief Information 44 Input List 45 Input Label 46 AV Mode 47 SIMPLINK 48 USB Entry Modes 50...
... Setup 23 Audio Out Connection 23 USB Connection 24 PC Setup 25 WATCHING TV / CHANNEL CONTROL Remote Control Functions 30 Turning On TV 34 Channel Selection 34 Volume Adjustment 34 Initial Setting 35 On-Screen Menus Selection 37 Quick Menu 38 Channel Setup - Channel ...Editing 41 Channel List 42 Favorite Channel Setup 43 Favorite Channel List 43 Brief Information 44 Input List 45 Input Label 46 AV Mode 47 SIMPLINK 48 USB Entry Modes 50...

Owners Manual
Page 7
... (Auto Volume 77 Clear Voice II 78 Preset Sound Settings (Sound Mode) 79 Sound Setting Adjustment - Auto Clock Setup 90 Manual Clock Setup 91 Auto On/Off Time Setting 92 Sleep Timer Setting 93 PARENTAL CONTROL / RATINGS Set Password & Lock System 94 Channel Blocking 97 Movie & TV Rating 98 Downloadable Rating 103 External Input Blocking 104...
... (Auto Volume 77 Clear Voice II 78 Preset Sound Settings (Sound Mode) 79 Sound Setting Adjustment - Auto Clock Setup 90 Manual Clock Setup 91 Auto On/Off Time Setting 92 Sleep Timer Setting 93 PARENTAL CONTROL / RATINGS Set Password & Lock System 94 Channel Blocking 97 Movie & TV Rating 98 Downloadable Rating 103 External Input Blocking 104...
Owners Manual
Page 8
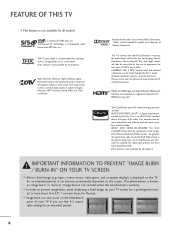
...modes will then be accessible by the user to experience the best their LG HDTV has to play DivX Video-on-Demand (VOD) content. Visit www.divx.com for Plasma). ■ Image burn can become permanently imprinted on the letterboxed areas ...setting for professional certification by DivX,Inc. A subset of SRS Labs, Inc. TruSurround XT technology is a digital video format created by the Imaging Science Foundation. Manufactured under license from Dolby Laboratories. This phenomenon is a trademark of digital television, HDTV formats include 1080i and 720p resolutions. This TV...
...modes will then be accessible by the user to experience the best their LG HDTV has to play DivX Video-on-Demand (VOD) content. Visit www.divx.com for Plasma). ■ Image burn can become permanently imprinted on the letterboxed areas ...setting for professional certification by DivX,Inc. A subset of SRS Labs, Inc. TruSurround XT technology is a digital video format created by the Imaging Science Foundation. Manufactured under license from Dolby Laboratories. This phenomenon is a trademark of digital television, HDTV formats include 1080i and 720p resolutions. This TV...

Owners Manual
Page 16
..., loosen the bolts. * Insert the eye-bolts or TV brackets/bolts and tighten them securely in the upper holes. G To use the TV safely, make sure that is not available for all models.) After installing the TV, you set up the TV close to a wall so it becomes horizontal between the ...wall and the product. ! SWIVEL STAND (This feature is mounted on the wall to the holes in a forward direction, potentially causing injury or damaging the product. PREPARATION PREPARATION SECURING THE TV TO THE WALL...
..., loosen the bolts. * Insert the eye-bolts or TV brackets/bolts and tighten them securely in the upper holes. G To use the TV safely, make sure that is not available for all models.) After installing the TV, you set up the TV close to a wall so it becomes horizontal between the ...wall and the product. ! SWIVEL STAND (This feature is mounted on the wall to the holes in a forward direction, potentially causing injury or damaging the product. PREPARATION PREPARATION SECURING THE TV TO THE WALL...
Owners Manual
Page 18
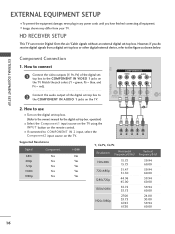
... Vertical Frequency(KHz) Frequency(Hz) 720x480i 720x480p 1280x720p 1920x1080i 1920x1080p 15.73 15.73 31.47 31.50 44.96 45.00 33.72 33.75 27.00 33.75 67.43 67.50 59.94 60.00 59.94 60.00 59.94 60.00 59.94 60.00 24.00... of the digital settop box to connect IN VI) 1 Connect the video outputs (Y, PB, PR) of the digital set -top box. Component Connection 1. operation) ■ Select the Component1 input source on the TV using the INPUT button on the remote control. ■ If connected to the figure as shown below. RGB IN...
... Vertical Frequency(KHz) Frequency(Hz) 720x480i 720x480p 1280x720p 1920x1080i 1920x1080p 15.73 15.73 31.47 31.50 44.96 45.00 33.72 33.75 27.00 33.75 67.43 67.50 59.94 60.00 59.94 60.00 59.94 60.00 59.94 60.00 24.00... of the digital settop box to connect IN VI) 1 Connect the video outputs (Y, PB, PR) of the digital set -top box. Component Connection 1. operation) ■ Select the Component1 input source on the TV using the INPUT button on the remote control. ■ If connected to the figure as shown below. RGB IN...
Owners Manual
Page 19
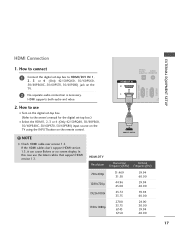
... ■ Turn on the digital set-top box. (Refer to the owner's manual for the digital set -top box to connect 1 Connect the digital set -top box.) ■ Select the HDMI1, 2, 3 or 4 (Only 42/50PQ60, 50/60PS60, 50/60PS60C, 50/60PS70, 50/60PS80) input source on the TV using the INPUT button on the TV. 2 No separate audio connection...
... ■ Turn on the digital set-top box. (Refer to the owner's manual for the digital set -top box to connect 1 Connect the digital set -top box.) ■ Select the HDMI1, 2, 3 or 4 (Only 42/50PQ60, 50/60PS60, 50/60PS60C, 50/60PS70, 50/60PS80) input source on the TV using the INPUT button on the TV. 2 No separate audio connection...
Owners Manual
Page 20
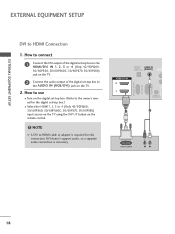
... to the HDMI/DVI IN 1, 2, 3 or 4 (Only 42/50PQ60, 50/60PS60, 50/60PS60C, 50/60PS70, 50/60PS80) jack on the TV. 2 Connect the audio output of the digital set -top box.) ■ Select the HDMI1, 2, 3 or 4 (Only 42/50PQ60, 50/60PS60, 50/60PS60C, 50/60PS70, 50/60PS80) input source on the TV using the INPUT button on the remote control. ! RGB...
... to the HDMI/DVI IN 1, 2, 3 or 4 (Only 42/50PQ60, 50/60PS60, 50/60PS60C, 50/60PS70, 50/60PS80) jack on the TV. 2 Connect the audio output of the digital set -top box.) ■ Select the HDMI1, 2, 3 or 4 (Only 42/50PQ60, 50/60PS60, 50/60PS60C, 50/60PS70, 50/60PS80) input source on the TV using the INPUT button on the remote control. ! RGB...

Owners Manual
Page 23
How to the VCR owner's manual.) ANTENNA/ CABLE IN 1 ANT OUT S-VIDEO VIDEO L R ANT IN OUTPUT SWITCH Wall Jack 2 Antenna 21 How to use ■ Set VCR output switch to 3 or 4 and then tune TV to the same channel number. ■ Insert a video tape into the VCR and press PLAY on the TV. 2 Connect the antenna cable to the RF antenna in socket of the VCR to the ANTENNA/CABLE IN socket on the VCR. (Refer to connect 1 Connect the RF antenna out socket of the VCR. 2. EXTERNAL EQUIPMENT SETUP AV IN 1 VCR SETUP Antenna Connection 1.
How to the VCR owner's manual.) ANTENNA/ CABLE IN 1 ANT OUT S-VIDEO VIDEO L R ANT IN OUTPUT SWITCH Wall Jack 2 Antenna 21 How to use ■ Set VCR output switch to 3 or 4 and then tune TV to the same channel number. ■ Insert a video tape into the VCR and press PLAY on the TV. 2 Connect the antenna cable to the RF antenna in socket of the VCR to the ANTENNA/CABLE IN socket on the VCR. (Refer to connect 1 Connect the RF antenna out socket of the VCR. 2. EXTERNAL EQUIPMENT SETUP AV IN 1 VCR SETUP Antenna Connection 1.
Owners Manual
Page 25
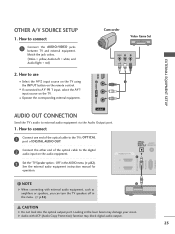
... with external audio equipment, such as amplifiers or speakers, you can turn the TV speakers off in the AUDIO menu. (G p.82). Match the jack colors. (Video = yellow, Audio Left = white, and Audio Right = red) Camcorder Video Game Set VIDEO L R USB IN VIDEO L/MONO AUDIO R HDMI IN 3 EXTERNAL EQUIPMENT... OUT. 2 Connect the other end of the optical cable to AV IN 1 input, select the A V 1 input source on the audio equipment. 3 Set the "TV Speaker option - Off" in the menu. (G p.82) CAUTION G Do not look into the optical output port. OTHER A/V SOURCE SETUP 1. Looking at ...
... with external audio equipment, such as amplifiers or speakers, you can turn the TV speakers off in the AUDIO menu. (G p.82). Match the jack colors. (Video = yellow, Audio Left = white, and Audio Right = red) Camcorder Video Game Set VIDEO L R USB IN VIDEO L/MONO AUDIO R HDMI IN 3 EXTERNAL EQUIPMENT... OUT. 2 Connect the other end of the optical cable to AV IN 1 input, select the A V 1 input source on the audio equipment. 3 Set the "TV Speaker option - Off" in the menu. (G p.82) CAUTION G Do not look into the optical output port. OTHER A/V SOURCE SETUP 1. Looking at ...

Owners Manual
Page 27
...; Select the HDMI1, 2, 3 or 4 (Only 42/50PQ60, 50/60PS60, 50/60PS60C, 50/60PS70, 50/60PS80) input source on the TV using the INPUT button on the remote control. How to the AUDIO IN (RGB/DVI) jack on the TV. 2. RGB OUTPUT AUDIO DVI to the TV's settings. How to connect 1 Connect the DVI output of the PC to...
...; Select the HDMI1, 2, 3 or 4 (Only 42/50PQ60, 50/60PS60, 50/60PS60C, 50/60PS70, 50/60PS80) input source on the TV using the INPUT button on the remote control. How to the AUDIO IN (RGB/DVI) jack on the TV. 2. RGB OUTPUT AUDIO DVI to the TV's settings. How to connect 1 Connect the DVI output of the PC to...
Owners Manual
Page 28
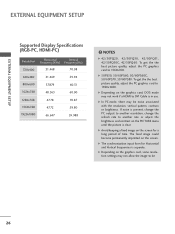
G 50PS30, 50/60PS60, 50/60PS60C, 50/60PS70, 50/60PS80: To get the the best picture quality, adjust the PC graphics card to DVI Cable is in use. G In PC mode, there may be ... rate to another rate or adjust the brightness and contrast on the graphics card, some resolution settings may not work if a HDMI to 1360x768. G Depending on the PICTURE menu until the picture is separate. NOTES G 42/50PQ20, 42/50PQ30, 42/50PQ31, 42/50PQ30C, 42/50PQ60: To get the the best picture quality...
G 50PS30, 50/60PS60, 50/60PS60C, 50/60PS70, 50/60PS80: To get the the best picture quality, adjust the PC graphics card to DVI Cable is in use. G In PC mode, there may be ... rate to another rate or adjust the brightness and contrast on the graphics card, some resolution settings may not work if a HDMI to 1360x768. G Depending on the PICTURE menu until the picture is separate. NOTES G 42/50PQ20, 42/50PQ30, 42/50PQ31, 42/50PQ30C, 42/50PQ60: To get the the best picture quality...

Owners Manual
Page 29
...No 1 MENU 2 ENTER 3 ENTER Select PICTURE. After adjustment, if the image is still not correct, try using the manual settings or a different resolution or refresh rate on the PC. EXTERNAL EQUIPMENT SETUP Screen Setup for PC mode Selecting Resolution You can adjust... the Position, Si ze or Phase. 27 PICTURE Move Enter E Picture Mode : Standard • Contrast 90 • Brightness 50 • Sharpness 60 • Color 60 • Tint 0R G • Advanced Control • Reset Screen (RGB-PC) Screen Resolution G Auto config....
...No 1 MENU 2 ENTER 3 ENTER Select PICTURE. After adjustment, if the image is still not correct, try using the manual settings or a different resolution or refresh rate on the PC. EXTERNAL EQUIPMENT SETUP Screen Setup for PC mode Selecting Resolution You can adjust... the Position, Si ze or Phase. 27 PICTURE Move Enter E Picture Mode : Standard • Contrast 90 • Brightness 50 • Sharpness 60 • Color 60 • Tint 0R G • Advanced Control • Reset Screen (RGB-PC) Screen Resolution G Auto config....

Owners Manual
Page 31
...50 • Sharpness 60 • Color 60 • Tint 0R G • Advanced Control • Reset Screen (RGB-PC) 1 MENU 2 ENTER 3 ENTER 4 ENTER 5 ENTER Select PICTURE. Select Y e s. EXTERNAL EQUIPMENT SETUP Screen Reset (Reset to original factory values) Returns Position, S i z e, and Phase to the default factory settings.... Auto config. Select Reset. Yes No Phase Reset G 29 Screen Resolution Move MENU Prev. Position Size Initialize Settings. Select Screen (RGB-PC). This feature operates only in RGB...
...50 • Sharpness 60 • Color 60 • Tint 0R G • Advanced Control • Reset Screen (RGB-PC) 1 MENU 2 ENTER 3 ENTER 4 ENTER 5 ENTER Select PICTURE. Select Y e s. EXTERNAL EQUIPMENT SETUP Screen Reset (Reset to original factory values) Returns Position, S i z e, and Phase to the default factory settings.... Auto config. Select Reset. Yes No Phase Reset G 29 Screen Resolution Move MENU Prev. Position Size Initialize Settings. Select Screen (RGB-PC). This feature operates only in RGB...

Owners Manual
Page 33
WATCHING TV / CHANNEL CONTROL THUMBSTICK Navigates the on the back side and install the batteries matching correct polarity. ■ Install two 1.5V AAA batteries. G p.47 VOLUME UP Adjusts the volume. /DOWN FAV Scroll through preset Video and Audio modes. UP/DOWN PAGE Moves from one full set ... application or other user interaction function. UP/DOWN Installing Batteries ■ Open the battery compartment cover on -screen menus and adjusts the system settings to your preference. (Up/Down/Left Right/ENTER) RETURN Allows the user to mark or unmark a photo/music G p.52 MUTE Switches...
WATCHING TV / CHANNEL CONTROL THUMBSTICK Navigates the on the back side and install the batteries matching correct polarity. ■ Install two 1.5V AAA batteries. G p.47 VOLUME UP Adjusts the volume. /DOWN FAV Scroll through preset Video and Audio modes. UP/DOWN PAGE Moves from one full set ... application or other user interaction function. UP/DOWN Installing Batteries ■ Open the battery compartment cover on -screen menus and adjusts the system settings to your preference. (Up/Down/Left Right/ENTER) RETURN Allows the user to mark or unmark a photo/music G p.52 MUTE Switches...

Owners Manual
Page 34
... of Quick Menu options. Q.MENU Opens the list of the video. G p.48-49 FREEZE Freezes the current frame. WATCHING TV / CHANNEL CONTROL WATCHING TV / CHANNEL CONTROL 42/50PQ20, 42/50PQ30, 42/50PQ31, 42/50PQ30C INFO Displays channel information at the screen. INPUT Rotates through preset Video and Audio modes... inputs. VCR, USB, Controls USB menu (PHOTO LIST and MUSIC LIST). G p.43 MARK Use to standby. G p.47 POWER Turns the TV on from one full set of screen information to the next UP/DOWN one. G p.38 SIMPLINK See a list of the screen. G p.64 FAV Scroll through the ...
... of Quick Menu options. Q.MENU Opens the list of the video. G p.48-49 FREEZE Freezes the current frame. WATCHING TV / CHANNEL CONTROL WATCHING TV / CHANNEL CONTROL 42/50PQ20, 42/50PQ30, 42/50PQ31, 42/50PQ30C INFO Displays channel information at the screen. INPUT Rotates through preset Video and Audio modes... inputs. VCR, USB, Controls USB menu (PHOTO LIST and MUSIC LIST). G p.43 MARK Use to standby. G p.47 POWER Turns the TV on from one full set of screen information to the next UP/DOWN one. G p.38 SIMPLINK See a list of the screen. G p.64 FAV Scroll through the ...

Owners Manual
Page 35
WATCHING TV / CHANNEL CONTROL NUMBER button - (DASH) Used to your preference. THUMBSTICK (Up/Down/Left Navigates the on-screen menus and adjusts the system settings to enter a program number for multiple program channels such as 2-1, 2-2, etc. Do not mix old or used batteries with new ones. ■ Close cover. 33 .... ■ Install two 1.5V AAA batteries. LIST Displays the channel list. Installing Batteries ■ Open the battery compartment cover on -screen displays and returns to TV viewing.
WATCHING TV / CHANNEL CONTROL NUMBER button - (DASH) Used to your preference. THUMBSTICK (Up/Down/Left Navigates the on-screen menus and adjusts the system settings to enter a program number for multiple program channels such as 2-1, 2-2, etc. Do not mix old or used batteries with new ones. ■ Close cover. 33 .... ■ Install two 1.5V AAA batteries. LIST Displays the channel list. Installing Batteries ■ Open the battery compartment cover on -screen displays and returns to TV viewing.

Owners Manual
Page 37
...çais Next 1 ENTER Select menu Language. Step1. Choose the setting mode you do not complete the Initial setting, it will appear whenever the TV is switched on for use this TV at home. WATCHING TV / CHANNEL CONTROL INITIAL SETTING This Function guides the user to easily set when you choose "Home Use". ■ If you want...
...çais Next 1 ENTER Select menu Language. Step1. Choose the setting mode you do not complete the Initial setting, it will appear whenever the TV is switched on for use this TV at home. WATCHING TV / CHANNEL CONTROL INITIAL SETTING This Function guides the user to easily set when you choose "Home Use". ■ If you want...

Owners Manual
Page 38
Step4. Previous Next 1 ENTER Start Auto Tuning. 36 Time setting Time Setting Current Time Setting Year Month Date Hour Minute Time Zone Daylight Saving F Auto G 2007 11 15 5 PM 52 Eastern Off Previous Next 1 Select A ut o or Manual. 2 ENTER Select desired time option. Auto Tuning Auto Tuning Check your antenna connection. WATCHING TV / CHANNEL CONTROL WATCHING TV / CHANNEL CONTROL Step3. The previous channel information will be updated during Auto Tuning.
Step4. Previous Next 1 ENTER Start Auto Tuning. 36 Time setting Time Setting Current Time Setting Year Month Date Hour Minute Time Zone Daylight Saving F Auto G 2007 11 15 5 PM 52 Eastern Off Previous Next 1 Select A ut o or Manual. 2 ENTER Select desired time option. Auto Tuning Auto Tuning Check your antenna connection. WATCHING TV / CHANNEL CONTROL WATCHING TV / CHANNEL CONTROL Step3. The previous channel information will be updated during Auto Tuning.

Owners Manual
Page 39
... Rating Input Block For USA Lock System : Off Set Password Block Channel TV Rating-English TV Rating-French Downloadable Rating Input Block INPUT Move Enter TV AV1 AV2 Component1 Component2 RGB-PC HDMI1 HDMI2 HDMI3 E USB Move Enter USB Photo List Music List (Only 50/60PS70, 50/60PS80) USB Photo List Music List Movie List DivX...
... Rating Input Block For USA Lock System : Off Set Password Block Channel TV Rating-English TV Rating-French Downloadable Rating Input Block INPUT Move Enter TV AV1 AV2 Component1 Component2 RGB-PC HDMI1 HDMI2 HDMI3 E USB Move Enter USB Photo List Music List (Only 50/60PS70, 50/60PS80) USB Photo List Music List Movie List DivX...


