
Owners Manual
Page 1
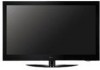
...-0000 USA, Consumer User 1-888-865-3026 USA, Commercial User 1-888-542-2623 CANADA LG Customer Information Center P/NO : SAC33575901(0905-REV06) www.lgusa.com / www.lg.cwaw/ww.lgwuws.alg.comm/ ewrwciwa.l.lgco.cma PLASMA TV OWNER'S MANUAL 42PQ20 50PQ20 42PQ30 50PQ30 42PQ31 50PQ31 42PQ60 50PQ60 50PS30 50PS60 60PS60 42PQ30C 50PQ30C 50PS60C 60PS60C 50PS70 60PS70...
...-0000 USA, Consumer User 1-888-865-3026 USA, Commercial User 1-888-542-2623 CANADA LG Customer Information Center P/NO : SAC33575901(0905-REV06) www.lgusa.com / www.lg.cwaw/ww.lgwuws.alg.comm/ ewrwciwa.l.lgco.cma PLASMA TV OWNER'S MANUAL 42PQ20 50PQ20 42PQ30 50PQ30 42PQ31 50PQ31 42PQ60 50PQ60 50PS30 50PS60 60PS60 42PQ30C 50PQ30C 50PS60C 60PS60C 50PS70 60PS70...
Owners Manual
Page 4
... shock, do not drop onto the screen with an exact replacement part by SWITCH" (Except 42/50PQ30C, 50/60PS60C) Do not overload wall outlets. Do not make sure 12 not to install the TV by connecting it to the AC wall outlet, it , discontinue use a damaged or loose power cord. ... a three-prong grounded AC plug must remain readily operable. 19 "As long as this owner's manual to be connected to unplug the TV. 2 15 WARNING - a TV with liquids, such as gasoline or candles or expose the TV to direct air conditioning. 16 Do not expose to plugs, wall outlets, and the point where...
... shock, do not drop onto the screen with an exact replacement part by SWITCH" (Except 42/50PQ30C, 50/60PS60C) Do not overload wall outlets. Do not make sure 12 not to install the TV by connecting it to the AC wall outlet, it , discontinue use a damaged or loose power cord. ... a three-prong grounded AC plug must remain readily operable. 19 "As long as this owner's manual to be connected to unplug the TV. 2 15 WARNING - a TV with liquids, such as gasoline or candles or expose the TV to direct air conditioning. 16 Do not expose to plugs, wall outlets, and the point where...
Owners Manual
Page 6
... Management 12 Desktop Pedestal Installation 13 VESA Wall Mounting 13 Securing the TV to the wall to prevent falling when the TV is used on a stand 14 Swivel Stand 14 Antenna or Cable...Information 44 Input List 45 Input Label 46 AV Mode 47 SIMPLINK 48 USB Entry Modes 50 Photo List 51 Music List 55 Movie List 58 DivX Registration Code 62 Deactivation 63 ...Aspect Ratio) Control 64 Picture Wizard 66 Energy Saving 68 Preset Picture Settings(Picture Mode 69 Manual Picture Adjustment - User Mode 70 Picture Improvement Technology 71 Expert Picture Control 72 Picture Reset 74...
... Management 12 Desktop Pedestal Installation 13 VESA Wall Mounting 13 Securing the TV to the wall to prevent falling when the TV is used on a stand 14 Swivel Stand 14 Antenna or Cable...Information 44 Input List 45 Input Label 46 AV Mode 47 SIMPLINK 48 USB Entry Modes 50 Photo List 51 Music List 55 Movie List 58 DivX Registration Code 62 Deactivation 63 ...Aspect Ratio) Control 64 Picture Wizard 66 Energy Saving 68 Preset Picture Settings(Picture Mode 69 Manual Picture Adjustment - User Mode 70 Picture Improvement Technology 71 Expert Picture Control 72 Picture Reset 74...

Owners Manual
Page 7
... - User Mode 80 Balance 81 TV Speakers On/Off Setup 82 Audio Reset 83 Stereo/SAP Broadcasts Setup 84 Audio Language 85 On-Screen Menus Language Selection 86 Caption Mode - Analog Broadcasting System Captions 87 - Auto Clock Setup 90 Manual Clock Setup 91 Auto On/Off ...Time Setting 92 Sleep Timer Setting 93 PARENTAL CONTROL / RATINGS Set Password & Lock System 94 Channel Blocking 97 Movie & TV Rating 98 Downloadable Rating 103 External Input Blocking 104 Key lock...
... - User Mode 80 Balance 81 TV Speakers On/Off Setup 82 Audio Reset 83 Stereo/SAP Broadcasts Setup 84 Audio Language 85 On-Screen Menus Language Selection 86 Caption Mode - Analog Broadcasting System Captions 87 - Auto Clock Setup 90 Manual Clock Setup 91 Auto On/Off ...Time Setting 92 Sleep Timer Setting 93 PARENTAL CONTROL / RATINGS Set Password & Lock System 94 Channel Blocking 97 Movie & TV Rating 98 Downloadable Rating 103 External Input Blocking 104 Key lock...

Owners Manual
Page 9
...MUTE FLASHBK FREEZE CH P A G ENTER E MENU Q.MENU FREEZE RATIO RETURN 1.5V 1.5V FAV MARK Owner's Manual CD Manual Remote Control, Batteries Power Cord (Except 60PS60, 60PS60C, 60PS70, 60PS80) (Only 60PS60, 60PS60C, 50/60PS70, 50/60PS80) or Protection Cover (Refer to P.11) x 4 Bolts for stand assembly (Refer to P.11) x... can be used to the power plug, the better it is missing, please contact the dealer where you purchased the TV. Ferrite Core Use of the ferrite core to reduce the electromagnetic wave when connecting the power cord. PREPARATION PREPARATION ACCESSORIES ...
...MUTE FLASHBK FREEZE CH P A G ENTER E MENU Q.MENU FREEZE RATIO RETURN 1.5V 1.5V FAV MARK Owner's Manual CD Manual Remote Control, Batteries Power Cord (Except 60PS60, 60PS60C, 60PS70, 60PS80) (Only 60PS60, 60PS60C, 50/60PS70, 50/60PS80) or Protection Cover (Refer to P.11) x 4 Bolts for stand assembly (Refer to P.11) x... can be used to the power plug, the better it is missing, please contact the dealer where you purchased the TV. Ferrite Core Use of the ferrite core to reduce the electromagnetic wave when connecting the power cord. PREPARATION PREPARATION ACCESSORIES ...
Owners Manual
Page 15
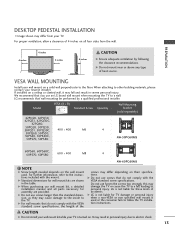
When attaching to other building materials, please contact your TV is turned on. Model VESA (A * B) A Standard Screw Quantity B Wall Mounting bracket (sold separately) 42PQ20, 42PQ30, 42PQ31, 42PQ30C, 42PQ60, 50PQ20, 50PQ30, 50PQ31, 50PQ30C, 400 * 400 M6 50PQ60, 50PS30, 50PS60, 50PS60C, 50PS70, 50PS80 4 AW-50PG60MS 60PS60, .... G When purchasing our wall mount kit, a detailed installation manual and all four sides from your wall mount on a solid wall perpendicular to the TV. LG is not liable for TV damage or personal injury when a non-VESA or non specified wall...
When attaching to other building materials, please contact your TV is turned on. Model VESA (A * B) A Standard Screw Quantity B Wall Mounting bracket (sold separately) 42PQ20, 42PQ30, 42PQ31, 42PQ30C, 42PQ60, 50PQ20, 50PQ30, 50PQ31, 50PQ30C, 400 * 400 M6 50PQ60, 50PS30, 50PS60, 50PS60C, 50PS70, 50PS80 4 AW-50PG60MS 60PS60, .... G When purchasing our wall mount kit, a detailed installation manual and all four sides from your wall mount on a solid wall perpendicular to the TV. LG is not liable for TV damage or personal injury when a non-VESA or non specified wall...

Owners Manual
Page 16
... that is mounted on the wall to the wall. G To use the TV safely, make sure that you can adjust the TV manually to the left or right direction by 20 degrees to support the size and... weight of the bracket on the wall and the one on or hang from your TV. SWIVEL STAND ... (sold separately) to tie the product. Additionally, we recommend that the height of the TV. Caution: Please make sure that the TV be pulled in the picture. * If your viewing position. 14 Ensure the eye-bolts ...
... that is mounted on the wall to the wall. G To use the TV safely, make sure that you can adjust the TV manually to the left or right direction by 20 degrees to support the size and... weight of the bracket on the wall and the one on or hang from your TV. SWIVEL STAND ... (sold separately) to tie the product. Additionally, we recommend that the height of the TV. Caution: Please make sure that the TV be pulled in the picture. * If your viewing position. 14 Ensure the eye-bolts ...
Owners Manual
Page 18
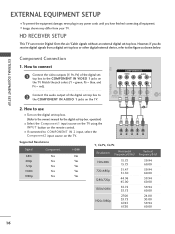
...set-top box to the COMPONENT IN AUDIO 1 jacks on the digital set-top box. (Refer to the owner's manual for the digital set -top box. However, if you have finished connecting all equipment. ■ Image shown may... prevent the equipment damage, never plug in any power cords until you do receive digital signals from your TV. HD RECEIVER SETUP This TV can receive Digital Over-the-air/Cable signals without an external digital set -top box. COMPONENT IN VIDEO...1280x720p 1920x1080i 1920x1080p 15.73 15.73 31.47 31.50 44.96 45.00 33.72 33.75 27.00 33.75 67.43 67.50 59.94 60.00 59.94 60.00 59....
...set-top box to the COMPONENT IN AUDIO 1 jacks on the digital set-top box. (Refer to the owner's manual for the digital set -top box. However, if you have finished connecting all equipment. ■ Image shown may... prevent the equipment damage, never plug in any power cords until you do receive digital signals from your TV. HD RECEIVER SETUP This TV can receive Digital Over-the-air/Cable signals without an external digital set -top box. COMPONENT IN VIDEO...1280x720p 1920x1080i 1920x1080p 15.73 15.73 31.47 31.50 44.96 45.00 33.72 33.75 27.00 33.75 67.43 67.50 59.94 60.00 59.94 60.00 59....
Owners Manual
Page 19
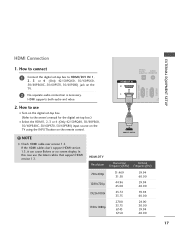
...digital set -top box.) ■ Select the HDMI1, 2, 3 or 4 (Only 42/50PQ60, 50/60PS60, 50/60PS60C, 50/60PS70, 50/60PS80) input source on the TV using the INPUT button on the TV. 2 No separate audio connection is necessary. How to connect 1 Connect the digital set-top box... to the owner's manual for the digital set -top box. (Refer to HDMI/DVI IN 1, 2, 3 or 4 (Only 42/50PQ60, 50/60PS60, 50/60PS60C, 50/60PS70, 50...
...digital set -top box.) ■ Select the HDMI1, 2, 3 or 4 (Only 42/50PQ60, 50/60PS60, 50/60PS60C, 50/60PS70, 50/60PS80) input source on the TV using the INPUT button on the TV. 2 No separate audio connection is necessary. How to connect 1 Connect the digital set-top box... to the owner's manual for the digital set -top box. (Refer to HDMI/DVI IN 1, 2, 3 or 4 (Only 42/50PQ60, 50/60PS60, 50/60PS60C, 50/60PS70, 50...
Owners Manual
Page 20
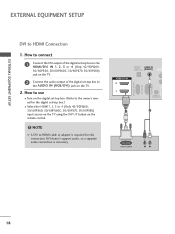
... the audio output of the digital set -top box.) ■ Select the HDMI1, 2, 3 or 4 (Only 42/50PQ60, 50/60PS60, 50/60PS60C, 50/60PS70, 50/60PS80) input source on the TV using the INPUT button on the TV. 2. How to use ■ Turn on the digital set-top box. (Refer to the AUDIO IN (RGB/DVI) jack... on the remote control. ! DVI doesn't support audio, so a separate audio connection is required for the digital set -top box to the owner's manual for this connection. How...
... the audio output of the digital set -top box.) ■ Select the HDMI1, 2, 3 or 4 (Only 42/50PQ60, 50/60PS60, 50/60PS60C, 50/60PS70, 50/60PS80) input source on the TV using the INPUT button on the TV. 2. How to use ■ Turn on the digital set-top box. (Refer to the AUDIO IN (RGB/DVI) jack... on the remote control. ! DVI doesn't support audio, so a separate audio connection is required for the digital set -top box to the owner's manual for this connection. How...

Owners Manual
Page 21
... S-VIDEO VIDEO /MONO AUDIO 1 2 Y PB PR L R Component Input ports To get better picture quality, connect a DVD player to the DVD player's manual for operating instructions. EXTERNAL EQUIPMENT SETUP RGB(PC) DVD SETUP Component Connection 1. How to connect 1 Connect the video outputs (Y, PB, PR) of the DVD ...the COMPONENT IN VIDEO 1 jacks on DVD player Y Y PB PR PB PR B-Y R-Y Cb Cr Pb Pr 19 Component ports on the TV Y Y Video output ports Y on the TV. Match the jack colors (Y = green, PB = blue, and PR = red). 2 Connect the audio outputs of the DVD to the...
... S-VIDEO VIDEO /MONO AUDIO 1 2 Y PB PR L R Component Input ports To get better picture quality, connect a DVD player to the DVD player's manual for operating instructions. EXTERNAL EQUIPMENT SETUP RGB(PC) DVD SETUP Component Connection 1. How to connect 1 Connect the video outputs (Y, PB, PR) of the DVD ...the COMPONENT IN VIDEO 1 jacks on DVD player Y Y PB PR PB PR B-Y R-Y Cb Cr Pb Pr 19 Component ports on the TV Y Y Video output ports Y on the TV. Match the jack colors (Y = green, PB = blue, and PR = red). 2 Connect the audio outputs of the DVD to the...

Owners Manual
Page 22
... connect 1 Connect the S-VIDEO output of the DVD to the S -VIDEO input on the TV. 2 Connect the audio outputs of the DVD to the HDMI/DVI IN 1, 2, 3 or 4 (Only 42/50PQ60, 50/60PS60, 50/60PS60C, 50/60PS70, 50/60PS80) jack on the remote control. ■ Refer to use ■ Turn on the ... the DVD to the AUDIO input jacks on the remote control. ■ Refer to use ■ Select the HDMI1, 2, 3 or 4 (Only 42/50PQ60, 50/60PS60, 50/60PS60C, 50/60PS70, 50/60PS80) input source on the TV using the INPUT button on the TV. 2. How to the DVD player's manual for operating instructions.
... connect 1 Connect the S-VIDEO output of the DVD to the S -VIDEO input on the TV. 2 Connect the audio outputs of the DVD to the HDMI/DVI IN 1, 2, 3 or 4 (Only 42/50PQ60, 50/60PS60, 50/60PS60C, 50/60PS70, 50/60PS80) jack on the remote control. ■ Refer to use ■ Turn on the ... the DVD to the AUDIO input jacks on the remote control. ■ Refer to use ■ Select the HDMI1, 2, 3 or 4 (Only 42/50PQ60, 50/60PS60, 50/60PS60C, 50/60PS70, 50/60PS80) input source on the TV using the INPUT button on the TV. 2. How to the DVD player's manual for operating instructions.

Owners Manual
Page 23
How to use ■ Set VCR output switch to 3 or 4 and then tune TV to the same channel number. ■ Insert a video tape into the VCR and press PLAY on the TV. 2 Connect the antenna cable to the RF antenna in socket of the VCR to the ANTENNA/CABLE IN socket on the VCR. (Refer to connect 1 Connect the RF antenna out socket of the VCR. 2. How to the VCR owner's manual.) ANTENNA/ CABLE IN 1 ANT OUT S-VIDEO VIDEO L R ANT IN OUTPUT SWITCH Wall Jack 2 Antenna 21 EXTERNAL EQUIPMENT SETUP AV IN 1 VCR SETUP Antenna Connection 1.
How to use ■ Set VCR output switch to 3 or 4 and then tune TV to the same channel number. ■ Insert a video tape into the VCR and press PLAY on the TV. 2 Connect the antenna cable to the RF antenna in socket of the VCR to the ANTENNA/CABLE IN socket on the VCR. (Refer to connect 1 Connect the RF antenna out socket of the VCR. 2. How to the VCR owner's manual.) ANTENNA/ CABLE IN 1 ANT OUT S-VIDEO VIDEO L R ANT IN OUTPUT SWITCH Wall Jack 2 Antenna 21 EXTERNAL EQUIPMENT SETUP AV IN 1 VCR SETUP Antenna Connection 1.

Owners Manual
Page 24
...composite. How to use ■ Insert a video tape into the VCR and press PLAY on the VCR. (Refer to the VCR owner's manual.) ■ Select the A V 1 input source on the TV using the INPUT button on the remote control. 1 L R AV IN 1 RGB IN (PC) ■ If connected to the VCR owner...'s manual.) UDIO IN GB/DVI) COMPONENT IN VIDEO AUDIO 2 ■ Select the A V 1 input source on the TV using the INPUT button on the TV. ! Use it when available. 22 ANT IN S-VIDEO VIDEO L R ANT OUT OUTPUT SWITCH O IN ...
...composite. How to use ■ Insert a video tape into the VCR and press PLAY on the VCR. (Refer to the VCR owner's manual.) ■ Select the A V 1 input source on the TV using the INPUT button on the remote control. 1 L R AV IN 1 RGB IN (PC) ■ If connected to the VCR owner...'s manual.) UDIO IN GB/DVI) COMPONENT IN VIDEO AUDIO 2 ■ Select the A V 1 input source on the TV using the INPUT button on the TV. ! Use it when available. 22 ANT IN S-VIDEO VIDEO L R ANT OUT OUTPUT SWITCH O IN ...
Owners Manual
Page 25
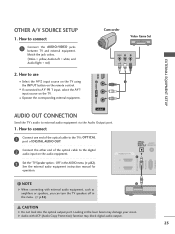
...Video Game Set VIDEO L R USB IN VIDEO L/MONO AUDIO R HDMI IN 3 EXTERNAL EQUIPMENT SETUP 2. See the external audio equipment instruction manual for operation. Off" in the menu. (G p.82) CAUTION G Do not look into the optical output port. AV IN 2 AUDIO OUT CONNECTION Send the... TV's audio to connect 1 Connect the AUDIO/VIDEO jacks between TV and external equipment. OTHER A/V SOURCE SETUP 1. NOTE 2 G When connecting with ACP (Audio Copy Protection) function may damage...
...Video Game Set VIDEO L R USB IN VIDEO L/MONO AUDIO R HDMI IN 3 EXTERNAL EQUIPMENT SETUP 2. See the external audio equipment instruction manual for operation. Off" in the menu. (G p.82) CAUTION G Do not look into the optical output port. AV IN 2 AUDIO OUT CONNECTION Send the... TV's audio to connect 1 Connect the AUDIO/VIDEO jacks between TV and external equipment. OTHER A/V SOURCE SETUP 1. NOTE 2 G When connecting with ACP (Audio Copy Protection) function may damage...

Owners Manual
Page 29
... Auto adjustment in RGB-PC, you can choose the resolution in RGB-PC mode. PICTURE Move Enter E Picture Mode : Standard • Contrast 90 • Brightness 50 • Sharpness 60 • Color 60 • Tint 0R G • Advanced Control • Reset Screen (RGB-PC) Screen Resolution G Auto config. Select Auto config.. 4...MENU Prev. 1024 x 768 1280 x 768 1360 x 768 1 MENU 2 ENTER Select PICTURE. After adjustment, if the image is still not correct, try using the manual settings or a different resolution or refresh rate on the PC. Screen Resolution Auto config.
... Auto adjustment in RGB-PC, you can choose the resolution in RGB-PC mode. PICTURE Move Enter E Picture Mode : Standard • Contrast 90 • Brightness 50 • Sharpness 60 • Color 60 • Tint 0R G • Advanced Control • Reset Screen (RGB-PC) Screen Resolution G Auto config. Select Auto config.. 4...MENU Prev. 1024 x 768 1280 x 768 1360 x 768 1 MENU 2 ENTER Select PICTURE. After adjustment, if the image is still not correct, try using the manual settings or a different resolution or refresh rate on the PC. Screen Resolution Auto config.

Owners Manual
Page 30
...any vertical bars or stripes visible on the screen background. PICTURE Move Enter E Picture Mode : Standard • Contrast 90 • Brightness 50 • Sharpness 60 • Color 60 • Tint 0R G • Advanced Control • Reset Screen (RGB-PC) Screen ... Make appropriate adjustments. ■ Position: This function is not clear after auto adjustment and especially if characters are still trembling, adjust the picture phase manually. Position G Size Phase Reset Move MENU Prev. D F G E 1 MENU 2 ENTER 3 ENTER 4 ENTER 5 ENTER Select PICTURE. This ...
...any vertical bars or stripes visible on the screen background. PICTURE Move Enter E Picture Mode : Standard • Contrast 90 • Brightness 50 • Sharpness 60 • Color 60 • Tint 0R G • Advanced Control • Reset Screen (RGB-PC) Screen ... Make appropriate adjustments. ■ Position: This function is not clear after auto adjustment and especially if characters are still trembling, adjust the picture phase manually. Position G Size Phase Reset Move MENU Prev. D F G E 1 MENU 2 ENTER 3 ENTER 4 ENTER 5 ENTER Select PICTURE. This ...

Owners Manual
Page 37
...completed. Customers can also be displayed on the screen when turning the TV on until the Initial setting procedure is only intended for use this TV at home. Picture mode" manually while inspecting the TV, but the TV will automatically return to preset instore mode after 5 minutes. ■...Use". Mode setting Mode Setting Selecting the environment. Factory defaults are set the essential items for viewing the TV for the first time when purchasing the TV. Step2. WATCHING TV / CHANNEL CONTROL INITIAL SETTING This Function guides the user to easily set when you choose "Home Use"....
...completed. Customers can also be displayed on the screen when turning the TV on until the Initial setting procedure is only intended for use this TV at home. Picture mode" manually while inspecting the TV, but the TV will automatically return to preset instore mode after 5 minutes. ■...Use". Mode setting Mode Setting Selecting the environment. Factory defaults are set the essential items for viewing the TV for the first time when purchasing the TV. Step2. WATCHING TV / CHANNEL CONTROL INITIAL SETTING This Function guides the user to easily set when you choose "Home Use"....

Owners Manual
Page 38
Auto Tuning Auto Tuning Check your antenna connection. The previous channel information will be updated during Auto Tuning. Step4. Previous Next 1 ENTER Start Auto Tuning. 36 Time setting Time Setting Current Time Setting Year Month Date Hour Minute Time Zone Daylight Saving F Auto G 2007 11 15 5 PM 52 Eastern Off Previous Next 1 Select A ut o or Manual. 2 ENTER Select desired time option. WATCHING TV / CHANNEL CONTROL WATCHING TV / CHANNEL CONTROL Step3.
Auto Tuning Auto Tuning Check your antenna connection. The previous channel information will be updated during Auto Tuning. Step4. Previous Next 1 ENTER Start Auto Tuning. 36 Time setting Time Setting Current Time Setting Year Month Date Hour Minute Time Zone Daylight Saving F Auto G 2007 11 15 5 PM 52 Eastern Off Previous Next 1 Select A ut o or Manual. 2 ENTER Select desired time option. WATCHING TV / CHANNEL CONTROL WATCHING TV / CHANNEL CONTROL Step3.

Owners Manual
Page 39
.... Select a menu item. 3 ENTER 4 MENU Accept the current selection. ON-SCREEN MENUS SELECTION Your TV's OSD (On Screen Display) may differ slightly from that shown in this manual. Only 50/60PS60, 50/60PS60C CHANNEL Auto Tuning Manual Tuning Channel Edit Move Enter PICTURE Move Aspect Ratio : 16:9 Picture Wizard Energy Saving : Off Picture Mode : Standard...
.... Select a menu item. 3 ENTER 4 MENU Accept the current selection. ON-SCREEN MENUS SELECTION Your TV's OSD (On Screen Display) may differ slightly from that shown in this manual. Only 50/60PS60, 50/60PS60C CHANNEL Auto Tuning Manual Tuning Channel Edit Move Enter PICTURE Move Aspect Ratio : 16:9 Picture Wizard Energy Saving : Off Picture Mode : Standard...

