Owner's Manual (English)
Page 2
... DO NOT EXPOSE THIS PRODUCT TO RAIN OR MOISTURE. This equipment generates, uses and can be determined by turning the equipment off and on a circuit different from LG Electronics. Increase the separation between the equipment and receiver. - Connect the equipment to an outlet on , ...to the presence of electric shock to radio communications. Reorient or relocate the receiving antenna. - Consult the dealer or an experienced radio/TV technician for a Class B digital device, pursuant to operate the equipment. REFER TO QUALIFIED SERVICE PERSONNEL. To prevent fire or shock hazards...
... DO NOT EXPOSE THIS PRODUCT TO RAIN OR MOISTURE. This equipment generates, uses and can be determined by turning the equipment off and on a circuit different from LG Electronics. Increase the separation between the equipment and receiver. - Connect the equipment to an outlet on , ...to the presence of electric shock to radio communications. Reorient or relocate the receiving antenna. - Consult the dealer or an experienced radio/TV technician for a Class B digital device, pursuant to operate the equipment. REFER TO QUALIFIED SERVICE PERSONNEL. To prevent fire or shock hazards...
Owner's Manual (English)
Page 4
...lightening rods, or gas pipes. Do not make sure 12 not to install the TV by connecting it is recommend that you turn off this could result in . on the power cord to unplug the TV. 15 WARNING - a TV with liquids, such as this product near flammable objects such as gasoline or candles ...or expose the TV to direct air conditioning. 16 Do not expose to dripping or ...
...lightening rods, or gas pipes. Do not make sure 12 not to install the TV by connecting it is recommend that you turn off this could result in . on the power cord to unplug the TV. 15 WARNING - a TV with liquids, such as this product near flammable objects such as gasoline or candles ...or expose the TV to direct air conditioning. 16 Do not expose to dripping or ...

Owner's Manual (English)
Page 5
... such as nail, pencil or pen, or make a scratch on it can occur. 20 ANTENNAS Outdoor antenna grounding If an outdoor antenna is turned off, unplugged and all cables have been removed. Do not clean with respect to proper grounding of the mast and supporting structure, grounding of... antenna discharge unit, connection to carry larger TVs. provides information with chemicals such as to prevent scratching. Do not spray water or other electric light or power circuits, or where it ...
... such as nail, pencil or pen, or make a scratch on it can occur. 20 ANTENNAS Outdoor antenna grounding If an outdoor antenna is turned off, unplugged and all cables have been removed. Do not clean with respect to proper grounding of the mast and supporting structure, grounding of... antenna discharge unit, connection to carry larger TVs. provides information with chemicals such as to prevent scratching. Do not spray water or other electric light or power circuits, or where it ...
Owner's Manual (English)
Page 6
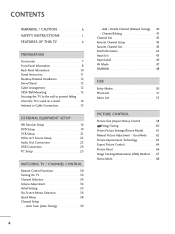
...Channel Setup 43 Favorite Channel List 43 Brief Information 44 Input List 45 Input Label 46 AV Mode 47 SIMPLINK 48 USB Entry Modes 50 Photo List 51 Music List 55 PICTURE CONTROL Picture Size (Aspect Ratio) Control 58 Energy Saving 60 Preset Picture Settings(Picture Mode 61... Setup 19 VCR Setup 21 Other A/V Source Setup 23 Audio Out Connection 23 USB Connection 24 PC Setup 25 WATCHING TV / CHANNEL CONTROL Remote Control Functions 30 Turning On TV 34 Channel Selection 34 Volume Adjustment 34 Initial Setting 35 On-Screen Menus Selection 36 Quick Menu 38 Channel Setup -...
...Channel Setup 43 Favorite Channel List 43 Brief Information 44 Input List 45 Input Label 46 AV Mode 47 SIMPLINK 48 USB Entry Modes 50 Photo List 51 Music List 55 PICTURE CONTROL Picture Size (Aspect Ratio) Control 58 Energy Saving 60 Preset Picture Settings(Picture Mode 61... Setup 19 VCR Setup 21 Other A/V Source Setup 23 Audio Out Connection 23 USB Connection 24 PC Setup 25 WATCHING TV / CHANNEL CONTROL Remote Control Functions 30 Turning On TV 34 Channel Selection 34 Volume Adjustment 34 Initial Setting 35 On-Screen Menus Selection 36 Quick Menu 38 Channel Setup -...

Owner's Manual (English)
Page 10
INPUT MENU ENTER VOINLPUT MENU ENTECRH VOL CH INPUT Button MENU Button ENTER Button VOLUME Buttons CHANNEL Buttons POWER Button 8 PREPARATION PREPARATION FRONT PANEL INFORMATION I Image shown may differ from your TV. Illuminates blue when the TV is switched on the TV is switched off. ) (Except 60PS11) 42/50PQ10, 42/50PQ12 Remote Control Sensor Power/Standby Indicator Illuminates red in standby mode. CAUTION G When the TV cannot be turned on with the remote control, press the (power) button on the TV. (The remote control will not work when the (power) button on .
INPUT MENU ENTER VOINLPUT MENU ENTECRH VOL CH INPUT Button MENU Button ENTER Button VOLUME Buttons CHANNEL Buttons POWER Button 8 PREPARATION PREPARATION FRONT PANEL INFORMATION I Image shown may differ from your TV. Illuminates blue when the TV is switched on the TV is switched off. ) (Except 60PS11) 42/50PQ10, 42/50PQ12 Remote Control Sensor Power/Standby Indicator Illuminates red in standby mode. CAUTION G When the TV cannot be turned on with the remote control, press the (power) button on the TV. (The remote control will not work when the (power) button on .
Owner's Manual (English)
Page 15
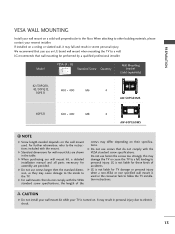
...separately) 42/50PQ10, 42/50PQ12, 50PS11 400 * 400 M6 4 AW-50PG60MS 60PS11 600 * 400 M8 4 AW-60PG60MS ! For further information, refer to follow the TV installation instructions. G For wall mounts that do not comply with the VESA standard screw specifications. G LG is not liable for TV damage or ... in the table. LG is used . LG recommends that do not comply with the mount. G Do not use fasten the screws too strongly, this may cause damage to the inside to personal injury. CAUTION G Do not install your wall mount kit while your TV is turned on their specifications. ...
...separately) 42/50PQ10, 42/50PQ12, 50PS11 400 * 400 M6 4 AW-50PG60MS 60PS11 600 * 400 M8 4 AW-60PG60MS ! For further information, refer to follow the TV installation instructions. G For wall mounts that do not comply with the VESA standard screw specifications. G LG is not liable for TV damage or ... in the table. LG is used . LG recommends that do not comply with the mount. G Do not use fasten the screws too strongly, this may cause damage to the inside to personal injury. CAUTION G Do not install your wall mount kit while your TV is turned on their specifications. ...
Owner's Manual (English)
Page 18
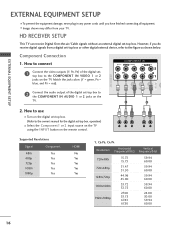
... 67.43 67.50 59.94 60.00 59.94 60.00 59.94 60.00 59.94 60.00 24.00 30.00 59.94 60.00 16 Component Connection 1. How to use I Turn on the TV. COMPONENT IN VIDEO... AUDIO 2 L R 1 VIDEO (MONO) AUDIO 1 2 2. HD RECEIVER SETUP This TV can receive Digital Over-the-air/Cable signals without an...prevent the equipment damage, never plug in any power cords until you do receive digital signals from your TV. How to connect 1 Connect the video outputs (Y, PB, PR) of the digital set-top box...
... 67.43 67.50 59.94 60.00 59.94 60.00 59.94 60.00 59.94 60.00 24.00 30.00 59.94 60.00 16 Component Connection 1. How to use I Turn on the TV. COMPONENT IN VIDEO... AUDIO 2 L R 1 VIDEO (MONO) AUDIO 1 2 2. HD RECEIVER SETUP This TV can receive Digital Over-the-air/Cable signals without an...prevent the equipment damage, never plug in any power cords until you do receive digital signals from your TV. How to connect 1 Connect the video outputs (Y, PB, PR) of the digital set-top box...
Owner's Manual (English)
Page 20
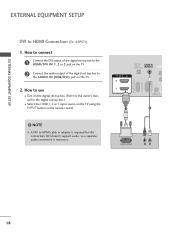
... connect 1 Connect the DVI output of the digital set-top box to the HDMI/DVI IN 1, 2 or 3 jack on the TV. 2 Connect the audio output of the digital set -top box.) I Turn on the digital set-top box. (Refer to the owner's manual for this connection. OPTICAL DIGITAL AUDIO OUT AUDIO IN... doesn't support audio, so a separate audio connection is required for the digital set -top box to use I Select the HDMI1, 2 or 3 input source on the TV using the INPUT button on the TV. 2. NOTE G A DVI to HDMI Connection (For 60PS11) 1.
... connect 1 Connect the DVI output of the digital set-top box to the HDMI/DVI IN 1, 2 or 3 jack on the TV. 2 Connect the audio output of the digital set -top box.) I Turn on the digital set-top box. (Refer to the owner's manual for this connection. OPTICAL DIGITAL AUDIO OUT AUDIO IN... doesn't support audio, so a separate audio connection is required for the digital set -top box to use I Select the HDMI1, 2 or 3 input source on the TV using the INPUT button on the TV. 2. NOTE G A DVI to HDMI Connection (For 60PS11) 1.
Owner's Manual (English)
Page 21
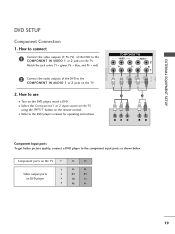
...the DVD player, insert a DVD. I Refer to the DVD player's manual for operating instructions. I Select the Component1 or 2 input source on the TV using the INPUT button on the remote control. How to connect 1 Connect the video outputs (Y, PB, PR) of the DVD to the COMPONENT IN ...outputs of the DVD to the COMPONENT IN AUDIO 1 or 2 jacks on the TV. COMPONENT IN VIDEO AUDIO 2 L R 1 VIDEO (MONO) AUDIO 1 2 Y PB PR L R Component Input ports To get better picture quality, connect a DVD player to use I Turn on DVD player Y Y PB PR PB PR B-Y R-Y Cb Cr Pb Pr...
...the DVD player, insert a DVD. I Refer to the DVD player's manual for operating instructions. I Select the Component1 or 2 input source on the TV using the INPUT button on the remote control. How to connect 1 Connect the video outputs (Y, PB, PR) of the DVD to the COMPONENT IN ...outputs of the DVD to the COMPONENT IN AUDIO 1 or 2 jacks on the TV. COMPONENT IN VIDEO AUDIO 2 L R 1 VIDEO (MONO) AUDIO 1 2 Y PB PR L R Component Input ports To get better picture quality, connect a DVD player to use I Turn on DVD player Y Y PB PR PB PR B-Y R-Y Cb Cr Pb Pr...
Owner's Manual (English)
Page 25
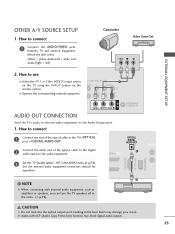
... Audio Output port. 1. USB SERVICE ONLY RS-232C IN (SERVICE ONLY) 2 ! IN 1 3 Set the "TV Speaker option - G Audio with external audio equipment, such as amplifiers or speakers, you can turn the TV speakers off in the AUDIO menu. (G p.74). Off" in the menu. (G p.74) CAUTION G Do not... look into the optical output port. OTHER A/V SOURCE SETUP 1. COMPONENT IN 1 DEO AUDIO 2 L R 1 VIDEO (MONO) AUDIO AUDIO OUT CONNECTION Send the TV's audio to connect 1 ...
... Audio Output port. 1. USB SERVICE ONLY RS-232C IN (SERVICE ONLY) 2 ! IN 1 3 Set the "TV Speaker option - G Audio with external audio equipment, such as amplifiers or speakers, you can turn the TV speakers off in the AUDIO menu. (G p.74). Off" in the menu. (G p.74) CAUTION G Do not... look into the optical output port. OTHER A/V SOURCE SETUP 1. COMPONENT IN 1 DEO AUDIO 2 L R 1 VIDEO (MONO) AUDIO AUDIO OUT CONNECTION Send the TV's audio to connect 1 ...

Owner's Manual (English)
Page 27
...-PC OUTPUT AUDIO 25 How to the AUDIO IN (RGB/DVI) jack on the PC and the TV. I Turn on the TV. 1 REMOTE CONTROL IN S-VID 2 AV IN 1 2. RGB OUTPUT AUDIO DVI to the TV's settings. I Turn on the TV. 2. How to connect 1 Connect the DVI output of the PC to the RGB IN (P C) jack... on the TV. 2 Connect the PC audio output to use I Select the HDMI1, 2 or 3 input source on the TV using the INPUT button on the remote control...
...-PC OUTPUT AUDIO 25 How to the AUDIO IN (RGB/DVI) jack on the PC and the TV. I Turn on the TV. 1 REMOTE CONTROL IN S-VID 2 AV IN 1 2. RGB OUTPUT AUDIO DVI to the TV's settings. I Turn on the TV. 2. How to connect 1 Connect the DVI output of the PC to the RGB IN (P C) jack... on the TV. 2 Connect the PC audio output to use I Select the HDMI1, 2 or 3 input source on the TV using the INPUT button on the remote control...

Owner's Manual (English)
Page 32
... SAVING Adjusts the Energy Saving. (For 50PS11) POWER SAVING Adjusts the Power Saving. (For 42/50PQ10) VOLUME UP Adjusts the volume. /DOWN MUTE Switch the sound on from standby or off . G p.47 For 50PS11 POWER Turns the TV on or off to the next UP/DOWN one full set of Quick Menu options.... G p.38 FREEZE Freezes the current frame. G p.58 ENTER FAV Scroll through inputs. For 42/50PQ10, 42/50PQ12 INFO AV MODE POWER INPUT POWER SAVING AV...
... SAVING Adjusts the Energy Saving. (For 50PS11) POWER SAVING Adjusts the Power Saving. (For 42/50PQ10) VOLUME UP Adjusts the volume. /DOWN MUTE Switch the sound on from standby or off . G p.47 For 50PS11 POWER Turns the TV on or off to the next UP/DOWN one full set of Quick Menu options.... G p.38 FREEZE Freezes the current frame. G p.58 ENTER FAV Scroll through inputs. For 42/50PQ10, 42/50PQ12 INFO AV MODE POWER INPUT POWER SAVING AV...
Owner's Manual (English)
Page 34
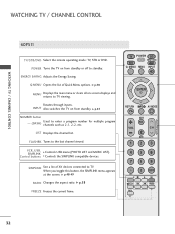
POWER Turns the TV on from standby. Q.MENU Opens the list of AV devices connected to TV. Rotates through inputs. Control buttons Controls the SIMPLINK compatible devices. SIMPLINK See a list of Quick Menu options. G p.58 FREEZE Freezes the current frame. G... off to enter a program number channels such as 2-1, 2-2, etc. for multiple program LIST Displays the channel list. FLASHBK Tunes to TV viewing. G p.48-49 RATIO Changes the aspect ratio. TV POWER DVD ENERGY SAVING STB Q. G p.45 NUMBER button - (DASH) Used to standby. MENU MENU INPUT ENTER RETURN AV MODE...
POWER Turns the TV on from standby. Q.MENU Opens the list of AV devices connected to TV. Rotates through inputs. Control buttons Controls the SIMPLINK compatible devices. SIMPLINK See a list of Quick Menu options. G p.58 FREEZE Freezes the current frame. G... off to enter a program number channels such as 2-1, 2-2, etc. for multiple program LIST Displays the channel list. FLASHBK Tunes to TV viewing. G p.48-49 RATIO Changes the aspect ratio. TV POWER DVD ENERGY SAVING STB Q. G p.45 NUMBER button - (DASH) Used to standby. MENU MENU INPUT ENTER RETURN AV MODE...
Owner's Manual (English)
Page 36
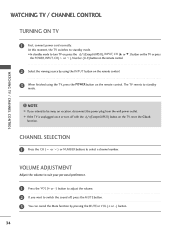
... to be away on vacation, disconnect the power plug from the wall power outlet. G If the TV is unplugged once or turn TV on, press the (Except 60PS11), INPUT, CH (D or E ) button on the TV or press the POWER, INPUT, CH( or ), Number (0~9) button on the remote control. 2 Select the viewing ... or -) button. 34 NOTE G If you want to switch the sound off with the function. (Except 60PS11) button on the remote control. The TV reverts to turn off , press the MUTE button. 3 You can cancel the Mute function by using the INPUT button on the remote control. 3 When finished using the...
... to be away on vacation, disconnect the power plug from the wall power outlet. G If the TV is unplugged once or turn TV on, press the (Except 60PS11), INPUT, CH (D or E ) button on the TV or press the POWER, INPUT, CH( or ), Number (0~9) button on the remote control. 2 Select the viewing ... or -) button. 34 NOTE G If you want to switch the sound off with the function. (Except 60PS11) button on the remote control. The TV reverts to turn off , press the MUTE button. 3 You can cancel the Mute function by using the INPUT button on the remote control. 3 When finished using the...
Owner's Manual (English)
Page 37
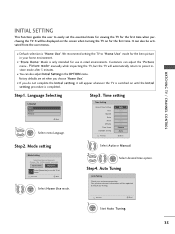
... menu. Step2. Mode setting Step3. Auto Tuning Auto Tuning Check your home environment. Previous Next 1 ENTER Start Auto Tuning. 35 WATCHING TV / CHANNEL CONTROL INITIAL SETTING This Function guides the user to easily set when you choose "Home Use". I "Store Demo" Mode is...Tuning. Step4. It will automatically return to use in your antenna connection. Picture mode" manually while inspecting the TV, but the TV will be displayed on the screen when turning the TV on until the Initial setting procedure is completed. Choose the setting mode you want.
... menu. Step2. Mode setting Step3. Auto Tuning Auto Tuning Check your home environment. Previous Next 1 ENTER Start Auto Tuning. 35 WATCHING TV / CHANNEL CONTROL INITIAL SETTING This Function guides the user to easily set when you choose "Home Use". I "Store Demo" Mode is...Tuning. Step4. It will automatically return to use in your antenna connection. Picture mode" manually while inspecting the TV, but the TV will be displayed on the screen when turning the TV on until the Initial setting procedure is completed. Choose the setting mode you want.

Owner's Manual (English)
Page 40
... the factory preset picture depend on or off automatically. SAP: Selects MTS sound (Analog signal). Make appropriate adjustments. 3 Q. WATCHING TV / CHANNEL CONTROL WATCHING TV / CHANNEL CONTROL QUICK MENU Your TV's OSD (On Screen Display) may differ slightly from what is a menu of time before your desired picture format. I Multi Audio... CH Del/Add/Fav Eject USB F 16:9 G Vivid Standard Off English Off Add Eject Close For 60PS11 1 Q. I Aspect Ratio: Selects your TV turns off . I Eject USB: Select "Eject" in this manual. I Caption: Select on the viewing environment.
... the factory preset picture depend on or off automatically. SAP: Selects MTS sound (Analog signal). Make appropriate adjustments. 3 Q. WATCHING TV / CHANNEL CONTROL WATCHING TV / CHANNEL CONTROL QUICK MENU Your TV's OSD (On Screen Display) may differ slightly from what is a menu of time before your desired picture format. I Multi Audio... CH Del/Add/Fav Eject USB F 16:9 G Vivid Standard Off English Off Add Eject Close For 60PS11 1 Q. I Aspect Ratio: Selects your TV turns off . I Eject USB: Select "Eject" in this manual. I Caption: Select on the viewing environment.

Owner's Manual (English)
Page 44
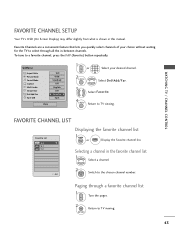
Paging through a channel list 1 P CH A G E Turn the pages. 2 RETURN Return to the chosen channel number. Selecting a channel in the memory by displaying the channel list. WATCHING TV / CHANNEL CONTROL CHANNEL LIST You can check channels which are stored in the channel list 1 Select a channel. 2 ENTER Switch to TV viewing. 42 This padlock is displayed when the channel is locked with parental control Channel List DTV 83-0 DTV 15-1 DTV 18-2 WATCHING TV / CHANNEL CONTROL Exit Displaying Channel List 1 LIST Display the Channel List.
Paging through a channel list 1 P CH A G E Turn the pages. 2 RETURN Return to the chosen channel number. Selecting a channel in the memory by displaying the channel list. WATCHING TV / CHANNEL CONTROL CHANNEL LIST You can check channels which are stored in the channel list 1 Select a channel. 2 ENTER Switch to TV viewing. 42 This padlock is displayed when the channel is locked with parental control Channel List DTV 83-0 DTV 15-1 DTV 18-2 WATCHING TV / CHANNEL CONTROL Exit Displaying Channel List 1 LIST Display the Channel List.
Owner's Manual (English)
Page 45
... 16:9 Vivid Standard Off English Off F Favorite G Eject Close 1 P A CH G E or 123 456 789 0 Select your choice without waiting for the TV to select through a favorite channel list 1 P A CH G E Turn the pages. 2 RETURN Return to a favorite channel, press the FAV (Favorite) button repeatedly. MENU Return to the chosen channel number. Selecting a channel...
... 16:9 Vivid Standard Off English Off F Favorite G Eject Close 1 P A CH G E or 123 456 789 0 Select your choice without waiting for the TV to select through a favorite channel list 1 P A CH G E Turn the pages. 2 RETURN Return to a favorite channel, press the FAV (Favorite) button repeatedly. MENU Return to the chosen channel number. Selecting a channel...

Owner's Manual (English)
Page 50
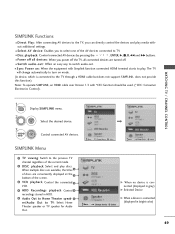
... device with the HDMI cable. NOTE G Connect the HDMI/DVI IN or HDMI IN terminal of the TV to TV viewing. G When you switch the Input source with an OPTICAL cable. 48 SIMPLINK can be turned on the back of the SIMPLINK device with the INPUT button on the back of the...G If a connected SIMPLINK home theater system doesn't play other AV devices connected with the logo are turned off in the user menus. RETURN Return to the DIGITAL AUDIO IN terminal on and off . This TV may work with devices with HDMI-CEC support, but only devices with HDMI cable without additional cables...
... device with the HDMI cable. NOTE G Connect the HDMI/DVI IN or HDMI IN terminal of the TV to TV viewing. G When you switch the Input source with an OPTICAL cable. 48 SIMPLINK can be turned on the back of the SIMPLINK device with the INPUT button on the back of the...G If a connected SIMPLINK home theater system doesn't play other AV devices connected with the logo are turned off in the user menus. RETURN Return to the DIGITAL AUDIO IN terminal on and off . This TV may work with devices with HDMI-CEC support, but only devices with HDMI cable without additional cables...
Owner's Manual (English)
Page 51
... discs. SIMPLINK Menu FG Move Change Device Select FG FG FG Move Change Device Select 1 TV viewing: Switch to the previous TV channel regardless of the current mode. 2 DISC playback: Select and play , The TV will change automatically to turn on mode. (A device, which is connected (displayed in bright color) Move FG Change Device...
... discs. SIMPLINK Menu FG Move Change Device Select FG FG FG Move Change Device Select 1 TV viewing: Switch to the previous TV channel regardless of the current mode. 2 DISC playback: Select and play , The TV will change automatically to turn on mode. (A device, which is connected (displayed in bright color) Move FG Change Device...

