Owner's Manual (English)
Page 4
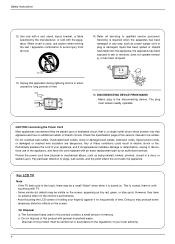
... it is turned on the screen, appearing as power supply cord or plug is used in any way, such as tiny red, green, or blue spots. Do not dispose of these conditions could result in a door, or walked upon a dedicated circuit; Some minute dot defects may be certain. Servicing is the disconnecting device. Do not overload wall outlets. Any of this owner's manual to...
... it is turned on the screen, appearing as power supply cord or plug is used in any way, such as tiny red, green, or blue spots. Do not dispose of these conditions could result in a door, or walked upon a dedicated circuit; Some minute dot defects may be certain. Servicing is the disconnecting device. Do not overload wall outlets. Any of this owner's manual to...
Owner's Manual (English)
Page 5
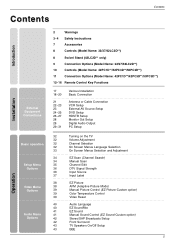
... Installation Basic Connection Antenna or Cable Connection VCR Setup External AV Source Setup DVD Setup HDSTB Setup Monitor Out Setup Digital Audio Output PC Setup 32 Turning on the TV 32 Volume Adjustment 32 Channel Selection 32 On Screen Menus Language Selection 33 On Screen Menus Selection and Adjustment 34 EZ Scan (Channel Search) 34 Manual Scan 35 Channel Edit 36 DTV Signal Strength 36 Input Source 37 Input Label 38 EZ Picture 38 APM (Adaptive Picture Mode) 39 Manual Picture Control (EZ Picture-Custom option) 39 Color Temperature Control 39 Video Reset...
... Installation Basic Connection Antenna or Cable Connection VCR Setup External AV Source Setup DVD Setup HDSTB Setup Monitor Out Setup Digital Audio Output PC Setup 32 Turning on the TV 32 Volume Adjustment 32 Channel Selection 32 On Screen Menus Language Selection 33 On Screen Menus Selection and Adjustment 34 EZ Scan (Channel Search) 34 Manual Scan 35 Channel Edit 36 DTV Signal Strength 36 Input Source 37 Input Label 38 EZ Picture 38 APM (Adaptive Picture Mode) 39 Manual Picture Control (EZ Picture-Custom option) 39 Color Temperature Control 39 Video Reset...
Owner's Manual (English)
Page 7
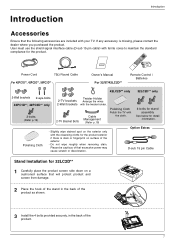
... DAYMENU GUIDE FREEZE TIMER EXIT 1.5VENTER VOL MUTE CC PAGE INFO 1 FAV 4 7 2 PAGE CH 5 EZ ADJUST PIC EZ APM SOUND 0 SAP 8 9 FLASHBK 6 3 FREEZE Power Cord 75Ω Round Cable Owner's Manual Remote Control / Batteries For 42PC1D**, 42PC3D**, 50PC3D** For 32/37/42LC2D** 42LC2D** only 32LC2D** only 2-Wall brackets 2-eye-bolts 42PC1D**, 42PC3D** only 2-bolts (Refer p.19) Twister Holder 2-TV brackets Arrange the wires 2-Wall brackets with the twister holder. 2-TV Bracket Bolts Cable Management...
... DAYMENU GUIDE FREEZE TIMER EXIT 1.5VENTER VOL MUTE CC PAGE INFO 1 FAV 4 7 2 PAGE CH 5 EZ ADJUST PIC EZ APM SOUND 0 SAP 8 9 FLASHBK 6 3 FREEZE Power Cord 75Ω Round Cable Owner's Manual Remote Control / Batteries For 42PC1D**, 42PC3D**, 50PC3D** For 32/37/42LC2D** 42LC2D** only 32LC2D** only 2-Wall brackets 2-eye-bolts 42PC1D**, 42PC3D** only 2-bolts (Refer p.19) Twister Holder 2-TV brackets Arrange the wires 2-Wall brackets with the twister holder. 2-TV Bracket Bolts Cable Management...
Owner's Manual (English)
Page 12
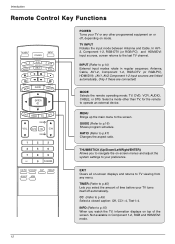
... watch the TV, information displays on -screen menus and adjust the system settings to p.14) External input modes rotate in Component 1-2, RGB and HDMI/DVI mode. 12 MENU Brings up the main menu to the last TV channel. In AV12, Component 1-2, RGB-DTV (or RGB-PC), and HDMI/DVI input sources, screen returns to the screen. INPUT (Refer to your preference. Introduction Remote Control Key Functions TV INPUT POWER TV AUDIO DVD MODE CABLE INPUT VCR STB DAY MENU GUIDE DAY+ RATIO ENTER EXIT TIMER CC...
... watch the TV, information displays on -screen menus and adjust the system settings to p.14) External input modes rotate in Component 1-2, RGB and HDMI/DVI mode. 12 MENU Brings up the main menu to the last TV channel. In AV12, Component 1-2, RGB-DTV (or RGB-PC), and HDMI/DVI input sources, screen returns to the screen. INPUT (Refer to your preference. Introduction Remote Control Key Functions TV INPUT POWER TV AUDIO DVD MODE CABLE INPUT VCR STB DAY MENU GUIDE DAY+ RATIO ENTER EXIT TIMER CC...
Owner's Manual (English)
Page 14
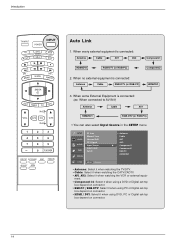
When no external equipment is connected: Antenna Cable AV1 AV2 Component1 HDMI/DVI RGB-DTV (or RGB-PC) Component2 2. SETUP VIDEO AUDIO TIME EZ Scan Manual Scan Channel Edit DTV Signal Input Source Input Label Set ID OPTION LOCK MENU Previous Antenna Cable AV1 AV2 G Component1 Component2 RGB-PC HDMI/DVI • Antenna: Select it when watching the TV/DTV. • Cable: Select it when watching the CATV/CADTV. • AV1, AV2: Select it when using DVD, PC or Digital set-top box depend...
When no external equipment is connected: Antenna Cable AV1 AV2 Component1 HDMI/DVI RGB-DTV (or RGB-PC) Component2 2. SETUP VIDEO AUDIO TIME EZ Scan Manual Scan Channel Edit DTV Signal Input Source Input Label Set ID OPTION LOCK MENU Previous Antenna Cable AV1 AV2 G Component1 Component2 RGB-PC HDMI/DVI • Antenna: Select it when watching the TV/DTV. • Cable: Select it when watching the CATV/CADTV. • AV1, AV2: Select it when using DVD, PC or Digital set-top box depend...
Owner's Manual (English)
Page 21
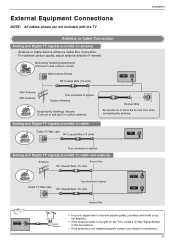
... ANTENNA IN VIDEO AUDIO S-VIDEO L/MONO R ( ) VIDEO AUDIO CAIABNVLEIN 1 S-VIDEO RGVBIDINEO CROENMTROOTLEINAUDIO COMPONENT IN AUDIO (RGB/DVI) RGB (PC/DTV) AV IN 2 Bronze Wire S-VIDEO R AUDIO L/MONO VIDEO AV IN 2 Be careful not to bend the bronze wire when connecting the antenna. For optimum picture quality, adjust antenna direction if needed. N 2 AV IN 2 Analog and Digital TV signals provided on antenna AV IN 2 - Antenna or Cable Service without a Cable Box Connection. - VI VIDEO AUDIO S-VIDEO L/MONO R AV IN 2 VIDEO AV IN 2 Installation External Equipment Connections...
... ANTENNA IN VIDEO AUDIO S-VIDEO L/MONO R ( ) VIDEO AUDIO CAIABNVLEIN 1 S-VIDEO RGVBIDINEO CROENMTROOTLEINAUDIO COMPONENT IN AUDIO (RGB/DVI) RGB (PC/DTV) AV IN 2 Bronze Wire S-VIDEO R AUDIO L/MONO VIDEO AV IN 2 Be careful not to bend the bronze wire when connecting the antenna. For optimum picture quality, adjust antenna direction if needed. N 2 AV IN 2 Analog and Digital TV signals provided on antenna AV IN 2 - Antenna or Cable Service without a Cable Box Connection. - VI VIDEO AUDIO S-VIDEO L/MONO R AV IN 2 VIDEO AV IN 2 Installation External Equipment Connections...
Owner's Manual (English)
Page 22
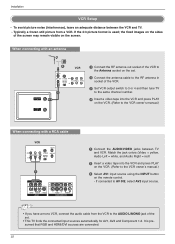
... 1 Connect the AUDIO/VIDEO jacks between the VCR and TV. - If the 4:3 picture format is presumed that RGB and HDMI/DVI sources are connected. If connected to the VCR owner's manual.) CABLE IN When connecting with an antenna ANTENNA IN CABLE IN ANTENNA IN 2 ANT IN VCR ANT OUT S-VIDEO OUT OUTPUT SWITCH 34 (R) AUDIO (L) IN VIDEO 1 1 Connect the RF antenna out socket of the VCR. 3 Set VCR output switch to 3 or 4 and then tune TV to the same channel number. 4 Insert a video...
... 1 Connect the AUDIO/VIDEO jacks between the VCR and TV. - If the 4:3 picture format is presumed that RGB and HDMI/DVI sources are connected. If connected to the VCR owner's manual.) CABLE IN When connecting with an antenna ANTENNA IN CABLE IN ANTENNA IN 2 ANT IN VCR ANT OUT S-VIDEO OUT OUTPUT SWITCH 34 (R) AUDIO (L) IN VIDEO 1 1 Connect the RF antenna out socket of the VCR. 3 Set VCR output switch to 3 or 4 and then tune TV to the same channel number. 4 Insert a video...
Owner's Manual (English)
Page 24
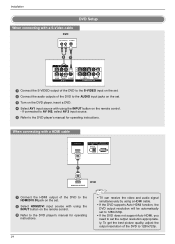
...; TV can receive the video and audio signal simultaneously by using a HDMI cable. • If the DVD supports Auto HDMI function, the DVD output resolution will be automatically set to 1280x720p. • If the DVD does not support Auto HDMI, you need to set . 2 Select HDMI/DVI input source with using the INPUT button on the remote control. - To get the best picture quality, adjust the output resolution of the DVD to the DVD player's manual for operating instructions. When connecting with a HDMI cable HDMI/DVI IN DIGITAL AUDIO RS-232C IN OUT (CONTROL&SERVICE) OPTICAL ) IO S-VIDEO...
...; TV can receive the video and audio signal simultaneously by using a HDMI cable. • If the DVD supports Auto HDMI function, the DVD output resolution will be automatically set to 1280x720p. • If the DVD does not support Auto HDMI, you need to set . 2 Select HDMI/DVI input source with using the INPUT button on the remote control. - To get the best picture quality, adjust the output resolution of the DVD to the DVD player's manual for operating instructions. When connecting with a HDMI cable HDMI/DVI IN DIGITAL AUDIO RS-232C IN OUT (CONTROL&SERVICE) OPTICAL ) IO S-VIDEO...
Owner's Manual (English)
Page 25
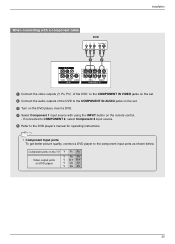
... component input ports as shown below. Installation When connecting with a component cable DVD B R (R) AUDIO (L) AV OUT 1 2 VIDEO (MONO) AUDIO AV IN 1 S-VIDEO VIDEO AUDIO COMPONENT IN HDMI/DVI IN DIGITAL AUDIO RS-232C OUT (CONTROL & SE OPTICAL 1 Connect the video outputs (Y, PB, PR) of the DVD to the COMPONENT IN VIDEO jacks on the set. 2 Connect the audio outputs of the DVD to the COMPONENT IN AUDIO jacks on the set. 3 Turn on the DVD player, insert a DVD. 4 Select Component 1 input source with using the INPUT button on DVD player Y Pb...
... component input ports as shown below. Installation When connecting with a component cable DVD B R (R) AUDIO (L) AV OUT 1 2 VIDEO (MONO) AUDIO AV IN 1 S-VIDEO VIDEO AUDIO COMPONENT IN HDMI/DVI IN DIGITAL AUDIO RS-232C OUT (CONTROL & SE OPTICAL 1 Connect the video outputs (Y, PB, PR) of the DVD to the COMPONENT IN VIDEO jacks on the set. 2 Connect the audio outputs of the DVD to the COMPONENT IN AUDIO jacks on the set. 3 Turn on the DVD player, insert a DVD. 4 Select Component 1 input source with using the INPUT button on DVD player Y Pb...
Owner's Manual (English)
Page 26
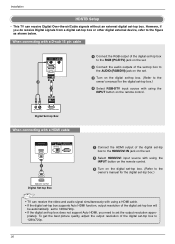
... TV can receive the video and audio signal simultaneously with using a HDMI cable. • If the digital set-top box supports Auto HDMI function, output resolution of the digital set-top box to the owner's manual for the digital set-top box.) • TV can receive Digital Over-the-air/Cable signals without an external digital set -top box. (Refer to AUDIO IN (RGB/DVI) REMOTE CONTROL 1280x720p. HDMI/DVI IN DIGITAL AUDIO RS-232C IN OUT (CONTROL & SERVICE) OPTICAL RGB IN REMOTE CONTROL IN AUDIO (RGB/DVI) RGB IN (PC/DTV) 26 RGB (PC/DTV) When connecting with...
... TV can receive the video and audio signal simultaneously with using a HDMI cable. • If the digital set-top box supports Auto HDMI function, output resolution of the digital set-top box to the owner's manual for the digital set-top box.) • TV can receive Digital Over-the-air/Cable signals without an external digital set -top box. (Refer to AUDIO IN (RGB/DVI) REMOTE CONTROL 1280x720p. HDMI/DVI IN DIGITAL AUDIO RS-232C IN OUT (CONTROL & SERVICE) OPTICAL RGB IN REMOTE CONTROL IN AUDIO (RGB/DVI) RGB IN (PC/DTV) 26 RGB (PC/DTV) When connecting with...
Owner's Manual (English)
Page 27
... box.) 4 Select HDMI/DVI inpAUuDIOt(RsGBo/DVuI) rce with using the INPUT button on the remote control. - To get the best picture quality, adjust the output resolution of the set-top box to the AUDIO (RGB/DVI) jack on the set. 3 AUDIO IN (RGB/DVI) RTEMuOTrEn CONTROL on the digital setR-GtBoINp bRoEMxOT.E (Refer CONTROL IN AUDIO IN (RGB/DVI) to the owner's manual for the digital RGB IN REMOTE CONTROL IN set . OPTICAL Turn on the digital set-top box. (Refer to the REMOTE CONTROL owner's manual for the digital set...
... box.) 4 Select HDMI/DVI inpAUuDIOt(RsGBo/DVuI) rce with using the INPUT button on the remote control. - To get the best picture quality, adjust the output resolution of the set-top box to the AUDIO (RGB/DVI) jack on the set. 3 AUDIO IN (RGB/DVI) RTEMuOTrEn CONTROL on the digital setR-GtBoINp bRoEMxOT.E (Refer CONTROL IN AUDIO IN (RGB/DVI) to the owner's manual for the digital RGB IN REMOTE CONTROL IN set . OPTICAL Turn on the digital set-top box. (Refer to the REMOTE CONTROL owner's manual for the digital set...
Owner's Manual (English)
Page 29
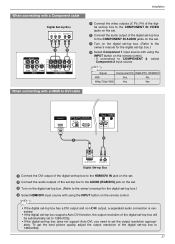
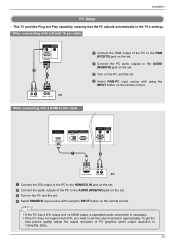
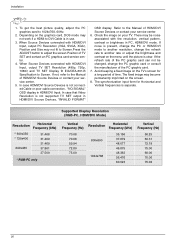
... support Auto DVI, you need to 1024x768, 60Hz. 29 This TV provides Plug and Play capability, meaning that the PC adjusts automatically to the AUDIO (RGB/DVI) jack on the set the output resolution appropriately. When connecting with a HDMI to DVI cable AUDIO RS-232C IN T (CONTROL & SERVICE) CAL AUDIO IN (RGB/DVI) REMOTE CONTROL RGB IN (PC/DTV) HDMI/DVI IN DIGITAL AUDIO RS-232C IN OUT (CONTROL&SERVICE) OPTICAL RGB IN REMOTE CONTROL IN AUDIO (RGB/DVI) RGB (PC/DTV) 1 2 DVI-PC OUTPUT (R) AUDIO (L) PC 1 Connect the DVI output...
... support Auto DVI, you need to 1024x768, 60Hz. 29 This TV provides Plug and Play capability, meaning that the PC adjusts automatically to the AUDIO (RGB/DVI) jack on the set the output resolution appropriately. When connecting with a HDMI to DVI cable AUDIO RS-232C IN T (CONTROL & SERVICE) CAL AUDIO IN (RGB/DVI) REMOTE CONTROL RGB IN (PC/DTV) HDMI/DVI IN DIGITAL AUDIO RS-232C IN OUT (CONTROL&SERVICE) OPTICAL RGB IN REMOTE CONTROL IN AUDIO (RGB/DVI) RGB (PC/DTV) 1 2 DVI-PC OUTPUT (R) AUDIO (L) PC 1 Connect the DVI output...
Owner's Manual (English)
Page 30
... HDMI/DVI Source Devices or contact your TV. The fixed image may not work if a HDMI to DVI Cable is clear. In case HDMI/DVI Source Devices is not supported TV SET output in HDMI/DVI Input. If noise is separate. When Source Devices connected with the resolution, vertical pattern, contrast or brightness in use. 3. There may not fit to Screen.Press the ADJUST button to the Manual of HDMI/DVI Source Devices or contact your service center. 6. Avoid keeping a fixed image on the menu until the picture...
... HDMI/DVI Source Devices or contact your TV. The fixed image may not work if a HDMI to DVI Cable is clear. In case HDMI/DVI Source Devices is not supported TV SET output in HDMI/DVI Input. If noise is separate. When Source Devices connected with the resolution, vertical pattern, contrast or brightness in use. 3. There may not fit to Screen.Press the ADJUST button to the Manual of HDMI/DVI Source Devices or contact your service center. 6. Avoid keeping a fixed image on the menu until the picture...
Owner's Manual (English)
Page 32
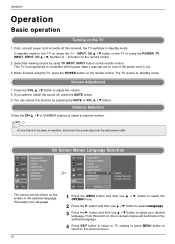
... a channel number. • If you want to standby mode. This TV is out. 3. First, connect power cord correctly. Select the viewing source by pressing the MUTE or VOL D / E button. You can be away on the remote control. First select your desired language. At this function by using the TV, press the POWER button on -screen menus will be shown in the selected language. On Screen Menus Language Selection SETUP VIDEO AUDIO TIME OPTION...
... a channel number. • If you want to standby mode. This TV is out. 3. First, connect power cord correctly. Select the viewing source by pressing the MUTE or VOL D / E button. You can be away on the remote control. First select your desired language. At this function by using the TV, press the POWER button on -screen menus will be shown in the selected language. On Screen Menus Language Selection SETUP VIDEO AUDIO TIME OPTION...
Owner's Manual (English)
Page 33
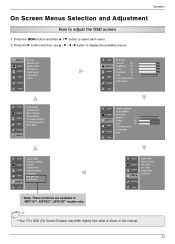
... Off Timer On Timer Sleep Timer Auto Off OPTION LOCK • Your TV's OSD (On Screen Display) may differ slightly from what is shown in 42PC1D**, 42PC3D**, 50PC3D** models only. Press the G button and then use D / E / F / G button to display the available menus. SETUP G VIDEO AUDIO TIME EZ Scan Manual Scan Channel Edit DTV Signal Input Source Input Label Set ID OPTION LOCK SETUP EZ Picture Contrast 85 VIDEO G Brightness 50 Color 50 AUDIO Sharpness 50 Tint 0 R G TIME Color Temperature OPTION Video Reset LOCK SETUP VIDEO AUDIO TIME Lock System Set Password Block...
... Off Timer On Timer Sleep Timer Auto Off OPTION LOCK • Your TV's OSD (On Screen Display) may differ slightly from what is shown in 42PC1D**, 42PC3D**, 50PC3D** models only. Press the G button and then use D / E / F / G button to display the available menus. SETUP G VIDEO AUDIO TIME EZ Scan Manual Scan Channel Edit DTV Signal Input Source Input Label Set ID OPTION LOCK SETUP EZ Picture Contrast 85 VIDEO G Brightness 50 Color 50 AUDIO Sharpness 50 Tint 0 R G TIME Color Temperature OPTION Video Reset LOCK SETUP VIDEO AUDIO TIME Lock System Set Password Block...
Owner's Manual (English)
Page 34
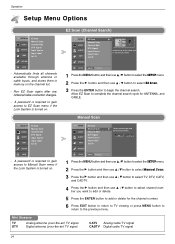
...air) TV signal Digital antenna (over-the-air) TV signal CATV Analog cable TV signal CADTV Digital cable TV signal 34 Automatically finds all channels available through antenna or cable inputs, and stores them in memory on . Run EZ Scan again after any Antenna/Cable connection changes. - A password is turned on. Operation Setup Menu Options EZ Scan (Channel Search) SETUP G VIDEO AUDIO TIME EZ Scan Manual Scan Channel Edit DTV Signal Input Source Input Label Set ID OPTION LOCK - A password is turned on the channel list. - TV 2 1 Press the MENU button and then use D / E button to...
...air) TV signal Digital antenna (over-the-air) TV signal CATV Analog cable TV signal CADTV Digital cable TV signal 34 Automatically finds all channels available through antenna or cable inputs, and stores them in memory on . Run EZ Scan again after any Antenna/Cable connection changes. - A password is turned on. Operation Setup Menu Options EZ Scan (Channel Search) SETUP G VIDEO AUDIO TIME EZ Scan Manual Scan Channel Edit DTV Signal Input Source Input Label Set ID OPTION LOCK - A password is turned on the channel list. - TV 2 1 Press the MENU button and then use D / E button to...
Owner's Manual (English)
Page 36
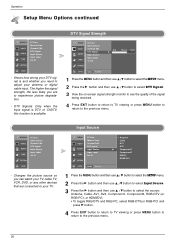
Input Source SETUP VIDEO AUDIO TIME EZ Scan Manual Scan Channel Edit DTV Signal Input Source Input Label Set ID OPTION LOCK MENU Previous Antenna Cable AV1 AV2 G Component1 Component2 RGB-PC HDMI/DVI 1 Press the MENU button and then use D / E button to select the SETUP menu. 2 Press the G button and then use D / E button to select Input Source. 3 Press the G button and then use D / E button to select DTV Signal. 3 View the on-screen signal strength monitor to see the quality of the signal being received. 4 Press EXIT button to return to TV viewing or press MENU button to...
Input Source SETUP VIDEO AUDIO TIME EZ Scan Manual Scan Channel Edit DTV Signal Input Source Input Label Set ID OPTION LOCK MENU Previous Antenna Cable AV1 AV2 G Component1 Component2 RGB-PC HDMI/DVI 1 Press the MENU button and then use D / E button to select the SETUP menu. 2 Press the G button and then use D / E button to select Input Source. 3 Press the G button and then use D / E button to select DTV Signal. 3 View the on-screen signal strength monitor to see the quality of the signal being received. 4 Press EXIT button to return to TV viewing or press MENU button to...
Owner's Manual (English)
Page 55
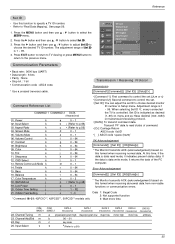
... 1: Illegal Code 2: Not supported function 3: Wait more time COM- Use this format when receiving abnormal data from non-viable functions or communication errors. Press the MENU button and then use D / E button to the previous menu. VIDEO AUDIO Channel Edit DTV Signal Input Source 2. Aspect Ratio k 04. Contrast k 08. Sharpness k 12. Color Temperature k 18. Error Acknowledgement [Command2][ ][Set ID][ ][NG][Data][x] * The Monitor transmits ACK (acknowledgement) based on this function to specify a TV ID number. - Input Select...
... 1: Illegal Code 2: Not supported function 3: Wait more time COM- Use this format when receiving abnormal data from non-viable functions or communication errors. Press the MENU button and then use D / E button to the previous menu. VIDEO AUDIO Channel Edit DTV Signal Input Source 2. Aspect Ratio k 04. Contrast k 08. Sharpness k 12. Color Temperature k 18. Error Acknowledgement [Command2][ ][Set ID][ ][NG][Data][x] * The Monitor transmits ACK (acknowledgement) based on this function to specify a TV ID number. - Input Select...
Owner's Manual (English)
Page 62
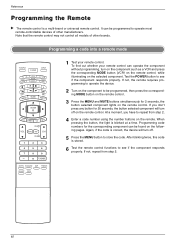
... the remote control. Programming code numbers for 2 seconds, the button selected component lights on the remote control. If not, repeat from step 2. 4 Enter a code number using the number buttons on the following pages. Note that the remote control may not control all models of other brands. Programming a code into a remote mode TV INPUT POWER TV AUDIO DVD MODE CABLE INPUT VCR STB DAY MENU GUIDE DAY+ RATIO ENTER EXIT TIMER CC INFO PAGE VOL MUTE FAV CH PAGE 1 2 3 4 5 6 7 8 9 0 FLASHBK EZ PIC EZ SOUND SAP FREEZE ADJUST...
... the remote control. Programming code numbers for 2 seconds, the button selected component lights on the remote control. If not, repeat from step 2. 4 Enter a code number using the number buttons on the following pages. Note that the remote control may not control all models of other brands. Programming a code into a remote mode TV INPUT POWER TV AUDIO DVD MODE CABLE INPUT VCR STB DAY MENU GUIDE DAY+ RATIO ENTER EXIT TIMER CC INFO PAGE VOL MUTE FAV CH PAGE 1 2 3 4 5 6 7 8 9 0 FLASHBK EZ PIC EZ SOUND SAP FREEZE ADJUST...
Owner's Manual (English)
Page 66
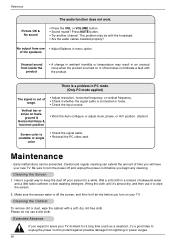
... color • Check the signal cable. • Reinstall the PC video card. Please do not use it whether the signal cable is connected or loose. • Check the input source. • Work the Auto configure or adjust clock, phase, or H/V position. (Option) Screen color is off and unplug the power cord before you turn the power off the screen, and then let it 's a good idea to unplug the power cord to wipe the screen...
... color • Check the signal cable. • Reinstall the PC video card. Please do not use it whether the signal cable is connected or loose. • Check the input source. • Work the Auto configure or adjust clock, phase, or H/V position. (Option) Screen color is off and unplug the power cord before you turn the power off the screen, and then let it 's a good idea to unplug the power cord to wipe the screen...


