Specification (English)
Page 1
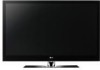
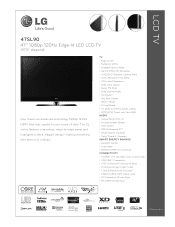
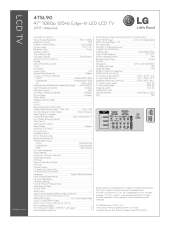
LCD TV 47SL90 47" 1080p 120Hz Edge-lit LED LCD TV (47.0" diagonal) Now there's an advanced-technology 1080p 120Hz HDTV that truly speaks to -edge panel and highlights a sleek, elegant design-making everything else seem just ordinary. The SL series features a seamless, edge-to your sense of style. TV • Edge-lit LED • TruMotion 120Hz • Intelligent...
LCD TV 47SL90 47" 1080p 120Hz Edge-lit LED LCD TV (47.0" diagonal) Now there's an advanced-technology 1080p 120Hz HDTV that truly speaks to -edge panel and highlights a sleek, elegant design-making everything else seem just ordinary. The SL series features a seamless, edge-to your sense of style. TV • Edge-lit LED • TruMotion 120Hz • Intelligent...
Specification (English)
Page 2
...; Quick Setup Guide • e-Manual • Parental Control w/V-Chip • Key Lock • Closed Caption • LG SIMPLINK (HDMI CEC) • CONVENIENCE FEATURES Language English/Spanish/French Auto Tuning/Programming • Channel Add/Delete • Channel...INPUTS/OUTPUTS (CONTINUED) HDMI/HDCP Input 3 (V.1.3 with Deep Color) RGB In (D-Sub 15pin) - LCD TV 47SL90 47" 1080p 120Hz Edge-lit LED LCD TV (47.0" diagonal) LGusa.com LCD SPECIFICATION Native Display Resolution 1920 x 1080p Brightness (cd/m2) 500 Dynamic Contrast Ratio 3,000,000:1 ...
...; Quick Setup Guide • e-Manual • Parental Control w/V-Chip • Key Lock • Closed Caption • LG SIMPLINK (HDMI CEC) • CONVENIENCE FEATURES Language English/Spanish/French Auto Tuning/Programming • Channel Add/Delete • Channel...INPUTS/OUTPUTS (CONTINUED) HDMI/HDCP Input 3 (V.1.3 with Deep Color) RGB In (D-Sub 15pin) - LCD TV 47SL90 47" 1080p 120Hz Edge-lit LED LCD TV (47.0" diagonal) LGusa.com LCD SPECIFICATION Native Display Resolution 1920 x 1080p Brightness (cd/m2) 500 Dynamic Contrast Ratio 3,000,000:1 ...
Owner's Manual (English)
Page 1
...-243-0000 USA, Consumer User 1-888-865-3026 USA, Commercial User 1-888-542-2623 CANADA LG Customer Information Center P/NO : SAC33601911 (0910-REV01) www.lgusa.com / www.lg.ca LED LCD TV OWNER'S MANUAL 42LH90 47LH90 55LH90 42SL90 47SL90 LCD TV OWNER'S MANUAL 42SL80 47SL80 Please read this manual carefully before operating your set and retain it...
...-243-0000 USA, Consumer User 1-888-865-3026 USA, Commercial User 1-888-542-2623 CANADA LG Customer Information Center P/NO : SAC33601911 (0910-REV01) www.lgusa.com / www.lg.ca LED LCD TV OWNER'S MANUAL 42LH90 47LH90 55LH90 42SL90 47SL90 LCD TV OWNER'S MANUAL 42SL80 47SL80 Please read this manual carefully before operating your set and retain it...

Owner's Manual (English)
Page 2
...of the device). This equipment generates, uses and can be determined by turning the equipment off and on a circuit different from LG Electronics. Any changes or modifications not expressly approved by one or more of the FCC Rules. WARNING/CAUTION TO REDUCE THE RISK... interference that may cause harmful interference to the grounding system of the building, as practical. Consult the dealer or an experienced radio/TV technician for compliance could void the user's authority to correct the interference by the party responsible for help. Reorient or relocate the ...
...of the device). This equipment generates, uses and can be determined by turning the equipment off and on a circuit different from LG Electronics. Any changes or modifications not expressly approved by one or more of the FCC Rules. WARNING/CAUTION TO REDUCE THE RISK... interference that may cause harmful interference to the grounding system of the building, as practical. Consult the dealer or an experienced radio/TV technician for compliance could void the user's authority to correct the interference by the party responsible for help. Reorient or relocate the ...
Owner's Manual (English)
Page 4
...Never touch this product near flammable objects such as gasoline or candles or expose the TV to direct air conditioning. 16 Do not expose to dripping or splashing and do not... the hanging power and signal cables on the wall, make the TV with the power cord plugged in fire or electric shock. Pay particular attention to unplug the TV. 4 15 WARNING - To reduce the risk of these conditions ...of the appliance, and have a qualified electrician install a separate circuit breaker. Do not touch the TV with a three-prong grounded AC plug must remain readily operable. 19 As long as this unit ...
...Never touch this product near flammable objects such as gasoline or candles or expose the TV to direct air conditioning. 16 Do not expose to dripping or splashing and do not... the hanging power and signal cables on the wall, make the TV with the power cord plugged in fire or electric shock. Pay particular attention to unplug the TV. 4 15 WARNING - To reduce the risk of these conditions ...of the appliance, and have a qualified electrician install a separate circuit breaker. Do not touch the TV with a three-prong grounded AC plug must remain readily operable. 19 As long as this unit ...
Owner's Manual (English)
Page 5
An outdoor antenna system should not be carried out in contact with respect to carry larger TVs. Do not press against or put stress on the monitor's performance. Avoid touching the LCD screen or holding your finger(s) against voltage surges and built-up static charges. Doing so may take 2... the National Electrical Code, ANSI/NFPA 70 Ground Clamp Antenna Lead in the U.S.A. Do not install in this product with TV. ON DISPOSAL (Only Hg lamp used LCD TV) The fluorescent lamp used in excessively dusty places. 24 If you smell smoke or other liquids directly on . Do not...
An outdoor antenna system should not be carried out in contact with respect to carry larger TVs. Do not press against or put stress on the monitor's performance. Avoid touching the LCD screen or holding your finger(s) against voltage surges and built-up static charges. Doing so may take 2... the National Electrical Code, ANSI/NFPA 70 Ground Clamp Antenna Lead in the U.S.A. Do not install in this product with TV. ON DISPOSAL (Only Hg lamp used LCD TV) The fluorescent lamp used in excessively dusty places. 24 If you smell smoke or other liquids directly on . Do not...
Owner's Manual (English)
Page 6
...Power Indicator 84 Demo Mode 85 LED Local Dimming 86 Add / Delete Channel (Manual Tuning 47 - Auto Scan (Auto Tuning 46 - CONTENTS WARNING / CAUTION 2 SAFETY INSTRUCTIONS 3 FEATURE OF THIS TV 8 PREPARATION Accessories 9 Front Panel Information 10 Back Panel Information 12 Stand Instructions 14 VESA ...Setup 29 PC Setup 30 Other A/V Source Setup 36 USB Connection 36 Audio out Connection 37 WATCHING TV / CHANNEL CONTROL Remote Control Functions 38 Turning On the TV 42 Channel Selection 42 Volume Adjustment 42 Initial Setting 43 On-Screen Menus Selection 44 Quick Menu ...
...Power Indicator 84 Demo Mode 85 LED Local Dimming 86 Add / Delete Channel (Manual Tuning 47 - Auto Scan (Auto Tuning 46 - CONTENTS WARNING / CAUTION 2 SAFETY INSTRUCTIONS 3 FEATURE OF THIS TV 8 PREPARATION Accessories 9 Front Panel Information 10 Back Panel Information 12 Stand Instructions 14 VESA ...Setup 29 PC Setup 30 Other A/V Source Setup 36 USB Connection 36 Audio out Connection 37 WATCHING TV / CHANNEL CONTROL Remote Control Functions 38 Turning On the TV 42 Channel Selection 42 Volume Adjustment 42 Initial Setting 43 On-Screen Menus Selection 44 Quick Menu ...
Owner's Manual (English)
Page 7
User Mode 90 Balance 91 TV Speakers On/Off Setup 92 Audio Reset 93 Stereo/SAP Broadcast Setup 94 Audio Language 95 On-Screen Menus Language Selection 96 Caption Mode - Auto ... Clock Setup 101 Auto On/Off Time Setting 102 Sleep Timer Setting 103 PARENTAL CONTROL / RATINGS Set Password & Lock System 104 Channel Blocking 107 Movie & TV Rating 108 Downloadable Rating 113 External Input Blocking 114 APPENDIX Troubleshooting 115 Maintenance 117 Product Specifications 118 IR Codes 119 External Control Through RS-232C...
User Mode 90 Balance 91 TV Speakers On/Off Setup 92 Audio Reset 93 Stereo/SAP Broadcast Setup 94 Audio Language 95 On-Screen Menus Language Selection 96 Caption Mode - Auto ... Clock Setup 101 Auto On/Off Time Setting 102 Sleep Timer Setting 103 PARENTAL CONTROL / RATINGS Set Password & Lock System 104 Channel Blocking 107 Movie & TV Rating 108 Downloadable Rating 113 External Input Blocking 114 APPENDIX Troubleshooting 115 Maintenance 117 Product Specifications 118 IR Codes 119 External Control Through RS-232C...

Owner's Manual (English)
Page 8
... are trademarks or registered trademarks of SRS Labs, Inc. "DivX Certified to play DivX Video-on the screen. Please contact your TV screen for a prolonged period (2 or more hours for LCD, 1 or more hours for a more pixels, 16:9 aspect-ratio screens, and AC3 digital audio. The resulting ISF "day"... une reproduction d'image nette. THX (Thomlinson Holman's Experiment) is a digital video format created by the user to experience the best their LG HDTV has to offer. ABOUT DIVX VIDEO-ON-DEMAND: This DivX Certified® device must be made through the ISFccc mode. FEATURE OF THIS...
... are trademarks or registered trademarks of SRS Labs, Inc. "DivX Certified to play DivX Video-on the screen. Please contact your TV screen for a prolonged period (2 or more hours for LCD, 1 or more hours for a more pixels, 16:9 aspect-ratio screens, and AC3 digital audio. The resulting ISF "day"... une reproduction d'image nette. THX (Thomlinson Holman's Experiment) is a digital video format created by the user to experience the best their LG HDTV has to offer. ABOUT DIVX VIDEO-ON-DEMAND: This DivX Certified® device must be made through the ISFccc mode. FEATURE OF THIS...

Owner's Manual (English)
Page 9
...(D-sub 15 pin cable) PC connection, the user must use shielded signal interface cables with the polishing cloth. * Do not wipe roughly. Only 42/47/55LH90 (For 42/47LH90) (For 42LH90) x 4 Screws for stand assembly Screw for stand fixing (Refer to P.14) (Refer to P.21) Protection ...Cover Only 42/47SL90 x 3 x 4 20mm 16mm Bolts for stand assembly Cable Management Clip (Refer to P.16) (Refer to P.19) VOL TV/INPUT CH 1.5V 1.5V FLASHBK Simple Remote Control, Batteries Cable Holder (Refer to P.19) Only ...
...(D-sub 15 pin cable) PC connection, the user must use shielded signal interface cables with the polishing cloth. * Do not wipe roughly. Only 42/47/55LH90 (For 42/47LH90) (For 42LH90) x 4 Screws for stand assembly Screw for stand fixing (Refer to P.14) (Refer to P.21) Protection ...Cover Only 42/47SL90 x 3 x 4 20mm 16mm Bolts for stand assembly Cable Management Clip (Refer to P.16) (Refer to P.19) VOL TV/INPUT CH 1.5V 1.5V FLASHBK Simple Remote Control, Batteries Cable Holder (Refer to P.19) Only ...

Owner's Manual (English)
Page 10
... ON Main power switch (For 42/47SL80) ! The floor or the product may break, causing possible injury from your TV. 42/47/55LH90 PREPARATION SPEAKER AC power control switch Remote Control Sensor, Intelligent Sensor Adjusts picture according to the surrounding conditions Power/Standby Indicator Illuminates ... Buttons ENTER MENU INPUT POWER Button Button Button Button VOL ENTER MENU INPUT Power/Standby Indicator Illuminates red in standby mode. Illuminates blue when the TV is switched on (Can be adjusted using the Power Indicator in the OPTION menu. Illuminates white when the...
... ON Main power switch (For 42/47SL80) ! The floor or the product may break, causing possible injury from your TV. 42/47/55LH90 PREPARATION SPEAKER AC power control switch Remote Control Sensor, Intelligent Sensor Adjusts picture according to the surrounding conditions Power/Standby Indicator Illuminates ... Buttons ENTER MENU INPUT POWER Button Button Button Button VOL ENTER MENU INPUT Power/Standby Indicator Illuminates red in standby mode. Illuminates blue when the TV is switched on (Can be adjusted using the Power Indicator in the OPTION menu. Illuminates white when the...

Owner's Manual (English)
Page 11
...I Image shown may differ from fragments of glass, or the TV may fall. Illuminates white when the TV is switched on the glass stand or subject it to any impact.It may break, causing possible injury from your TV. 42/47SL90 CH CHANNEL (D,E) Buttons VOLUME (+, -) VOL Buttons OFF ON ...Main power switch (For 42/47SL90) ENTER MENU INPUT ENTER Button MENU Button INPUT Button POWER Button Remote Control Sensor Intelligent ...
...I Image shown may differ from fragments of glass, or the TV may fall. Illuminates white when the TV is switched on the glass stand or subject it to any impact.It may break, causing possible injury from your TV. 42/47SL90 CH CHANNEL (D,E) Buttons VOLUME (+, -) VOL Buttons OFF ON ...Main power switch (For 42/47SL90) ENTER MENU INPUT ENTER Button MENU Button INPUT Button POWER Button Remote Control Sensor Intelligent ...

Owner's Manual (English)
Page 13
PREPARATION AV IN COMPONENT IN 42/47SL90 IN 4 USB IN ( ) 9 2 /DVI IN 3 2 1 4 3 6 5 RGB IN (PC) (CONTROL&SERVICE) RS-232C IN DIGITAL AUDIO OUT AUDIO IN VIDEO L(MONO) AUDIO R OPTICAL (RGB/DVI) ( ) 1 VIDEO 2 L R 1 ... for use with AC power. Supports HD. Caution: Never attempt to this jack. Supports HD video and Digital audio. Connect cable signals to operate the TV on DC power. 13 Accepts DVI video using an adapter or HDMI to this jack. 6 RS-232C IN (CONTROL & SERVICE) Used by third party devices...
PREPARATION AV IN COMPONENT IN 42/47SL90 IN 4 USB IN ( ) 9 2 /DVI IN 3 2 1 4 3 6 5 RGB IN (PC) (CONTROL&SERVICE) RS-232C IN DIGITAL AUDIO OUT AUDIO IN VIDEO L(MONO) AUDIO R OPTICAL (RGB/DVI) ( ) 1 VIDEO 2 L R 1 ... for use with AC power. Supports HD. Caution: Never attempt to this jack. Supports HD video and Digital audio. Connect cable signals to operate the TV on DC power. 13 Accepts DVI video using an adapter or HDMI to this jack. 6 RS-232C IN (CONTROL & SERVICE) Used by third party devices...

Owner's Manual (English)
Page 14
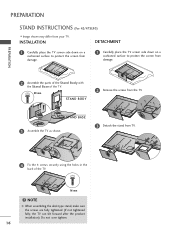
... protect the screen from damage. 1 Carefully place the TV screen side down on a cushioned surface to the TV as shown. 2 Remove the screws from the TV. 3 Detach the stand from your TV. Do not over tighten. PREPARATION STAND INSTRUCTIONS (For 42/47/55LH90) I Image shown may differ from TV. 3 Fix the 4 screws securely using the holes...
... protect the screen from damage. 1 Carefully place the TV screen side down on a cushioned surface to the TV as shown. 2 Remove the screws from the TV. 3 Detach the stand from your TV. Do not over tighten. PREPARATION STAND INSTRUCTIONS (For 42/47/55LH90) I Image shown may differ from TV. 3 Fix the 4 screws securely using the holes...

Owner's Manual (English)
Page 15
...tighten. 15 Do not over the hole for the stand. STAND BASE 3 Assemble the TV as shown. 3 Detach the stand from damage. 2 Assemble the parts of the Stand Body with the Stand Base of the TV. NOTE G When assembling the desk type stand, make sure the screws are fully tightened ...surface to protect the screen from damage. 1 Carefully place the TV screen side down on a cushioned surface to protect the screen from TV. 4 Fix the 4 screws securely using the holes in the back of the TV. Press the PROTECTION COVER into the TV until you hear it click. ! PREPARATION STAND INSTRUCTIONS (For 42...
...tighten. 15 Do not over the hole for the stand. STAND BASE 3 Assemble the TV as shown. 3 Detach the stand from damage. 2 Assemble the parts of the Stand Body with the Stand Base of the TV. NOTE G When assembling the desk type stand, make sure the screws are fully tightened ...surface to protect the screen from damage. 1 Carefully place the TV screen side down on a cushioned surface to protect the screen from TV. 4 Fix the 4 screws securely using the holes in the back of the TV. Press the PROTECTION COVER into the TV until you hear it click. ! PREPARATION STAND INSTRUCTIONS (For 42...
Owner's Manual (English)
Page 16
... the 4 screws securely using the holes in the back of the TV. 20 mm STAND BODY 2 Remove the screws from the TV. Do not over tighten. 16 PREPARATION PREPARATION STAND INSTRUCTIONS (For 42/47SL90) I Image shown may differ from damage. 2 Assemble the parts of the Stand Body with the Stand ...Base of the TV. 16 mm ! NOTE G When assembling the desk type stand, ...
... the 4 screws securely using the holes in the back of the TV. 20 mm STAND BODY 2 Remove the screws from the TV. Do not over tighten. 16 PREPARATION PREPARATION STAND INSTRUCTIONS (For 42/47SL90) I Image shown may differ from damage. 2 Assemble the parts of the Stand Body with the Stand ...Base of the TV. 16 mm ! NOTE G When assembling the desk type stand, ...
Owner's Manual (English)
Page 17
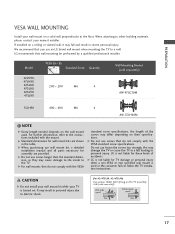
... cause the TV to the floor. NOTE G Screw length needed depends on . LG is not liable for assembly are shown in personal injury due to electric shock. (For 42/47SL80, 42/47SL90) Use screws 12mm (±0.5) long on a ceiling or slanted wall, it may differ depending on a solid ... fall and result in severe personal injury. CAUTION G Do not install your wall mount kit while your TV is used . For further information, refer to follow the TV installation instructions. G LG is not liable for wall mount kits are provided. With guide spacer Without guide spacer 12mm 12mm 17 ...
... cause the TV to the floor. NOTE G Screw length needed depends on . LG is not liable for assembly are shown in personal injury due to electric shock. (For 42/47SL80, 42/47SL90) Use screws 12mm (±0.5) long on a ceiling or slanted wall, it may differ depending on a solid ... fall and result in severe personal injury. CAUTION G Do not install your wall mount kit while your TV is used . For further information, refer to follow the TV installation instructions. G LG is not liable for wall mount kits are provided. With guide spacer Without guide spacer 12mm 12mm 17 ...

Owner's Manual (English)
Page 18
... MANAGEMENT CLIP as necessary. Install CABLE HOLDER as shown. CABLE HOLDER ! NOTE G Do not hold the CABLE MANAGEMENT CLIP when moving the TV. - CABLE MANAGEMENT CLIP 2 Connect the cables as necessary. CABLE MANAGEMENT CLIP 3 Put the cables inside the CABLE MANAGEMENT CLIP and snap it...EXTERNAL EQUIPMENT SETUP section. To connect additional equipment, see the EXTERNAL EQUIPMENT SETUP section. If the TV is dropped, you may be injured or the product may differ from your TV. 42/47/55LH90 1 Connect the cables as shown. PREPARATION CABLE MANAGEMENT I Image shown may be broken. ...
... MANAGEMENT CLIP as necessary. Install CABLE HOLDER as shown. CABLE HOLDER ! NOTE G Do not hold the CABLE MANAGEMENT CLIP when moving the TV. - CABLE MANAGEMENT CLIP 2 Connect the cables as necessary. CABLE MANAGEMENT CLIP 3 Put the cables inside the CABLE MANAGEMENT CLIP and snap it...EXTERNAL EQUIPMENT SETUP section. To connect additional equipment, see the EXTERNAL EQUIPMENT SETUP section. If the TV is dropped, you may be injured or the product may differ from your TV. 42/47/55LH90 1 Connect the cables as shown. PREPARATION CABLE MANAGEMENT I Image shown may be broken. ...

Owner's Manual (English)
Page 19
... dropped, you may be injured or the product may differ from your TV. 42/47SL90 FOR DESK-TYPE STAND 1 Install the CABLE MANAGEMENT CLIP as necessary. Install CABLE HOLDER as necessary. To connect additional equipment, see the EXTERNAL ...EQUIPMENT SETUP section. NOTE G Do not hold the CABLE MANAGEMENT CLIP when moving the TV. - To connect additional equipment, see the EXTERNAL EQUIPMENT SETUP section. FOR...
... dropped, you may be injured or the product may differ from your TV. 42/47SL90 FOR DESK-TYPE STAND 1 Install the CABLE MANAGEMENT CLIP as necessary. Install CABLE HOLDER as necessary. To connect additional equipment, see the EXTERNAL ...EQUIPMENT SETUP section. NOTE G Do not hold the CABLE MANAGEMENT CLIP when moving the TV. - To connect additional equipment, see the EXTERNAL EQUIPMENT SETUP section. FOR...
Owner's Manual (English)
Page 20
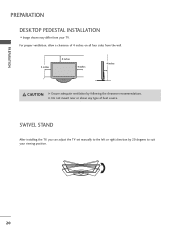
For proper ventilation, allow a clearance of heat source. PREPARATION PREPARATION DESKTOP PEDESTAL INSTALLATION I Image shown may differ from the wall. 4 inches 4 inches 4 inches 4 inches CAUTION G Ensure adequate ventilation by 20 degrees to the left or right direction by following the clearance recommendations. G Do not mount near or above any type of 4 inches on all four sides from your viewing position. 20 SWIVEL STAND After installing the TV, you can adjust the TV set manually to suit your TV.
For proper ventilation, allow a clearance of heat source. PREPARATION PREPARATION DESKTOP PEDESTAL INSTALLATION I Image shown may differ from the wall. 4 inches 4 inches 4 inches 4 inches CAUTION G Ensure adequate ventilation by 20 degrees to the left or right direction by following the clearance recommendations. G Do not mount near or above any type of 4 inches on all four sides from your viewing position. 20 SWIVEL STAND After installing the TV, you can adjust the TV set manually to suit your TV.


