Specification (English)
Page 2
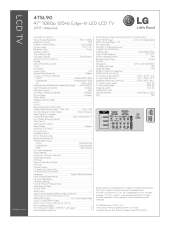
... POWER Voltage, Hz 100V ~ 240V, 50/60 Hz On Mode (Average) TBD Stand-by Mode Component 1080p/1080i/720p - HDMI 60p/30p/24p - RGB 60p (WXGA...• Parental Control w/V-Chip • Key Lock • Closed Caption • LG SIMPLINK (HDMI CEC) • CONVENIENCE FEATURES Language English/Spanish/French Auto Tuning/Programming &#...HDMI 1080p/1080i/720p - Component 60p/30p/24p - LCD TV 47SL90 47" 1080p 120Hz Edge-lit LED LCD TV (47.0" diagonal) LGusa.com LCD SPECIFICATION Native Display Resolution 1920 x 1080p Brightness (cd/m2...
... POWER Voltage, Hz 100V ~ 240V, 50/60 Hz On Mode (Average) TBD Stand-by Mode Component 1080p/1080i/720p - HDMI 60p/30p/24p - RGB 60p (WXGA...• Parental Control w/V-Chip • Key Lock • Closed Caption • LG SIMPLINK (HDMI CEC) • CONVENIENCE FEATURES Language English/Spanish/French Auto Tuning/Programming &#...HDMI 1080p/1080i/720p - Component 60p/30p/24p - LCD TV 47SL90 47" 1080p 120Hz Edge-lit LED LCD TV (47.0" diagonal) LGusa.com LCD SPECIFICATION Native Display Resolution 1920 x 1080p Brightness (cd/m2...

Owner's Manual (English)
Page 3
... ventilation openings. supply cord or plug is required when the apparatus has been damaged in accordance with the manufacturer's instructions. 8 Use only with the cart, stand, tripod, bracket, or table specified by the manufacturer. 3 Do not block any heat sources such as power- bination to qualified service personnel. A grounding type plug...
... ventilation openings. supply cord or plug is required when the apparatus has been damaged in accordance with the manufacturer's instructions. 8 Use only with the cart, stand, tripod, bracket, or table specified by the manufacturer. 3 Do not block any heat sources such as power- bination to qualified service personnel. A grounding type plug...
Owner's Manual (English)
Page 6
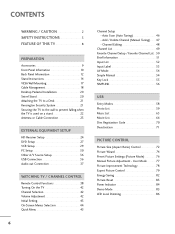
... Local Dimming 86 Add / Delete Channel (Manual Tuning 47 - Auto Scan (Auto Tuning 46 - CONTENTS WARNING / CAUTION 2 SAFETY INSTRUCTIONS 3 FEATURE OF THIS TV 8 PREPARATION Accessories 9 Front Panel Information 10 Back Panel Information 12 Stand Instructions 14 VESA Wall Mounting 17 Cable Management 18 Desktop... Pedestal Installation 20 Swivel Stand 20 Attaching the TV to a Desk 21 Kensington Security System 21 Securing the TV to the wall to prevent falling when the TV is used on a stand 22 Antenna or Cable Connection 23 EXTERNAL EQUIPMENT SETUP...
... Local Dimming 86 Add / Delete Channel (Manual Tuning 47 - Auto Scan (Auto Tuning 46 - CONTENTS WARNING / CAUTION 2 SAFETY INSTRUCTIONS 3 FEATURE OF THIS TV 8 PREPARATION Accessories 9 Front Panel Information 10 Back Panel Information 12 Stand Instructions 14 VESA Wall Mounting 17 Cable Management 18 Desktop... Pedestal Installation 20 Swivel Stand 20 Attaching the TV to a Desk 21 Kensington Security System 21 Securing the TV to the wall to prevent falling when the TV is used on a stand 22 Antenna or Cable Connection 23 EXTERNAL EQUIPMENT SETUP...

Owner's Manual (English)
Page 9
... with ferrite cores to P.18) 9 Only 42/47/55LH90 (For 42/47LH90) (For 42LH90) x 4 Screws for stand assembly Screw for stand fixing (Refer to P.14) (Refer to P.21) Protection Cover Only 42/47SL90 x 3 x 4 20mm 16mm Bolts for stand assembly Cable Management Clip (Refer to P.16) (... not wipe roughly. The accessories included may cause scratches or discoloration. POWER 7 LIST 1ENERGY SAVING MODAVE 42 53 86 ON/OFF TV INPUT POWER 1 ENERGY SAVING ON/OFF AV MODE TV 4 2 INPUT 09 VOL FMAAVRK/ FLASHBK 7 5 3 8 6 MENU ENTER MUTE RATIO Q.MENU CH P A G E or INFO ...
... with ferrite cores to P.18) 9 Only 42/47/55LH90 (For 42/47LH90) (For 42LH90) x 4 Screws for stand assembly Screw for stand fixing (Refer to P.14) (Refer to P.21) Protection Cover Only 42/47SL90 x 3 x 4 20mm 16mm Bolts for stand assembly Cable Management Clip (Refer to P.16) (... not wipe roughly. The accessories included may cause scratches or discoloration. POWER 7 LIST 1ENERGY SAVING MODAVE 42 53 86 ON/OFF TV INPUT POWER 1 ENERGY SAVING ON/OFF AV MODE TV 4 2 INPUT 09 VOL FMAAVRK/ FLASHBK 7 5 3 8 6 MENU ENTER MUTE RATIO Q.MENU CH P A G E or INFO ...

Owner's Manual (English)
Page 10
...mode. NOTE G Do not step on (Can be adjusted using the Power Indicator in standby mode. Illuminates white when the TV is switched on the glass stand or subject it to any impact.It may be damaged. 10 The floor or the product may break, causing possible injury... from your TV. 42/47/55LH90 PREPARATION SPEAKER AC power control switch Remote Control Sensor, Intelligent Sensor Adjusts picture according to the surrounding ...
...mode. NOTE G Do not step on (Can be adjusted using the Power Indicator in standby mode. Illuminates white when the TV is switched on the glass stand or subject it to any impact.It may be damaged. 10 The floor or the product may break, causing possible injury... from your TV. 42/47/55LH90 PREPARATION SPEAKER AC power control switch Remote Control Sensor, Intelligent Sensor Adjusts picture according to the surrounding ...

Owner's Manual (English)
Page 11
.... 11 G p.84). ! G Do not drag the TV. PREPARATION I Image shown may differ from fragments of glass, or the TV may fall. Illuminates white when the TV is switched on the glass stand or subject it to any impact.It may break, causing possible injury from your TV. 42/47SL90 CH CHANNEL (D,E) Buttons VOLUME (+, -) VOL Buttons OFF...
.... 11 G p.84). ! G Do not drag the TV. PREPARATION I Image shown may differ from fragments of glass, or the TV may fall. Illuminates white when the TV is switched on the glass stand or subject it to any impact.It may break, causing possible injury from your TV. 42/47SL90 CH CHANNEL (D,E) Buttons VOLUME (+, -) VOL Buttons OFF...

Owner's Manual (English)
Page 14
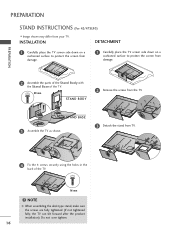
...the holes in the back of the TV. ! NOTE G When assembling the desk type stand, make sure the screws are fully tightened (If not tightened fully, the TV can tilt forward after the product installation). PREPARATION STAND INSTRUCTIONS (For 42/47/55LH90) I Image shown may differ from... damage. INSTALLATION (For 42/47LH90) DETACHMENT 1 Carefully place the TV screen side down on a cushioned surface to protect...
...the holes in the back of the TV. ! NOTE G When assembling the desk type stand, make sure the screws are fully tightened (If not tightened fully, the TV can tilt forward after the product installation). PREPARATION STAND INSTRUCTIONS (For 42/47/55LH90) I Image shown may differ from... damage. INSTALLATION (For 42/47LH90) DETACHMENT 1 Carefully place the TV screen side down on a cushioned surface to protect...

Owner's Manual (English)
Page 15
... screws are fully tightened (If not tightened fully, the TV can tilt forward after the product installation). STAND BASE 3 Assemble the TV as shown. 3 Detach the stand from damage. 2 Assemble the parts of the Stand Body with the Stand Base of the TV. PROTECTION COVER 4 After removing the stand, install the included protection cover over tighten. 15 Do...
... screws are fully tightened (If not tightened fully, the TV can tilt forward after the product installation). STAND BASE 3 Assemble the TV as shown. 3 Detach the stand from damage. 2 Assemble the parts of the Stand Body with the Stand Base of the TV. PROTECTION COVER 4 After removing the stand, install the included protection cover over tighten. 15 Do...
Owner's Manual (English)
Page 16
PREPARATION PREPARATION STAND INSTRUCTIONS (For 42/47SL90) I Image shown may differ from the TV. NOTE G When assembling the desk type stand, make sure the screws are fully tightened (If not tightened fully, the TV can tilt forward after the product installation). Do not over tighten. 16 INSTALLATION DETACHMENT 1 Carefully place the TV screen side down on a cushioned...
PREPARATION PREPARATION STAND INSTRUCTIONS (For 42/47SL90) I Image shown may differ from the TV. NOTE G When assembling the desk type stand, make sure the screws are fully tightened (If not tightened fully, the TV can tilt forward after the product installation). Do not over tighten. 16 INSTALLATION DETACHMENT 1 Carefully place the TV screen side down on a cushioned...

Owner's Manual (English)
Page 18
... equipment, see the EXTERNAL EQUIPMENT SETUP section. 42/47SL80 FOR DESK-TYPE STAND 1 Install the CABLE MANAGEMENT CLIP as necessary. Install CABLE HOLDER as shown. NOTE G Do not hold the CABLE MANAGEMENT CLIP when moving the TV. - PREPARATION 2 Install the CABLE MANAGEMENT CLIP as shown and bundle the... cables. FOR WALL MOUNT 1 Connect the cables as necessary. If the TV is dropped, you may be injured or the product may differ from your TV. 42/47/55LH90 1 Connect the cables as shown. CABLE MANAGEMENT CLIP 3 Put the cables inside the CABLE MANAGEMENT...
... equipment, see the EXTERNAL EQUIPMENT SETUP section. 42/47SL80 FOR DESK-TYPE STAND 1 Install the CABLE MANAGEMENT CLIP as necessary. Install CABLE HOLDER as shown. NOTE G Do not hold the CABLE MANAGEMENT CLIP when moving the TV. - PREPARATION 2 Install the CABLE MANAGEMENT CLIP as shown and bundle the... cables. FOR WALL MOUNT 1 Connect the cables as necessary. If the TV is dropped, you may be injured or the product may differ from your TV. 42/47/55LH90 1 Connect the cables as shown. CABLE MANAGEMENT CLIP 3 Put the cables inside the CABLE MANAGEMENT...

Owner's Manual (English)
Page 19
... EQUIPMENT SETUP section. CABLE MANAGEMENT CLIP 2 Connect the cables as shown and bundle the cables. Install CABLE HOLDER as necessary. If the TV is dropped, you may be broken. 19 To connect additional equipment, see the EXTERNAL EQUIPMENT SETUP section. NOTE G Do not hold the... CABLE MANAGEMENT CLIP when moving the TV. - PREPARATION CABLE MANAGEMENT I Image shown may be injured or the product may differ from your TV. 42/47SL90 FOR DESK-TYPE STAND 1 Install the CABLE MANAGEMENT CLIP as necessary. CABLE HOLDER ! FOR WALL MOUNT ...
... EQUIPMENT SETUP section. CABLE MANAGEMENT CLIP 2 Connect the cables as shown and bundle the cables. Install CABLE HOLDER as necessary. If the TV is dropped, you may be broken. 19 To connect additional equipment, see the EXTERNAL EQUIPMENT SETUP section. NOTE G Do not hold the... CABLE MANAGEMENT CLIP when moving the TV. - PREPARATION CABLE MANAGEMENT I Image shown may be injured or the product may differ from your TV. 42/47SL90 FOR DESK-TYPE STAND 1 Install the CABLE MANAGEMENT CLIP as necessary. CABLE HOLDER ! FOR WALL MOUNT ...
Owner's Manual (English)
Page 20
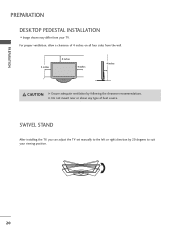
SWIVEL STAND After installing the TV, you can adjust the TV set manually to the left or right direction by following the clearance recommendations. G Do not mount near or above any type of 4 inches on all four sides from your viewing position. 20 PREPARATION PREPARATION DESKTOP PEDESTAL INSTALLATION I Image shown may differ from the wall. 4 inches 4 inches 4 inches 4 inches CAUTION G Ensure adequate ventilation by 20 degrees to suit your TV. For proper ventilation, allow a clearance of heat source.
SWIVEL STAND After installing the TV, you can adjust the TV set manually to the left or right direction by following the clearance recommendations. G Do not mount near or above any type of 4 inches on all four sides from your viewing position. 20 PREPARATION PREPARATION DESKTOP PEDESTAL INSTALLATION I Image shown may differ from the wall. 4 inches 4 inches 4 inches 4 inches CAUTION G Ensure adequate ventilation by 20 degrees to suit your TV. For proper ventilation, allow a clearance of heat source.

Owner's Manual (English)
Page 21
...the Kensington Security System. Stand 1-Screw (provided as parts of the product) Desk WARNING G To prevent TV from your TV. For further information, contact...backward direction, potentially causing injury or damaging the product. PREPARATION ATTACHING THE TV TO A DESK (For 42LH90) I This feature is not available for... the TV should be attached to the user's guide provided with a Kensington Security System connector on the back panel. The TV is... - The TV must be securely attached to the floor/wall per installation instructions. KENSINGTON SECURITY SYSTEM (Except 42/47SL90) I Image ...
...the Kensington Security System. Stand 1-Screw (provided as parts of the product) Desk WARNING G To prevent TV from your TV. For further information, contact...backward direction, potentially causing injury or damaging the product. PREPARATION ATTACHING THE TV TO A DESK (For 42LH90) I This feature is not available for... the TV should be attached to the user's guide provided with a Kensington Security System connector on the back panel. The TV is... - The TV must be securely attached to the floor/wall per installation instructions. KENSINGTON SECURITY SYSTEM (Except 42/47SL90) I Image ...

Owner's Manual (English)
Page 22
... THE WALL TO PREVENT FALLING WHEN THE TV IS USED ON A STAND I You should purchase necessary components to the wall as shown in the picture. * If your TV. I Insert the eye-bolts (or TV brackets and bolts) to tighten the product to prevent the TV from tipping over if pushed backwards. Ensure the eye-bolts...
... THE WALL TO PREVENT FALLING WHEN THE TV IS USED ON A STAND I You should purchase necessary components to the wall as shown in the picture. * If your TV. I Insert the eye-bolts (or TV brackets and bolts) to tighten the product to prevent the TV from tipping over if pushed backwards. Ensure the eye-bolts...
Owner's Manual (English)
Page 118
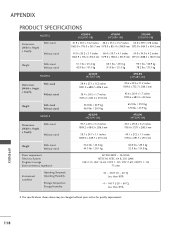
...Width x Height x Depth) With stand Without stand 54.8 lbs / 24.9 kg 46.0 lbs / 20.9 kg 42SL90 (42SL90-UA) 39.7 x 27.3 x 11.2 inches 1009.2 x 694.5 x 286.5 mm 39.7 x 24.7 x 1.1 inches 1009.2 x 629.7 x 29.3 mm 65.9 lbs / 29.9 kg 57.0 lbs / 25.9 kg 47SL90 (47SL90-UA) 44.1 x 29.8 x ...11.2 inches 1119.6 x 757.1 x 286.5 mm 44.1 x 27.2 x 1.1 inches 1119.6 x 691.3 x 29.3 mm Weight With stand Without stand Power requirement Television System Program Coverage External Antenna Impedance 54.2 lbs / 24.6 kg 44.3 ...
...Width x Height x Depth) With stand Without stand 54.8 lbs / 24.9 kg 46.0 lbs / 20.9 kg 42SL90 (42SL90-UA) 39.7 x 27.3 x 11.2 inches 1009.2 x 694.5 x 286.5 mm 39.7 x 24.7 x 1.1 inches 1009.2 x 629.7 x 29.3 mm 65.9 lbs / 29.9 kg 57.0 lbs / 25.9 kg 47SL90 (47SL90-UA) 44.1 x 29.8 x ...11.2 inches 1119.6 x 757.1 x 286.5 mm 44.1 x 27.2 x 1.1 inches 1119.6 x 691.3 x 29.3 mm Weight With stand Without stand Power requirement Television System Program Coverage External Antenna Impedance 54.2 lbs / 24.6 kg 44.3 ...


