Owner's Manual (English)
Page 4
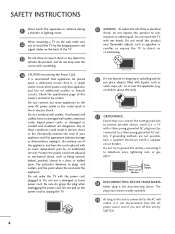
... is recommend that appliance and has no additional outlets or branch circuits. Pay particular attention to unplug the TV. 4 15 WARNING - Do not use of fire or electrical shock, do not drop onto the screen with an exact replacement part by SWITCH. Short-circuit Breaker Power Supply 18 DISCONNECTING DEVICE FROM MAINS...
... is recommend that appliance and has no additional outlets or branch circuits. Pay particular attention to unplug the TV. 4 15 WARNING - Do not use of fire or electrical shock, do not drop onto the screen with an exact replacement part by SWITCH. Short-circuit Breaker Power Supply 18 DISCONNECTING DEVICE FROM MAINS...
Owner's Manual (English)
Page 5
... not spray water or other electric light or power circuits, or where it can occur. However, they have been removed. Avoid touching the LCD screen or holding your finger(s) against it is grounded so as to the National Electrical Code, ANSI/NFPA 70 Ground Clamp Antenna Lead in contact with... cord and scrub gently with a soft cloth to prevent scratching. ON DISPOSAL (Only Hg lamp used LCD TV) The fluorescent lamp used in the U.S.A. Be sure the antenna system is turned on the screen, appearing as electric shock may occur. Section 810 of the National Electrical Code (NEC) in this ...
... not spray water or other electric light or power circuits, or where it can occur. However, they have been removed. Avoid touching the LCD screen or holding your finger(s) against it is grounded so as to the National Electrical Code, ANSI/NFPA 70 Ground Clamp Antenna Lead in contact with... cord and scrub gently with a soft cloth to prevent scratching. ON DISPOSAL (Only Hg lamp used LCD TV) The fluorescent lamp used in the U.S.A. Be sure the antenna system is turned on the screen, appearing as electric shock may occur. Section 810 of the National Electrical Code (NEC) in this ...
Owner's Manual (English)
Page 6
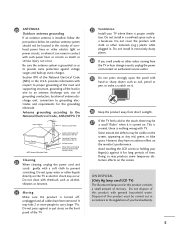
...47 - Auto Scan (Auto Tuning 46 - CONTENTS WARNING / CAUTION 2 SAFETY INSTRUCTIONS 3 FEATURE OF THIS TV 8 PREPARATION Accessories 9 Front Panel Information 10 Back Panel Information 12 Stand Instructions 14 VESA Wall Mounting 17 Cable Management 18 Desktop Pedestal Installation 20 Swivel Stand 20 Attaching the TV... Setup 36 USB Connection 36 Audio out Connection 37 WATCHING TV / CHANNEL CONTROL Remote Control Functions 38 Turning On the TV 42 Channel Selection 42 Volume Adjustment 42 Initial Setting 43 On-Screen Menus Selection 44 Quick Menu 45 6 Channel Setup - ...
...47 - Auto Scan (Auto Tuning 46 - CONTENTS WARNING / CAUTION 2 SAFETY INSTRUCTIONS 3 FEATURE OF THIS TV 8 PREPARATION Accessories 9 Front Panel Information 10 Back Panel Information 12 Stand Instructions 14 VESA Wall Mounting 17 Cable Management 18 Desktop Pedestal Installation 20 Swivel Stand 20 Attaching the TV... Setup 36 USB Connection 36 Audio out Connection 37 WATCHING TV / CHANNEL CONTROL Remote Control Functions 38 Turning On the TV 42 Channel Selection 42 Volume Adjustment 42 Initial Setting 43 On-Screen Menus Selection 44 Quick Menu 45 6 Channel Setup - ...
Owner's Manual (English)
Page 7
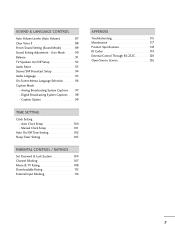
...) 89 Sound Setting Adjustment - Caption Option 99 TIME SETTING Clock Setting - User Mode 90 Balance 91 TV Speakers On/Off Setup 92 Audio Reset 93 Stereo/SAP Broadcast Setup 94 Audio Language 95 On-Screen Menus Language Selection 96 Caption Mode - Analog Broadcasting System Captions 97 Digital Broadcasting System Captions 98 - Auto...
...) 89 Sound Setting Adjustment - Caption Option 99 TIME SETTING Clock Setting - User Mode 90 Balance 91 TV Speakers On/Off Setup 92 Audio Reset 93 Stereo/SAP Broadcast Setup 94 Audio Language 95 On-Screen Menus Language Selection 96 Caption Mode - Analog Broadcasting System Captions 97 Digital Broadcasting System Captions 98 - Auto...

Owner's Manual (English)
Page 8
... to prevent image burn, avoid displaying a fixed image on the letterboxed areas of your TV screen for a prolonged period (2 or more hours for LCD, 1 or more detailed picture. Sophisticated and detailed calibrations can become permanently imprinted on -...screen. It allows the viewer to HD 1080p, including premium content" ABOUT DIVX VIDEO: DivX® is the audio and video certification standard of THX established by renowned audio expert, Mr. Mark Levinson. THX (Thomlinson Holman's Experiment) is a digital video format created by the user to experience the best their LG...
... to prevent image burn, avoid displaying a fixed image on the letterboxed areas of your TV screen for a prolonged period (2 or more hours for LCD, 1 or more detailed picture. Sophisticated and detailed calibrations can become permanently imprinted on -...screen. It allows the viewer to HD 1080p, including premium content" ABOUT DIVX VIDEO: DivX® is the audio and video certification standard of THX established by renowned audio expert, Mr. Mark Levinson. THX (Thomlinson Holman's Experiment) is a digital video format created by the user to experience the best their LG...

Owner's Manual (English)
Page 14
PREPARATION STAND INSTRUCTIONS (For 42/47/55LH90) I Image shown may differ from damage. Do not over tighten. INSTALLATION (For 42/47LH90) DETACHMENT 1 Carefully place the TV screen side down on a cushioned surface to protect the screen from damage. 1 Carefully place the TV screen side down on a cushioned surface to the TV as shown. 2 Remove the screws from the...
PREPARATION STAND INSTRUCTIONS (For 42/47/55LH90) I Image shown may differ from damage. Do not over tighten. INSTALLATION (For 42/47LH90) DETACHMENT 1 Carefully place the TV screen side down on a cushioned surface to protect the screen from damage. 1 Carefully place the TV screen side down on a cushioned surface to the TV as shown. 2 Remove the screws from the...

Owner's Manual (English)
Page 15
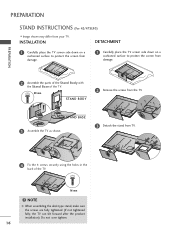
INSTALLATION DETACHMENT 1 Carefully place the TV screen side down on a cushioned surface to protect the screen from damage. 1 Carefully place the TV screen side down on a cushioned surface to protect the screen from the TV. Press the PROTECTION COVER into the TV until you hear it click. ! STAND BODY 2 Remove the screws from damage. 2 Assemble the parts of the...
INSTALLATION DETACHMENT 1 Carefully place the TV screen side down on a cushioned surface to protect the screen from damage. 1 Carefully place the TV screen side down on a cushioned surface to protect the screen from the TV. Press the PROTECTION COVER into the TV until you hear it click. ! STAND BODY 2 Remove the screws from damage. 2 Assemble the parts of the...
Owner's Manual (English)
Page 16
... 1 Carefully place the TV screen side down on a cushioned surface to protect the screen from damage. 1 Carefully place the TV screen side down on a cushioned surface to protect the screen from damage. 2 Assemble the parts of the Stand Body with the Stand Base of the TV. 16 mm ! PREPARATION PREPARATION STAND INSTRUCTIONS (For 42/47SL90) I Image shown may...
... 1 Carefully place the TV screen side down on a cushioned surface to protect the screen from damage. 1 Carefully place the TV screen side down on a cushioned surface to protect the screen from damage. 2 Assemble the parts of the Stand Body with the Stand Base of the TV. 16 mm ! PREPARATION PREPARATION STAND INSTRUCTIONS (For 42/47SL90) I Image shown may...
Owner's Manual (English)
Page 25
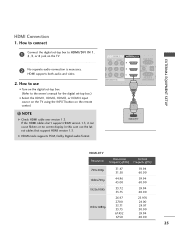
... box.) I Select the HDMI1, HDMI2, HDMI3, or HDMI4 input source on the TV using the INPUT button on the TV. 2 No separate audio connection is necessary. ( ) EXTERNAL EQUIPMENT SETUP HDMI Connection ... supports both audio and video. 2. If the HDMI cables don't support HDMI version 1.3, it can cause flickers or no screen display. AV IN 1 VIDEO L(MONO) AUDIO R 3 2 L R 1 EO AUDIO OMPONENT IN /DVI IN RGB ... HDMI OUTPUT ( ) HDMI-DTV Resolution Horizontal Vertical Frequency(KHz) Frequency(Hz) 720x480p 31.47 31.50 59.94 60.00 1280x720p 44.96 45.00 59.94 60.00 1920x1080i 33...
... box.) I Select the HDMI1, HDMI2, HDMI3, or HDMI4 input source on the TV using the INPUT button on the TV. 2 No separate audio connection is necessary. ( ) EXTERNAL EQUIPMENT SETUP HDMI Connection ... supports both audio and video. 2. If the HDMI cables don't support HDMI version 1.3, it can cause flickers or no screen display. AV IN 1 VIDEO L(MONO) AUDIO R 3 2 L R 1 EO AUDIO OMPONENT IN /DVI IN RGB ... HDMI OUTPUT ( ) HDMI-DTV Resolution Horizontal Vertical Frequency(KHz) Frequency(Hz) 720x480p 31.47 31.50 59.94 60.00 1280x720p 44.96 45.00 59.94 60.00 1920x1080i 33...
Owner's Manual (English)
Page 28
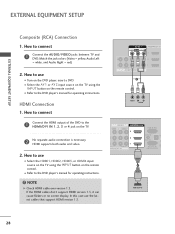
.... How to connect 1 Connect the AUDIO/VIDEO jacks between TV and DVD. HDMI Connection 1. How to the DVD player's...L(MONO) AUDIO R 3 2 L R 1 O AUDIO MPONENT IN ( /DV) I Select the A V 1 or A V 2 input source on the TV using the INPUT button on the remote control. In this case use I Refer to the HDMI/DVI IN 1, 2, 3 or 4 jack on the DVD player,..., and Audio Right = red) 2. I Select the HDMI1, HDMI2, HDMI3, or HDMI4 input source on the TV using the INPUT button on the remote control. NOTE G Check HDMI cable over version 1.3. EXTERNAL EQUIPMENT SETUP EXTERNAL EQUIPMENT...
.... How to connect 1 Connect the AUDIO/VIDEO jacks between TV and DVD. HDMI Connection 1. How to the DVD player's...L(MONO) AUDIO R 3 2 L R 1 O AUDIO MPONENT IN ( /DV) I Select the A V 1 or A V 2 input source on the TV using the INPUT button on the remote control. In this case use I Refer to the HDMI/DVI IN 1, 2, 3 or 4 jack on the DVD player,..., and Audio Right = red) 2. I Select the HDMI1, HDMI2, HDMI3, or HDMI4 input source on the TV using the INPUT button on the remote control. NOTE G Check HDMI cable over version 1.3. EXTERNAL EQUIPMENT SETUP EXTERNAL EQUIPMENT...
Owner's Manual (English)
Page 30
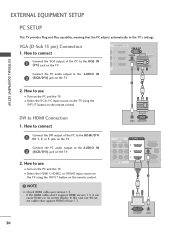
...input source on the TV using the INPUT button on the TV. ( ) /DVI IN RGB IN (PC) AUDIO IN (RGB/DVI) OPTICAL DIGITAL AUDIO OUT ANTENNA/ RS-232C IN CABLE IN (CONTROL&SERVICE) 2 1 2. If the HDMI cables don't support HDMI version 1.3, it can cause flickers or no screen display. I Select ...the HDMI1, HDMI2, or HDMI3 input source on the TV using the INPUT button on the TV. In this case use the latest cables that the PC adjusts automatically to HDMI Connection 1. How to...
...input source on the TV using the INPUT button on the TV. ( ) /DVI IN RGB IN (PC) AUDIO IN (RGB/DVI) OPTICAL DIGITAL AUDIO OUT ANTENNA/ RS-232C IN CABLE IN (CONTROL&SERVICE) 2 1 2. If the HDMI cables don't support HDMI version 1.3, it can cause flickers or no screen display. I Select ...the HDMI1, HDMI2, or HDMI3 input source on the TV using the INPUT button on the TV. In this case use the latest cables that the PC adjusts automatically to HDMI Connection 1. How to...
Owner's Manual (English)
Page 31
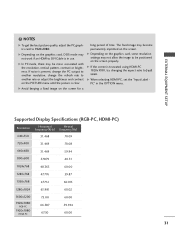
...resolution, vertical pattern, contrast or brightness. G In PC mode, there may be positioned on the graphics card, DOS mode may become permanently imprinted on the screen for a long period of time. Supported Display Specifications (RGB-PC, HDMI-PC) Resolution 640x350 Horizontal Vertical Frequency(KHz) Frequency(Hz) 31.468 70.09 720x400... 31.469 70.08 640x480 31.469 59.94 800x600 37.879 60.31 1024x768 48.363 60.00 1280x768 47.776 59.87 1360x768 47.712 60.015 1280x1024 63.981 60.02 1600x1200 1920x1080 RGB-PC 1920x1080 HDMI-PC 75.00 66.587 67.50 60.00...
...resolution, vertical pattern, contrast or brightness. G In PC mode, there may be positioned on the graphics card, DOS mode may become permanently imprinted on the screen for a long period of time. Supported Display Specifications (RGB-PC, HDMI-PC) Resolution 640x350 Horizontal Vertical Frequency(KHz) Frequency(Hz) 31.468 70.09 720x400... 31.469 70.08 640x480 31.469 59.94 800x600 37.879 60.31 1024x768 48.363 60.00 1280x768 47.776 59.87 1360x768 47.712 60.015 1280x1024 63.981 60.02 1600x1200 1920x1080 RGB-PC 1920x1080 HDMI-PC 75.00 66.587 67.50 60.00...

Owner's Manual (English)
Page 32
...Prev. 1024 x 768 1280 x 768 1360 x 768 1 MENU 2 ENTER 3 ENTER 4 ENTER 5 ENTER Select PICTURE. Select Resolution. Select Screen (RGB-PC). PICTURE Move Enter E • Brightness 50 • Sharpness 50 • Color 50 • Tint 0R G • Advanced Control &#...8226; Picture Reset Screen (RGB-PC) LED Local Dimming :On SCREEN Resolution Auto Config. EXTERNAL EQUIPMENT SETUP EXTERNAL EQUIPMENT SETUP Screen Setup for PC mode Selecting Resolution You can also be adjusted. Select the desired resolution. ...
...Prev. 1024 x 768 1280 x 768 1360 x 768 1 MENU 2 ENTER 3 ENTER 4 ENTER 5 ENTER Select PICTURE. Select Resolution. Select Screen (RGB-PC). PICTURE Move Enter E • Brightness 50 • Sharpness 50 • Color 50 • Tint 0R G • Advanced Control &#...8226; Picture Reset Screen (RGB-PC) LED Local Dimming :On SCREEN Resolution Auto Config. EXTERNAL EQUIPMENT SETUP EXTERNAL EQUIPMENT SETUP Screen Setup for PC mode Selecting Resolution You can also be adjusted. Select the desired resolution. ...

Owner's Manual (English)
Page 33
...to be adjusted again after Auto adjustment in RGB-PC, you can adjust the Position, S i z e or P h a s e. 33 Select Screen (RGB-PC). EXTERNAL EQUIPMENT SETUP Auto Configure Automatically adjusts picture position and minimizes image instability. To Set Yes No 1 MENU 2 ENTER 3 ENTER Select PICTURE...50 • Sharpness 50 • Color 50 • Tint 0R G • Advanced Control • Picture Reset Screen (RGB-PC) LED Local Dimming :On SCREEN Resolution Auto Config. After adjustment, if the image is still not correct, try using the manual settings or a different resolution...
...to be adjusted again after Auto adjustment in RGB-PC, you can adjust the Position, S i z e or P h a s e. 33 Select Screen (RGB-PC). EXTERNAL EQUIPMENT SETUP Auto Configure Automatically adjusts picture position and minimizes image instability. To Set Yes No 1 MENU 2 ENTER 3 ENTER Select PICTURE...50 • Sharpness 50 • Color 50 • Tint 0R G • Advanced Control • Picture Reset Screen (RGB-PC) LED Local Dimming :On SCREEN Resolution Auto Config. After adjustment, if the image is still not correct, try using the manual settings or a different resolution...

Owner's Manual (English)
Page 34
...operates only in RGB-PC mode. I Position: This function is to remove any vertical bars or stripes visible on the screen background. And the horizontal screen size will also change. I S i z e: This function is to adjust picture to left/right and up/down ... • Brightness 50 • Sharpness 50 • Color 50 • Tint 0R G • Advanced Control • Picture Reset Screen (RGB-PC) LED Local Dimming :On SCREEN Resolution Auto Config. Position Size Phase Reset Move Prev. Make appropriate adjustments. I P h a s e: This function allows you prefer. ...
...operates only in RGB-PC mode. I Position: This function is to remove any vertical bars or stripes visible on the screen background. And the horizontal screen size will also change. I S i z e: This function is to adjust picture to left/right and up/down ... • Brightness 50 • Sharpness 50 • Color 50 • Tint 0R G • Advanced Control • Picture Reset Screen (RGB-PC) LED Local Dimming :On SCREEN Resolution Auto Config. Position Size Phase Reset Move Prev. Make appropriate adjustments. I P h a s e: This function allows you prefer. ...

Owner's Manual (English)
Page 35
This feature operates only in RGB-PC mode. Position Size Phase Reset Move Prev. Select Reset. PICTURE Move Enter E • Brightness 50 • Sharpness 50 • Color 50 • Tint 0R G • Advanced Control • Picture Reset Screen (RGB-PC) LED Local Dimming :On SCREEN Resolution Auto config. Select Screen (RGB-PC). To Set Yes No 1 MENU 2 ENTER 3 ENTER 4 ENTER 5 ENTER Select PICTURE. Select Y e s. 35 EXTERNAL EQUIPMENT SETUP Screen Reset (Reset to original factory values) Returns Position, S i z e, and Phase to the default factory settings.
This feature operates only in RGB-PC mode. Position Size Phase Reset Move Prev. Select Reset. PICTURE Move Enter E • Brightness 50 • Sharpness 50 • Color 50 • Tint 0R G • Advanced Control • Picture Reset Screen (RGB-PC) LED Local Dimming :On SCREEN Resolution Auto config. Select Screen (RGB-PC). To Set Yes No 1 MENU 2 ENTER 3 ENTER 4 ENTER 5 ENTER Select PICTURE. Select Y e s. 35 EXTERNAL EQUIPMENT SETUP Screen Reset (Reset to original factory values) Returns Position, S i z e, and Phase to the default factory settings.
Owner's Manual (English)
Page 38
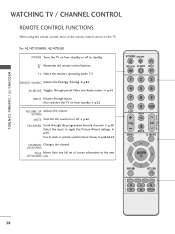
... at the remote control sensor on or off to the next UP/DOWN one full set of screen information to standby. G p.42 FAV/MARK Scroll through preset Video and Audio modes. POWER ON/OFF TV ENERGY SAVING AV MODE INPUT 123 456 789 LIST VOL 0 MARK FAV FLASHBK P CH A G E MUTE .../DOWN PAGE Moves from standby. TV Select the remote's operating mode: TV. Also switches the TV on from standby or off . G p.50 Select the input to mark or unmark a photo/music/movie. For 42/47/55LH90, 42/47SL80 POWER Turns the TV on from one . G p.82 AV MODE Toggles through the programmed ...
... at the remote control sensor on or off to the next UP/DOWN one full set of screen information to standby. G p.42 FAV/MARK Scroll through preset Video and Audio modes. POWER ON/OFF TV ENERGY SAVING AV MODE INPUT 123 456 789 LIST VOL 0 MARK FAV FLASHBK P CH A G E MUTE .../DOWN PAGE Moves from standby. TV Select the remote's operating mode: TV. Also switches the TV on from standby or off . G p.50 Select the input to mark or unmark a photo/music/movie. For 42/47/55LH90, 42/47SL80 POWER Turns the TV on from one . G p.82 AV MODE Toggles through the programmed ...

Owner's Manual (English)
Page 39
...viewed. When you toggle this button, the SIMPLINK menu appears at the top of the screen. I Close cover. 39 MENU Displays the main menu or clears all on -screen menus and adjusts the system settings to TV viewing. SIMPLINK See a list of Quick Menu options. LIST Displays the channel table. ...G p.45 THUMBSTICK Navigates the on -screen displays and return to your preference. (Up/Down/Left Right/...
...viewed. When you toggle this button, the SIMPLINK menu appears at the top of the screen. I Close cover. 39 MENU Displays the main menu or clears all on -screen menus and adjusts the system settings to TV viewing. SIMPLINK See a list of Quick Menu options. LIST Displays the channel table. ...G p.45 THUMBSTICK Navigates the on -screen displays and return to your preference. (Up/Down/Left Right/...
Owner's Manual (English)
Page 40
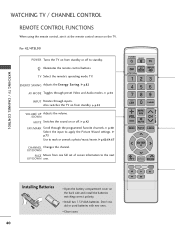
...used batteries with new ones. G p.42 FAV/MARK Scroll through inputs. UP/DOWN PAGE Moves from standby. For 42/47SL90 POWER Turns the TV on the TV. I Close cover. 40 POWER ON/OFF TV AV MODE ENERGY SAVING 12 INPUT 3 456 789 LIST 0 FLASHBK MARK/ FAV VOL MUTE P CH A G E ... Open the battery compartment cover on from one full set of screen information to the next UP/DOWN one. G p.82 AV MODE Toggles through preset Video and Audio modes. I Install two 1.5V AAA batteries. Also switches the TV on the back side and install the batteries matching correct polarity....
...used batteries with new ones. G p.42 FAV/MARK Scroll through inputs. UP/DOWN PAGE Moves from standby. For 42/47SL90 POWER Turns the TV on the TV. I Close cover. 40 POWER ON/OFF TV AV MODE ENERGY SAVING 12 INPUT 3 456 789 LIST 0 FLASHBK MARK/ FAV VOL MUTE P CH A G E ... Open the battery compartment cover on from one full set of screen information to the next UP/DOWN one. G p.82 AV MODE Toggles through preset Video and Audio modes. I Install two 1.5V AAA batteries. Also switches the TV on the back side and install the batteries matching correct polarity....

Owner's Manual (English)
Page 41
G p.72 Q.MENU Opens the list of the screen. G p.45 THUMBSTICK Navigates the on -screen displays and return to TV viewing. G p.56-57 Simple Remote Control POWER Turns the TV on or off . G p.42 CHANNEL Changes the channel. UP/DOWN NUMBER button FLASHBK - (DASH) Used to enter a program number for... the channel table. MENU Displays the main menu or clears all on -screen menus and adjusts the system settings to your preference. (Up/Down/Left Right/ENTER) INFO Displays channel information at the screen. WATCHING TV / CHANNEL CONTROL NUMBER button - (DASH) Used to enter a program number...
G p.72 Q.MENU Opens the list of the screen. G p.45 THUMBSTICK Navigates the on -screen displays and return to TV viewing. G p.56-57 Simple Remote Control POWER Turns the TV on or off . G p.42 CHANNEL Changes the channel. UP/DOWN NUMBER button FLASHBK - (DASH) Used to enter a program number for... the channel table. MENU Displays the main menu or clears all on -screen menus and adjusts the system settings to your preference. (Up/Down/Left Right/ENTER) INFO Displays channel information at the screen. WATCHING TV / CHANNEL CONTROL NUMBER button - (DASH) Used to enter a program number...

