Owner's Manual
Page 4
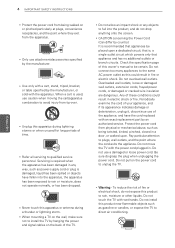
... the product, and do grasp the plug when unplugging the power cord. Do not install this product to direct air conditioning. yyUse only with a cart, stand, tripod, bracket, or table specified by country): It is damaged, liquid has been spilled or objects have the cord replaced with the power cord plugged...
... the product, and do grasp the plug when unplugging the power cord. Do not install this product to direct air conditioning. yyUse only with a cart, stand, tripod, bracket, or table specified by country): It is damaged, liquid has been spilled or objects have the cord replaced with the power cord plugged...
Owner's Manual
Page 8
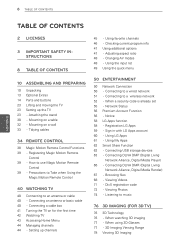
... program info 47 Using additional options 47 - Connecting to use Magic Motion Remote Control 39 - Network Status 56 Premium Account Function 56 - Using LG Apps 61 - Browsing files 68 - Viewing Photos 74 - When using 3D Glasses 77 - 3D Imaging Viewing Range 78 Viewing 3D Imaging Registering ... ASSEMBLING AND PREPARING 10 Unpacking 13 Optional Extras 14 Parts and buttons 23 Lifting and moving the TV 23 Setting up channels 45 - Attaching the stand 30 - Mounting on a table 32 - DivX registration code 72 - How to a wired network 51 - Precautions to Take when Using the...
... program info 47 Using additional options 47 - Connecting to use Magic Motion Remote Control 39 - Network Status 56 Premium Account Function 56 - Using LG Apps 61 - Browsing files 68 - Viewing Photos 74 - When using 3D Glasses 77 - 3D Imaging Viewing Range 78 Viewing 3D Imaging Registering ... ASSEMBLING AND PREPARING 10 Unpacking 13 Optional Extras 14 Parts and buttons 23 Lifting and moving the TV 23 Setting up channels 45 - Attaching the stand 30 - Mounting on a table 32 - DivX registration code 72 - How to a wired network 51 - Precautions to Take when Using the...
Owner's Manual
Page 9
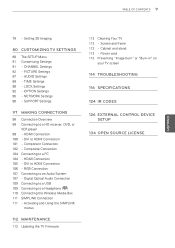
... CODES 126 EXTERNAL CONTROL DEVICE SETUP 134 OPEN SOURCE LICENSE DVI to HDMI Connection 101 - TABLE OF CONTENTS 9 ENEGNLGISH 78 - CHANNEL Settings 82 - Cabinet and stand 113 - Activating and Using the SIMPLINK menus 112 MAINTENANCE 112 Updating the TV Firmware 113 Cleaning Your TV 113 - Setting 3D Imaging 80 CUSTOMIZING TV...
... CODES 126 EXTERNAL CONTROL DEVICE SETUP 134 OPEN SOURCE LICENSE DVI to HDMI Connection 101 - TABLE OF CONTENTS 9 ENEGNLGISH 78 - CHANNEL Settings 82 - Cabinet and stand 113 - Activating and Using the SIMPLINK menus 112 MAINTENANCE 112 Updating the TV Firmware 113 Cleaning Your TV 113 - Setting 3D Imaging 80 CUSTOMIZING TV...

Owner's Manual
Page 23
... keep the TV upright, never turn the TV on a flat surface. PZ750, PZ950, PZ950U series 1 Lay the TV with the stand base of the TV frame firmly. Stand Body Stand Base ENEGNLGISH yyWhen transporting the TV, do not expose the TV to prevent the TV from being scratched or damaged and for... the following illustration. yyHold the top and bottom of the TV. Make sure no objects press against the screen. 2 Assemble the parts of the stand body with the screen side down on its type and size. yyWhen transporting the TV by hand, hold the transparent part, speaker, or speaker grill...
... keep the TV upright, never turn the TV on a flat surface. PZ750, PZ950, PZ950U series 1 Lay the TV with the stand base of the TV frame firmly. Stand Body Stand Base ENEGNLGISH yyWhen transporting the TV, do not expose the TV to prevent the TV from being scratched or damaged and for... the following illustration. yyHold the top and bottom of the TV. Make sure no objects press against the screen. 2 Assemble the parts of the stand body with the screen side down on its type and size. yyWhen transporting the TV by hand, hold the transparent part, speaker, or speaker grill...

Owner's Manual
Page 24
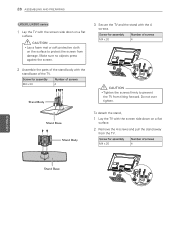
...Model 50PZ750, 50PZ950, 50PZ950U 60PZ750, 60PZ950, 60PZ950U Screw for assembly M4 x 26 M4 x 28 Number of screws 4 4 To detach the stand, 1 Lay the TV with the 4 screws. Protection cover tape ENEGNLGISH Protection cover When installing the wall mounting bracket, use the protection cover.... 24 ASSEMBLING AND PREPARING 3 Secure the TV and the stand with the screen side down on a flat surface. 2 Remove the 4 screws and pull the stand away from the TV. Attach the protection cover tape. - Do not over tighten. 3 Push the ...
...Model 50PZ750, 50PZ950, 50PZ950U 60PZ750, 60PZ950, 60PZ950U Screw for assembly M4 x 26 M4 x 28 Number of screws 4 4 To detach the stand, 1 Lay the TV with the 4 screws. Protection cover tape ENEGNLGISH Protection cover When installing the wall mounting bracket, use the protection cover.... 24 ASSEMBLING AND PREPARING 3 Secure the TV and the stand with the screen side down on a flat surface. 2 Remove the 4 screws and pull the stand away from the TV. Attach the protection cover tape. - Do not over tighten. 3 Push the ...

Owner's Manual
Page 25
...the TV. Model Screw for assembly LV3700, M4 x 12 LV5400, LV5500, LW5600, LW5700, LW7700 series, 47/55LW6500 65LW6500 M4 x 16 Number of screws 4 4 Stand Body Stand Base 3 Secure the TV and the stand with the screen side down on the surface to prevent the TV from damage. To detach the... protect the screen from tilting forward. CAUTION yyLay a foam mat or soft protective cloth on a flat surface. 2 Remove the 4 screws and pull the stand away from the TV. Do not over tighten. Make sure no objects press against the screen. 2 Assemble the parts of screws 4 ENEGNLGISH
...the TV. Model Screw for assembly LV3700, M4 x 12 LV5400, LV5500, LW5600, LW5700, LW7700 series, 47/55LW6500 65LW6500 M4 x 16 Number of screws 4 4 Stand Body Stand Base 3 Secure the TV and the stand with the screen side down on the surface to prevent the TV from damage. To detach the... protect the screen from tilting forward. CAUTION yyLay a foam mat or soft protective cloth on a flat surface. 2 Remove the 4 screws and pull the stand away from the TV. Do not over tighten. Make sure no objects press against the screen. 2 Assemble the parts of screws 4 ENEGNLGISH

Owner's Manual
Page 26
Make sure no objects press against the screen. 2 Assemble the parts of the stand body with the stand base of the stand rear cover with the TV. Do not over tighten. Screw for assembly M4 x 16 Number of screws 4 Stand Body Stand Base 3 Assemble the parts of the TV. Screw for assembly M4 x 16 Number... PREPARING LW9500 series 1 Lay the TV with the screen side down on a flat surface. 2 Remove the 4 screws and pull the stand away from the TV. Stand Rear Cover 4 Secure the TV and the stand with the screen side down on the surface to prevent the TV from tilting forward. To detach the...
Make sure no objects press against the screen. 2 Assemble the parts of the stand body with the stand base of the stand rear cover with the TV. Do not over tighten. Screw for assembly M4 x 16 Number of screws 4 Stand Body Stand Base 3 Assemble the parts of the TV. Screw for assembly M4 x 16 Number... PREPARING LW9500 series 1 Lay the TV with the screen side down on a flat surface. 2 Remove the 4 screws and pull the stand away from the TV. Stand Rear Cover 4 Secure the TV and the stand with the screen side down on the surface to prevent the TV from tilting forward. To detach the...

Owner's Manual
Page 27
... the TV with the screen side down on a flat surface. 2 Remove the 4 screws and pull the stand away from tilting forward. Make sure no objects press against the screen. 2 Assemble the parts of the stand body with the TV. Screw for assembly M4 x 26 Number of the TV. CAUTION yyLay a foam mat... or soft protective cloth on a flat surface. Screw for assembly M5 x 35 Number of the stand rear cover with the stand base of screws 4 CAUTION yyTighten the screws firmly to protect the screen from damage. To detach the...
... the TV with the screen side down on a flat surface. 2 Remove the 4 screws and pull the stand away from tilting forward. Make sure no objects press against the screen. 2 Assemble the parts of the stand body with the TV. Screw for assembly M4 x 26 Number of the TV. CAUTION yyLay a foam mat... or soft protective cloth on a flat surface. Screw for assembly M5 x 35 Number of the stand rear cover with the stand base of screws 4 CAUTION yyTighten the screws firmly to protect the screen from damage. To detach the...
Owner's Manual
Page 28
...screen. 2 Assemble the parts of the stand body with the screen side down on the surface to prevent the TV from damage. Stand Base Stand Body M4X20 To detach the stand, 1 Lay the TV with the stand base of screws 4 Stand Body 3 Secure the TV and the stand with the screen side down on a ...flat surface. 2 Remove the 4 screws and pull the stand away from the TV. Screw for ...
...screen. 2 Assemble the parts of the stand body with the screen side down on the surface to prevent the TV from damage. Stand Base Stand Body M4X20 To detach the stand, 1 Lay the TV with the stand base of screws 4 Stand Body 3 Secure the TV and the stand with the screen side down on a ...flat surface. 2 Remove the 4 screws and pull the stand away from the TV. Screw for ...

Owner's Manual
Page 30
... WARNING yyTo prevent TV from the wall for proper ventilation. NOTE yySwivel 20 degrees to the left or right and adjust the angle of the stand. 10 cm 10 cm (4 inch) 10 cm 10 cm ENEGNLGISH 2 Connect the power cord to prevent from tilting forward, damage, and potential injury. Securing the...
... WARNING yyTo prevent TV from the wall for proper ventilation. NOTE yySwivel 20 degrees to the left or right and adjust the angle of the stand. 10 cm 10 cm (4 inch) 10 cm 10 cm ENEGNLGISH 2 Connect the power cord to prevent from tilting forward, damage, and potential injury. Securing the...
Owner's Manual
Page 33
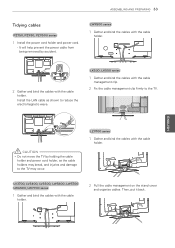
... and bind the cables with the cable holder. LZ9700 series 1 Gather and bind the cables with the cable holder. 2 Pull the cable management on the stand cover and organize cables. LK530, LK550 series 1 Gather and bind the cables with the cable management clip. 2 Fix the cable management clip firmly to reduce...
... and bind the cables with the cable holder. LZ9700 series 1 Gather and bind the cables with the cable holder. 2 Pull the cable management on the stand cover and organize cables. LK530, LK550 series 1 Gather and bind the cables with the cable management clip. 2 Fix the cable management clip firmly to reduce...

Owner's Manual
Page 64
....11g), or faster 1 Start up your computer's CD-ROM drive. 4 Click Nero MediaHome 4 Essentials. yyVisit http://www.nero.com for a typical installation of Nero MediaHome stand-alone yy1.2 GHz Intel® Pentium® III or AMD Sempron™ 2200+ processors yyMemory: 256 MB RAM yyGraphics card with at the More button...
....11g), or faster 1 Start up your computer's CD-ROM drive. 4 Click Nero MediaHome 4 Essentials. yyVisit http://www.nero.com for a typical installation of Nero MediaHome stand-alone yy1.2 GHz Intel® Pentium® III or AMD Sempron™ 2200+ processors yyMemory: 256 MB RAM yyGraphics card with at the More button...

Owner's Manual
Page 88
... of the TV when using only a High Speed HDMI cable without an additional optical cable. Wall Mount Type Optimized sound mode for a stand-type TV. Turns on and SIMPLINK is enabled, the device speaker is not automatically used when SIMPLINK is recommended). yyThe ARC mode only works... Hi-Fi system. ENEGNLGISH yyActivates the SIMPLINK feature to the digital audio output port. Adjusts the sync of the TV speaker and SPDIF. Stand type Optimized sound mode for a wall-mounted TV. TV Speaker SPDIF (Sony Philips Digital InterFace) Adjusts the sync of the sound from ...
... of the TV when using only a High Speed HDMI cable without an additional optical cable. Wall Mount Type Optimized sound mode for a stand-type TV. Turns on and SIMPLINK is enabled, the device speaker is not automatically used when SIMPLINK is recommended). yyThe ARC mode only works... Hi-Fi system. ENEGNLGISH yyActivates the SIMPLINK feature to the digital audio output port. Adjusts the sync of the TV speaker and SPDIF. Stand type Optimized sound mode for a wall-mounted TV. TV Speaker SPDIF (Sony Philips Digital InterFace) Adjusts the sync of the sound from ...

Owner's Manual
Page 113
... a dry, clean, and soft cloth. MAINTENANCE 113 ENEGNLGISH Cleaning Your TV CAUTION yyMake sure to prevent possible damage from lightning or power surges. Cabinet and stand To remove dust or light dirt, wipe the cabinet with a soft cloth dampened in scratches on the power cord regularly. Then wipe immediately with a dry...
... a dry, clean, and soft cloth. MAINTENANCE 113 ENEGNLGISH Cleaning Your TV CAUTION yyMake sure to prevent possible damage from lightning or power surges. Cabinet and stand To remove dust or light dirt, wipe the cabinet with a soft cloth dampened in scratches on the power cord regularly. Then wipe immediately with a dry...

Owner's Manual
Page 116
...80% Storage Temperature -20 - 60°C Storage Humidity Less than 85% MODELS Dimensions (W x H x D) With stand Without stand Weight With stand Without stand Current Value / Power consumption Power requirement 50PZ750 (50PZ750-UG) 60PZ750 (60PZ750-UG) 1185.2 mm x 782.6 mm x... A / 370 W 5.3 A / 530 W AC 100 - 240 V ~ 50 / 60 Hz MODELS Dimensions (W x H x D) With stand Without stand Weight With stand Without stand Current Value / Power consumption Power requirement 50PZ950 (50PZ950-UA) 60PZ950 (60PZ950-UA) 50PZ950U (50PZ950U-UA) 60PZ950U (60PZ950U-UA) 1175.2 mm x 787.6...
...80% Storage Temperature -20 - 60°C Storage Humidity Less than 85% MODELS Dimensions (W x H x D) With stand Without stand Weight With stand Without stand Current Value / Power consumption Power requirement 50PZ750 (50PZ750-UG) 60PZ750 (60PZ750-UG) 1185.2 mm x 782.6 mm x... A / 370 W 5.3 A / 530 W AC 100 - 240 V ~ 50 / 60 Hz MODELS Dimensions (W x H x D) With stand Without stand Weight With stand Without stand Current Value / Power consumption Power requirement 50PZ950 (50PZ950-UA) 60PZ950 (60PZ950-UA) 50PZ950U (50PZ950U-UA) 60PZ950U (60PZ950U-UA) 1175.2 mm x 787.6...

Owner's Manual
Page 117
... / 60 Hz Other Country: AC 100 - 240 V ~ 50 / 60 Hz MODELS Dimensions (W x H x D) With stand Without stand Weight With stand Without stand Current Value / Power consumption Power requirement 42LV5400 (42LV5400-UB) 47LV5400 (47LV5400-UB) 55LV5400 (55LV5400-UB) 42LV5500 (42LV5500-UA) 47LV5500...50 / 60 Hz Other Country: AC 100 - 240 V ~ 50 / 60 Hz MODELS Dimensions (W x H x D) With stand Without stand Weight With stand Without stand Current Value / Power consumption Power requirement 42LW5600 (42LW5600-UA) 47LW5600 (47LW5600-UA) 55LW5600 (55LW5600-UA) 1005.0 mm x 688.0 mm...
... / 60 Hz Other Country: AC 100 - 240 V ~ 50 / 60 Hz MODELS Dimensions (W x H x D) With stand Without stand Weight With stand Without stand Current Value / Power consumption Power requirement 42LV5400 (42LV5400-UB) 47LV5400 (47LV5400-UB) 55LV5400 (55LV5400-UB) 42LV5500 (42LV5500-UA) 47LV5500...50 / 60 Hz Other Country: AC 100 - 240 V ~ 50 / 60 Hz MODELS Dimensions (W x H x D) With stand Without stand Weight With stand Without stand Current Value / Power consumption Power requirement 42LW5600 (42LW5600-UA) 47LW5600 (47LW5600-UA) 55LW5600 (55LW5600-UA) 1005.0 mm x 688.0 mm...

Owner's Manual
Page 118
... 50 / 60 Hz Other Country: AC 100 - 240 V ~ 50 / 60 Hz MODELS Dimensions (W x H x D) With stand Without stand Weight With stand Without stand Current Value / Power consumption Power requirement 47LW6500 (47LW6500-UA) 55LW6500 (55LW6500-UA) 65LW6500 (65LW6500-UA) 1119.0 mm x 749.0 mm...V ~ 50 / 60 Hz Other Country: AC 100 - 240 V ~ 50 / 60 Hz MODELS Dimensions (W x H x D) With stand Without stand Weight With stand Without stand Current Value / Power consumption Power requirement 47LW9500 (47LW9500-UA) 55LW9500 (55LW9500-UA) 60LW9500 (60LW9500-UA) 1095.2 mm x 734.9 mm 1265...
... 50 / 60 Hz Other Country: AC 100 - 240 V ~ 50 / 60 Hz MODELS Dimensions (W x H x D) With stand Without stand Weight With stand Without stand Current Value / Power consumption Power requirement 47LW6500 (47LW6500-UA) 55LW6500 (55LW6500-UA) 65LW6500 (65LW6500-UA) 1119.0 mm x 749.0 mm...V ~ 50 / 60 Hz Other Country: AC 100 - 240 V ~ 50 / 60 Hz MODELS Dimensions (W x H x D) With stand Without stand Weight With stand Without stand Current Value / Power consumption Power requirement 47LW9500 (47LW9500-UA) 55LW9500 (55LW9500-UA) 60LW9500 (60LW9500-UA) 1095.2 mm x 734.9 mm 1265...

Owner's Manual
Page 119
...: AC 100 - 240 V ~ 50 / 60 Hz MODELS Dimensions (W x H x D) With stand Without stand Weight With stand Without stand Current Value / Power consumption Power requirement 42LK530 (42LK530-UC) 47LK530 (47LK530-UC) 55LK530 (55LK530-UC) 1024.0 mm x 685.0 mm 1137.0 mm x 758.0 mm 1329.0...200 W 2.5 A / 250 W 3.2 A / 320 W AC 100 - 240V ~ 50 / 60 Hz MODELS Dimensions (W x H x D) With stand Without stand Weight With stand Without stand Current Value / Power consumption Power requirement 42LK550 (42LK550-UA) 47LK550 (47LK550-UA) 1019.0 mm x 698.0 mm x 265.0 mm 1132.0 mm x 762.0...
...: AC 100 - 240 V ~ 50 / 60 Hz MODELS Dimensions (W x H x D) With stand Without stand Weight With stand Without stand Current Value / Power consumption Power requirement 42LK530 (42LK530-UC) 47LK530 (47LK530-UC) 55LK530 (55LK530-UC) 1024.0 mm x 685.0 mm 1137.0 mm x 758.0 mm 1329.0...200 W 2.5 A / 250 W 3.2 A / 320 W AC 100 - 240V ~ 50 / 60 Hz MODELS Dimensions (W x H x D) With stand Without stand Weight With stand Without stand Current Value / Power consumption Power requirement 42LK550 (42LK550-UA) 47LK550 (47LK550-UA) 1019.0 mm x 698.0 mm x 265.0 mm 1132.0 mm x 762.0...


