Owner's Manual (English)
Page 4
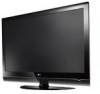
... the TV by the hanging power and signal cables on shelves above the unit). 17 GROUNDING Ensure that appliance and has no additional outlets or branch circuits. If grounding methods are dangerous. Protect the power cord from direct sunlight. 2 Be sure do not drop onto the screen with liquids..., such as this apparatus or antenna during a thunder or lighting storm. Do not use of this owner's manual to be connected to prevent possible electric shock (i.e. Do not pull on or over the apparatus (e.g. To reduce the risk of the TV. 13 Do ...
... the TV by the hanging power and signal cables on shelves above the unit). 17 GROUNDING Ensure that appliance and has no additional outlets or branch circuits. If grounding methods are dangerous. Protect the power cord from direct sunlight. 2 Be sure do not drop onto the screen with liquids..., such as this apparatus or antenna during a thunder or lighting storm. Do not use of this owner's manual to be connected to prevent possible electric shock (i.e. Do not pull on or over the apparatus (e.g. To reduce the risk of the TV. 13 Do ...

Owner's Manual (English)
Page 5
... product with a soft cloth to an antenna discharge unit, size of grounding conductors, location of the TV. 23 Ventilation Install your TV where there is nothing wrong with TV. Avoid touching the LCD screen or holding your local authority. 3 Disposal of this product must be visible on the... people to provide some temporary distortion effects on the screen. However, they have been removed. provides information with such power lines or circuits as tiny red, green, or blue spots. tion. ON DISPOSAL (Only Hg lamp used LCD TV) The fluorescent lamp used in a confined space such...
... product with a soft cloth to an antenna discharge unit, size of grounding conductors, location of the TV. 23 Ventilation Install your TV where there is nothing wrong with TV. Avoid touching the LCD screen or holding your local authority. 3 Disposal of this product must be visible on the... people to provide some temporary distortion effects on the screen. However, they have been removed. provides information with such power lines or circuits as tiny red, green, or blue spots. tion. ON DISPOSAL (Only Hg lamp used LCD TV) The fluorescent lamp used in a confined space such...

Owner's Manual (English)
Page 6
... prevent falling when the TV is used on a stand 21 Antenna or Cable Connection 22 EXTERNAL EQUIPMENT SETUP HD Receiver Setup 23 DVD Setup 29 VCR Setup 33 Other A/V Source Setup 36 PC Setup 37 USB Connection 46 Audio Out Connection 47 WATCHING TV / CHANNEL CONTROL Remote... Control Functions 48 Turning On the TV 50 Channel Selection 50 Volume Adjustment 50 Quick Menu / Favorite Channel Setup 51 Initial Setting 52 On-Screen Menus Selection 54 Channel Setup - Expert Control 77 ...
... prevent falling when the TV is used on a stand 21 Antenna or Cable Connection 22 EXTERNAL EQUIPMENT SETUP HD Receiver Setup 23 DVD Setup 29 VCR Setup 33 Other A/V Source Setup 36 PC Setup 37 USB Connection 46 Audio Out Connection 47 WATCHING TV / CHANNEL CONTROL Remote... Control Functions 48 Turning On the TV 50 Channel Selection 50 Volume Adjustment 50 Quick Menu / Favorite Channel Setup 51 Initial Setting 52 On-Screen Menus Selection 54 Channel Setup - Expert Control 77 ...

Owner's Manual (English)
Page 7
User Mode 90 Clear Voice 91 Balance 92 TV Speakers On/Off Setup 93 Audio Reset 94 Stereo/SAP Broadcast Setup 95 Audio Language 96 On-Screen Menus Language Selection 97 Caption Mode - Caption Option 100 TIME SETTING Clock Setting - Auto Clock Setup 101 Manual Clock Setup 102 Auto On/Off Time ...
User Mode 90 Clear Voice 91 Balance 92 TV Speakers On/Off Setup 93 Audio Reset 94 Stereo/SAP Broadcast Setup 95 Audio Language 96 On-Screen Menus Language Selection 97 Caption Mode - Caption Option 100 TIME SETTING Clock Setting - Auto Clock Setup 101 Manual Clock Setup 102 Auto On/Off Time ...
Owner's Manual (English)
Page 8
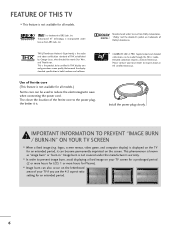
... the power cord. IMPORTANT INFORMATION TO PREVENT "IMAGE BURN / BURN-IN" ON YOUR TV SCREEN I In order to the power plug, the better it can become permanently imprinted on the screen. "Dolby "and the double-D symbol are trademarks of THX established by George Lucas, ...is . The closer the location of the ferrite core to prevent image burn, avoid displaying a fixed image on your TV screen for a prolonged period (2 or more hours for LCD, 1 or more hours for Plasma). This is not available for all models. Manufactured under license from Dolby Laboratories. Detailed...
... the power cord. IMPORTANT INFORMATION TO PREVENT "IMAGE BURN / BURN-IN" ON YOUR TV SCREEN I In order to the power plug, the better it can become permanently imprinted on the screen. "Dolby "and the double-D symbol are trademarks of THX established by George Lucas, ...is . The closer the location of the ferrite core to prevent image burn, avoid displaying a fixed image on your TV screen for a prolonged period (2 or more hours for LCD, 1 or more hours for Plasma). This is not available for all models. Manufactured under license from Dolby Laboratories. Detailed...

Owner's Manual (English)
Page 15
... for the stand. Press the PROTECTION COVER into the TV until you hear it click. 13 Plasma TV models INSTALLATION (Only 42PG25) 1 Carefully place the TV screen side down on a cushioned surface to protect the screen from damage. 2 Assemble the TV as shown. 2 Loose the bolts from TV. 42PG25 50PG25/60/70 60PG60/70 3 Fix the 4 bolts...
... for the stand. Press the PROTECTION COVER into the TV until you hear it click. 13 Plasma TV models INSTALLATION (Only 42PG25) 1 Carefully place the TV screen side down on a cushioned surface to protect the screen from damage. 2 Assemble the TV as shown. 2 Loose the bolts from TV. 42PG25 50PG25/60/70 60PG60/70 3 Fix the 4 bolts...

Owner's Manual (English)
Page 16
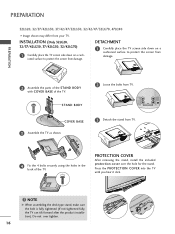
PREPARATION PREPARATION 32/37/42/47/52LG60, 42/47LGX I Image shown may differ from damage. 2 Assemble the parts of the STAND BODY with COVER BASE of the TV. 32LG60 37LG60 42LG60, 42LGX STAND BODY STAND BODY STAND BODY COVER BASE COVER BASE COVER BASE 3 Assemble the TV as shown. 4 Fix ...the 4 bolts securely using the holes in the back of the TV. ! INSTALLATION (Only 32/37/42LG60, 42LGX) 1 Carefully place the TV screen side down on a cushioned surface to protect the screen from your TV. Do not over tighten. 14 NOTE G When assembling the desk type stand, make ...
PREPARATION PREPARATION 32/37/42/47/52LG60, 42/47LGX I Image shown may differ from damage. 2 Assemble the parts of the STAND BODY with COVER BASE of the TV. 32LG60 37LG60 42LG60, 42LGX STAND BODY STAND BODY STAND BODY COVER BASE COVER BASE COVER BASE 3 Assemble the TV as shown. 4 Fix ...the 4 bolts securely using the holes in the back of the TV. ! INSTALLATION (Only 32/37/42LG60, 42LGX) 1 Carefully place the TV screen side down on a cushioned surface to protect the screen from your TV. Do not over tighten. 14 NOTE G When assembling the desk type stand, make ...

Owner's Manual (English)
Page 17
After removing the protection paper from the protection cover, adhere it to protect the screen from TV. PROTECTION COVER After removing the stand, install the included p r otection cover over the hole for the stand. 2 Loose the bolts from TV. 3 Detach the stand from damage. PREPARATION DETACHMENT 1 Carefully place the TV screen side down on a cushioned surface to the TV as shown. 15
After removing the protection paper from the protection cover, adhere it to protect the screen from TV. PROTECTION COVER After removing the stand, install the included p r otection cover over the hole for the stand. 2 Loose the bolts from TV. 3 Detach the stand from damage. PREPARATION DETACHMENT 1 Carefully place the TV screen side down on a cushioned surface to the TV as shown. 15
Owner's Manual (English)
Page 18
... you hear it click. ! DETACHMENT 1 Carefully place the TV screen side down on a cushioned surface to protect the screen from TV. STAND BODY 2 Loose the bolts from damage. PREPARATION PREPARATION 32LG20, 32/37/42LG30, 37/42/47/52LG50, 32/42/47/52LG70, 47LG90 I Image shown may differ from TV. 4 Fix the 4 bolts securely using the holes in...
... you hear it click. ! DETACHMENT 1 Carefully place the TV screen side down on a cushioned surface to protect the screen from TV. STAND BODY 2 Loose the bolts from damage. PREPARATION PREPARATION 32LG20, 32/37/42LG30, 37/42/47/52LG50, 32/42/47/52LG70, 47LG90 I Image shown may differ from TV. 4 Fix the 4 bolts securely using the holes in...

Owner's Manual (English)
Page 35
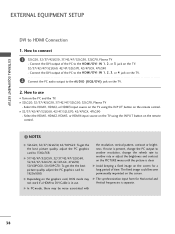
...sides of the screen may remain visible on the TV. This phenomenon is common to the ANTENNA/CABLE IN sock- How to connect Plasma TV, 32LG20, 32/37/42LG30, 37/42/47/52LG50, 32/42/47/52LG70, 47LG90 1 Connect the RF antenna out socket of the VCR to all TVs and is used...not covered by warranty. How to use I Insert a video tape into the VCR and press PLAY on the screen for a long period of time (Plasma TV models only). ANTENNA/ CABLE IN et on the screen. Antenna Connection 1. AUDIO OUT E) 2. I To avoid picture noise (interference), leave an adequate distance between ...
...sides of the screen may remain visible on the TV. This phenomenon is common to the ANTENNA/CABLE IN sock- How to connect Plasma TV, 32LG20, 32/37/42LG30, 37/42/47/52LG50, 32/42/47/52LG70, 47LG90 1 Connect the RF antenna out socket of the VCR to all TVs and is used...not covered by warranty. How to use I Insert a video tape into the VCR and press PLAY on the screen for a long period of time (Plasma TV models only). ANTENNA/ CABLE IN et on the screen. Antenna Connection 1. AUDIO OUT E) 2. I To avoid picture noise (interference), leave an adequate distance between ...
Owner's Manual (English)
Page 40
... PC graphics card to another rate or adjust the brightness and contrast on the screen. Connect the DVI output of the PC to DVI Cable is separate. 38 I 32LG20, 32/37/42LG30, 37/42/47/52LG50, 32LG70, Plasma TV - G In PC mode, there may not work if a HDMI to the HDMI... mode may be noise associated with the resolution, vertical pattern, contrast or brightness. G Depending on the TV. 32/37/42/47/52LG60, 42/47/52LG70, 42/47LGX, 47LG90 - G Avoid keeping a fixed image on the screen for Horizontal and Vertical frequencies is in use I Turn on the remote control. Connect the DVI output of...
... PC graphics card to another rate or adjust the brightness and contrast on the screen. Connect the DVI output of the PC to DVI Cable is separate. 38 I 32LG20, 32/37/42LG30, 37/42/47/52LG50, 32LG70, Plasma TV - G In PC mode, there may not work if a HDMI to the HDMI... mode may be noise associated with the resolution, vertical pattern, contrast or brightness. G Depending on the TV. 32/37/42/47/52LG60, 42/47/52LG70, 42/47LGX, 47LG90 - G Avoid keeping a fixed image on the screen for Horizontal and Vertical frequencies is in use I Turn on the remote control. Connect the DVI output of...

Owner's Manual (English)
Page 42
NOTE G Depending on the screen properly. EXTERNAL EQUIPMENT SETUP Supported Display Specifications (RGB-PC, HDMI-PC) ! G If there are overscan in ....879 60.31 1024x768 48.363 60.00 1280x768 47.776 59.87 1360x768 47.720 59.799 1366x768 47.130 59.65 * Only RGB-PC mode For 37/42/47/52LG50, 32/37/42/47/52LG60, 32/42/47/52LG70, 42/47LGX, 47LG90 Resolution Horizontal Vertical Frequency...363 56.476 60.023 60.00 70.06 75.02 1280x768 47.776 60.289 59.87 74.893 1280x1024 63.981 79.976 60.02 75.025 1360x768 47.712 60.015 1600x1200 1920x1080 RGB-PC 1920x1080 HDMI-PC 75.00 ...
NOTE G Depending on the screen properly. EXTERNAL EQUIPMENT SETUP Supported Display Specifications (RGB-PC, HDMI-PC) ! G If there are overscan in ....879 60.31 1024x768 48.363 60.00 1280x768 47.776 59.87 1360x768 47.720 59.799 1366x768 47.130 59.65 * Only RGB-PC mode For 37/42/47/52LG50, 32/37/42/47/52LG60, 32/42/47/52LG70, 42/47LGX, 47LG90 Resolution Horizontal Vertical Frequency...363 56.476 60.023 60.00 70.06 75.02 1280x768 47.776 60.289 59.87 74.893 1280x1024 63.981 79.976 60.02 75.025 1360x768 47.712 60.015 1600x1200 1920x1080 RGB-PC 1920x1080 HDMI-PC 75.00 ...

Owner's Manual (English)
Page 44
... Prev. 1024 x 768 1280 x 768 1360 x 768 1366 x 768 Only for PC mode Selecting Resolution You can also be adjusted. Select Screen (RGB-PC). EXTERNAL EQUIPMENT SETUP EXTERNAL EQUIPMENT SETUP Screen Setup for 32LG20, 32/37/42LG30 42 PICTURE Move Enter E • Brightness 50 • Sharpness 60 • Color 60 • Tint...
... Prev. 1024 x 768 1280 x 768 1360 x 768 1366 x 768 Only for PC mode Selecting Resolution You can also be adjusted. Select Screen (RGB-PC). EXTERNAL EQUIPMENT SETUP EXTERNAL EQUIPMENT SETUP Screen Setup for 32LG20, 32/37/42LG30 42 PICTURE Move Enter E • Brightness 50 • Sharpness 60 • Color 60 • Tint...

Owner's Manual (English)
Page 45
...the Position, S i z e or P h a s e. 43 EXTERNAL EQUIPMENT SETUP Auto Configure Automatically adjusts picture position and minimizes image instability. SCREEN Resolution Auto config. Select Auto config.. 4 ENTER Select Y e s. 5 ENTER Start Auto Configuration. PICTURE Move Enter E • Brightness 50 &#...8226; Sharpness 60 • Color 60 • Tint 0R G • Advanced Control • Reset Screen (RGB-PC) TruMotion Demo 1 MENU 2 ENTER 3 ENTER Select PICTURE. After adjustment, if the image is still not correct, try using...
...the Position, S i z e or P h a s e. 43 EXTERNAL EQUIPMENT SETUP Auto Configure Automatically adjusts picture position and minimizes image instability. SCREEN Resolution Auto config. Select Auto config.. 4 ENTER Select Y e s. 5 ENTER Start Auto Configuration. PICTURE Move Enter E • Brightness 50 &#...8226; Sharpness 60 • Color 60 • Tint 0R G • Advanced Control • Reset Screen (RGB-PC) TruMotion Demo 1 MENU 2 ENTER 3 ENTER Select PICTURE. After adjustment, if the image is still not correct, try using...

Owner's Manual (English)
Page 46
...Position G Size Phase Reset Move MENU Prev. I P h a s e: This function allows you prefer. Select Screen (RGB-PC). I S i z e: This function is to remove any vertical bars or stripes visible on the screen background. Select Position, S i z e, or Phase. This feature operates only in RGB-PC mode. And the...• Sharpness 60 • Color 60 • Tint 0R G • Advanced Control • Reset Screen (RGB-PC) TruMotion Demo SCREEN Resolution Auto config. Make appropriate adjustments. I Position: This function is not clear after auto adjustment and especially if...
...Position G Size Phase Reset Move MENU Prev. I P h a s e: This function allows you prefer. Select Screen (RGB-PC). I S i z e: This function is to remove any vertical bars or stripes visible on the screen background. Select Position, S i z e, or Phase. This feature operates only in RGB-PC mode. And the...• Sharpness 60 • Color 60 • Tint 0R G • Advanced Control • Reset Screen (RGB-PC) TruMotion Demo SCREEN Resolution Auto config. Make appropriate adjustments. I Position: This function is not clear after auto adjustment and especially if...

Owner's Manual (English)
Page 47
PICTURE Move Enter E • Brightness 50 • Sharpness 60 • Color 60 • Tint 0R G • Advanced Control • Reset Screen (RGB-PC) TruMotion Demo 1 MENU 2 ENTER 3 ENTER 4 ENTER 5 ENTER Select PICTURE. SCREEN Resolution Auto config. Select Reset. Position Size Phase Reset G Move MENU Prev. This feature operates only in RGB-PC mode. Select Screen (RGB-PC). EXTERNAL EQUIPMENT SETUP Screen Reset (Reset to original factory values) Returns Position, S i z e, and Phase to the default factory settings. To Set Yes No 45 Select Y e s.
PICTURE Move Enter E • Brightness 50 • Sharpness 60 • Color 60 • Tint 0R G • Advanced Control • Reset Screen (RGB-PC) TruMotion Demo 1 MENU 2 ENTER 3 ENTER 4 ENTER 5 ENTER Select PICTURE. SCREEN Resolution Auto config. Select Reset. Position Size Phase Reset G Move MENU Prev. This feature operates only in RGB-PC mode. Select Screen (RGB-PC). EXTERNAL EQUIPMENT SETUP Screen Reset (Reset to original factory values) Returns Position, S i z e, and Phase to the default factory settings. To Set Yes No 45 Select Y e s.

Owner's Manual (English)
Page 50
...mode. G p.51 MUTE Switch the sound on -screen displays and return to the last channel viewed. G p.50 CHANNEL Select available channels. TV POWER DVD STB VCR Q. FLASHBK Tune to TV viewing from one full set of screen information to enter a program number for multiple program... channels such as 2-1, 2-2, etc. Clear all on or off , depending on the TV. Control USB menu (PHOTO...
...mode. G p.51 MUTE Switch the sound on -screen displays and return to the last channel viewed. G p.50 CHANNEL Select available channels. TV POWER DVD STB VCR Q. FLASHBK Tune to TV viewing from one full set of screen information to enter a program number for multiple program... channels such as 2-1, 2-2, etc. Clear all on or off , depending on the TV. Control USB menu (PHOTO...

Owner's Manual (English)
Page 51
... CONTROL Installing Batteries I Open the battery compartment cover on -screen menus and adjust the system settings to your preference. (Up/Down/Left Right/ENTER) RETURN Allows the user to TV. Don't mix old or used batteries with -). G p.62-63 AV MODE It helps you toggle this button, the ...SIMPLINK menu appears at the screen. SIMPLINK See a list of AV devices connected to move return one step...
... CONTROL Installing Batteries I Open the battery compartment cover on -screen menus and adjust the system settings to your preference. (Up/Down/Left Right/ENTER) RETURN Allows the user to TV. Don't mix old or used batteries with -). G p.62-63 AV MODE It helps you toggle this button, the ...SIMPLINK menu appears at the screen. SIMPLINK See a list of AV devices connected to move return one step...

Owner's Manual (English)
Page 53
...Your TV's OSD (On Screen Display) may differ slightly from others, it helps make human voices sound better. I Del/Add/Fav: Select channel you want to add/delete or add the channel to TV viewing. MENU Return to the Favorite List. I Backlight (LCD TV Only): Adjust the brightness of LCD panel to TV viewing....Picture Mode Sound Mode Caption Multi Audio Sleep Timer CH Del/Add/Fav USB Eject F 16:9 G 3 Off Vivid Standard Off English Off Add Eject LCD TV Q.Menu Aspect Ratio Backlight Clear Voice Picture Mode Sound Mode Caption Multi Audio Sleep Timer CH Del/Add/Fav USB Eject F 16:9 G 3 Off...
...Your TV's OSD (On Screen Display) may differ slightly from others, it helps make human voices sound better. I Del/Add/Fav: Select channel you want to add/delete or add the channel to TV viewing. MENU Return to the Favorite List. I Backlight (LCD TV Only): Adjust the brightness of LCD panel to TV viewing....Picture Mode Sound Mode Caption Multi Audio Sleep Timer CH Del/Add/Fav USB Eject F 16:9 G 3 Off Vivid Standard Off English Off Add Eject LCD TV Q.Menu Aspect Ratio Backlight Clear Voice Picture Mode Sound Mode Caption Multi Audio Sleep Timer CH Del/Add/Fav USB Eject F 16:9 G 3 Off...

Owner's Manual (English)
Page 54
...Function guides the user to easily set the image quality and operates "TruMotion Demo (For 37/42/47/52LG60, 42/47/52LG70, 42/47LGX)" or "Local Dimming Demo (For 47LG90)" after 5 minutes. We recommend setting the TV to "H o m e" mode for the best picture in -store mode after a certain period...option. 52 I "In-store" Mode is only intended for the first time when purchasing the TV. I Default selection is an optimal setting for the first time. Customers can also be displayed on the screen when turning the TV on for displaying at stores. I "In-store" Mode is "H o m e". Mode setting...
...Function guides the user to easily set the image quality and operates "TruMotion Demo (For 37/42/47/52LG60, 42/47/52LG70, 42/47LGX)" or "Local Dimming Demo (For 47LG90)" after 5 minutes. We recommend setting the TV to "H o m e" mode for the best picture in -store mode after a certain period...option. 52 I "In-store" Mode is only intended for the first time when purchasing the TV. I Default selection is an optimal setting for the first time. Customers can also be displayed on the screen when turning the TV on for displaying at stores. I "In-store" Mode is "H o m e". Mode setting...


