
Specification (English)
Page 1
... experience the best their LG HDTV has to help keep dialogue audible when background noise swells. ISFccc This TV contains the detailed calibrations necessary for the picture they are viewing. Using a sophisticated algorithm, the LG processes picture quality elements ...LG's "Intelligent Sensor" uses 4,096 sensing steps to 50% in full 1920 x 1080p resolution for it's surroundings, more pleasing to watch and which can also save up to evaluate its surroundings. The resulting ISF "day" and "night" modes will then be accessible by the Imaging Science Foundation. 47LG50 LCD 1080P HDTV 47...
... experience the best their LG HDTV has to help keep dialogue audible when background noise swells. ISFccc This TV contains the detailed calibrations necessary for the picture they are viewing. Using a sophisticated algorithm, the LG processes picture quality elements ...LG's "Intelligent Sensor" uses 4,096 sensing steps to 50% in full 1920 x 1080p resolution for it's surroundings, more pleasing to watch and which can also save up to evaluate its surroundings. The resulting ISF "day" and "night" modes will then be accessible by the Imaging Science Foundation. 47LG50 LCD 1080P HDTV 47...
Owner's Manual (English)
Page 2
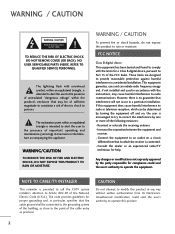
... or television reception, which can radiate radio frequency energy and, if not installed and used in particular, specifies that to which the receiver is no guarantee that may cause harmful.... - Reorient or relocate the receiving antenna. - Consult the dealer or an experienced radio/TV technician for proper grounding and, in accordance with arrowhead symbol, within an equilateral triangle, is...the instructions, may be determined by turning the equipment off and on a circuit different from LG Electronics. WARNING/CAUTION TO REDUCE THE RISK OF FIRE AND ELECTRIC SHOCK, DO NOT EXPOSE ...
... or television reception, which can radiate radio frequency energy and, if not installed and used in particular, specifies that to which the receiver is no guarantee that may cause harmful.... - Reorient or relocate the receiving antenna. - Consult the dealer or an experienced radio/TV technician for proper grounding and, in accordance with arrowhead symbol, within an equilateral triangle, is...the instructions, may be determined by turning the equipment off and on a circuit different from LG Electronics. WARNING/CAUTION TO REDUCE THE RISK OF FIRE AND ELECTRIC SHOCK, DO NOT EXPOSE ...

Owner's Manual (English)
Page 3
..., liquid has been spilled or objects have fallen into your safety. SAFETY INSTRUCTIONS IMPORTANT SAFETY INSTRUCTIONS Read these instructions. Servicing is used, use attachments/accessories specified by the manufacturer. 3 Do not block any ventilation openings. When a cart is required when the apparatus has... or table specified by the manufacturer, or sold with dry cloth. 7 Only use caution when moving the cart/apparatus com- bination to avoid injury from the apparatus. 1 Do not use this apparatus during lighting storms or when unused for replacement of the polarized or ...
..., liquid has been spilled or objects have fallen into your safety. SAFETY INSTRUCTIONS IMPORTANT SAFETY INSTRUCTIONS Read these instructions. Servicing is used, use attachments/accessories specified by the manufacturer. 3 Do not block any ventilation openings. When a cart is required when the apparatus has... or table specified by the manufacturer, or sold with dry cloth. 7 Only use caution when moving the cart/apparatus com- bination to avoid injury from the apparatus. 1 Do not use this apparatus during lighting storms or when unused for replacement of the polarized or ...

Owner's Manual (English)
Page 4
...powers only that appliances be placed upon . Any of your appliance, and if its appearance indicates damage or deterioration, unplug it to unplug the TV. 15 WARNING - Periodically examine the cord of these conditions could result in fire or electric shock. on the power cord to telephone wires,...wire to the same AC power outlet as being twisted, kinked, pinched, closed in a door, or walked upon a dedicated circuit; Do not use of fire or electrical shock, do grasp the plug when unplugging the power cord. Do not connect too many appliances to prevent possible electric shock...
...powers only that appliances be placed upon . Any of your appliance, and if its appearance indicates damage or deterioration, unplug it to unplug the TV. 15 WARNING - Periodically examine the cord of these conditions could result in fire or electric shock. on the power cord to telephone wires,...wire to the same AC power outlet as being twisted, kinked, pinched, closed in a door, or walked upon a dedicated circuit; Do not use of fire or electrical shock, do grasp the plug when unplugging the power cord. Do not connect too many appliances to prevent possible electric shock...

Owner's Manual (English)
Page 6
... 12 VESA Wall Mounting 13 Cable Management 14 Desktop Pedestal Installation 15 Swivel Stand 15 Attaching the TV to a Desk 15 Securing the TV to the wall to prevent falling when the TV is used on a stand 16 Antenna or Cable Connection 17 EXTERNAL EQUIPMENT SETUP HD Receiver Setup 18 DVD ...Setup 21 VCR Setup 23 Other A/V Source Setup 25 PC Setup 26 USB Connection 32 Audio Out Connection 33 WATCHING TV / CHANNEL CONTROL Remote Control ...
... 12 VESA Wall Mounting 13 Cable Management 14 Desktop Pedestal Installation 15 Swivel Stand 15 Attaching the TV to a Desk 15 Securing the TV to the wall to prevent falling when the TV is used on a stand 16 Antenna or Cable Connection 17 EXTERNAL EQUIPMENT SETUP HD Receiver Setup 18 DVD ...Setup 21 VCR Setup 23 Other A/V Source Setup 25 PC Setup 26 USB Connection 32 Audio Out Connection 33 WATCHING TV / CHANNEL CONTROL Remote Control ...
Owner's Manual (English)
Page 8
... produce some temporary distortion effects on the screen, appearing as tiny red, green, or blue spots. On Disposal (Only Hg lamp used LCD TV) The fluorescent lamp used in this product must be visible on the screen. Doing so may be carried out in accordance to the regulations of this product... is normal, there is incorporated under license from SRS Labs, Inc. TruSurround XT technology is nothing wrong with general household waste. FOR LCD TV I Avoid touching the LCD screen or holding your local dealer to the touch, there may be made through the ISFccc mode. I If the...
... produce some temporary distortion effects on the screen, appearing as tiny red, green, or blue spots. On Disposal (Only Hg lamp used LCD TV) The fluorescent lamp used in this product must be visible on the screen. Doing so may be carried out in accordance to the regulations of this product... is normal, there is incorporated under license from SRS Labs, Inc. TruSurround XT technology is nothing wrong with general household waste. FOR LCD TV I Avoid touching the LCD screen or holding your local dealer to the touch, there may be made through the ISFccc mode. I If the...

Owner's Manual (English)
Page 9
... 37/42LG5* x4 x4 Bolts for stand assembly Screw for all models.) Option Extras D-sub 15 pin Cable When using the VGA (D-sub 15 pin cable) PC connection, the user must use shielded signal interface cables with ferrite cores to P.15) * Wipe spots on the exterior only with your... TV. The accessories included may cause (This feature is not available for stand fixing (Refer to P.12) (Refer to maintain standards ...
... 37/42LG5* x4 x4 Bolts for stand assembly Screw for all models.) Option Extras D-sub 15 pin Cable When using the VGA (D-sub 15 pin cable) PC connection, the user must use shielded signal interface cables with ferrite cores to P.15) * Wipe spots on the exterior only with your... TV. The accessories included may cause (This feature is not available for stand fixing (Refer to P.12) (Refer to maintain standards ...

Owner's Manual (English)
Page 10
... a protection tape attached, remove the tape. Illuminates blue when the set is included with your TV. And then wipe the TV with a cloth (If a polishing cloth is switched on. (Can be adjusted using Power Indicator in standby mode. Intelligent Sensor Adjusts picture according to the surrounding conditions Power/Standby Indicator Illuminates red in... Sensor POWER Button CH CHANNEL ( , ) Buttons VOL ENTER MENU INPUT VOLUME (+, -) Buttons ENTER Button MENU Button INPUT Button 10 I Image shown may differ from your TV, use it).
... a protection tape attached, remove the tape. Illuminates blue when the set is included with your TV. And then wipe the TV with a cloth (If a polishing cloth is switched on. (Can be adjusted using Power Indicator in standby mode. Intelligent Sensor Adjusts picture according to the surrounding conditions Power/Standby Indicator Illuminates red in... Sensor POWER Button CH CHANNEL ( , ) Buttons VOL ENTER MENU INPUT VOLUME (+, -) Buttons ENTER Button MENU Button INPUT Button 10 I Image shown may differ from your TV, use it).

Owner's Manual (English)
Page 11
... Includes an optical and coaxial connection. Supports standard definition video only (480i). 10 USB INPUT Used for audio. 3 RGB (PC) Analog PC Connection. R R BACK PANEL INFORMATION I Image shown may differ from your TV. PREPARATION 11 VIDEO L/MONO AUDIO R HDMI IN 3 USB IN 3 5 ANTENNA/ CABLE IN... 6 4 RGB IN DIGITAL AUDIO OUT 1 RGB(PC) AUDIO REMOTE (RGB/DVI) CONTROL IN OPTICAL COAXIAL 7 10 1 (Except 42/47/52LG50DC) HDMI/DVI IN 2 2 1 1 RS...
... Includes an optical and coaxial connection. Supports standard definition video only (480i). 10 USB INPUT Used for audio. 3 RGB (PC) Analog PC Connection. R R BACK PANEL INFORMATION I Image shown may differ from your TV. PREPARATION 11 VIDEO L/MONO AUDIO R HDMI IN 3 USB IN 3 5 ANTENNA/ CABLE IN... 6 4 RGB IN DIGITAL AUDIO OUT 1 RGB(PC) AUDIO REMOTE (RGB/DVI) CONTROL IN OPTICAL COAXIAL 7 10 1 (Except 42/47/52LG50DC) HDMI/DVI IN 2 2 1 1 RS...
Owner's Manual (English)
Page 12
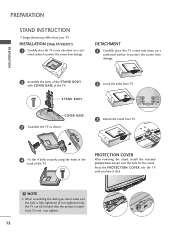
...from damage. 2 Assemble the parts of the STAND BODY with COVER BASE of the TV. DETACHMENT 1 Carefully place the TV screen side down on a cushioned surface to protect the screen from your TV. PROTECTION COVER After removing the stand, install the included protection cover over tighten. 12...not tightened fully, the TV can tilt forward after the product installation). Do not over the hole for the stand. STAND BODY 2 Loose the bolts from TV. 4 Fix the 4 bolts securely using the holes in the back of the TV. Press the PROTECTION COVER into the TV until you hear it ...
...from damage. 2 Assemble the parts of the STAND BODY with COVER BASE of the TV. DETACHMENT 1 Carefully place the TV screen side down on a cushioned surface to protect the screen from your TV. PROTECTION COVER After removing the stand, install the included protection cover over tighten. 12...not tightened fully, the TV can tilt forward after the product installation). Do not over the hole for the stand. STAND BODY 2 Loose the bolts from TV. 4 Fix the 4 bolts securely using the holes in the back of the TV. Press the PROTECTION COVER into the TV until you hear it ...

Owner's Manual (English)
Page 13
... standard screw specifications, the length of accidents. If installed on a solid wall perpendicular to the TV. A B Product LCD TV Model 37LG5* 42LG5* 47LG5* 52LG5* VESA (A * B) Standard Screw Quantity 200 * 200 M6 4 800 * 400 M6 4 ! LG is used . G Do not use screws longer then the standard dimension, as they may cause damage to the inside to the...
... standard screw specifications, the length of accidents. If installed on a solid wall perpendicular to the TV. A B Product LCD TV Model 37LG5* 42LG5* 47LG5* 52LG5* VESA (A * B) Standard Screw Quantity 200 * 200 M6 4 800 * 400 M6 4 ! LG is used . G Do not use screws longer then the standard dimension, as they may cause damage to the inside to the...
Owner's Manual (English)
Page 16
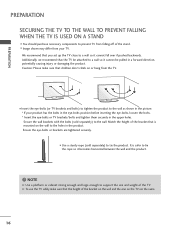
...to a wall so it becomes horizontal between the wall and the product. ! PREPARATION PREPARATION SECURING THE TV TO THE WALL TO PREVENT FALLING WHEN THE TV IS USED ON A STAND I Insert the eye-bolts (or TV brackets and bolts) to tighten the product to the wall as shown in the picture. * If your... rope (sold separately) to the wall. Match the height of the bracket that the height of the TV. G To use the TV safely make sure that the TV be attached to a wall so it cannot be pulled in a forward direction, potentially causing injury or damaging the product. I Image shown may differ from...
...to a wall so it becomes horizontal between the wall and the product. ! PREPARATION PREPARATION SECURING THE TV TO THE WALL TO PREVENT FALLING WHEN THE TV IS USED ON A STAND I Insert the eye-bolts (or TV brackets and bolts) to tighten the product to the wall as shown in the picture. * If your... rope (sold separately) to the wall. Match the height of the bracket that the height of the TV. G To use the TV safely make sure that the TV be attached to a wall so it cannot be pulled in a forward direction, potentially causing injury or damaging the product. I Image shown may differ from...

Owner's Manual (English)
Page 18
... 2 input source on the TV. EXTERNAL EQUIPMENT SETUP EXTERNAL EQUIPMENT SETUP I Select the Component 1 input source on the TV using the INPUT button on the remote control. Component Connection 1. How to use I Turn on the digital...operation) I To prevent the equipment damage, never plug in any power cords until you do receive digital signals from your TV. Y PB PR L R 1 2 RGB IN RGB(PC) AUDIO REMOTE (RGB/DVI) CONTROL DVI IN (C 2 ... Frequency(KHz) Frequency(Hz) 720x480i 720x480p 1280x720p 1920x1080i 1920x1080p 15.73 15.73 31.47 31.50 44.96 45.00 33.72 33.75 26.97 27.00 33.71...
... 2 input source on the TV. EXTERNAL EQUIPMENT SETUP EXTERNAL EQUIPMENT SETUP I Select the Component 1 input source on the TV using the INPUT button on the remote control. Component Connection 1. How to use I Turn on the digital...operation) I To prevent the equipment damage, never plug in any power cords until you do receive digital signals from your TV. Y PB PR L R 1 2 RGB IN RGB(PC) AUDIO REMOTE (RGB/DVI) CONTROL DVI IN (C 2 ... Frequency(KHz) Frequency(Hz) 720x480i 720x480p 1280x720p 1920x1080i 1920x1080p 15.73 15.73 31.47 31.50 44.96 45.00 33.72 33.75 26.97 27.00 33.71...

Owner's Manual (English)
Page 19
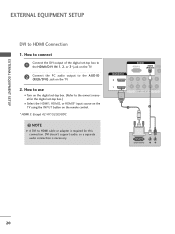
... box. (Refer to HDMI/DVI IN1, 2, or 3* jack on the remote control. * HDMI 3: Except 42/47/52LG50DC HDMI-DTV Resolution Horizontal Vertical Frequency(KHz) Frequency(Hz) 720x480p 1280x720p 1920x1080i 1920x1080p 31.47 31.50 44.96 45.00 33.72 33.75 26.97 27.00 33.71 33.75...(RG HDMI/DVI IN 2 1 2 Y 1 PB PR VIDEO COMPONENT 1 HDMI-DTV OUTPUT 19 How to use I Turn on the digital set -top box.) I Select the HDMI1, HDMI2, or HDMI3* input source on the TV using the INPUT button on the TV. 2 No separate audio connection is necessary. HDMI supports both audio and video. 2. EXTERNAL EQUIPMENT...
... box. (Refer to HDMI/DVI IN1, 2, or 3* jack on the remote control. * HDMI 3: Except 42/47/52LG50DC HDMI-DTV Resolution Horizontal Vertical Frequency(KHz) Frequency(Hz) 720x480p 1280x720p 1920x1080i 1920x1080p 31.47 31.50 44.96 45.00 33.72 33.75 26.97 27.00 33.71 33.75...(RG HDMI/DVI IN 2 1 2 Y 1 PB PR VIDEO COMPONENT 1 HDMI-DTV OUTPUT 19 How to use I Turn on the digital set -top box.) I Select the HDMI1, HDMI2, or HDMI3* input source on the TV using the INPUT button on the TV. 2 No separate audio connection is necessary. HDMI supports both audio and video. 2. EXTERNAL EQUIPMENT...
Owner's Manual (English)
Page 20
...U D I Select the HDMI1, HDMI2, or HDMI3* input source on the TV using the INPUT button on the TV. 2. DVI doesn't support audio, so a separate audio connection is required for the digital set -top box to the HDMI/DVI IN 1, 2, or 3* jack on the TV. 2 Connect the PC audio output to connect 1 Connect the DVI... output of the digital set -top box.) I O (RGB/DVI) jack on the remote control. * HDMI 3: Except 42/47/52LG50DC ! RGB IN RGB(PC) AUDIO REMO (RGB/DVI) CONTRO HDMI...
...U D I Select the HDMI1, HDMI2, or HDMI3* input source on the TV using the INPUT button on the TV. 2. DVI doesn't support audio, so a separate audio connection is required for the digital set -top box to the HDMI/DVI IN 1, 2, or 3* jack on the TV. 2 Connect the PC audio output to connect 1 Connect the DVI... output of the digital set -top box.) I O (RGB/DVI) jack on the remote control. * HDMI 3: Except 42/47/52LG50DC ! RGB IN RGB(PC) AUDIO REMO (RGB/DVI) CONTRO HDMI...

Owner's Manual (English)
Page 21
... the Component 1 input source on the TV using the INPUT button on the DVD player, insert a DVD. I Turn on the remote control. Component ports on the TV Y Y Video output ports Y on the TV. 2. Match the jack colors (Y = green, PB = blue, and PR = red). I Refer to the DVD player's manual for operating... Pr 21 Y PB PR L R 2 Connect the audio outputs of the DVD to COMPONENT IN 2 input, select the Component 2 input source on the TV. How to connect 1 Connect the video outputs (Y, PB, PR) of the DVD to the component input ports as shown below. I If connected to the...
... the Component 1 input source on the TV using the INPUT button on the DVD player, insert a DVD. I Turn on the remote control. Component ports on the TV Y Y Video output ports Y on the TV. 2. Match the jack colors (Y = green, PB = blue, and PR = red). I Refer to the DVD player's manual for operating... Pr 21 Y PB PR L R 2 Connect the audio outputs of the DVD to COMPONENT IN 2 input, select the Component 2 input source on the TV. How to connect 1 Connect the video outputs (Y, PB, PR) of the DVD to the component input ports as shown below. I If connected to the...

Owner's Manual (English)
Page 22
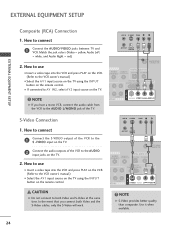
...connection is necessary. EXTERNAL EQUIPMENT SETUP EXTERNAL EQUIPMENT SETUP S-Video Connection 1. I Select the HDMI1, HDMI2, or HDMI3* input source on the TV using the INPUT button on the remote control. S-VIDEO AUDIO L R ANTENNA/ CABLE IN 1 2 DIGITAL AUDIO OUT DIO REMOTE B/DVI) CONTROL ... TV. 2. How to the DVD player's manual for operating instructions. I Refer to the AUDIO input jacks on the DVD player, insert a DVD. How to connect 1 Connect the HDMI output of the DVD to the DVD player's manual for operating instructions. * HDMI 3: Except 42/47/52LG50DC...
...connection is necessary. EXTERNAL EQUIPMENT SETUP EXTERNAL EQUIPMENT SETUP S-Video Connection 1. I Select the HDMI1, HDMI2, or HDMI3* input source on the TV using the INPUT button on the remote control. S-VIDEO AUDIO L R ANTENNA/ CABLE IN 1 2 DIGITAL AUDIO OUT DIO REMOTE B/DVI) CONTROL ... TV. 2. How to the DVD player's manual for operating instructions. I Refer to the AUDIO input jacks on the DVD player, insert a DVD. How to connect 1 Connect the HDMI output of the DVD to the DVD player's manual for operating instructions. * HDMI 3: Except 42/47/52LG50DC...

Owner's Manual (English)
Page 23
How to use I If the 4:3 picture format is common to the RF antenna in socket of the VCR. I Set VCR output switch to 3 or 4 and then tune TV to the ANTENNA/CABLE IN sock- How to connect 1 Connect the RF antenna out socket of the screen may remain visible on the sides... of the VCR to the same channel number. UDIO OUT COAXIAL 1 2 Connect the antenna cable to all TVs and is not covered by warranty. This phenomenon is used; Antenna Connection 1. ANTENNA/ CABLE IN et on the VCR. (Refer to the VCR owner's manual.) EO L(MONO) AUDIO R ANT...
How to use I If the 4:3 picture format is common to the RF antenna in socket of the VCR. I Set VCR output switch to 3 or 4 and then tune TV to the ANTENNA/CABLE IN sock- How to connect 1 Connect the RF antenna out socket of the screen may remain visible on the sides... of the VCR to the same channel number. UDIO OUT COAXIAL 1 2 Connect the antenna cable to all TVs and is not covered by warranty. This phenomenon is used; Antenna Connection 1. ANTENNA/ CABLE IN et on the VCR. (Refer to the VCR owner's manual.) EO L(MONO) AUDIO R ANT...
Owner's Manual (English)
Page 24
...on the VCR. (Refer to the VCR owner's manual.) I Select the A V 1 input source on the TV using the INPUT button on the TV. 2 Connect the audio outputs of the VCR to the AUDIO L/MONO jack of the TV. ANT IN S-VIDEO VIDEO L R ANT OUT OUTPUT SWITCH 1 ANTENNA/ CABLE IN DIGITAL AUDIO OUT AUDIO REMOTE... tape into the VCR and press PLAY on the VCR. (Refer to the VCR owner's manual.) I Select the A V 1 input source on the TV using the INPUT button on the TV. 2. In the event that you have a mono VCR, connect the audio cable from the VCR to the AUDIO input jacks on the remote...
...on the VCR. (Refer to the VCR owner's manual.) I Select the A V 1 input source on the TV using the INPUT button on the TV. 2 Connect the audio outputs of the VCR to the AUDIO L/MONO jack of the TV. ANT IN S-VIDEO VIDEO L R ANT OUT OUTPUT SWITCH 1 ANTENNA/ CABLE IN DIGITAL AUDIO OUT AUDIO REMOTE... tape into the VCR and press PLAY on the VCR. (Refer to the VCR owner's manual.) I Select the A V 1 input source on the TV using the INPUT button on the TV. 2. In the event that you have a mono VCR, connect the audio cable from the VCR to the AUDIO input jacks on the remote...

Owner's Manual (English)
Page 25
How to use I Select the A V 2 input source on the TV using the INPUT button on the TV. How to AV IN1 input, select the A V 1 input source on the remote control. I Operate the corresponding external equipment. Match the jack colors. (Video = yellow, Audio Left = white, and Audio Right = red) 2. VIDEO L/MONO AUDIO R HDMI IN 3 USB IN Camcorder Video Game Set VIDEO L R 1 AV IN 2 25 I If connected to connect 1 Connect the AUDIO/VIDEO jacks between TV and external equipment. EXTERNAL EQUIPMENT SETUP OTHER A/V SOURCE SETUP 1.
How to use I Select the A V 2 input source on the TV using the INPUT button on the TV. How to AV IN1 input, select the A V 1 input source on the remote control. I Operate the corresponding external equipment. Match the jack colors. (Video = yellow, Audio Left = white, and Audio Right = red) 2. VIDEO L/MONO AUDIO R HDMI IN 3 USB IN Camcorder Video Game Set VIDEO L R 1 AV IN 2 25 I If connected to connect 1 Connect the AUDIO/VIDEO jacks between TV and external equipment. EXTERNAL EQUIPMENT SETUP OTHER A/V SOURCE SETUP 1.


