

Owner's Manual (English)
Page 1
Retain it for energy efficiency. Record model number and serial number of the set of power-saving guidelines issued by the U.S. See the label attached on the back cover and quote this information to your set. As an ENERGY STAR Partner LGE U.S.A., Inc. ENERGY STAR is a set . has determined that this product meets the ENERGY STAR guidelines for future reference. Environmental Protection Agency(EPA). PLASMA TV OWNER'S MANUAL MODELS : 42PB4D 60PB4D 50PB4D Please read this manual carefully before operating your dealer when you require service. www.lgusa.com / www.lg.ca
Retain it for energy efficiency. Record model number and serial number of the set of power-saving guidelines issued by the U.S. See the label attached on the back cover and quote this information to your set. As an ENERGY STAR Partner LGE U.S.A., Inc. ENERGY STAR is a set . has determined that this product meets the ENERGY STAR guidelines for future reference. Environmental Protection Agency(EPA). PLASMA TV OWNER'S MANUAL MODELS : 42PB4D 60PB4D 50PB4D Please read this manual carefully before operating your dealer when you require service. www.lgusa.com / www.lg.ca

Owner's Manual (English)
Page 3
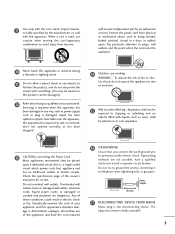
... this apparatus when unused for use attachments/accessories specified by adding statements after the end of time. 2 Owner Manual 8 Unplug this apparatus near any ventilation openings. At the mplaanceudfaicmtumreerd'siaotepltyioand,jaacepnictOOtwwtunneeorrrMMeaanntuuaahlloart drawing that produce heat. 6 Protect... particularly at plugs, convenience receptacles, and the point where they exit from the apparatus. Owner Owner ManuOalwner Manual Manual 5 Do not defeat the safety purpose of a specific safety instruction may be located before any operating instructions...
... this apparatus when unused for use attachments/accessories specified by adding statements after the end of time. 2 Owner Manual 8 Unplug this apparatus near any ventilation openings. At the mplaanceudfaicmtumreerd'siaotepltyioand,jaacepnictOOtwwtunneeorrrMMeaanntuuaahlloart drawing that produce heat. 6 Protect... particularly at plugs, convenience receptacles, and the point where they exit from the apparatus. Owner Owner ManuOalwner Manual Manual 5 Do not defeat the safety purpose of a specific safety instruction may be located before any operating instructions...
Owner's Manual (English)
Page 4
..., extension cords, frayed power cords, or damaged or cracked wire insulation are not possible, have fallen into the product, and do not expose this owner's manual to be damaged.) 12 Refer all servicing to rain or moisture, does not operate normally, or has been dropped. 14 Outdoor use marking : WARNING - If...
..., extension cords, frayed power cords, or damaged or cracked wire insulation are not possible, have fallen into the product, and do not expose this owner's manual to be damaged.) 12 Refer all servicing to rain or moisture, does not operate normally, or has been dropped. 14 Outdoor use marking : WARNING - If...
Owner's Manual (English)
Page 5
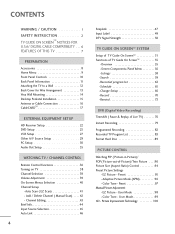
Preset 95 - Color Tone - EZ Picture - Picture Improvement Technology 100 Add / Delete Channel ( Manual Scan) . . . . 42 - EZ Picture - Channel Editing 43 Brief Info 44 Input Source Selection 45 Auto Link 46 4 SimpLink 47 Input Label 49 DTV Signal Strength ...-Screen Menus Selection 40 Channel Setup -Auto Scan ( EZ Scan 41 - Adaptive Picture Mode (APM 96 - User Mode 98 - User Mode 99 XD - Preset 97 Manual Picture Adjustment -
Preset 95 - Color Tone - EZ Picture - Picture Improvement Technology 100 Add / Delete Channel ( Manual Scan) . . . . 42 - EZ Picture - Channel Editing 43 Brief Info 44 Input Source Selection 45 Auto Link 46 4 SimpLink 47 Input Label 49 DTV Signal Strength ...-Screen Menus Selection 40 Channel Setup -Auto Scan ( EZ Scan 41 - Adaptive Picture Mode (APM 96 - User Mode 98 - User Mode 99 XD - Preset 97 Manual Picture Adjustment -
Owner's Manual (English)
Page 9
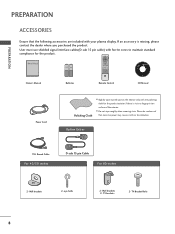
... Remote Control CD Manual Power Cord Polishing Cloth I Do not wipe roughly when removing stain. Option Extras 75Ω Round Cable For 42/50 inches D-sub 15 pin Cable ... are included with the polishing cloth for the product. TV INPUT TV/VIDEO MODE Owner's Manual DAY - DAY + 1.5V 1.5V LCD TV PLASMA TV Owner's Manual FLASHBK APM CC AUTO DEMO M/C EJECT http://www.lgusa.com www.lg.ca Copyright© 2007 LGE, All Rights Reserved. PREPARATION PREPARATION ACCESSORIES Ensure that excessive power...
... Remote Control CD Manual Power Cord Polishing Cloth I Do not wipe roughly when removing stain. Option Extras 75Ω Round Cable For 42/50 inches D-sub 15 pin Cable ... are included with the polishing cloth for the product. TV INPUT TV/VIDEO MODE Owner's Manual DAY - DAY + 1.5V 1.5V LCD TV PLASMA TV Owner's Manual FLASHBK APM CC AUTO DEMO M/C EJECT http://www.lgusa.com www.lg.ca Copyright© 2007 LGE, All Rights Reserved. PREPARATION PREPARATION ACCESSORIES Ensure that excessive power...
Owner's Manual (English)
Page 10
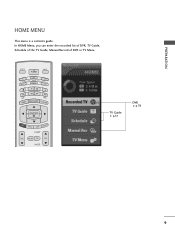
LIVE TV INPUT MODE DAY - In HOME Menu, you can enter the recorded list of DVR, TV Guide, Schedule of the TV Guide, Manual Record of DVR or TV Menu. DAY + SIMPLINK TV Guide p.51 DVR p.76 9 PREPARATION HOME MENU This menu is a contents guide.
LIVE TV INPUT MODE DAY - In HOME Menu, you can enter the recorded list of DVR, TV Guide, Schedule of the TV Guide, Manual Record of DVR or TV Menu. DAY + SIMPLINK TV Guide p.51 DVR p.76 9 PREPARATION HOME MENU This menu is a contents guide.
Owner's Manual (English)
Page 19
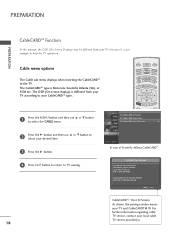
... SCM etc. Cable menu options The Cable sub menu displays when inserting the CableCARDTM to help the TV operation. PREPARATION PREPARATION CableCARDTM Function In this manual, the OSD (On Screen Display) may be different from your TV according to start service for this device, please contact customer service at Ph#: 1-866...
... SCM etc. Cable menu options The Cable sub menu displays when inserting the CableCARDTM to help the TV operation. PREPARATION PREPARATION CableCARDTM Function In this manual, the OSD (On Screen Display) may be different from your TV according to start service for this device, please contact customer service at Ph#: 1-866...
Owner's Manual (English)
Page 21
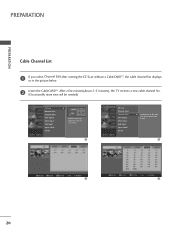
EZ Scan Manual Scan Channel Edit DTV Signal Main Input Sub Input Input Label Set ID G Selection ( G or ) leads you select Channel Edit after running the EZ Scan ... to the EZ scan screen. After a few minutes(about 2~3 minutes), the TV receives a new cable channel list . (Occasionally more time will be needed) EZ Scan Manual Scan Channel Edit DTV Signal Main Input Sub Input Input Label Set ID G Selection ( G or ) leads you to the channel edit screen. 20
EZ Scan Manual Scan Channel Edit DTV Signal Main Input Sub Input Input Label Set ID G Selection ( G or ) leads you select Channel Edit after running the EZ Scan ... to the EZ scan screen. After a few minutes(about 2~3 minutes), the TV receives a new cable channel list . (Occasionally more time will be needed) EZ Scan Manual Scan Channel Edit DTV Signal Main Input Sub Input Input Label Set ID G Selection ( G or ) leads you to the channel edit screen. 20
Owner's Manual (English)
Page 23
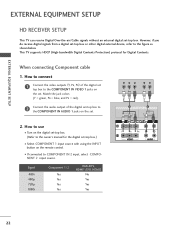
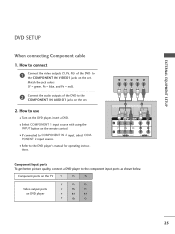
... video outputs (Y, PB, PR) of the digital set-top box to the COMPONENT IN AUDIO 1 jacks on the set -top box. How to the owner's manual for Digital Contents. I Turn on the remote control. This TV supports HDCP (High-bandwidth Digital Contents Protection) protocol for the digital set . When connecting Component...
... video outputs (Y, PB, PR) of the digital set-top box to the COMPONENT IN AUDIO 1 jacks on the set -top box. How to the owner's manual for Digital Contents. I Turn on the remote control. This TV supports HDCP (High-bandwidth Digital Contents Protection) protocol for the digital set . When connecting Component...
Owner's Manual (English)
Page 24
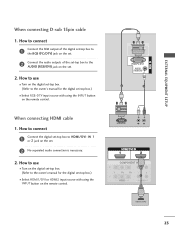
...L R L R AUDIO HDMI-DTV OUTPUT 23 EXTERNAL EQUIPMENT SETUP When connecting HDMI cable 1. How to connect 1 Connect the digital set-top box to the owner's manual for the digital set -top box.) I Select RGB-DTV input source with using the INPUT button on the set . 2 No separated audio connection is necessary...digital set-top box to the RGB (PC/DTV) jack on the set. 2 Connect the audio outputs of the set-top box to the owner's manual for the digital set -top box.) I Select HDMI1/DVI or HDMI2 input source with using the INPUT button on the set . 2. When connecting D-sub...
...L R L R AUDIO HDMI-DTV OUTPUT 23 EXTERNAL EQUIPMENT SETUP When connecting HDMI cable 1. How to connect 1 Connect the digital set-top box to the owner's manual for the digital set -top box.) I Select RGB-DTV input source with using the INPUT button on the set . 2 No separated audio connection is necessary...digital set-top box to the RGB (PC/DTV) jack on the set. 2 Connect the audio outputs of the set-top box to the owner's manual for the digital set -top box.) I Select HDMI1/DVI or HDMI2 input source with using the INPUT button on the set . 2. When connecting D-sub...
Owner's Manual (English)
Page 25
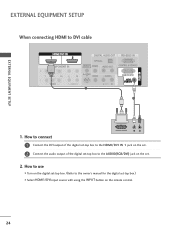
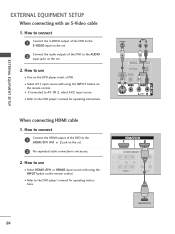
EXTERNAL EQUIPMENT SETUP When connecting HDMI to the HDMI/DVI IN 1 jack on the set. 2 Connect the audio output of the digital set-top box to DVI cable EXTERNAL EQUIPMENT SETUP AUDIO 1. How to use I Turn on the digital set-top box. (Refer to the owner's manual for the digital set-top box.) I Select HDMI1/DVI input source with using the INPUT button on the set -top box to the AUDIO(RGB/DVI) jack on the remote control. 24 How to connect DVI-DTV OUTPUT L R 1 Connect the DVI output of the digital set . 2.
EXTERNAL EQUIPMENT SETUP When connecting HDMI to the HDMI/DVI IN 1 jack on the set. 2 Connect the audio output of the digital set-top box to DVI cable EXTERNAL EQUIPMENT SETUP AUDIO 1. How to use I Turn on the digital set-top box. (Refer to the owner's manual for the digital set-top box.) I Select HDMI1/DVI input source with using the INPUT button on the set -top box to the AUDIO(RGB/DVI) jack on the remote control. 24 How to connect DVI-DTV OUTPUT L R 1 Connect the DVI output of the digital set . 2.
Owner's Manual (English)
Page 26
... the COMPONENT IN AUDIO1 jacks on the remote control. How to connect 1 Connect the video outputs (Y, PB, PR) of the DVD to the DVD player's manual for operating instruc- Match the jack colors (Y = green, PB = blue, and PR = red). 2 Connect the audio outputs of the DVD to the component input ports...
... the COMPONENT IN AUDIO1 jacks on the remote control. How to connect 1 Connect the video outputs (Y, PB, PR) of the DVD to the DVD player's manual for operating instruc- Match the jack colors (Y = green, PB = blue, and PR = red). 2 Connect the audio outputs of the DVD to the component input ports...
Owner's Manual (English)
Page 27
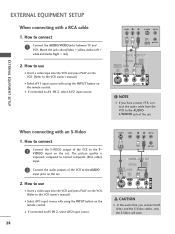
...EQUIPMENT SETUP EXTERNAL EQUIPMENT SETUP When connecting with using the INPUT button on the remote control. I If connected to use I Refer to the DVD player's manual for operating instructions. 26 S-VIDEO AUDIO L R L R AUDIO HDMI-DVD OUTPUT How to AV IN 2, select A V 2 input source. How to...output of the DVD to the AUDIO input jacks on the set . 2 No separated audio connection is necessary. 2. I Refer to the DVD player's manual for operating instructions. How to connect 1 Connect the S-VIDEO output of the DVD to the S-VIDEO input on the set. 2. I Select A ...
...EQUIPMENT SETUP EXTERNAL EQUIPMENT SETUP When connecting with using the INPUT button on the remote control. I If connected to use I Refer to the DVD player's manual for operating instructions. 26 S-VIDEO AUDIO L R L R AUDIO HDMI-DVD OUTPUT How to AV IN 2, select A V 2 input source. How to...output of the DVD to the AUDIO input jacks on the set . 2 No separated audio connection is necessary. 2. I Refer to the DVD player's manual for operating instructions. How to connect 1 Connect the S-VIDEO output of the DVD to the S-VIDEO input on the set. 2. I Select A ...
Owner's Manual (English)
Page 28
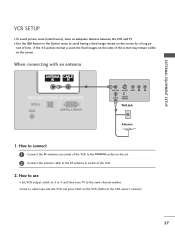
... to avoid having a fixed image remain on the set. 2 Connect the antenna cable to the RF antenna in the Option menu to the VCR owner's manual.) 27 EXTERNAL EQUIPMENT SETUP VCR SETUP I To avoid picture noise (interference), leave an adequate distance between the VCR and TV I Use the ISM feature in...
... to avoid having a fixed image remain on the set. 2 Connect the antenna cable to the RF antenna in the Option menu to the VCR owner's manual.) 27 EXTERNAL EQUIPMENT SETUP VCR SETUP I To avoid picture noise (interference), leave an adequate distance between the VCR and TV I Use the ISM feature in...
Owner's Manual (English)
Page 29
EXTERNAL EQUIPMENT SETUP EXTERNAL EQUIPMENT SETUP When connecting with using the INPUT button on the VCR. (Refer to the VCR owner's manual.) I If connected to AV IN 2, select AV2 input source. 28 S-VIDEO VIDEO L R ANT IN OUTPUT SWITCH ANT OUT CAUTION In the event that you have a... S-VIDEO output of the set. How to use I Insert a video tape into the VCR and press PLAY on the VCR. (Refer to the VCR owner's manual.) I Insert a video tape into the VCR and press PLAY on the remote control. How to use I Select AV1 input source with an S-Video 1. When ...
EXTERNAL EQUIPMENT SETUP EXTERNAL EQUIPMENT SETUP When connecting with using the INPUT button on the VCR. (Refer to the VCR owner's manual.) I If connected to AV IN 2, select AV2 input source. 28 S-VIDEO VIDEO L R ANT IN OUTPUT SWITCH ANT OUT CAUTION In the event that you have a... S-VIDEO output of the set. How to use I Insert a video tape into the VCR and press PLAY on the VCR. (Refer to the VCR owner's manual.) I Insert a video tape into the VCR and press PLAY on the remote control. How to use I Select AV1 input source with an S-Video 1. When ...
Owner's Manual (English)
Page 33
... graphics card service center. EXTERNAL EQUIPMENT SETUP EXTERNAL EQUIPMENT SETUP NOTES To get the the best picture quality, adjust the PC graphics card to the Manual of HDMI/DVI Source Devices or contact your service center. As shown in the picture, press the ADJUST button to the Source Device... manual or contact your service center. If the HDMI/DVI Source Device is not connected to the Cable or if there is a poor cable connection, "No ...
... graphics card service center. EXTERNAL EQUIPMENT SETUP EXTERNAL EQUIPMENT SETUP NOTES To get the the best picture quality, adjust the PC graphics card to the Manual of HDMI/DVI Source Devices or contact your service center. As shown in the picture, press the ADJUST button to the Source Device... manual or contact your service center. If the HDMI/DVI Source Device is not connected to the Cable or if there is a poor cable connection, "No ...
Owner's Manual (English)
Page 36
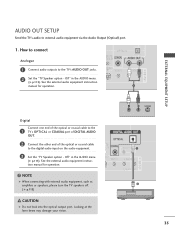
...Connect audio outputs to the digital audio input on the audio equipment. 3 Set the "TV Speaker option - See the external audio equipment instruction manual for operation. NOTE When connecting with external audio equipment, such as amplifers or speakers, please turn the TV speakers off. ( p.113) CAUTION... TV's AUDIO OUT jacks. 2 Set the "TV Speaker option - Looking at the laser beam may damage your vision. See the external audio equipment instruction manual for operation. L R S-VIDEO 35 Off" in the AUDIO menu. (G p.113). Off" in the AUDIO menu. (G p.113). AUDIO OUT SETUP ...
...Connect audio outputs to the digital audio input on the audio equipment. 3 Set the "TV Speaker option - See the external audio equipment instruction manual for operation. NOTE When connecting with external audio equipment, such as amplifers or speakers, please turn the TV speakers off. ( p.113) CAUTION... TV's AUDIO OUT jacks. 2 Set the "TV Speaker option - Looking at the laser beam may damage your vision. See the external audio equipment instruction manual for operation. L R S-VIDEO 35 Off" in the AUDIO menu. (G p.113). Off" in the AUDIO menu. (G p.113). AUDIO OUT SETUP ...
Owner's Manual (English)
Page 41
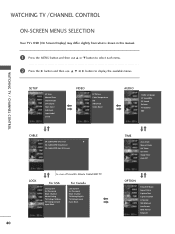
... TV Rating-General Input Block For Canada Lock System Set Password Block Channel TV Rating-English TV Rating-French Input Block TIME Auto Clock Manual Clock Off Timer On Timer Sleep Timer Auto Off OPTION Timeshift Mode Aspect Ratio Caption/Text Caption Option Language ISM Method Low Power HDD ...Format SimpLink WATCHING TV /CHANNEL CONTROL ON-SCREEN MENUS SELECTION Your TV's OSD (On Screen Display) may differ slightly from what is shown in this manual. 1 Press the MENU button and then use D or E button to select each menu. 2 Press the G button and then use D E F G button to display the ...
... TV Rating-General Input Block For Canada Lock System Set Password Block Channel TV Rating-English TV Rating-French Input Block TIME Auto Clock Manual Clock Off Timer On Timer Sleep Timer Auto Off OPTION Timeshift Mode Aspect Ratio Caption/Text Caption Option Language ISM Method Low Power HDD ...Format SimpLink WATCHING TV /CHANNEL CONTROL ON-SCREEN MENUS SELECTION Your TV's OSD (On Screen Display) may differ slightly from what is shown in this manual. 1 Press the MENU button and then use D or E button to select each menu. 2 Press the G button and then use D E F G button to display the ...
Owner's Manual (English)
Page 42
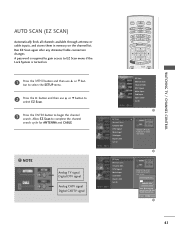
... Digital DTV signal Analog CATV signal Digital CADTV signal LIVE TV INPUT MODE DAY - DAY + SIMPLINK EZ Scan Manual Scan Channel Edit DTV Signal Main Input Sub Input Input Label Set ID EZ Scan Manual Scan Channel Edit DTV Signal Main Input Sub Input Input Label Set ID G Selection ( G or ) leads you... to the EZ scan screen. EZ Scan Manual Scan Channel Edit DTV Signal Main Input Sub Input Input Label Set ID Selection ( G or ) leads you to complete the channel search cycle for ANTENNA ...
... Digital DTV signal Analog CATV signal Digital CADTV signal LIVE TV INPUT MODE DAY - DAY + SIMPLINK EZ Scan Manual Scan Channel Edit DTV Signal Main Input Sub Input Input Label Set ID EZ Scan Manual Scan Channel Edit DTV Signal Main Input Sub Input Input Label Set ID G Selection ( G or ) leads you... to the EZ scan screen. EZ Scan Manual Scan Channel Edit DTV Signal Main Input Sub Input Input Label Set ID Selection ( G or ) leads you to complete the channel search cycle for ANTENNA ...

Owner's Manual (English)
Page 43
... CONTROL 1 Press the MENU button and then use D or E button to select the SETUP menu. 2 Press the G button and then use D or E button to select Manual Scan. 3 Press the G button and then use D or E button to select TV, DTV, CATV, and CADTV. 4 Press the G button and then use D or E button to... ENTER button to add or delete for the channel number. 6 Press EXIT button to return to TV viewing or press MENU button to return to Manual Scan menu if the Lock System is turned on. While using the CableCARDTM, CATV, CADTV is different from the normal channel number shown in...
... CONTROL 1 Press the MENU button and then use D or E button to select the SETUP menu. 2 Press the G button and then use D or E button to select Manual Scan. 3 Press the G button and then use D or E button to select TV, DTV, CATV, and CADTV. 4 Press the G button and then use D or E button to... ENTER button to add or delete for the channel number. 6 Press EXIT button to return to TV viewing or press MENU button to return to Manual Scan menu if the Lock System is turned on. While using the CableCARDTM, CATV, CADTV is different from the normal channel number shown in...


