
Owners Manual
Page 1
0 (% LCD TV OWNER'S MANUAL 32LG30DC 37LG30DC 42LG30DC 47LGSODC 52LGSODC Please read this information : when quote P/NO : SAC30708017 (0810-REV03) See the label attached o this manual carefully your set . Retain it for future reference. before operating Record model number and serial number of the set .
0 (% LCD TV OWNER'S MANUAL 32LG30DC 37LG30DC 42LG30DC 47LGSODC 52LGSODC Please read this information : when quote P/NO : SAC30708017 (0810-REV03) See the label attached o this manual carefully your set . Retain it for future reference. before operating Record model number and serial number of the set .

Owners Manual
Page 4
...insulation are not possible, have the cord replaced with a three-prong grounded AC plug must remain readily operable. Any of this owner's manual to be connected to a three-prong grounded AC outlet) If grounding methods are dangerous. Periodically examine the cord of fire or electrical shock...not place objects filled with something. 0 CAUTION concerning the Power Cord: It is the disconnecting device. on the power cord to unplug the TV. O GROUNDING Ensure that appliance and has no additional outlets or branch circuits. Do not try to ground the unit by connecting it , ...
...insulation are not possible, have the cord replaced with a three-prong grounded AC plug must remain readily operable. Any of this owner's manual to be connected to a three-prong grounded AC outlet) If grounding methods are dangerous. Periodically examine the cord of fire or electrical shock...not place objects filled with something. 0 CAUTION concerning the Power Cord: It is the disconnecting device. on the power cord to unplug the TV. O GROUNDING Ensure that appliance and has no additional outlets or branch circuits. Do not try to ground the unit by connecting it , ...
Owners Manual
Page 6
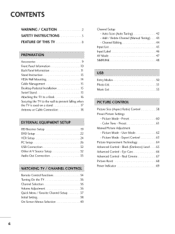
Add / Delete Channel (Manual Tuning) ...... 43 - Picture Mode - Picture Mode - User Mode 62 - Real Cinema 67 Picture Reset 68 Power Indicator 69 6 Color Tone - Expert Control 63 Picture Improvement Technology 64 Advanced Control- CONTENTS WARNING / CAUTION 2 SAFETY INSTRUCTIONS 3 FEATURE OF THIS TV 8 Accessories 9 Front Panel Information 10 Back Panel Information 11 Stand ... SIMPLINK 48 Entry Modes 50 Photo List 51 Music List 55 Picture Size (Aspect Ratio) Control 58 Preset Picture Settings - Auto Scan (Auto Tuning 42 - Preset 61 Manual Picture Adjustment -
Add / Delete Channel (Manual Tuning) ...... 43 - Picture Mode - Picture Mode - User Mode 62 - Real Cinema 67 Picture Reset 68 Power Indicator 69 6 Color Tone - Expert Control 63 Picture Improvement Technology 64 Advanced Control- CONTENTS WARNING / CAUTION 2 SAFETY INSTRUCTIONS 3 FEATURE OF THIS TV 8 Accessories 9 Front Panel Information 10 Back Panel Information 11 Stand ... SIMPLINK 48 Entry Modes 50 Photo List 51 Music List 55 Picture Size (Aspect Ratio) Control 58 Preset Picture Settings - Auto Scan (Auto Tuning 42 - Preset 61 Manual Picture Adjustment -
Owners Manual
Page 7
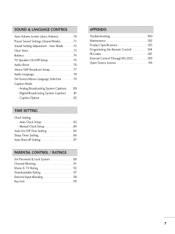
...IR Codes 107 External Control Through RS-232C 109 Open Source License 116 Clock Setting - User Mode 72 Clear Voice 73 Balance 74 TV Speakers On/Off Setup 75 Audio Reset 76 Stereo/SAP Broadcast Setup 77 Audio Language 78 On-Screen Menus Language Selection 79 Caption ...Mode - Digital Broadcasting System Captions ........ 81 - Manual Clock Setup 84 Auto On/Off Time Setting 85 Sleep Timer Setting 86 Auto Shut-off Setting 87 Set Password & Lock System 88 ...
...IR Codes 107 External Control Through RS-232C 109 Open Source License 116 Clock Setting - User Mode 72 Clear Voice 73 Balance 74 TV Speakers On/Off Setup 75 Audio Reset 76 Stereo/SAP Broadcast Setup 77 Audio Language 78 On-Screen Menus Language Selection 79 Caption ...Mode - Digital Broadcasting System Captions ........ 81 - Manual Clock Setup 84 Auto On/Off Time Setting 85 Sleep Timer Setting 86 Auto Shut-off Setting 87 Set Password & Lock System 88 ...
Owners Manual
Page 9
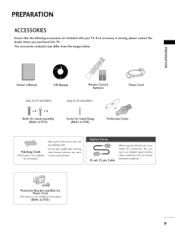
"o _o r_l _o © z Owner's Manual CD Manual Remote Control, Batteries Power Cord (Only 32/37/42LG30DC) x4 x4 Bolts for stand assembly (Refer to R13) (Only 32/37/42LG30DC) Screw for all models.) * Do not wipe roughly when removing stain, Excessive pressure may differ from ... Cable When using the VGA (D-sub 15 pin cable) PC connection, the user must use shielded signal interface cables with your TV. PREPARATION ACCESSORIES Ensure that the following accessories are included with ferrite cores to maintain standards compliance. The accessories included may cause scratch...
"o _o r_l _o © z Owner's Manual CD Manual Remote Control, Batteries Power Cord (Only 32/37/42LG30DC) x4 x4 Bolts for stand assembly (Refer to R13) (Only 32/37/42LG30DC) Screw for all models.) * Do not wipe roughly when removing stain, Excessive pressure may differ from ... Cable When using the VGA (D-sub 15 pin cable) PC connection, the user must use shielded signal interface cables with your TV. PREPARATION ACCESSORIES Ensure that the following accessories are included with ferrite cores to maintain standards compliance. The accessories included may cause scratch...
Owners Manual
Page 15
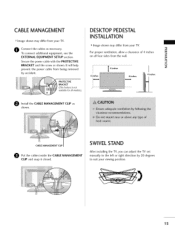
i !ii_ii¸ii_l ii¸i¸ii¸i_iiiiiiiiiiiiiiiiii! DESKTOP PEDESTAL INSTALLATION ,,,IImage shown may differ from your TV. 0 Connect the cables as shown. CABLE MANAGEMENT CLIP O ut the cables inside the CABLE MANAGEMENT CLIP and snap it closed. For proper ventilation, allow ... your viewing position. Secure the power cable with the PROTECTIVE BRACKET and the screw as shown. SWIVELSTAND After installing the TV, you can adjust the TV set manually to suit your TV. ii.i.,._.il.i.!i_!;!i_!;!i_!;!i_!i!_!_i!!i!ii!ii!ii!ii!ii!ii!ii!i:i_!i_;!!i!_i!!i 15 To connect ...
i !ii_ii¸ii_l ii¸i¸ii¸i_iiiiiiiiiiiiiiiiii! DESKTOP PEDESTAL INSTALLATION ,,,IImage shown may differ from your TV. 0 Connect the cables as shown. CABLE MANAGEMENT CLIP O ut the cables inside the CABLE MANAGEMENT CLIP and snap it closed. For proper ventilation, allow ... your viewing position. Secure the power cable with the PROTECTIVE BRACKET and the screw as shown. SWIVELSTAND After installing the TV, you can adjust the TV set manually to suit your TV. ii.i.,._.il.i.!i_!;!i_!;!i_!;!i_!i!_!_i!!i!ii!ii!ii!ii!ii!ii!ii!i:i_!i_;!!i!_i!!i 15 To connect ...
Owners Manual
Page 20
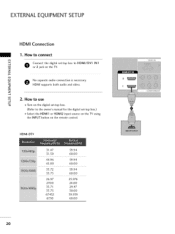
... How to HDMI/DVI IN1 z m x:) C O No separate audio connection is necessary. How to use C 01T_urn on the digital set-top box. (Refer to the owner's manual for the digital set -top box to connect m X m O oron2njeacctk tohne thdeigiTtaVl . set -top box.) 01S_elect the HDMI1 or HDMI2 input source on the...
... How to HDMI/DVI IN1 z m x:) C O No separate audio connection is necessary. How to use C 01T_urn on the digital set-top box. (Refer to the owner's manual for the digital set -top box to connect m X m O oron2njeacctk tohne thdeigiTtaVl . set -top box.) 01S_elect the HDMI1 or HDMI2 input source on the...
Owners Manual
Page 21
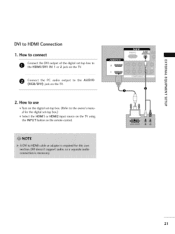
m z m 2. How to connect m x O theonnHeDctMI/tDhVeI DVI IoNutp1utor o2f tjhaeck doignitathl e seTtV-t.op box to m _D z m X:) O Connect the PC audio output to the owner's manual for the digital set -top box. (Refer to the AUDIO c (RGB/DVI) jack on the remote control. 21 How to use c 01T_urn on the digital set -top box.) 0HSelect the HDMI1 or HDMI2 input source on the TV using the INPUT button on the TV. DVI to HDMI Connection 1.
m z m 2. How to connect m x O theonnHeDctMI/tDhVeI DVI IoNutp1utor o2f tjhaeck doignitathl e seTtV-t.op box to m _D z m X:) O Connect the PC audio output to the owner's manual for the digital set -top box. (Refer to the AUDIO c (RGB/DVI) jack on the remote control. 21 How to use c 01T_urn on the digital set -top box.) 0HSelect the HDMI1 or HDMI2 input source on the TV using the INPUT button on the TV. DVI to HDMI Connection 1.

Owners Manual
Page 22
... connect a DVD player to the COMPONENT IN AUDIO1 jacks on the TV. If connected to the DVD player's manual for operating instructions. Refer to COMPONENT IN 2 input, select the Component 2 input source on the TV. How to the COMPONENT IN VIDEO1 jacks on the DVD player, insert... a DVD. Component ports on the TV Video output ports on the remote control. ...
... connect a DVD player to the COMPONENT IN AUDIO1 jacks on the TV. If connected to the DVD player's manual for operating instructions. Refer to COMPONENT IN 2 input, select the Component 2 input source on the TV. How to the COMPONENT IN VIDEO1 jacks on the DVD player, insert... a DVD. Component ports on the TV Video output ports on the remote control. ...

Owners Manual
Page 23
... X:) c "O 2. How to connect O onnect the HDMI output of the DVD to the DVD player's manual for operating instructions. 23 How to use 01_Select the HDMI1 or HDMI2 input source on the TV using the INPUT c button on the remote control. "O Refer to the HDMI/DVI IN1 or2 jack on... the TV. How to connect O onnect the S-VIDEO output of the DVD to the S-VIDEO input on the TV. How to the DVD player's manual for operating instructions. S-Video Connection 1. r_l Select the AV 1 input source on the...
... X:) c "O 2. How to connect O onnect the HDMI output of the DVD to the DVD player's manual for operating instructions. 23 How to use 01_Select the HDMI1 or HDMI2 input source on the TV using the INPUT c button on the remote control. "O Refer to the HDMI/DVI IN1 or2 jack on... the TV. How to connect O onnect the S-VIDEO output of the DVD to the S-VIDEO input on the TV. How to the DVD player's manual for operating instructions. S-Video Connection 1. r_l Select the AV 1 input source on the...

Owners Manual
Page 24
... the sides of the VCR. 2. How to the VCR owner's manual.) Wall Jack Antenna 2.4 "0 et on the screen. r_l z r_l c "0 Connect the antenna cable to the RF antenna in socket of the screen may remain visible on the TV. Insert a video tape into the VCR and press PLAY on the...common to the same channel number. rT1 Antenna Connection x r_l _o z 1. How to use Set VCR output switch to 3 or 4 and then tune TV to all TVs and is not covered by warranty. EXTERNALEQUIPMENT SETUP VCR SETUP To avoid picture noise (interference), leave an adequate distance between the VCR and...
... the sides of the VCR. 2. How to the VCR owner's manual.) Wall Jack Antenna 2.4 "0 et on the screen. r_l z r_l c "0 Connect the antenna cable to the RF antenna in socket of the screen may remain visible on the TV. Insert a video tape into the VCR and press PLAY on the...common to the same channel number. rT1 Antenna Connection x r_l _o z 1. How to use Set VCR output switch to 3 or 4 and then tune TV to all TVs and is not covered by warranty. EXTERNALEQUIPMENT SETUP VCR SETUP To avoid picture noise (interference), leave an adequate distance between the VCR and...

Owners Manual
Page 25
...and Audio Right = red) m _o 2. m z If connected to the VCR owner's manual.) c Select the AVl input source on the TV using the INPUT button on the remote control. m _D (Refer to AV IN2, select AV2 input source on the TV. How to connect O onnect the S-VIDEO output of the VCR to the... VCR owner's manual.) Select the AVl input source on the TV using the INPUT button on the remote control. 25 How to use z Insert ...
...and Audio Right = red) m _o 2. m z If connected to the VCR owner's manual.) c Select the AVl input source on the TV using the INPUT button on the remote control. m _D (Refer to AV IN2, select AV2 input source on the TV. How to connect O onnect the S-VIDEO output of the VCR to the... VCR owner's manual.) Select the AVl input source on the TV using the INPUT button on the remote control. 25 How to use z Insert ...

Owners Manual
Page 29
r'_ x m z m c m z m c Select PICTURE. Select Yes. Select Screen (RGB-PC). Auto Configure Automatically adjusts picture position and minimizes image instability. Select Auto config.. Start Auto Configuration. • If the position of the image is still not correct, try Auto adjustment again. • If picture needs to be adjusted again after Auto adjustment in RGB-PC, you can adjust the Position, Phase. Size or 29 After adjustment, if the image is still not correct, try using the manual settings or a different resolution or refresh rate on the PC.
r'_ x m z m c m z m c Select PICTURE. Select Yes. Select Screen (RGB-PC). Auto Configure Automatically adjusts picture position and minimizes image instability. Select Auto config.. Start Auto Configuration. • If the position of the image is still not correct, try Auto adjustment again. • If picture needs to be adjusted again after Auto adjustment in RGB-PC, you can adjust the Position, Phase. Size or 29 After adjustment, if the image is still not correct, try using the manual settings or a different resolution or refresh rate on the PC.

Owners Manual
Page 30
...: This function allows you prefer. _ Size: This function is not clear after auto adjustment and especially if characters are still trembling, adjust the picture phase manually. Select Position, Size, or Phase. m x m z m _D c m z m c Select PICTURE. EXTERNALEQUIPMENT SETUP Adjustment for screen Position, Size, and Phase If the picture is to remove any vertical...
...: This function allows you prefer. _ Size: This function is not clear after auto adjustment and especially if characters are still trembling, adjust the picture phase manually. Select Position, Size, or Phase. m x m z m _D c m z m c Select PICTURE. EXTERNALEQUIPMENT SETUP Adjustment for screen Position, Size, and Phase If the picture is to remove any vertical...

Owners Manual
Page 33
... O Connect one end of the optical or coaxial cable to the TV's OPTICAL or COAXIAL (Except 32/37/42LG30DC) port of the optical or coaxial cable to the digital audio input on the audio equipment. O Set the "TV Speaker option - Off" in the AUDIO menu. (_ p.75). ...(_ p.75). O Connect the other end of DIGITAL AUDIO OUT. AUDIO OUT CONNECTION Send the TV's audio to the TV's AUDIO OUT jacks. r_l z r_l O Set the "TV Speaker option - See the external audio equipment instruction manual for operation. r_l z Digital r_l c 1. How to connect r_l x O Connect audio outputs ...
... O Connect one end of the optical or coaxial cable to the TV's OPTICAL or COAXIAL (Except 32/37/42LG30DC) port of the optical or coaxial cable to the digital audio input on the audio equipment. O Set the "TV Speaker option - Off" in the AUDIO menu. (_ p.75). ...(_ p.75). O Connect the other end of DIGITAL AUDIO OUT. AUDIO OUT CONNECTION Send the TV's audio to the TV's AUDIO OUT jacks. r_l z r_l O Set the "TV Speaker option - See the external audio equipment instruction manual for operation. r_l z Digital r_l c 1. How to connect r_l x O Connect audio outputs ...

Owners Manual
Page 37
...factory preset sound for -r" type of time before > z your TV turns off . z Caption: Select on the viewing environment. N USB Eject: Select "USB Eject" in this manual. Make appropriate adjustments. Backlight: Adjust the brightness of LCD panel to the Favorite List. (Favorite) button repeatedly. Select Favorite... features which users might use frequently. _ Aspect Ratio: Selects your desired channel. Z © Except 32/37/42LG30DC Display each menu. Select your desired picture format. N SAP: Selects MTS sound (Analog signal). Q.Menu (Quick Menu) is shown ...
...factory preset sound for -r" type of time before > z your TV turns off . z Caption: Select on the viewing environment. N USB Eject: Select "USB Eject" in this manual. Make appropriate adjustments. Backlight: Adjust the brightness of LCD panel to the Favorite List. (Favorite) button repeatedly. Select Favorite... features which users might use frequently. _ Aspect Ratio: Selects your desired channel. Z © Except 32/37/42LG30DC Display each menu. Select your desired picture format. N SAP: Selects MTS sound (Analog signal). Q.Menu (Quick Menu) is shown ...

Owners Manual
Page 38
... guides the user to easily set the essential items for viewing the TV for use in retail environments. Mode setting fT1 N © Z © Select Home Mode. Time setting Select Auto or Manual. We recommend setting the TV to preset in your home environment. 010"Irn_-store" Mode is ...time option. 38 It can adjust the "Picture menu Picture mode" manually while inspecting the TV, but the TV will be activated from the user menus. 0_Default selection is only intended for the first time when purchasing the TV. If will automatically return to "Home" mode for the best picture...
... guides the user to easily set the essential items for viewing the TV for use in retail environments. Mode setting fT1 N © Z © Select Home Mode. Time setting Select Auto or Manual. We recommend setting the TV to preset in your home environment. 010"Irn_-store" Mode is ...time option. 38 It can adjust the "Picture menu Picture mode" manually while inspecting the TV, but the TV will be activated from the user menus. 0_Default selection is only intended for the first time when purchasing the TV. If will automatically return to "Home" mode for the best picture...

Owners Manual
Page 40
Enter to TV viewing. Select a menu item. Return to the pop up menu. WATCHING TV / CHANNEL CONTROL ON-SCREENMENUSSELECTION Your TV's OSD (On Screen Display) may differ slightly from that shown in this manual. 47/52LGSODC z c_ < N -r > Z Z fT1 N 0 Z 0 4O i I TT I i!__!i_i_ii_!i_!i_!i_!i_!i_!i_!i_!i_!i_!i_!i_!i_!ii!i!iii!ii!ii!ii!ii!ii!ii!ii!ii!ii!ii!ii!ii!ii!ii!ii!ii!ii!_i_i_!_!_! !i__i!i J ii_lii_!i!i!i!i!i!i!i!_i_i_i_ii_ii_ii_iiii_ii_iiiiiiiiiiiiiiiiiiiiiiiiii%i!ii!ii!ii For USA For Canada Display each menu.
Enter to TV viewing. Select a menu item. Return to the pop up menu. WATCHING TV / CHANNEL CONTROL ON-SCREENMENUSSELECTION Your TV's OSD (On Screen Display) may differ slightly from that shown in this manual. 47/52LGSODC z c_ < N -r > Z Z fT1 N 0 Z 0 4O i I TT I i!__!i_i_ii_!i_!i_!i_!i_!i_!i_!i_!i_!i_!i_!i_!i_!ii!i!iii!ii!ii!ii!ii!ii!ii!ii!ii!ii!ii!ii!ii!ii!ii!ii!ii!ii!_i_i_!_!_! !i__i!i J ii_lii_!i!i!i!i!i!i!i!_i_i_i_ii_ii_ii_iiii_ii_iiiiiiiiiiiiiiiiiiiiiiiiii%i!ii!ii!ii For USA For Canada Display each menu.

Owners Manual
Page 43
Select channel you can view the on . 43 Select CHANNEL. Select Manual Tuning. N -r" z c_ < N -r" > Z Z fT1 N 0 Z 0 01A_ password is turned on -screen signal strength monitor to TV viewing. Return to see the quality of the signal being received. Add/Delete Channel (Manual Tuning) If selecting DTV or CADTV input signal, you want to Manual Tuning menu if the Lock System is required to gain access to add or delete. Select Add or Delete. Return to the previous menu. Select DTV, TV, CADTV, or CATV.
Select channel you can view the on . 43 Select CHANNEL. Select Manual Tuning. N -r" z c_ < N -r" > Z Z fT1 N 0 Z 0 01A_ password is turned on -screen signal strength monitor to TV viewing. Return to see the quality of the signal being received. Add/Delete Channel (Manual Tuning) If selecting DTV or CADTV input signal, you want to Manual Tuning menu if the Lock System is required to gain access to add or delete. Select Add or Delete. Return to the previous menu. Select DTV, TV, CADTV, or CATV.

Owners Manual
Page 60
...changes toJust scan. Select Intelligent Sensor (Except 32/37/42LG30DC), Vivid, Standard, Cinema, Sport, or Game. Only for 47/52LG50DC "O N C m Select PICTURE. 01W_ hen selecting Intelligent Sensor N © Z Select Picture Mode. © (Except 32/37/42 LG30DC), the most suitable picture is automatically adjusted according...use a preset, change each setting manually, or use the Intelligent Sensor. Preset There are factory presets for the opti- Return to the previous menu. You can also adjust Picture Mode in the user menus. Return to TV viewing. 6O mum picture quality at...
...changes toJust scan. Select Intelligent Sensor (Except 32/37/42LG30DC), Vivid, Standard, Cinema, Sport, or Game. Only for 47/52LG50DC "O N C m Select PICTURE. 01W_ hen selecting Intelligent Sensor N © Z Select Picture Mode. © (Except 32/37/42 LG30DC), the most suitable picture is automatically adjusted according...use a preset, change each setting manually, or use the Intelligent Sensor. Preset There are factory presets for the opti- Return to the previous menu. You can also adjust Picture Mode in the user menus. Return to TV viewing. 6O mum picture quality at...


