

Owner's Manual
Page 1
....lgusa.com / www.lg.ca / www.lgcommercial.com See the label attached on the back cover and quote this information to your set . has determined that this product meets the ENERGY STAR guidelines for future reference. LCD TV OWNER'S MANUAL LCD TV MODELS 26LC7D 26LC7DC 32LC4D 42LC4D Please read this manual carefully before operating...
....lgusa.com / www.lg.ca / www.lgcommercial.com See the label attached on the back cover and quote this information to your set . has determined that this product meets the ENERGY STAR guidelines for future reference. LCD TV OWNER'S MANUAL LCD TV MODELS 26LC7D 26LC7DC 32LC4D 42LC4D Please read this manual carefully before operating...
Owner's Manual
Page 5
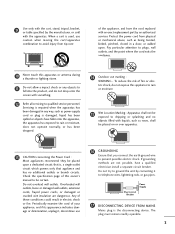
... allow a impact shock or any way, such as being twisted, kinked, pinched, closed in electric shock or fire. Periodically examine the cord of this owner's manual to telephone wires, lightening rods, or gas pipes. When a cart is damaged, liquid has been spilled or objects have a qualified electrician install a separate circuit breaker...
... allow a impact shock or any way, such as being twisted, kinked, pinched, closed in electric shock or fire. Periodically examine the cord of this owner's manual to telephone wires, lightening rods, or gas pipes. When a cart is damaged, liquid has been spilled or objects have a qualified electrician install a separate circuit breaker...
Owner's Manual
Page 6
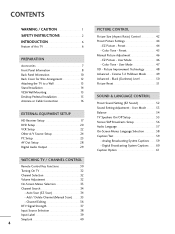
Preset 45 Manual Picture Adjustment 46 - Picture Improvement Technology 48 Advanced - User Mode 53 Balance 54 TV Speakers On/Off Setup 55 Stereo/SAP Broadcasts Setup 56 Audio ... 34 - Black (Darkness) Level 50 Picture Reset 51 SOUND & LANGUAGE CONTROL Preset Sound Setting (EZ Sound 52 Sound Setting Adjustment - EZ Picture - Add / Delete Channel (Manual Scan 35 - User Mode 47 XD - Auto Scan (EZ Scan 34 - Cinema 3:2 Pulldown Mode 49 Advanced -
Preset 45 Manual Picture Adjustment 46 - Picture Improvement Technology 48 Advanced - User Mode 53 Balance 54 TV Speakers On/Off Setup 55 Stereo/SAP Broadcasts Setup 56 Audio ... 34 - Black (Darkness) Level 50 Picture Reset 51 SOUND & LANGUAGE CONTROL Preset Sound Setting (EZ Sound 52 Sound Setting Adjustment - EZ Picture - Add / Delete Channel (Manual Scan 35 - User Mode 47 XD - Auto Scan (EZ Scan 34 - Cinema 3:2 Pulldown Mode 49 Advanced -
Owner's Manual
Page 7
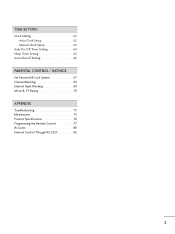
TIME SETTING Clock Setting 62 Auto Clock Setup 62 Manual Clock Setup 63 Auto On/Off Timer Setting 64 Sleep Timer Setting 65 Auto Shut-off Setting 66 PARENTAL CONTROL / RATINGS Set Password & Lock System 67 Channel Blocking 69 External Input Blocking 69 Movie & TV Rating 70 APPENDIX Troubleshooting 73 Maintenance 75 Product Specifications 76 Programming the Remote Control 77 IR Codes 80 External Control Through RS-232C 82 5
TIME SETTING Clock Setting 62 Auto Clock Setup 62 Manual Clock Setup 63 Auto On/Off Timer Setting 64 Sleep Timer Setting 65 Auto Shut-off Setting 66 PARENTAL CONTROL / RATINGS Set Password & Lock System 67 Channel Blocking 69 External Input Blocking 69 Movie & TV Rating 70 APPENDIX Troubleshooting 73 Maintenance 75 Product Specifications 76 Programming the Remote Control 77 IR Codes 80 External Control Through RS-232C 82 5

Owner's Manual
Page 9
... TIVNPUT INPUT RATIO PICTURCEOMPS1OUHNDDMIA1DJURGSBT-PC POWER TMVODE DVD VCR SIMPLINK * EXIT CC MENU SAP ENTER TIMER VOL FAV 1 MUTE CH 4 2 7 5 3 8 6 0 9 BACK 1.5V 1.5V Owner's Manual CD Manual Remote Control, Batteries Power Cord This feature is missing, please contact the dealer where you purchased the product. Please be cautions of the exterior. * Do...
... TIVNPUT INPUT RATIO PICTURCEOMPS1OUHNDDMIA1DJURGSBT-PC POWER TMVODE DVD VCR SIMPLINK * EXIT CC MENU SAP ENTER TIMER VOL FAV 1 MUTE CH 4 2 7 5 3 8 6 0 9 BACK 1.5V 1.5V Owner's Manual CD Manual Remote Control, Batteries Power Cord This feature is missing, please contact the dealer where you purchased the product. Please be cautions of the exterior. * Do...
Owner's Manual
Page 19
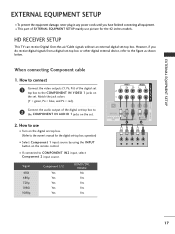
... Component 1 input source by using the INPUT button on the set . operation) I This part of EXTERNAL EQUIPMENT SETUP mainly use I If connected to the owner's manual for the 42 inches models. HD RECEIVER SETUP This TV can receive Digital Over-the-air/Cable signals without an external digital set -top box...
... Component 1 input source by using the INPUT button on the set . operation) I This part of EXTERNAL EQUIPMENT SETUP mainly use I If connected to the owner's manual for the 42 inches models. HD RECEIVER SETUP This TV can receive Digital Over-the-air/Cable signals without an external digital set -top box...
Owner's Manual
Page 20
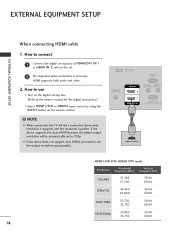
NOTE G When connected, the TV will be automatically set -top box.) I Turn on the digital set-top box. (Refer to the owner's manual for the digital set to use I Select HDMI1/DVI or HDMI2 input source by using the INPUT button on the set the output resolution appropriately. ...
NOTE G When connected, the TV will be automatically set -top box.) I Turn on the digital set-top box. (Refer to the owner's manual for the digital set to use I Select HDMI1/DVI or HDMI2 input source by using the INPUT button on the set the output resolution appropriately. ...
Owner's Manual
Page 21
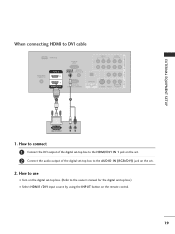
... the AUDIO IN (RGB/DVI) jack on the remote control. 19 How to use I Turn on the digital set-top box. (Refer to the owner's manual for the digital set-top box.) I Select HDMI1/DVI input source by using the INPUT button on the set -top box to DVI cable SERVICE...
... the AUDIO IN (RGB/DVI) jack on the remote control. 19 How to use I Turn on the digital set-top box. (Refer to the owner's manual for the digital set-top box.) I Select HDMI1/DVI input source by using the INPUT button on the set -top box to DVI cable SERVICE...

Owner's Manual
Page 22
... OPTICAL DIGITAL AUDIO OUT (MONO) S-VIDEO VIDEO AUDIO 1 2 Y PB PR L R Component Input ports To get better picture quality, connect a DVD player to the DVD player's manual for operating instructions. Component ports on the TV Y PB PR Video output ports on the remote control. How to the COMPONENT IN AUDIO1 jacks on...
... OPTICAL DIGITAL AUDIO OUT (MONO) S-VIDEO VIDEO AUDIO 1 2 Y PB PR L R Component Input ports To get better picture quality, connect a DVD player to the DVD player's manual for operating instructions. Component ports on the TV Y PB PR Video output ports on the remote control. How to the COMPONENT IN AUDIO1 jacks on...
Owner's Manual
Page 23
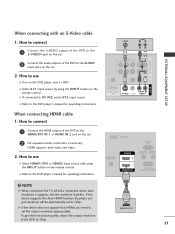
...Connect the HDMI output of the DVD to use I Turn on the DVD player, insert a DVD. When connecting HDMI cable 1. How to the DVD player's manual for operating instructions. I Refer to use I Select HDMI1/DVI or HDMI2 input source with an S-Video cable 1. I Select A V 1 input source by ... the remote control. I Refer to 720p. G If the device does not support Auto HDMI, you need to set to the DVD player's manual for operating instructions. EXTERNAL EQUIPMENT SETUP COMPONENT IN AV OUT AV IN 1 When connecting with using the INPUT button on the remote control. I...
...Connect the HDMI output of the DVD to use I Turn on the DVD player, insert a DVD. When connecting HDMI cable 1. How to the DVD player's manual for operating instructions. I Refer to use I Select HDMI1/DVI or HDMI2 input source with an S-Video cable 1. I Select A V 1 input source by ... the remote control. I Refer to 720p. G If the device does not support Auto HDMI, you need to set to the DVD player's manual for operating instructions. EXTERNAL EQUIPMENT SETUP COMPONENT IN AV OUT AV IN 1 When connecting with using the INPUT button on the remote control. I...

Owner's Manual
Page 24
... fixed images on the sides of the VCR to the ANTENNA/CABLE IN socket on the set. 2 Connect the antenna cable to the VCR owner's manual.) 22 ( ) AUDIO EXTERNAL EQUIPMENT SETUP EXTERNAL EQUIPMENT SETUP VCR SETUP VIDEO ( ) AUDIO I If the 4:3 picture format is common to the same channel number. When connecting...
... fixed images on the sides of the VCR to the ANTENNA/CABLE IN socket on the set. 2 Connect the antenna cable to the VCR owner's manual.) 22 ( ) AUDIO EXTERNAL EQUIPMENT SETUP EXTERNAL EQUIPMENT SETUP VCR SETUP VIDEO ( ) AUDIO I If the 4:3 picture format is common to the same channel number. When connecting...

Owner's Manual
Page 25
... IN AV OUT AV IN 1 2. How to use I Insert a video tape into the VCR and press PLAY on the VCR. (Refer to the VCR owner's manual.) I If connected to the AUDIO L/MONO jack of the set . In the event that you have a mono VCR, connect the audio cable from the VCR... OUT S-VIDEO VIDEO (MONO) AUDIO ! How to use I Insert a video tape into the VCR and press PLAY on the VCR. (Refer to the VCR owner's manual.) I If connected to normal composite (RCA cable) input.
... IN AV OUT AV IN 1 2. How to use I Insert a video tape into the VCR and press PLAY on the VCR. (Refer to the VCR owner's manual.) I If connected to the AUDIO L/MONO jack of the set . In the event that you have a mono VCR, connect the audio cable from the VCR... OUT S-VIDEO VIDEO (MONO) AUDIO ! How to use I Insert a video tape into the VCR and press PLAY on the VCR. (Refer to the VCR owner's manual.) I If connected to normal composite (RCA cable) input.

Owner's Manual
Page 30
How to connect 1 Connect the second TV or monitor to hook up the second TV or monitor. 1. ICAL L AUDIO UT S-VIDEO VIDEO (MONO) AUDIO 1 VIDEO L R S-VIDEO 28 NOTE G Component1-2, RGB-PC, HDMI1/DVI, HDMI2, DTV input sources cannot be used for further details regarding that device's input settings. ! NT IN AV OUT AV IN 1 EXTERNAL EQUIPMENT SETUP EXTERNAL EQUIPMENT SETUP AV OUT SETUP The TV has a special signal output capability which allows you to the TV's AV OUT jacks. See the Operating Manual of the second TV or monitor 2 for AV out.
How to connect 1 Connect the second TV or monitor to hook up the second TV or monitor. 1. ICAL L AUDIO UT S-VIDEO VIDEO (MONO) AUDIO 1 VIDEO L R S-VIDEO 28 NOTE G Component1-2, RGB-PC, HDMI1/DVI, HDMI2, DTV input sources cannot be used for further details regarding that device's input settings. ! NT IN AV OUT AV IN 1 EXTERNAL EQUIPMENT SETUP EXTERNAL EQUIPMENT SETUP AV OUT SETUP The TV has a special signal output capability which allows you to the TV's AV OUT jacks. See the Operating Manual of the second TV or monitor 2 for AV out.

Owner's Manual
Page 31
See the external audio equipment instruction manual for operation. ! NOTE G When connecting with external audio equipments, such as amplifiers or speakers, please turn the TV speakers off. (G p.55) CAUTION G Do not look ...
See the external audio equipment instruction manual for operation. ! NOTE G When connecting with external audio equipments, such as amplifiers or speakers, please turn the TV speakers off. (G p.55) CAUTION G Do not look ...

Owner's Manual
Page 35
... and then use D or E button to select the each menu. 2 Press the G button and then use D E F G button to display the available menus. SETUP EZ Scan Manual Scan Channel Edit DTV Signal Input Source Input Label Set ID VIDEO EZ Picture Color Temperature XD Advanced Video Reset WATCHING TV / CHANNEL CONTROL LOCK...-French Downloadable Rating Input Block OPTION Aspect Ratio Caption/Text Caption Option Language SimpLink AUDIO Audio Language EZ Sound Balance TV Speaker TIME Auto Clock Manual Clock Off Timer On Timer Sleep Timer Auto Off 33
... and then use D or E button to select the each menu. 2 Press the G button and then use D E F G button to display the available menus. SETUP EZ Scan Manual Scan Channel Edit DTV Signal Input Source Input Label Set ID VIDEO EZ Picture Color Temperature XD Advanced Video Reset WATCHING TV / CHANNEL CONTROL LOCK...-French Downloadable Rating Input Block OPTION Aspect Ratio Caption/Text Caption Option Language SimpLink AUDIO Audio Language EZ Sound Balance TV Speaker TIME Auto Clock Manual Clock Off Timer On Timer Sleep Timer Auto Off 33

Owner's Manual
Page 36
A password is required to gain access to EZ Scan menu if the Lock System is turned on the channel list. EZ Scan Manual Scan Channel Edit DTV Signal Input Source Input Label Set ID 2 Selection ( G or ) leads you to the EZ scan screen. WATCHING TV / CHANNEL CONTROL WATCHING ... again after any Antenna/Cable connection changes. CC EXIT MENU SAP TIMER ENTER FAV VOL CH MUTE 1 2 3 EZ Scan Manual Scan Channel Edit DTV Signal Input Source Input Label Set ID EZ Scan Manual Scan Channel Edit DTV Signal Input Source Input Label Set ID 1 G Selection ( G or ) leads you to the EZ...
A password is required to gain access to EZ Scan menu if the Lock System is turned on the channel list. EZ Scan Manual Scan Channel Edit DTV Signal Input Source Input Label Set ID 2 Selection ( G or ) leads you to the EZ scan screen. WATCHING TV / CHANNEL CONTROL WATCHING ... again after any Antenna/Cable connection changes. CC EXIT MENU SAP TIMER ENTER FAV VOL CH MUTE 1 2 3 EZ Scan Manual Scan Channel Edit DTV Signal Input Source Input Label Set ID EZ Scan Manual Scan Channel Edit DTV Signal Input Source Input Label Set ID 1 G Selection ( G or ) leads you to the EZ...

Owner's Manual
Page 37
... on. 1 Press the MENU button and then use D or E button to select the SETUP menu. 2 Press the G button and then use D or E button to select Manual Scan. 3 Press the G button and then use D or E button to select T V, D T V, CATV, and CADTV. 4 Press the G button and then use D or E button to select... channel. 6 Press the EXIT button to return to TV viewing or press MENU button to return to delete the channel. 345 35 TV 2 EZ Scan Manual Scan Channel Edit DTV Signal Input Source Input Label Set ID 2 Select channel type and RF-channel number. D E TV G 2 TV 2-0 Press to the ...
... on. 1 Press the MENU button and then use D or E button to select the SETUP menu. 2 Press the G button and then use D or E button to select Manual Scan. 3 Press the G button and then use D or E button to select T V, D T V, CATV, and CADTV. 4 Press the G button and then use D or E button to select... channel. 6 Press the EXIT button to return to TV viewing or press MENU button to return to delete the channel. 345 35 TV 2 EZ Scan Manual Scan Channel Edit DTV Signal Input Source Input Label Set ID 2 Select channel type and RF-channel number. D E TV G 2 TV 2-0 Press to the ...

Owner's Manual
Page 38
... to return to the previous menu. 36 CC EXIT MENU SAP TIMER ENTER FAV VOL CH MUTE 1 2 3 EZ Scan Manual Scan Channel Edit DTV Signal Input Source Input Label Set ID 1 EZ Scan Manual Scan Channel Edit DTV Signal Input Source Input Label Set ID G Selection ( G or ) leads you can add or...
... to return to the previous menu. 36 CC EXIT MENU SAP TIMER ENTER FAV VOL CH MUTE 1 2 3 EZ Scan Manual Scan Channel Edit DTV Signal Input Source Input Label Set ID 1 EZ Scan Manual Scan Channel Edit DTV Signal Input Source Input Label Set ID G Selection ( G or ) leads you can add or...

Owner's Manual
Page 39
... you are to experience picture degradation. CC EXIT MENU SAP TIMER ENTER FAV VOL CH MUTE 1 2 3 EZ Scan Manual Scan Channel Edit DTV Signal Input Source Input Label Set ID EZ Scan Manual Scan Channel Edit DTV Signal Input Source Input Label Set ID 1 Bad Normal Good 23 37 WATCHING TV / CHANNEL...
... you are to experience picture degradation. CC EXIT MENU SAP TIMER ENTER FAV VOL CH MUTE 1 2 3 EZ Scan Manual Scan Channel Edit DTV Signal Input Source Input Label Set ID EZ Scan Manual Scan Channel Edit DTV Signal Input Source Input Label Set ID 1 Bad Normal Good 23 37 WATCHING TV / CHANNEL...

Owner's Manual
Page 40
... to return to the previous menu. CC EXIT MENU SAP TIMER ENTER FAV VOL CH MUTE 1 2 3 EZ Scan Manual Scan Channel Edit DTV Signal Input Source Input Label Set ID EZ Scan Manual Scan Channel Edit DTV Signal Input Source Input Label Set ID 1 TV AV1 AV2 Component1 G Component2 RGB-PC HDMI1...
... to return to the previous menu. CC EXIT MENU SAP TIMER ENTER FAV VOL CH MUTE 1 2 3 EZ Scan Manual Scan Channel Edit DTV Signal Input Source Input Label Set ID EZ Scan Manual Scan Channel Edit DTV Signal Input Source Input Label Set ID 1 TV AV1 AV2 Component1 G Component2 RGB-PC HDMI1...


