

Owner's Manual
Page 4
...redily operable. Unplug this owner's manual to avoid injury from physical or mechanical abuse, such as power supply cord or plug is turned on the screen, appearing as tiny red, green, or blue spots. This is normal, there is , a single outlet circuit which powers only that appliance ...and has no adverse effect on the screen. b. DISCONNECTING DEVICE FROM MAINS Main plug is used in accordance to the regulations of this apparatus during lightning storms or when unused for long ...
...redily operable. Unplug this owner's manual to avoid injury from physical or mechanical abuse, such as power supply cord or plug is turned on the screen, appearing as tiny red, green, or blue spots. This is normal, there is , a single outlet circuit which powers only that appliance ...and has no adverse effect on the screen. b. DISCONNECTING DEVICE FROM MAINS Main plug is used in accordance to the regulations of this apparatus during lightning storms or when unused for long ...
Owner's Manual
Page 5
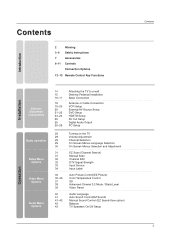
... 33 34 35 35~36 37 38 39 40 41 41~42 43 43 Turning on the TV Volume Adjustment Channel Selection On Screen Menus Language Selection On Screen Menus Selection and Adjustment EZ Scan (Channel Search) Manual Scan Channel Edit DTV Signal Strength Input Source Input Label Auto Picture Control(EZ...
... 33 34 35 35~36 37 38 39 40 41 41~42 43 43 Turning on the TV Volume Adjustment Channel Selection On Screen Menus Language Selection On Screen Menus Selection and Adjustment EZ Scan (Channel Search) Manual Scan Channel Edit DTV Signal Strength Input Source Input Label Auto Picture Control(EZ...
Owner's Manual
Page 7
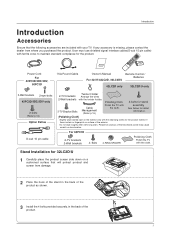
... PAGE CH 5 EZ ADJUST PIC EZ APM SOUND 0 SAP 8 9 FLASHBK 6 3 FREEZE Remote Control / For 42PC3D/3DC/3DV, For 32/37/42LC2D, 32LC2DU Batteries 50PC3D 42LC2D only 32LC2D/U only 2-Wall brackets 2-eye-bolts 42PC3D/3DC/3DV only 2-bolts (Refer p.14) Option Extras D-sub 15 pin cable Twister Holder 2-TV brackets...product. Please be cautious of the exterior. If any accessory is stain or fingerprint on surface of that will protect product and screen from where you purchased the product. User must use shielded signal interface cables(D-sub 15 pin cable) with the cloth. Power ...
... PAGE CH 5 EZ ADJUST PIC EZ APM SOUND 0 SAP 8 9 FLASHBK 6 3 FREEZE Remote Control / For 42PC3D/3DC/3DV, For 32/37/42LC2D, 32LC2DU Batteries 50PC3D 42LC2D only 32LC2D/U only 2-Wall brackets 2-eye-bolts 42PC3D/3DC/3DV only 2-bolts (Refer p.14) Option Extras D-sub 15 pin cable Twister Holder 2-TV brackets...product. Please be cautious of the exterior. If any accessory is stain or fingerprint on surface of that will protect product and screen from where you purchased the product. User must use shielded signal interface cables(D-sub 15 pin cable) with the cloth. Power ...
Owner's Manual
Page 12
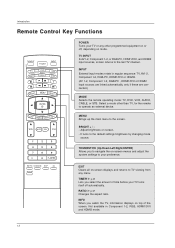
...the remote operating mode: TV, DVD, VCR, AUDIO, CABLE, or STB. THUMBSTICK (Up/Down/Left/Right/ENTER) Allows you select the amount of the screen. INPUT External input modes rotate in Component 1-2, RGB, HDMI1/DVI and HDMI2 mode. 12 BRIGHT + / - Adjust brightness on top of time before your ...preference. EXIT Clears all on or off automatically. TIMER G p.45 Lets you to navigate the on-screen menus and adjust the system settings to your TV turns itself off , depending on mode. MENU BRIGHT + ENTER EXIT TIMER RATIO INFO VOL MUTE FAV...
...the remote operating mode: TV, DVD, VCR, AUDIO, CABLE, or STB. THUMBSTICK (Up/Down/Left/Right/ENTER) Allows you select the amount of the screen. INPUT External input modes rotate in Component 1-2, RGB, HDMI1/DVI and HDMI2 mode. 12 BRIGHT + / - Adjust brightness on top of time before your ...preference. EXIT Clears all on or off automatically. TIMER G p.45 Lets you to navigate the on-screen menus and adjust the system settings to your TV turns itself off , depending on mode. MENU BRIGHT + ENTER EXIT TIMER RATIO INFO VOL MUTE FAV...
Owner's Manual
Page 13
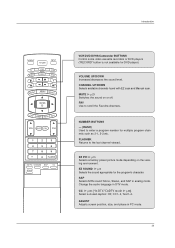
... enter a program number for multiple program channels such as 2-1, 2-2,etc. CC G p.48 (*In DTV/CADTV mode G p.48) Select a closed caption: Off, CC1~4, Text1~4. ADJUST Adjusts screen position, size, and phase in analog mode. Introduction TV INPUT POWER TV AUDIO DVD MODE CABLE INPUT VCR STB BRIGHT - CHANNEL UP/DOWN Selects available...
... enter a program number for multiple program channels such as 2-1, 2-2,etc. CC G p.48 (*In DTV/CADTV mode G p.48) Select a closed caption: Off, CC1~4, Text1~4. ADJUST Adjusts screen position, size, and phase in analog mode. Introduction TV INPUT POWER TV AUDIO DVD MODE CABLE INPUT VCR STB BRIGHT - CHANNEL UP/DOWN Selects available...
Owner's Manual
Page 17
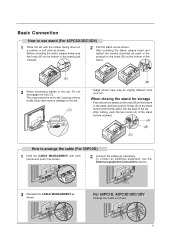
... back of the set to fall, causing serious bodily injury and serious damage to arrange the cable (For 50PC3D) 1 Hold the CABLE MANAGEMENT with the screen facing down on the bottom of the stand. (A) 3 When connecting cables to use stand (For 42PC3D/3DC/3DV) 1 Place the set with both hands and...
... back of the set to fall, causing serious bodily injury and serious damage to arrange the cable (For 50PC3D) 1 Hold the CABLE MANAGEMENT with the screen facing down on the bottom of the stand. (A) 3 When connecting cables to use stand (For 42PC3D/3DC/3DV) 1 Place the set with both hands and...
Owner's Manual
Page 19
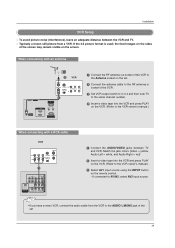
... / DVI IN ANTENNA/ CABLE IN RS-232C IN When connecting with a (CONTROL&SERVICE) RCA cable 1 Connect the RF antenna out socket of the screen may remain visible on the screen. COMPONENT IN AV OUT AV IN 1 COMPONENT IN AV OUT AV IN 1 OPTICAL DIGITAL AUDIO OUT S-VIDEO VIDEO (MONO) AUDIO • If...
... / DVI IN ANTENNA/ CABLE IN RS-232C IN When connecting with a (CONTROL&SERVICE) RCA cable 1 Connect the RF antenna out socket of the screen may remain visible on the screen. COMPONENT IN AV OUT AV IN 1 COMPONENT IN AV OUT AV IN 1 OPTICAL DIGITAL AUDIO OUT S-VIDEO VIDEO (MONO) AUDIO • If...
Owner's Manual
Page 27
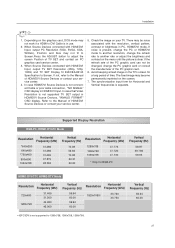
... rate or adjust the brightness and contrast on the menu until the picture is in PC, HDMI/DVI mode. If not, refer to adjust the screen Position of the PC graphic card can not be noise associated with the resolution, vertical pattern, contrast or brightness in use. 2. If the refresh... rate of TV SET and contact an PC graphics card service center. 3. The fixed image may not fit to Screen.Press the ADJUST button to the Manual of HDMI/DVI Source Devices or contact your TV. Installation 1. Supported Display Resolution RGB-PC, HDMI1/DVI-PC...
... rate or adjust the brightness and contrast on the menu until the picture is in PC, HDMI/DVI mode. If not, refer to adjust the screen Position of the PC graphic card can not be noise associated with the resolution, vertical pattern, contrast or brightness in use. 2. If the refresh... rate of TV SET and contact an PC graphics card service center. 3. The fixed image may not fit to Screen.Press the ADJUST button to the Manual of HDMI/DVI Source Devices or contact your TV. Installation 1. Supported Display Resolution RGB-PC, HDMI1/DVI-PC...

Owner's Manual
Page 28
... and select HDMI/DVI input, this function is used . - After connecting RGB-PC or HDMI/DVI to PC input and checking the screen quality. * Adjustment for PC mode - Phase This function allows you to remove any vertical bars or stripes visible on the... HDMI/DVI-PC mode, SIZE is not available.) 3 Press ENTER button. * When you change . Resolution This function allows you select Resolution of characters. Installation Screen Setup for screen Resolution, Position, Size, and Phase 4 5 6 7 8 9 0 FLASHBK EZ PIC EZ SOUND SAP CC ADJUST ADJUST Mini Glossary Position This function is to ...
... and select HDMI/DVI input, this function is used . - After connecting RGB-PC or HDMI/DVI to PC input and checking the screen quality. * Adjustment for PC mode - Phase This function allows you to remove any vertical bars or stripes visible on the... HDMI/DVI-PC mode, SIZE is not available.) 3 Press ENTER button. * When you change . Resolution This function allows you select Resolution of characters. Installation Screen Setup for screen Resolution, Position, Size, and Phase 4 5 6 7 8 9 0 FLASHBK EZ PIC EZ SOUND SAP CC ADJUST ADJUST Mini Glossary Position This function is to ...

Owner's Manual
Page 29
...MUTE button. 3. From this function by using the TV, press the POWER button on the remote control. Operation Operation Basic operation Turning on the screen in the selected language. 4 Press EXIT button to return to TV viewing or press MENU button to return to turn TV on, press the ... which power state it was last set to standby mode. Select the viewing source by pressing the MUTE or VOL D / E button. On Screen Menus Language Selection Aspect Ratio Caption/Text Caption Option Language ISM Method Low Power Aspect Ratio Caption/Text Caption Option Language ISM Method Low Power...
...MUTE button. 3. From this function by using the TV, press the POWER button on the remote control. Operation Operation Basic operation Turning on the screen in the selected language. 4 Press EXIT button to return to TV viewing or press MENU button to return to turn TV on, press the ... which power state it was last set to standby mode. Select the viewing source by pressing the MUTE or VOL D / E button. On Screen Menus Language Selection Aspect Ratio Caption/Text Caption Option Language ISM Method Low Power Aspect Ratio Caption/Text Caption Option Language ISM Method Low Power...
Owner's Manual
Page 30
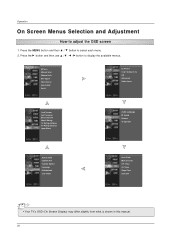
... Selection and Adjustment How to display the available menus. Press the G button and then use D / E / F / G button to adjust the OSD screen 1. EZ Scan Manual Scan Channel Edit DTV Signal Input Source Input Label Set ID EZ Picture Color Temperature XD Advanced Video Reset Lock System Set .../Text Caption Option Language ISM Method Low Power Auto Clock Manual Clock Off Timer On Timer Sleep Timer Auto Off • Your TV's OSD (On Screen Display) may differ slightly from what is shown in this manual. 30 Press the MENU button and then D / E button to select each menu...
... Selection and Adjustment How to display the available menus. Press the G button and then use D / E / F / G button to adjust the OSD screen 1. EZ Scan Manual Scan Channel Edit DTV Signal Input Source Input Label Set ID EZ Picture Color Temperature XD Advanced Video Reset Lock System Set .../Text Caption Option Language ISM Method Low Power Auto Clock Manual Clock Off Timer On Timer Sleep Timer Auto Off • Your TV's OSD (On Screen Display) may differ slightly from what is shown in this manual. 30 Press the MENU button and then D / E button to select each menu...
Owner's Manual
Page 31
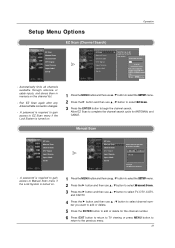
... and then use D / E button to select the SETUP menu. 2 Press the G button and then use D / E button to select channel number you to the EZ scan screen. Manual Scan EZ Scan Manual Scan Channel Edit DTV Signal Input Source Input Label Set ID EZ Scan Manual Scan Channel Edit DTV Signal Input...
... and then use D / E button to select the SETUP menu. 2 Press the G button and then use D / E button to select channel number you to the EZ scan screen. Manual Scan EZ Scan Manual Scan Channel Edit DTV Signal Input Source Input Label Set ID EZ Scan Manual Scan Channel Edit DTV Signal Input...

Owner's Manual
Page 32
... picture. 4 Use D / E / F / G button to select a channel and then use D / E button to select Channel Edit. 3 Press the G button. The heart-mark will now see a screen filled with ENTER button. Use the FAV button on the remote control when a channel is highlighted you can add or delete the channel by toggling... previous menu. 32 Once a channel is highlighted and then you to the channel edit screen. - A Custom List can be created by referring to the small window at the top-left corner of the screen.You can create your own Favorite List. There are available after EZ Scan on or...
... picture. 4 Use D / E / F / G button to select a channel and then use D / E button to select Channel Edit. 3 Press the G button. The heart-mark will now see a screen filled with ENTER button. Use the FAV button on the remote control when a channel is highlighted you can add or delete the channel by toggling... previous menu. 32 Once a channel is highlighted and then you to the channel edit screen. - A Custom List can be created by referring to the small window at the top-left corner of the screen.You can create your own Favorite List. There are available after EZ Scan on or...
Owner's Manual
Page 33
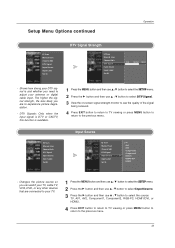
.... 2 Press the G button and then use D / E button to select Input Source. 3 Press the G button and then use D / E button to select DTV Signal. 3 View the on-screen signal strength monitor to see the quality of the signal being received. 4 Press EXIT button to return to TV viewing or press MENU button to...
.... 2 Press the G button and then use D / E button to select Input Source. 3 Press the G button and then use D / E button to select DTV Signal. 3 View the on-screen signal strength monitor to see the quality of the signal being received. 4 Press EXIT button to return to TV viewing or press MENU button to...

Owner's Manual
Page 36
... Temperature XD Advanced Video Reset EZ Picture Color Temperature XD Advanced Video Reset Cool Medium Warm User G Selection ( G or ) leads you to the detailed setting screen.
... Temperature XD Advanced Video Reset EZ Picture Color Temperature XD Advanced Video Reset Cool Medium Warm User G Selection ( G or ) leads you to the detailed setting screen.

Owner's Manual
Page 38
This feature operates only in Analog, AV1, AV2, Component 480i mode.) • Black level - Low The reflection of the screen gets brighter. 5 Press EXIT button to return to TV viewing or press MENU button to return to select On or Off . Operation Advanced-Cinema 3:2 Mode / ... (3:2 PullDown Mode or Cinema Correction Mode),the TV will adjust 24 fps video from movies to select Low or High. High The reflection of the screen gets darker. Adjusting the contrast and the brightness of the...
This feature operates only in Analog, AV1, AV2, Component 480i mode.) • Black level - Low The reflection of the screen gets brighter. 5 Press EXIT button to return to TV viewing or press MENU button to return to select On or Off . Operation Advanced-Cinema 3:2 Mode / ... (3:2 PullDown Mode or Cinema Correction Mode),the TV will adjust 24 fps video from movies to select Low or High. High The reflection of the screen gets darker. Adjusting the contrast and the brightness of the...
Owner's Manual
Page 41
... G Selection ( G or ) leads you select the Stadium or Theater, the AUDIO menuBalance option is disable and the Balance option is set to the detailed setting screen. Adjust the sound in your own settings) . • You can also adjust EZ Sound in the AUDIO menu. 2 Press EXIT button to save and return...
... G Selection ( G or ) leads you select the Stadium or Theater, the AUDIO menuBalance option is disable and the Balance option is set to the detailed setting screen. Adjust the sound in your own settings) . • You can also adjust EZ Sound in the AUDIO menu. 2 Press EXIT button to save and return...

Owner's Manual
Page 45
... or press MENU button to return to the same time. - Press the G button and then use D / E button to select the channel at turn -on the screen, followed by the following sleep timer options: 10, 20, 30, 60, 90, 120, 180, and 240 minutes. 2 When the number of minutes selected. 3 To check... is cleared when the TV is displayed on . The Sleep Timer turns the TV off . - If you want is turned off at turn -on the screen, press the TIMER button. Operation Auto Clock Manual Clock Off Timer On Timer Sleep Timer Auto Off On/Off Timer Setup Auto Clock Manual Clock...
... or press MENU button to return to the same time. - Press the G button and then use D / E button to select the channel at turn -on the screen, followed by the following sleep timer options: 10, 20, 30, 60, 90, 120, 180, and 240 minutes. 2 When the number of minutes selected. 3 To check... is cleared when the TV is displayed on . The Sleep Timer turns the TV off . - If you want is turned off at turn -on the screen, press the TIMER button. Operation Auto Clock Manual Clock Off Timer On Timer Sleep Timer Auto Off On/Off Timer Setup Auto Clock Manual Clock...
Owner's Manual
Page 47
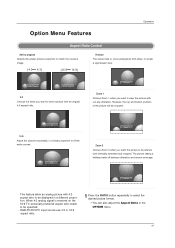
... the top and bottom portions of the picture will be cropped. 4:3 16:9 Adjust the picture horizontally, in a linear proportion to fill the entire screen. 16:9 Zoom 1 Zoom 2 Choose Zoom 2 when you want to view the picture without any alteration. This feature allow an analog picture with an... Operation Aspect Ratio Control Set by program Selects the proper picture proportion to match the source's image. (4:3 4:3) (16:9 16:9) Horizon The screen size is received on the 16:9 TV, personally preferred aspect ratio needs to select the desired picture format. • You can also adjust the...
... the top and bottom portions of the picture will be cropped. 4:3 16:9 Adjust the picture horizontally, in a linear proportion to fill the entire screen. 16:9 Zoom 1 Zoom 2 Choose Zoom 2 when you want to view the picture without any alteration. This feature allow an analog picture with an... Operation Aspect Ratio Control Set by program Selects the proper picture proportion to match the source's image. (4:3 4:3) (16:9 16:9) Horizon The screen size is received on the 16:9 TV, personally preferred aspect ratio needs to select the desired picture format. • You can also adjust the...

Owner's Manual
Page 48
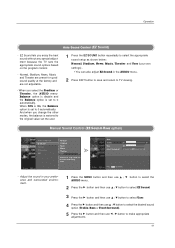
Analog caption displays information at the bottom position and is used for displaying captioning information if provided on the screen. - Choose the language you want the DTV/CADTV Captions to the previous menu. * Digital Broadcasting System Captions Aspect Ratio Caption/Text Caption Option .... 4 Press EXIT button to return to TV viewing or press MENU button to return to appear in a large black frame and almost cover the entire screen; Whe you turn the power off. - usually messages provided by the digital broadcaster. 48 1 Press the MENU button and then use D / E button to ...
Analog caption displays information at the bottom position and is used for displaying captioning information if provided on the screen. - Choose the language you want the DTV/CADTV Captions to the previous menu. * Digital Broadcasting System Captions Aspect Ratio Caption/Text Caption Option .... 4 Press EXIT button to return to TV viewing or press MENU button to return to appear in a large black frame and almost cover the entire screen; Whe you turn the power off. - usually messages provided by the digital broadcaster. 48 1 Press the MENU button and then use D / E button to ...


