
Owner's Manual
Page 5
... Adjustment Channel Selection On Screen Menus Language Selection On Screen Menus Selection and Adjustment EZ Scan (Channel Search) Manual Scan Channel Edit DTV Signal Strength Input Source Input Label Auto Picture Control(EZ Picture) Color Temperature Control XD Advanced-Cinema 3:2 Mode / Black Level Video Reset Audio Language Auto Sound Control(EZ Sound...
... Adjustment Channel Selection On Screen Menus Language Selection On Screen Menus Selection and Adjustment EZ Scan (Channel Search) Manual Scan Channel Edit DTV Signal Strength Input Source Input Label Auto Picture Control(EZ Picture) Color Temperature Control XD Advanced-Cinema 3:2 Mode / Black Level Video Reset Audio Language Auto Sound Control(EZ Sound...
Owner's Manual
Page 7
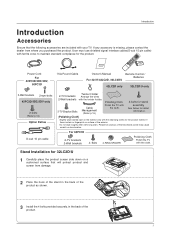
... 5 EZ ADJUST PIC EZ APM SOUND 0 SAP 8 9 FLASHBK 6 3 FREEZE Remote Control / For 42PC3D/3DC/3DV, For 32/37/42LC2D, 32LC2DU Batteries 50PC3D 42LC2D only 32LC2D/U only 2-Wall brackets 2-eye-bolts 42PC3D/3DC/3DV only 2-bolts (Refer p.14) Option Extras D-sub 15 pin cable Twister Holder...purchased the product. For 60PC1D 2-TV brackets 2-Wall brackets 4- Power Cord 75Ω Round Cable Owner's Manual TV INPUT TV AUDIO POWER DAY - Introduction Introduction Accessories Ensure that the following accessories are included with ferrite cores to maintain standard compliance...
... 5 EZ ADJUST PIC EZ APM SOUND 0 SAP 8 9 FLASHBK 6 3 FREEZE Remote Control / For 42PC3D/3DC/3DV, For 32/37/42LC2D, 32LC2DU Batteries 50PC3D 42LC2D only 32LC2D/U only 2-Wall brackets 2-eye-bolts 42PC3D/3DC/3DV only 2-bolts (Refer p.14) Option Extras D-sub 15 pin cable Twister Holder...purchased the product. For 60PC1D 2-TV brackets 2-Wall brackets 4- Power Cord 75Ω Round Cable Owner's Manual TV INPUT TV AUDIO POWER DAY - Introduction Introduction Accessories Ensure that the following accessories are included with ferrite cores to maintain standard compliance...

Owner's Manual
Page 8
... in standby mode. Illuminates white when the set is switched on . 8 ENTER ENTER POWER INPUT Button Button MENU ENTER Button Button VOLUME (F,G)Buttons CHANNEL (E,D)Buttons CH VOL ENTER MENU INPUT CHANNEL (D, E) Buttons VOLUME (F,G) Buttons ENTER Button MENU Button INPUT Button (Power) Button 60PC1D Remote Control Sensor Power Standby Indicator Illuminates red in standby...
... in standby mode. Illuminates white when the set is switched on . 8 ENTER ENTER POWER INPUT Button Button MENU ENTER Button Button VOLUME (F,G)Buttons CHANNEL (E,D)Buttons CH VOL ENTER MENU INPUT CHANNEL (D, E) Buttons VOLUME (F,G) Buttons ENTER Button MENU Button INPUT Button (Power) Button 60PC1D Remote Control Sensor Power Standby Indicator Illuminates red in standby...
Owner's Manual
Page 9
...IN VIDEO AUDIO Connect a HDMI signal to stereo sound from an external device. S-VIDEO VIDEO ( ) AUDIO 9 S-VIDEO VIDEO ( ) AUDIO VIDEO Input Connects the video signal from various types of equipment. Or DVI (VIDEO)signal to these ports do notVwIDEOork. 8 Remote Control Port Connect your TV. ...Connect cable signals to HDMI cable. R AUDIO Input Connections are available for lis/MONO tening to 1(DVI) or 2. Caution: Never attempt to operate the TV on a PC. 10 SERVICE ...
...IN VIDEO AUDIO Connect a HDMI signal to stereo sound from an external device. S-VIDEO VIDEO ( ) AUDIO 9 S-VIDEO VIDEO ( ) AUDIO VIDEO Input Connects the video signal from various types of equipment. Or DVI (VIDEO)signal to these ports do notVwIDEOork. 8 Remote Control Port Connect your TV. ...Connect cable signals to HDMI cable. R AUDIO Input Connections are available for lis/MONO tening to 1(DVI) or 2. Caution: Never attempt to operate the TV on a PC. 10 SERVICE ...

Owner's Manual
Page 10
This picture shown below may be conveniently swivelled on . CHANNEL (D, E) Buttons VOLUME (F,G) Buttons ENTER Button MENU Button INPUT Button (Power) Button Swivel Stand (42LC2D Only) - R 10 The TV can be somewhat different from your TV. This is switched on its stand 30° to the ...left or right to provide the optimum viewing angle. CH VOL ENTER MENU R INPUT Remote Control Sensor Power/Standby Indicator • ...
This picture shown below may be conveniently swivelled on . CHANNEL (D, E) Buttons VOLUME (F,G) Buttons ENTER Button MENU Button INPUT Button (Power) Button Swivel Stand (42LC2D Only) - R 10 The TV can be somewhat different from your TV. This is switched on its stand 30° to the ...left or right to provide the optimum viewing angle. CH VOL ENTER MENU R INPUT Remote Control Sensor Power/Standby Indicator • ...
Owner's Manual
Page 11
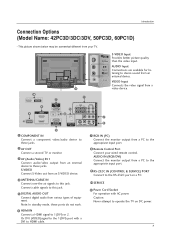
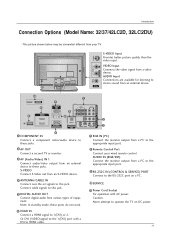
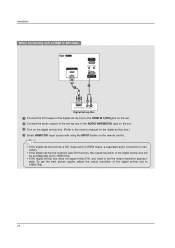
...video/audio device toS-VIDEO VIDEO AV IN 1 7 RGB IN (PC) ( ) AUDIO Connect the monitor output from a PC to this jack. AUDIO Input Connections are available for listening to AC IN stereo sound from an external device. 11 10 1 SERVICE 7 COMPONENT IN 6 RGB IN (PC) VIDEO AUDIO... IN VIDEO AUDIO Introduction S-VIDEO VIDEO ( ) AUDIO AV OUT Connection Options (Model Name: 32/37/42LC2D, 32LC2DU) AV IN 1 S-VIDEO VIDEO ( ) AUDIO - S-VIDEO Connect S-Video out from a PC to the appropriate input port. 9 RS-232C IN (CONTROL & SERVICE) PORT Connect to this jack. 5 DIGITAL AUDIO OUT...
...video/audio device toS-VIDEO VIDEO AV IN 1 7 RGB IN (PC) ( ) AUDIO Connect the monitor output from a PC to this jack. AUDIO Input Connections are available for listening to AC IN stereo sound from an external device. 11 10 1 SERVICE 7 COMPONENT IN 6 RGB IN (PC) VIDEO AUDIO... IN VIDEO AUDIO Introduction S-VIDEO VIDEO ( ) AUDIO AV OUT Connection Options (Model Name: 32/37/42LC2D, 32LC2DU) AV IN 1 S-VIDEO VIDEO ( ) AUDIO - S-VIDEO Connect S-Video out from a PC to the appropriate input port. 9 RS-232C IN (CONTROL & SERVICE) PORT Connect to this jack. 5 DIGITAL AUDIO OUT...
Owner's Manual
Page 12
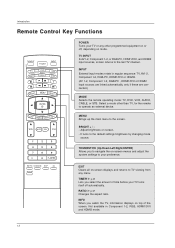
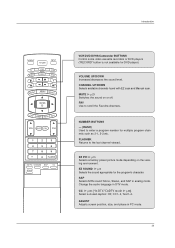
...STB BRIGHT - MENU Brings up the main menu to the last TV channel. TIMER G p.45 Lets you select the amount of the screen. INPUT External input modes rotate in Component 1-2, RGB, HDMI1/DVI and HDMI2 mode. 12 Adjust brightness on top of time before your preference. MENU BRIGHT + ENTER.... - Not available in regular sequence: TV, AV1-2, Component 1-2, RGB-PC, HDMI1/DVI or HDMI2. (AV 1-2, Component 1-2, RGB-PC , HDMI1/DVI or HDMI2 input sources are linked automatically, only if these are connected.) MODE Selects the remote operating mode: TV, DVD, VCR, AUDIO, CABLE, or STB.
...STB BRIGHT - MENU Brings up the main menu to the last TV channel. TIMER G p.45 Lets you select the amount of the screen. INPUT External input modes rotate in Component 1-2, RGB, HDMI1/DVI and HDMI2 mode. 12 Adjust brightness on top of time before your preference. MENU BRIGHT + ENTER.... - Not available in regular sequence: TV, AV1-2, Component 1-2, RGB-PC, HDMI1/DVI or HDMI2. (AV 1-2, Component 1-2, RGB-PC , HDMI1/DVI or HDMI2 input sources are linked automatically, only if these are connected.) MODE Selects the remote operating mode: TV, DVD, VCR, AUDIO, CABLE, or STB.
Owner's Manual
Page 13
... mode. MUTE G p.29 Switches the sound on the viewing environment. CHANNEL UP/DOWN Selects available channels found with EZ scan and Manual scan. Introduction TV INPUT POWER TV AUDIO DVD MODE CABLE INPUT VCR STB BRIGHT - FLASHBK Returns to the last channel viewed.
... mode. MUTE G p.29 Switches the sound on the viewing environment. CHANNEL UP/DOWN Selects available channels found with EZ scan and Manual scan. Introduction TV INPUT POWER TV AUDIO DVD MODE CABLE INPUT VCR STB BRIGHT - FLASHBK Returns to the last channel viewed.
Owner's Manual
Page 14
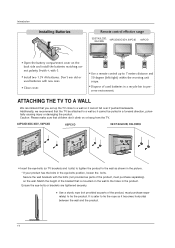
...must purchase separately) on the wall to the holes in a recycle bin to preserve environment. Introduction Installing Batteries Remote control effective range 32/37/42LC2D, 32LC2DU 42PC3D/3DC/3DV, 50PC3D 60PC1D I Use a remote control up the TV close to a wall so it cannot fall over if pushed... TV AUDIO DVD MODE CABLE INPUT VCR STB BRIGHT - I Install two 1.5V AA batteries. MENU BRIGHT + ENTER EXIT TIMER RATIO INFO I Open the battery compartment cover on or hang from the TV. 42PC3D/3DC/3DV, 50PC3D 60PC1D 32/37/42LC2D, 32LC2DU I Insert the eye-bolts (or ...
...must purchase separately) on the wall to the holes in a recycle bin to preserve environment. Introduction Installing Batteries Remote control effective range 32/37/42LC2D, 32LC2DU 42PC3D/3DC/3DV, 50PC3D 60PC1D I Use a remote control up the TV close to a wall so it cannot fall over if pushed... TV AUDIO DVD MODE CABLE INPUT VCR STB BRIGHT - I Install two 1.5V AA batteries. MENU BRIGHT + ENTER EXIT TIMER RATIO INFO I Open the battery compartment cover on or hang from the TV. 42PC3D/3DC/3DV, 50PC3D 60PC1D 32/37/42LC2D, 32LC2DU I Insert the eye-bolts (or ...
Owner's Manual
Page 19
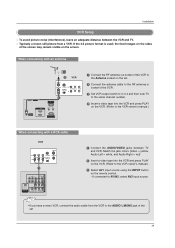
... of the screen may remain visible on the VCR. (Refer to AV IN2, select AV2 input source. the fixed images on the sides of the VCR to the VCR owner's manual.) 3 Select AV1 input source using the INPUT button on the remote control. - If connected to the VCR owner's manual.) VCR ANT IN...
... of the screen may remain visible on the VCR. (Refer to AV IN2, select AV2 input source. the fixed images on the sides of the VCR to the VCR owner's manual.) 3 Select AV1 input source using the INPUT button on the remote control. - If connected to the VCR owner's manual.) VCR ANT IN...
Owner's Manual
Page 20
...video tape into the VCR and press PLAY on the VCR. (Refer to the AUDIO input jacks on the remote control. - If connected to external equipment operating guide. • This TV finds the connected input sources automatically for AV1, AV2, Component 1-2, RGB, HDMI1/DVI and HDMI2 sources are ...external equipment. The picture quality is improved; Match the jack colors (Video = yellow, Audio Left = white, and Audio Right = red). 2 Select AV2 input source with an S-Video cable VCR ANT IN S-VIDEO OUT ANT OUT OUTPUT SWITCH (R) AUDIO (L) VIDEO 3 4 IN 1 2 VIDEO AUDIO COMPONENT IN ...
...video tape into the VCR and press PLAY on the VCR. (Refer to the AUDIO input jacks on the remote control. - If connected to external equipment operating guide. • This TV finds the connected input sources automatically for AV1, AV2, Component 1-2, RGB, HDMI1/DVI and HDMI2 sources are ...external equipment. The picture quality is improved; Match the jack colors (Video = yellow, Audio Left = white, and Audio Right = red). 2 Select AV2 input source with an S-Video cable VCR ANT IN S-VIDEO OUT ANT OUT OUTPUT SWITCH (R) AUDIO (L) VIDEO 3 4 IN 1 2 VIDEO AUDIO COMPONENT IN ...
Owner's Manual
Page 21
... automatically set to 1280x720p. • If the DVD does not support Auto HDMI, you need to set . 2 Select HDMI1/DVI or HDMI2 input source with using the INPUT button on the remote control. 3 Refer to the DVD player's manual for operating instructions. VIDEO AUDIO DVD Setup When connecting with a S-Video...Connect the S-VIDEO output of the DVD to the S-VIDEO input on the set. 2 Connect the audio outputs of the DVD to the AUDIO input jacks on the set. 3 Turn on the DVD player, insert a DVD. 4 Select AV1 input source with using the INPUT button on the remote control. - If connected to AV ...
... automatically set to 1280x720p. • If the DVD does not support Auto HDMI, you need to set . 2 Select HDMI1/DVI or HDMI2 input source with using the INPUT button on the remote control. 3 Refer to the DVD player's manual for operating instructions. VIDEO AUDIO DVD Setup When connecting with a S-Video...Connect the S-VIDEO output of the DVD to the S-VIDEO input on the set. 2 Connect the audio outputs of the DVD to the AUDIO input jacks on the set. 3 Turn on the DVD player, insert a DVD. 4 Select AV1 input source with using the INPUT button on the remote control. - If connected to AV ...
Owner's Manual
Page 22
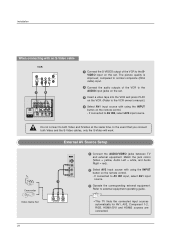
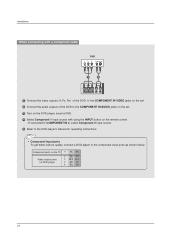
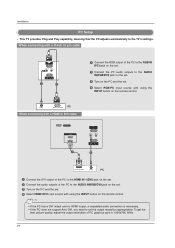
...Pb OPTICAL Y B-Y DIGITALAUDIO Y OUT Cb Y PB Pr R-Y S-VIDEO VIDEO Cr PR ( ) AUDIO 22 COMPONENT IN AV OUT AV IN 1 • Component Input ports VIDEO AUDIO To get better picture quality, connect a DVD player to the COMPONENT IN AUDIO jacks on the set. 3 Turn on the DVD player..., insert a DVD. 4 Select Component 1 input source with a component cable DVD B R (R) AUDIO (L) 1 2 VIDEO AUDIO ANTENNA/ CABLE IN HDMI / DVI IN COMPONENT IN 1 Connect the video outputs (Y, PB...
...Pb OPTICAL Y B-Y DIGITALAUDIO Y OUT Cb Y PB Pr R-Y S-VIDEO VIDEO Cr PR ( ) AUDIO 22 COMPONENT IN AV OUT AV IN 1 • Component Input ports VIDEO AUDIO To get better picture quality, connect a DVD player to the COMPONENT IN AUDIO jacks on the set. 3 Turn on the DVD player..., insert a DVD. 4 Select Component 1 input source with a component cable DVD B R (R) AUDIO (L) 1 2 VIDEO AUDIO ANTENNA/ CABLE IN HDMI / DVI IN COMPONENT IN 1 Connect the video outputs (Y, PB...
Owner's Manual
Page 23
...on the remote control. 3 Turn on the digital set-top box. (Refer to the owner's manual for the digita(ClONTsROLe&StER-VtICoE) p box.) 4 Select Component 1 input source with a Component cable RS-232C IN (CONTROL & SERVICE) Digital Set-top Box B R (R) AUDIO (L) 1 2 VIDEO AUDIO 1 Connect the video outputs (Y, ... resolution of the digital set . priately. HDMI / DVI IN 3 Turn on the set -top box to COMPONENT IN 2, select Component 2 input source. To get the best picture quality, adjust the output resolution of the digital set-top box will be automatically set to 1280x720p. •...
...on the remote control. 3 Turn on the digital set-top box. (Refer to the owner's manual for the digita(ClONTsROLe&StER-VtICoE) p box.) 4 Select Component 1 input source with a Component cable RS-232C IN (CONTROL & SERVICE) Digital Set-top Box B R (R) AUDIO (L) 1 2 VIDEO AUDIO 1 Connect the video outputs (Y, ... resolution of the digital set . priately. HDMI / DVI IN 3 Turn on the set -top box to COMPONENT IN 2, select Component 2 input source. To get the best picture quality, adjust the output resolution of the digital set-top box will be automatically set to 1280x720p. •...
Owner's Manual
Page 24
... digital set-top box. (Refer to the owner's manual for the d(PCi)gital set-top box.) REMORTEGBAIUNDIO IN CONTROL IN (RGB/DVI) 4 Select HDMI1/DVI input source with a HDMI to DVI cable SERVICE HDMI IN 2 1(DVI) 1 RGB IN (PC) AUDIO IN REMOTE (RGB/DVI) CONTROL IN RS-232C IN (CONTROL & SERVICE... the AUDIO IN(RGB/DVI) jack on the remote control. Installation VIDEO AUDIO OPTICAL DIGITAL AUDIO OUT S-VIDEO VIDEO ( ) AUDIO When connecting with using the INPUT button on the set. To get the best picture quality, adjust the output resolution of the digital set-top box will be automatically set to...
... digital set-top box. (Refer to the owner's manual for the d(PCi)gital set-top box.) REMORTEGBAIUNDIO IN CONTROL IN (RGB/DVI) 4 Select HDMI1/DVI input source with a HDMI to DVI cable SERVICE HDMI IN 2 1(DVI) 1 RGB IN (PC) AUDIO IN REMOTE (RGB/DVI) CONTROL IN RS-232C IN (CONTROL & SERVICE... the AUDIO IN(RGB/DVI) jack on the remote control. Installation VIDEO AUDIO OPTICAL DIGITAL AUDIO OUT S-VIDEO VIDEO ( ) AUDIO When connecting with using the INPUT button on the set. To get the best picture quality, adjust the output resolution of the digital set-top box will be automatically set to...
Owner's Manual
Page 25
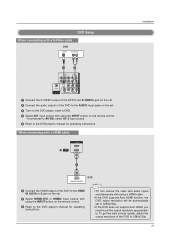
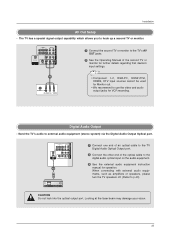
... port. 2 Connect the other end of the second TV or monitor for further details regarding that device's input settings. 1/2 S-VIDEO IN (R) AUDIO (L) VIDEO • Component 1-2, RGB-PC, HDMI1/DVI, HDMI2, DTV input sources cannot be used for Monitor out. • We recommend to use the video and audio output jacks...- When connecting with external audio equipments, such as amplifiers or speakers, please turn the TV speakers off. (Refer to the digital audio optical input on the audio equipment. 3 See the external audio equipment instruction manual for VCR recording. Digital Audio Output -
... port. 2 Connect the other end of the second TV or monitor for further details regarding that device's input settings. 1/2 S-VIDEO IN (R) AUDIO (L) VIDEO • Component 1-2, RGB-PC, HDMI1/DVI, HDMI2, DTV input sources cannot be used for Monitor out. • We recommend to use the video and audio output jacks...- When connecting with external audio equipments, such as amplifiers or speakers, please turn the TV speakers off. (Refer to the digital audio optical input on the audio equipment. 3 See the external audio equipment instruction manual for VCR recording. Digital Audio Output -
Owner's Manual
Page 26
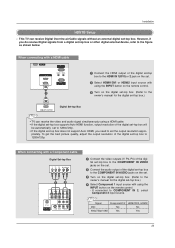
... PC audio outputs to the AUDIO IN(RGB/DVI) jack on the set. 3 Turn on the PC and the set. 4 Select HDMI1/DVI input source with using the INPUT button on the remote control. AUDIO RGB-PC OUTPUT PC When connecting with a HDMI to DVI cable SERVICE HDMI IN 2 1(DVI) 1 RGB IN... PC to the HDMI IN 1(DVI) jack on the set. 2 Connect the audio outputs of PC graphics card to set . 4 Select RGB-PC input source with using the INPUT button on the remote control. RGB IN (PC) AUDIO IN REMOTE (RGB/DVI) CONTROL IN • If the PC has a DVI output and...
... PC audio outputs to the AUDIO IN(RGB/DVI) jack on the set. 3 Turn on the PC and the set. 4 Select HDMI1/DVI input source with using the INPUT button on the remote control. AUDIO RGB-PC OUTPUT PC When connecting with a HDMI to DVI cable SERVICE HDMI IN 2 1(DVI) 1 RGB IN... PC to the HDMI IN 1(DVI) jack on the set. 2 Connect the audio outputs of PC graphics card to set . 4 Select RGB-PC input source with using the INPUT button on the remote control. RGB IN (PC) AUDIO IN REMOTE (RGB/DVI) CONTROL IN • If the PC has a DVI output and...
Owner's Manual
Page 27
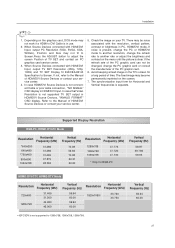
.../DVI Source Devices or contact your service center. 5. If the refresh rate of the PC graphic card can not be noise associated with HDMI/DVI Input, output PC Resolution (VGA, SVGA, XGA, WXGA), Position and Size may not fit to Screen.Press the ADJUST button to 1280x768, 1360x768, 1366x768.... 6. In case that Video Resolution is not connected Cable or poor cable connection, "NO SIGNAL" OSD display in PC, HDMI/DVI mode. The synchronization input form for RGB-PC Vertical Frequency (Hz) 59.87 59.799 59.65 HDMI1/DVI-DTV, HDMI2-DTV Mode Resolution Horizontal Frequency (kHz) 720x480 1280x720...
.../DVI Source Devices or contact your service center. 5. If the refresh rate of the PC graphic card can not be noise associated with HDMI/DVI Input, output PC Resolution (VGA, SVGA, XGA, WXGA), Position and Size may not fit to Screen.Press the ADJUST button to 1280x768, 1360x768, 1366x768.... 6. In case that Video Resolution is not connected Cable or poor cable connection, "NO SIGNAL" OSD display in PC, HDMI/DVI mode. The synchronization input form for RGB-PC Vertical Frequency (Hz) 59.87 59.799 59.65 HDMI1/DVI-DTV, HDMI2-DTV Mode Resolution Horizontal Frequency (kHz) 720x480 1280x720...

Owner's Manual
Page 28
...SAP CC ADJUST ADJUST Mini Glossary Position This function is to adjust picture to select Yes. 3 Press ENTER button. When RGB connect to PC input and select HDMI/DVI input, this function is used . - And the horizontal screen size will also change the resolution, select the proper resolution in present... input to see the best picture appearance. * Initializing (Reset to minimize any horizontal noise and clear or sharpen the image of XGA/WXGA. 1 Press ...
...SAP CC ADJUST ADJUST Mini Glossary Position This function is to adjust picture to select Yes. 3 Press ENTER button. When RGB connect to PC input and select HDMI/DVI input, this function is used . - And the horizontal screen size will also change the resolution, select the proper resolution in present... input to see the best picture appearance. * Initializing (Reset to minimize any horizontal noise and clear or sharpen the image of XGA/WXGA. 1 Press ...

Owner's Manual
Page 29
In standby mode to turn TV on, press the , INPUT, CH D / E button on the TV or press the POWER, TV INPUT, INPUT, CH D / E, Number (0 ~ 9) button on the remote control. Press the VOL D / E button to , even if the power cord is out. 3. At this point on, the on-... in the selected language. This TV is programmed to remember which power state it was last set to adjust the volume. 2. When finished using TV INPUT, INPUT button on the TV 1. From this moment, the TV switches to be shown on vacation, disconnect the power plug from the wall power outlet. On...
In standby mode to turn TV on, press the , INPUT, CH D / E button on the TV or press the POWER, TV INPUT, INPUT, CH D / E, Number (0 ~ 9) button on the remote control. Press the VOL D / E button to , even if the power cord is out. 3. At this point on, the on-... in the selected language. This TV is programmed to remember which power state it was last set to adjust the volume. 2. When finished using TV INPUT, INPUT button on the TV 1. From this moment, the TV switches to be shown on vacation, disconnect the power plug from the wall power outlet. On...

