
Owners Manual
Page 1
OWNER'S MANUAL LED TV * LG LED TV applies LCD screen with LED backlights. Please read this manual carefully before operating your set and retain it for future reference. 32LN520B 42LN5200 32LN530B 32LN5300 39LN5300 42LN5300 42LN5400 47LN5400 50LN5400 55LN5400 P/NO : MFL67651192 (1301-REV00) www.lg.com
OWNER'S MANUAL LED TV * LG LED TV applies LCD screen with LED backlights. Please read this manual carefully before operating your set and retain it for future reference. 32LN520B 42LN5200 32LN530B 32LN5300 39LN5300 42LN5300 42LN5400 47LN5400 50LN5400 55LN5400 P/NO : MFL67651192 (1301-REV00) www.lg.com
Owners Manual
Page 7
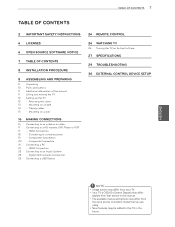
... OF CONTENTS 8 INSTALLATION PROCEDURE 8 ASSEMBLING AND PREPARING 8 Unpacking 10 Parts and buttons 11 Additional information of the manual 11 Lifting and moving the TV 12 Setting up the TV 12 - Mounting on a wall 16 MAKING CONNECTIONS 16 Connecting to an antenna or cable 17 Connecting to a HD receiver, DVD Player or...
... OF CONTENTS 8 INSTALLATION PROCEDURE 8 ASSEMBLING AND PREPARING 8 Unpacking 10 Parts and buttons 11 Additional information of the manual 11 Lifting and moving the TV 12 Setting up the TV 12 - Mounting on a wall 16 MAKING CONNECTIONS 16 Connecting to an antenna or cable 17 Connecting to a HD receiver, DVD Player or...
Owners Manual
Page 12
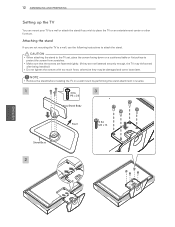
12 ASSEMBLING AND PREPARING Setting up the TV
12 ASSEMBLING AND PREPARING Setting up the TV

Owners Manual
Page 32
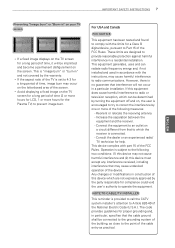
... could exceed the limits necessary to use the personal computer (PC) equipped with a CD-ROM drive. www.lg.com This product qualifies for ENERGY STAR. Changing the factory default settings or enabling other features may increase power consumption that contain information on the advanced features of this... LG TV are located on the back and one side of the TV is located on the CD-...
... could exceed the limits necessary to use the personal computer (PC) equipped with a CD-ROM drive. www.lg.com This product qualifies for ENERGY STAR. Changing the factory default settings or enabling other features may increase power consumption that contain information on the advanced features of this... LG TV are located on the back and one side of the TV is located on the CD-...

Owners Manual
Page 33
Please read this manual carefully before operating your set and retain it for future reference. 32LN520B 42LN5200 32LN530B 32LN5300 39LN5300 42LN5300 42LN5400 47LN5400 50LN5400 55LN5400 P/NO : SAC35595002 (1301-REV00) www.lg.com OWNER'S MANUAL LED TV * LG LED TV applies LCD screen with LED backlights.
Please read this manual carefully before operating your set and retain it for future reference. 32LN520B 42LN5200 32LN530B 32LN5300 39LN5300 42LN5300 42LN5400 47LN5400 50LN5400 55LN5400 P/NO : SAC35595002 (1301-REV00) www.lg.com OWNER'S MANUAL LED TV * LG LED TV applies LCD screen with LED backlights.
Owners Manual
Page 39
... with the instructions, may cause harmful interference to correct the interference by the warranty. Operation is connected. - NOTE TO CABLE/TV INSTALLER This reminder is set to the following measures: - yyIf the aspect ratio of the TV is provided to call the CATV system installer's attention to comply with part 15...
... with the instructions, may cause harmful interference to correct the interference by the warranty. Operation is connected. - NOTE TO CABLE/TV INSTALLER This reminder is set to the following measures: - yyIf the aspect ratio of the TV is provided to call the CATV system installer's attention to comply with part 15...

Owners Manual
Page 41
... 20 REMOTE CONTROL 22 WATCHING TV 22 Turning the TV on a table 18 - Adjusting aspect ratio 27 - LOCK Settings ENGLISH Changing AV modes 27 - TIME Settings 40 - OPTION Settings 42 - Checking current program info 26 Using additional options 26 - Mounting on for the first time 22 Watching TV ... CONTENTS 11 INSTALLATION PROCEDURE 11 ASSEMBLING AND PREPARING 11 Unpacking 13 Parts and buttons 14 Lifting and moving the TV 15 Setting up channels 24 - PICTURE Settings 38 - Using the input list 28 Using the quick menu 29 ENTERTAINMENT 29 - Browsing files 31 - Attaching the stand ...
... 20 REMOTE CONTROL 22 WATCHING TV 22 Turning the TV on a table 18 - Adjusting aspect ratio 27 - LOCK Settings ENGLISH Changing AV modes 27 - TIME Settings 40 - OPTION Settings 42 - Checking current program info 26 Using additional options 26 - Mounting on for the first time 22 Watching TV ... CONTENTS 11 INSTALLATION PROCEDURE 11 ASSEMBLING AND PREPARING 11 Unpacking 13 Parts and buttons 14 Lifting and moving the TV 15 Setting up channels 24 - PICTURE Settings 38 - Using the input list 28 Using the quick menu 29 ENTERTAINMENT 29 - Browsing files 31 - Attaching the stand ...

Owners Manual
Page 43
... / ASSEMBLING AND PREPARING 11 INSTALLATION PROCEDURE 1 Open the package and make sure all the accessories are included. 2 Attach the stand to the TV set. 3 Connect an external device to upgrade of the screen, do not remove it. yyUse an extension cable that supports USB 2.0 if the USB cable.... If there are not covered by the warranty. yyProduct specifications or contents of this manual may be changed without prior notice due to the TV set. NOTE yyThe items supplied with your TV's USB port. B B A A *A 10 mm (0.39 inches) *B 18 mm (0.7 inches) The illustrations in this manual ...
... / ASSEMBLING AND PREPARING 11 INSTALLATION PROCEDURE 1 Open the package and make sure all the accessories are included. 2 Attach the stand to the TV set. 3 Connect an external device to upgrade of the screen, do not remove it. yyUse an extension cable that supports USB 2.0 if the USB cable.... If there are not covered by the warranty. yyProduct specifications or contents of this manual may be changed without prior notice due to the TV set. NOTE yyThe items supplied with your TV's USB port. B B A A *A 10 mm (0.39 inches) *B 18 mm (0.7 inches) The illustrations in this manual ...

Owners Manual
Page 45
... Sensor Intelligent Sensor1 Buttons Rear Connection Panel (See p. 44) ANTENNA IN / CABLE IN IN 1 VIDEO/ Y PB PR L/MONO AUDIO R COMPONENT IN / AV IN Button OK ) (SETTINGS) (INPUT ) () Scrolls through the saved channels. Changes the input source. Adjusts the volume level. Accesses the main menus, or saves your input and exits the...
... Sensor Intelligent Sensor1 Buttons Rear Connection Panel (See p. 44) ANTENNA IN / CABLE IN IN 1 VIDEO/ Y PB PR L/MONO AUDIO R COMPONENT IN / AV IN Button OK ) (SETTINGS) (INPUT ) () Scrolls through the saved channels. Changes the input source. Adjusts the volume level. Accesses the main menus, or saves your input and exits the...

Owners Manual
Page 47
otherwise they are not mounting the TV to a wall, use the following instructions to attach the stand. ASSEMBLING AND PREPARING 15 Setting up the TV You can mount your TV to a wall or attach the stand if you are not fastened securely enough, the TV may be .... (If they may tilt forward after being installed.) yyDo not tighten the screws with too much force; CAUTION yyWhen attaching the stand to the TV set, place the screen facing down on a cushioned table or flat surface to place the TV on a wall mount by performing the stand attachment in reverse...
otherwise they are not mounting the TV to a wall, use the following instructions to attach the stand. ASSEMBLING AND PREPARING 15 Setting up the TV You can mount your TV to a wall or attach the stand if you are not fastened securely enough, the TV may be .... (If they may tilt forward after being installed.) yyDo not tighten the screws with too much force; CAUTION yyWhen attaching the stand to the TV set, place the screen facing down on a cushioned table or flat surface to place the TV on a wall mount by performing the stand attachment in reverse...

Owners Manual
Page 52
... pointed in the direction of the TV's remote sensor. Turns the TV on or off . VOL Adjusts the volume level. Analog signal: Changes the sound setting. When in use the TV correctly. Number button Enters numbers. - (Dash) Inserts a dash between the two last channels selected (pressing repeatedly). MUTE Mutes all sounds...
... pointed in the direction of the TV's remote sensor. Turns the TV on or off . VOL Adjusts the volume level. Analog signal: Changes the sound setting. When in use the TV correctly. Number button Enters numbers. - (Dash) Inserts a dash between the two last channels selected (pressing repeatedly). MUTE Mutes all sounds...

Owners Manual
Page 53
Q.MENU (See p. 28) Accesses the quick menu. SETTINGS Accesses the main menu. Navigation buttons (up/down/left/right) Scrolls through menus or options. Opens the SIMPLINK menu. EXIT Clears all on the current ... to the TV. BACK Returns to turns off. REMOTE CONTROL 21 ENGLISH FLASHBK AUDIO PICTURE Changes the image mode. SOUND Changes the sound mode. SLEEP Sets the length of time until the TV to the previous screen.
Q.MENU (See p. 28) Accesses the quick menu. SETTINGS Accesses the main menu. Navigation buttons (up/down/left/right) Scrolls through menus or options. Opens the SIMPLINK menu. EXIT Clears all on the current ... to the TV. BACK Returns to turns off. REMOTE CONTROL 21 ENGLISH FLASHBK AUDIO PICTURE Changes the image mode. SOUND Changes the sound mode. SLEEP Sets the length of time until the TV to the previous screen.
Owners Manual
Page 54
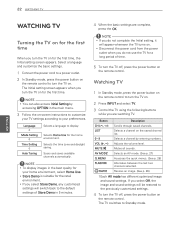
.... ENGLISH Selects Home Use for the retail environment. Scans and saves available channels automatically. yyIf you select Store Demo, any customized settings will appear whenever the TV turns on. Watching TV 1 In Standby mode, press the power button on the remote control to your... home environment, select Home Use. The TV switches to display. MUTE AV MODE1 Mutes all sounds. NOTE yyYou can also access Initial Setting by entering numbers. yyStore Demo is suitable for the home environment. Button Description CH ( , ) Scrolls through saved channels. If you ...
.... ENGLISH Selects Home Use for the retail environment. Scans and saves available channels automatically. yyIf you select Store Demo, any customized settings will appear whenever the TV turns on. Watching TV 1 In Standby mode, press the power button on the remote control to your... home environment, select Home Use. The TV switches to display. MUTE AV MODE1 Mutes all sounds. NOTE yyYou can also access Initial Setting by entering numbers. yyStore Demo is suitable for the home environment. Button Description CH ( , ) Scrolls through saved channels. If you ...

Owners Manual
Page 55
... delete channels. 5 When you are finished, press EXIT. When you can store up channels Storing channels To store channels automatically, 1 Press SETTINGS to access the main menus. 2 Press the Navigation buttons to scroll to CHANNEL and press OK. 3 Press the Navigation buttons to scroll to...Select Yes to the previous menu, press BACK. NOTE yyYou can store differs depending on the broadcasting signal environment. WATCHING TV 23 Managing channels Setting up to the previous menu, press BACK. NOTE yyIf the TV scans and saves channels, the previously saved channels will be overwritten. 5...
... delete channels. 5 When you are finished, press EXIT. When you can store up channels Storing channels To store channels automatically, 1 Press SETTINGS to access the main menus. 2 Press the Navigation buttons to scroll to CHANNEL and press OK. 3 Press the Navigation buttons to scroll to...Select Yes to the previous menu, press BACK. NOTE yyYou can store differs depending on the broadcasting signal environment. WATCHING TV 23 Managing channels Setting up to the previous menu, press BACK. NOTE yyIf the TV scans and saves channels, the previously saved channels will be overwritten. 5...

Owners Manual
Page 56
.... 2 Select a channel you are finished, press EXIT. To move to the favorite list. 6 When you want and press OK. Moves to view. Setting up your channel list 1 Press SETTINGS to access the main menus. 2 Press the Navigation buttons to scroll to CHANNEL and press OK. 3 Press the Navigation buttons to scroll to...
.... 2 Select a channel you are finished, press EXIT. To move to the favorite list. 6 When you want and press OK. Moves to view. Setting up your channel list 1 Press SETTINGS to access the main menus. 2 Press the Navigation buttons to scroll to CHANNEL and press OK. 3 Press the Navigation buttons to scroll to...
Owners Manual
Page 57
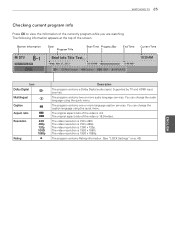
... 720p 1080i 1080p ꔒ Description The program contains a Dolby Digital audio signal. The video resolution is 1280 x 720p. The program contains Rating information. (See "LOCK Settings" on p. 42) ENGLISH The following information appears at the top of the currently program while you are watching. You can change the audio language using...
... 720p 1080i 1080p ꔒ Description The program contains a Dolby Digital audio signal. The video resolution is 1280 x 720p. The program contains Rating information. (See "LOCK Settings" on p. 42) ENGLISH The following information appears at the top of the currently program while you are watching. You can change the audio language using...
Owners Manual
Page 58
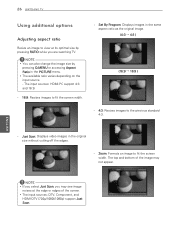
... in the original size without cutting off the edges. - NOTE yyYou can also change the image size by pressing RATIO while you may not appear. Set By Program: Displays images in the same aspect ratio as the original image. (4:3 → 4:3 ) (16:9 → 16:9 ) - 4:3: Resizes images to fit the screen width. The...
... in the original size without cutting off the edges. - NOTE yyYou can also change the image size by pressing RATIO while you may not appear. Set By Program: Displays images in the same aspect ratio as the original image. (4:3 → 4:3 ) (16:9 → 16:9 ) - 4:3: Resizes images to fit the screen width. The...
Owners Manual
Page 59
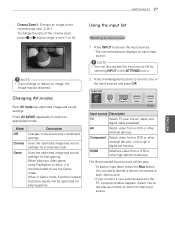
...label, press the Blue button. NOTE yyIf you connect a new external device to access the input sources. - Uses the optimized image and sound settings for fast gaming. The disconnected input sources will be optimized for playing games. ENGLISH it is from a VCR or other external devices, or ... high definition devices. You can also access the input source list by selecting INPUT in Game mode, functions related to the previously customized settings. Using the input list Selecting an input source 1 Press INPUT to the TV, a pop-up window to switch to that input source...
...label, press the Blue button. NOTE yyIf you connect a new external device to access the input sources. - Uses the optimized image and sound settings for fast gaming. The disconnected input sources will be optimized for playing games. ENGLISH it is from a VCR or other external devices, or ... high definition devices. You can also access the input source list by selecting INPUT in Game mode, functions related to the previously customized settings. Using the input list Selecting an input source 1 Press INPUT to the TV, a pop-up window to switch to that input source...

Owners Manual
Page 60
... the option you want. 4 When you return to the previous menu, press BACK. Audio (Digital signal) ꕁ SAP (Analog signal) Changes the sound setting. ꕨ Sleep Timer Sets the length of the input labels and press OK. 5 When you are finished, press Q.MENU. When you are finished, press EXIT. Menu Description ꔣ...
... the option you want. 4 When you return to the previous menu, press BACK. Audio (Digital signal) ꕁ SAP (Analog signal) Changes the sound setting. ꕨ Sleep Timer Sets the length of the input labels and press OK. 5 When you are finished, press Q.MENU. When you are finished, press EXIT. Menu Description ꔣ...

Owners Manual
Page 63
...11/27/2012 ꕯ Exit Button Description Navigation Scrolls through the files. Menu Description View Views the selected photo. To (Background set a slideshow speed, select Option. Mark All Selects all files Unmark All Clears all photos saved in Photo List and Music List....storage device. yyIf there are displayed using the following options are changed in Photo List or Music List are available while viewing photos. yyTo set the background music folder, select Music) Option. ꘤ (Rotate) Rotates photos clockwise. (90°, 180°, 270°, 360&#...
...11/27/2012 ꕯ Exit Button Description Navigation Scrolls through the files. Menu Description View Views the selected photo. To (Background set a slideshow speed, select Option. Mark All Selects all files Unmark All Clears all photos saved in Photo List and Music List....storage device. yyIf there are displayed using the following options are changed in Photo List or Music List are available while viewing photos. yyTo set the background music folder, select Music) Option. ꘤ (Rotate) Rotates photos clockwise. (90°, 180°, 270°, 360&#...


