
Owner's Manual
Page 3
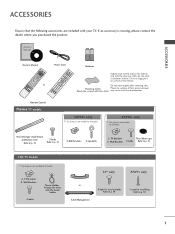
... p. 10 1 Wall Brackets 2-bolts Refer to p. 10 1-screw for the product exterior if there is missing, please contact the dealer where you purchased the product. Remote Control Plasma TV models 50PF9* only I This feature is not available for all models. 60PF9* only I /II EXIT BACK MENU INFO i OK GUIDE VOL FAV 1 MUTE...
... p. 10 1 Wall Brackets 2-bolts Refer to p. 10 1-screw for the product exterior if there is missing, please contact the dealer where you purchased the product. Remote Control Plasma TV models 50PF9* only I This feature is not available for all models. 60PF9* only I /II EXIT BACK MENU INFO i OK GUIDE VOL FAV 1 MUTE...

Owner's Manual
Page 4
... . . . 60 - User option 66 XD - TruMotion 69 Advanced - Button function in NOW/NEXT guide mode . . . . 59 - Auto Colour Tone Control (Warm/Medium/Cool) . . . 64 Manual Picture Adjustment - Picture Improvement Technology 67 XD Demo 68 TruMotion Demo 68 Advanced - Button function in timer list mode...ATTACHING THE TV TO A DESK 10 Attaching the TV to a wall 11 Back Cover for PC Mode 30 WATCHING TV / PROGRAMME CONTROL Remote Control Key Functions 34 Turning on /off EPG 58 - Screen Setup for Wire Arrangement 12 Desktop Pedestal Installation 15 Wall Mount: Horizontal ...
... . . . 60 - User option 66 XD - TruMotion 69 Advanced - Button function in NOW/NEXT guide mode . . . . 59 - Auto Colour Tone Control (Warm/Medium/Cool) . . . 64 Manual Picture Adjustment - Picture Improvement Technology 67 XD Demo 68 TruMotion Demo 68 Advanced - Button function in timer list mode...ATTACHING THE TV TO A DESK 10 Attaching the TV to a wall 11 Back Cover for PC Mode 30 WATCHING TV / PROGRAMME CONTROL Remote Control Key Functions 34 Turning on /off EPG 58 - Screen Setup for Wire Arrangement 12 Desktop Pedestal Installation 15 Wall Mount: Horizontal ...

Owner's Manual
Page 5
...within Digital Service 92 Teletext in Digital Service 92 APPENDIX Troubleshooting 93 Maintenance 95 Product Specifications 96 Programming the Remote Control 98 IR Codes 102 External Control Device Setup 104 TIME SETTING Clock Setup 84 Auto On/ Off Timer Setting 85 Auto Shut-off Setting 86...3 Stereo/Dual Reception (In Analogue Mode Only) . . . .80 - NICAM Reception (In Analogue Mode Only 81 - CONTENTS SOUND & LANGUAGE CONTROL Auto Volume Leveler 74 Preset Sound Settings - Sound Mode 75 Sound Setting Adjustment - User Mode 76 Balance 77 TV Speakers On/ Off Setup 78 ...
...within Digital Service 92 Teletext in Digital Service 92 APPENDIX Troubleshooting 93 Maintenance 95 Product Specifications 96 Programming the Remote Control 98 IR Codes 102 External Control Device Setup 104 TIME SETTING Clock Setup 84 Auto On/ Off Timer Setting 85 Auto Shut-off Setting 86...3 Stereo/Dual Reception (In Analogue Mode Only) . . . .80 - NICAM Reception (In Analogue Mode Only 81 - CONTENTS SOUND & LANGUAGE CONTROL Auto Volume Leveler 74 Preset Sound Settings - Sound Mode 75 Sound Setting Adjustment - User Mode 76 Balance 77 TV Speakers On/ Off Setup 78 ...
Owner's Manual
Page 6
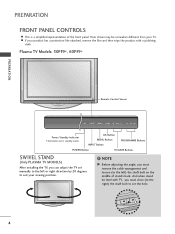
Plasma TV Models: 50PF9*, 60PF9* PREPARATION Remote Control Sensor INPUT MENU OK VOL PR INPUT MENU OK VOL PR Power/Standby Indicator • illuminates red in standby mode. A If your product has a protection ..., remove the film and then wipe the product with TV, you must remove the cable management and loosen (to suit your TV. PREPARATION FRONT PANEL CONTROLS A This is a simplified representation of stand's back. OK Button MENU Button INPUT Button PROGRAMME Buttons POWER Button VOLUME Buttons SWIVEL STAND (Only PLASMA TV MODELS...
Plasma TV Models: 50PF9*, 60PF9* PREPARATION Remote Control Sensor INPUT MENU OK VOL PR INPUT MENU OK VOL PR Power/Standby Indicator • illuminates red in standby mode. A If your product has a protection ..., remove the film and then wipe the product with TV, you must remove the cable management and loosen (to suit your TV. PREPARATION FRONT PANEL CONTROLS A This is a simplified representation of stand's back. OK Button MENU Button INPUT Button PROGRAMME Buttons POWER Button VOLUME Buttons SWIVEL STAND (Only PLASMA TV MODELS...

Owner's Manual
Page 7
PREPARATION LCD TV Models: 37LF6*, 42LF6*, 47LF6*, 52LF6* PR VOL OK MENU INPUT /I PROGRAMME Buttons VOLUME Buttons OK Button MENU Button INPUT Button POWER Button Intelligent Eye Adjusts picture according to the surrounding conditions. Power/Standby Indicator • illuminates red in standby mode. Remote Control Sensor • illuminates green when the set is switched on. 5
PREPARATION LCD TV Models: 37LF6*, 42LF6*, 47LF6*, 52LF6* PR VOL OK MENU INPUT /I PROGRAMME Buttons VOLUME Buttons OK Button MENU Button INPUT Button POWER Button Intelligent Eye Adjusts picture according to the surrounding conditions. Power/Standby Indicator • illuminates red in standby mode. Remote Control Sensor • illuminates green when the set is switched on. 5

Owner's Manual
Page 8
... LCD TV Models: 37LY9*, 42LY9*, 47LY9*, 52LY9* PREPARATION Intelligent Eye Adjusts picture according to the surrounding conditions. Remote Control Sensor PR VOL OK MENU INPUT PROGRAMME Buttons VOLUME Buttons OK Button MENU Button INPUT Button POWER Button Power/Standby ...Indicator • illuminates red in standby mode. • illuminates green when the set is switched on . Remote Control Sensor INPUT Button POWER Button Power/Standby Indicator • illuminates red in standby mode. • illuminates green when the set is switched on...
... LCD TV Models: 37LY9*, 42LY9*, 47LY9*, 52LY9* PREPARATION Intelligent Eye Adjusts picture according to the surrounding conditions. Remote Control Sensor PR VOL OK MENU INPUT PROGRAMME Buttons VOLUME Buttons OK Button MENU Button INPUT Button POWER Button Power/Standby ...Indicator • illuminates red in standby mode. • illuminates green when the set is switched on . Remote Control Sensor INPUT Button POWER Button Power/Standby Indicator • illuminates red in standby mode. • illuminates green when the set is switched on...

Owner's Manual
Page 20
... to HDMI/DVI IN 1, HDMI IN 2 or HDMI IN 3 jack on the digital set-top box. VIDEO AUDIO 1 COMPONENT IN 18 OPTIC RS-232C IN (CONTROL & SERVICE) RGB(PC) AUD (RGB 2 Turn on the set. EXTERNAL EQUIPMENT SETUP PCMCIA CARD SLOT EJECT HDMI/DVI IN 1 HDMI IN 2 When connecting with a .... (Refer to the owner's manual for the digital set-top box.) 3 Select HDMI1, HDMI2 or HDMI3 input source with using the INPUT button on the remote control. ANTENNA IN RGB IN (Refer to the owner's manual for the digital set-top box.) 3 Select HDMI1 or HDMI2 input source with using the INPUT...
... to HDMI/DVI IN 1, HDMI IN 2 or HDMI IN 3 jack on the digital set-top box. VIDEO AUDIO 1 COMPONENT IN 18 OPTIC RS-232C IN (CONTROL & SERVICE) RGB(PC) AUD (RGB 2 Turn on the set. EXTERNAL EQUIPMENT SETUP PCMCIA CARD SLOT EJECT HDMI/DVI IN 1 HDMI IN 2 When connecting with a .... (Refer to the owner's manual for the digital set-top box.) 3 Select HDMI1, HDMI2 or HDMI3 input source with using the INPUT button on the remote control. ANTENNA IN RGB IN (Refer to the owner's manual for the digital set-top box.) 3 Select HDMI1 or HDMI2 input source with using the INPUT...

Owner's Manual
Page 21
...-top box to the owner's manual for the digital set-top box.) AV 1 AV 2 4 Select HDMI1 input source with using the INPUT button on the remote control. 19 EXTERNAL EQUIPMENT SETUP When connecting with a HDMI to DVI cable Except 37/42LF7*, 42LY99 JECT HDMI/DVI IN 1 HDMI IN 2 AV 1 AV 2 PCMCIA ... IN (RGB/DVI) jack on the set. Connect the audio output of the digital set-top box to the owner's (CONTROL & SERVICE) manual for the digital set-top box.) RS-232C IN (CONTROL & SERVICE) ANTENNA IN RGB(PC) OPTICAL AUDIO IN (RGB/DVI) RGB IN VIDEO AUDIO 1 COMPONENT IN 2 DIGITAL AUDIO ...
...-top box to the owner's manual for the digital set-top box.) AV 1 AV 2 4 Select HDMI1 input source with using the INPUT button on the remote control. 19 EXTERNAL EQUIPMENT SETUP When connecting with a HDMI to DVI cable Except 37/42LF7*, 42LY99 JECT HDMI/DVI IN 1 HDMI IN 2 AV 1 AV 2 PCMCIA ... IN (RGB/DVI) jack on the set. Connect the audio output of the digital set-top box to the owner's (CONTROL & SERVICE) manual for the digital set-top box.) RS-232C IN (CONTROL & SERVICE) ANTENNA IN RGB(PC) OPTICAL AUDIO IN (RGB/DVI) RGB IN VIDEO AUDIO 1 COMPONENT IN 2 DIGITAL AUDIO ...

Owner's Manual
Page 22
... IN 1 HDMI IN 2 B-Y R-Y Cb Cr Pb Pr ANTENNA IN VIDEO AUDIO RS-232C IN 20 Component ports on the TV Y Y Video output ports Y on the remote control. 1 2 5 Refer to the component input ports as shown below. CARD SLOT HDMI/DVI IN 1 HDMI IN 2 RGB IN RGB(PC) AUDIO IN (RGB/DVI) AV...
... IN 1 HDMI IN 2 B-Y R-Y Cb Cr Pb Pr ANTENNA IN VIDEO AUDIO RS-232C IN 20 Component ports on the TV Y Y Video output ports Y on the remote control. 1 2 5 Refer to the component input ports as shown below. CARD SLOT HDMI/DVI IN 1 HDMI IN 2 RGB IN RGB(PC) AUDIO IN (RGB/DVI) AV...
Owner's Manual
Page 23
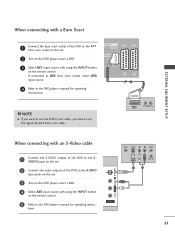
tions. IN VIDEO 3 Select AV1 input source with using the INPUT button AUDIO on the remote control. If connected to AV2 Euro scart socRSk-e23t2,C INselect AV2 input source. 4 Refer to the AUDIO input jacks on the set. 2 Connect the audio outputs ... When connecting with a Euro Scart PCMCIA EJECT CARD SLOT 1 Connect the Euro scart sockeHtDoMfI/DtVhIeIND1VD tHoDMtIhINe2A V 1 Euro scart socket on the set. 2 Turn on the remote control.
tions. IN VIDEO 3 Select AV1 input source with using the INPUT button AUDIO on the remote control. If connected to AV2 Euro scart socRSk-e23t2,C INselect AV2 input source. 4 Refer to the AUDIO input jacks on the set. 2 Connect the audio outputs ... When connecting with a Euro Scart PCMCIA EJECT CARD SLOT 1 Connect the Euro scart sockeHtDoMfI/DtVhIeIND1VD tHoDMtIhINe2A V 1 Euro scart socket on the set. 2 Turn on the remote control.
Owner's Manual
Page 24
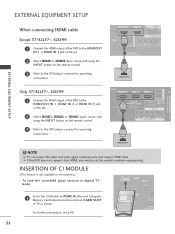
...G TV can receive the video and audio signal simultaneously with using the INPUT button on the remote control. 3 Refer to the DVD player's manual for operating instructions. ! ANTENNA IN TV OPTICA RS-232C IN (CONTROL & VIDEO 22 G If the DVD does not support Auto HDMI, you need to the HDMI...IN RGB(PC) OPTICAL AUDIO IN (RGB/DVI) RGB IN 2 Select HDMI1, HDMI2 or HDMI3 input source with using the INPUT button on the remote control. PCMCIA CARD SLOT 1 EJECT HDMI IN 1 HDMI IN 2 1 Insert the CI Module to PCMCIA (Personal Computer Memory Card International Association) CARD SLOT...
...G TV can receive the video and audio signal simultaneously with using the INPUT button on the remote control. 3 Refer to the DVD player's manual for operating instructions. ! ANTENNA IN TV OPTICA RS-232C IN (CONTROL & VIDEO 22 G If the DVD does not support Auto HDMI, you need to the HDMI...IN RGB(PC) OPTICAL AUDIO IN (RGB/DVI) RGB IN 2 Select HDMI1, HDMI2 or HDMI3 input source with using the INPUT button on the remote control. PCMCIA CARD SLOT 1 EJECT HDMI IN 1 HDMI IN 2 1 Insert the CI Module to PCMCIA (Personal Computer Memory Card International Association) CARD SLOT...

Owner's Manual
Page 26
... RS-232C IN 1 4 If connected to use the signal sAhVieINld3 ed Euro scart cable. When connecting with using the INPUT button on AV IN 3 the remote control. ! VIDEO L/MONO AUDIO R S-VIDEO EXTERNAL EQUIPMENT SETUP AUDIO/ VIDEO (R) AUDIO (L) ! Match the jack colors (Video = yellow, Audio Left = white, and ...and press PLAY on the VCR. (Refer to the VCR owner's manual.) 3 Select AV3 input source using thRSe-23I2NC INPUT button on the remote control. EXTERNAL EQUIPMENT SETUP When connecting with a Euro Scart VI IN 1 HDMI IN 2 PCMCIA EJECT CARD SLOT HDMI/DVI IN 1 HDMI IN...
... RS-232C IN 1 4 If connected to use the signal sAhVieINld3 ed Euro scart cable. When connecting with using the INPUT button on AV IN 3 the remote control. ! VIDEO L/MONO AUDIO R S-VIDEO EXTERNAL EQUIPMENT SETUP AUDIO/ VIDEO (R) AUDIO (L) ! Match the jack colors (Video = yellow, Audio Left = white, and ...and press PLAY on the VCR. (Refer to the VCR owner's manual.) 3 Select AV3 input source using thRSe-23I2NC INPUT button on the remote control. EXTERNAL EQUIPMENT SETUP When connecting with a Euro Scart VI IN 1 HDMI IN 2 PCMCIA EJECT CARD SLOT HDMI/DVI IN 1 HDMI IN...
Owner's Manual
Page 27
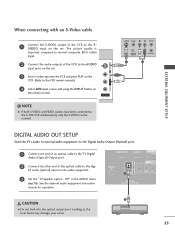
tal audio (optical) input on the audio equipment. RS-232C IN (CONTROL & SERVICE) 2 CAUTION GDo not look into the VCR and press PLAY on the VCR. (Refer to the AUDIO input jacks on the set . Looking at .... See the external audio equipment instruction manual for operation. EXTERNAL EQUIPMENT SETUP HDMI IN 2 AV 1 AV 2 When connecting with using the INPUT button on the remote control. VIDEO L/MONO AUDIO R S-VIDEO S-VIDEO VIDEO L R ANT IN OUTPUT SWITCH ANT OUT 1 2 VIDEO L/MONO AUDIO R S-VIDEO DIGITAL AUDIO OUT DIGITAL AUDIO OUT SETUP Send the...
tal audio (optical) input on the audio equipment. RS-232C IN (CONTROL & SERVICE) 2 CAUTION GDo not look into the VCR and press PLAY on the VCR. (Refer to the AUDIO input jacks on the set . Looking at .... See the external audio equipment instruction manual for operation. EXTERNAL EQUIPMENT SETUP HDMI IN 2 AV 1 AV 2 When connecting with using the INPUT button on the remote control. VIDEO L/MONO AUDIO R S-VIDEO S-VIDEO VIDEO L R ANT IN OUTPUT SWITCH ANT OUT 1 2 VIDEO L/MONO AUDIO R S-VIDEO DIGITAL AUDIO OUT DIGITAL AUDIO OUT SETUP Send the...

Owner's Manual
Page 28
Match the jack colors. (Video = yellow, Audio Left = white, and Audio Right = red) 2 Select AV3 input source with using the INPUT button on the remote control. 3 Operate the corresponding external equipment. Refer to external equipment operating guide. 26 EXTERNAL EQUIPMENT SETUP EXTERNAL EQUIPMENT SETUP OTHER A/V SOURCE SETUP Camcorder Video Game Set VIDEO L R VIDEO L/MONO AUDIO R S-VIDEO 1 AV IN 3 1 Connect the AUDIO/VIDEO jacks between TV and external equipment.
Match the jack colors. (Video = yellow, Audio Left = white, and Audio Right = red) 2 Select AV3 input source with using the INPUT button on the remote control. 3 Operate the corresponding external equipment. Refer to external equipment operating guide. 26 EXTERNAL EQUIPMENT SETUP EXTERNAL EQUIPMENT SETUP OTHER A/V SOURCE SETUP Camcorder Video Game Set VIDEO L R VIDEO L/MONO AUDIO R S-VIDEO 1 AV IN 3 1 Connect the AUDIO/VIDEO jacks between TV and external equipment.

Owner's Manual
Page 29
... the set . G If the PC does not support Auto DVI, you need to the H D M I / D V I O ANTENNA IN IN (RGB/DVI) jack on the remote control. DIGITAL AUDIO OUT ANTENNA IN COMPONENT IN VIDEO AVUIDDEIOO RS-232C IN SERVICE) RS-232C IN AV 1 AV 2 AV 1 AV 2 AUDIO 3 Turn on the PC...TV provides Plug and Play capability, meaning that the PC adjusts automatically to the A U D I HDMI/DVI IN 1 HDMI IN 2 IN 1 jack on the remote control. When connecting with using the INPUT button on the set the output resolution appropriately. 27 ANTENNA IN RGB IN RGB(PC) AUDIO IN (RGB/DVI...
... the set . G If the PC does not support Auto DVI, you need to the H D M I / D V I O ANTENNA IN IN (RGB/DVI) jack on the remote control. DIGITAL AUDIO OUT ANTENNA IN COMPONENT IN VIDEO AVUIDDEIOO RS-232C IN SERVICE) RS-232C IN AV 1 AV 2 AV 1 AV 2 AUDIO 3 Turn on the PC...TV provides Plug and Play capability, meaning that the PC adjusts automatically to the A U D I HDMI/DVI IN 1 HDMI IN 2 IN 1 jack on the remote control. When connecting with using the INPUT button on the set the output resolution appropriately. 27 ANTENNA IN RGB IN RGB(PC) AUDIO IN (RGB/DVI...

Owner's Manual
Page 36
... FUNCTIONS (Only 37/42/47/52LY9*, 50/60PF9*) When using the remote control, aim it at the remote control sensor on or off to standby. GUIDE Shows programme schedule. Q.VIEW Returns to your preference. FAV Displays the selected favourite programme. D/A POWER... UP/DOWN 0~9 number Selects a programme. MODE Selects the remote operating modes. OK Accepts your preferred subtitle in digital mode. Switches the set on from standby or off . INDEX i HOLD THUMBSTICK Allows you have already selected DVD or VCR mode button. Control connected AV devices by pressing the D or E or F...
... FUNCTIONS (Only 37/42/47/52LY9*, 50/60PF9*) When using the remote control, aim it at the remote control sensor on or off to standby. GUIDE Shows programme schedule. Q.VIEW Returns to your preference. FAV Displays the selected favourite programme. D/A POWER... UP/DOWN 0~9 number Selects a programme. MODE Selects the remote operating modes. OK Accepts your preferred subtitle in digital mode. Switches the set on from standby or off . INDEX i HOLD THUMBSTICK Allows you have already selected DVD or VCR mode button. Control connected AV devices by pressing the D or E or F...

Owner's Manual
Page 38
.... VOLUME UP Adjusts the volume. /DOWN FAV Displays the selected favourite programme. WATCHING TV / PROGRAMME CONTROL WATCHING TV /PROGRAMME CONTROL REMOTE CONTROL KEY FUNCTIONS (Only 37/42/47/52LF6*, 37/42LF7*) When using the remote control, aim it at the remote control sensor on or off to standby. INPUT External input mode rotate in digital mode. MUTE Switches...
.... VOLUME UP Adjusts the volume. /DOWN FAV Displays the selected favourite programme. WATCHING TV / PROGRAMME CONTROL WATCHING TV /PROGRAMME CONTROL REMOTE CONTROL KEY FUNCTIONS (Only 37/42/47/52LF6*, 37/42LF7*) When using the remote control, aim it at the remote control sensor on or off to standby. INPUT External input mode rotate in digital mode. MUTE Switches...

Owner's Manual
Page 40
...r / I, INPUT or PR D or E button on the TV or press the POWER, INPUT, D/A, PR D or E (or PR + or -) or NUMBER button on the remote control and then the TV will switch on. ( This feature is not available for all models.) Initializing setup If the OSD (On Screen Display) is pressed... on the screen as figure after turning on , you can adjust the Language, Country, Time Zone, Auto programme tuning. WATCHING TV / PROGRAMME CONTROL WATCHING TV /PROGRAMME CONTROL TURNING ON THE TV - Press the BACK button to use its features. 1 First, connect power cord correctly. D/A POWER INPUT TV DVD VCR...
...r / I, INPUT or PR D or E button on the TV or press the POWER, INPUT, D/A, PR D or E (or PR + or -) or NUMBER button on the remote control and then the TV will switch on. ( This feature is not available for all models.) Initializing setup If the OSD (On Screen Display) is pressed... on the screen as figure after turning on , you can adjust the Language, Country, Time Zone, Auto programme tuning. WATCHING TV / PROGRAMME CONTROL WATCHING TV /PROGRAMME CONTROL TURNING ON THE TV - Press the BACK button to use its features. 1 First, connect power cord correctly. D/A POWER INPUT TV DVD VCR...

Owner's Manual
Page 46
...the D or E or F or G button. 2 Press the GREEN button. Be sure to release the skipped programme. ton on the remote control handset. Displayed when the Subtitle Programme. A Skipping a programme number 1 Select a programme number to select it means that you want to select... after releasing a locked programme and then return to the locked programme within 1 minute, you forgot your password, press '7', '7', '7', '7' on your remote control handset. Displayed when the Radio Programme. Displayed when the MHEG Programme. When a programme number is skipped it using the PR D or E (or ...
...the D or E or F or G button. 2 Press the GREEN button. Be sure to release the skipped programme. ton on the remote control handset. Displayed when the Subtitle Programme. A Skipping a programme number 1 Select a programme number to select it means that you want to select... after releasing a locked programme and then return to the locked programme within 1 minute, you forgot your password, press '7', '7', '7', '7' on your remote control handset. Displayed when the Radio Programme. Displayed when the MHEG Programme. When a programme number is skipped it using the PR D or E (or ...

Owner's Manual
Page 59
...in the above method, connect the DIGITAL AUDIO OUT terminal on the remote controller, you to select one of the screen. 2 Selected Device 3 VCR playback : Play and control the connected 3 VCR. 4 4 HDD Recordings playback : Play and control recordings stored in bright colour) ! When no device is connected (... you switch the Input source with the HDMI cable. Direct Play After connecting AV devices to the DIGITAL AUDIO IN terminal on the remote controller. G When operating the external device with the OPTICAL cable. Power off TV, all devices When you can stop the operation of ...
...in the above method, connect the DIGITAL AUDIO OUT terminal on the remote controller, you to select one of the screen. 2 Selected Device 3 VCR playback : Play and control the connected 3 VCR. 4 4 HDD Recordings playback : Play and control recordings stored in bright colour) ! When no device is connected (... you switch the Input source with the HDMI cable. Direct Play After connecting AV devices to the DIGITAL AUDIO IN terminal on the remote controller. G When operating the external device with the OPTICAL cable. Power off TV, all devices When you can stop the operation of ...


