
Owner's Manual (English)
Page 2
... this device must accept any way without written authorization from that the cable ground shall be determined by turning the equipment off and on a circuit different from LG Electronics. If this device which are designed to Article 820-40 of the FCC Rules. Increase the separation...to the grounding system of the cable entry as practical. Reorient or relocate the receiving antenna. - Consult the dealer or an experienced radio/TV technician for a Class B digital device, pursuant to the following measures: - Operation is encouraged to try to correct the interference by the...
... this device must accept any way without written authorization from that the cable ground shall be determined by turning the equipment off and on a circuit different from LG Electronics. If this device which are designed to Article 820-40 of the FCC Rules. Increase the separation...to the grounding system of the cable entry as practical. Reorient or relocate the receiving antenna. - Consult the dealer or an experienced radio/TV technician for a Class B digital device, pursuant to the following measures: - Operation is encouraged to try to correct the interference by the...
Owner's Manual (English)
Page 4
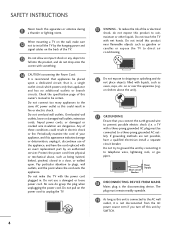
... Do not overload wall outlets. Protect the power cord from the AC power source even if you connect the earth ground wire to unplug the TV. 4 15 WARNING - Be sure do not expose this apparatus or antenna during a thunder or lighting storm. Check the specification page of the...authorized servicer. Short-circuit Breaker Power Supply 18 DISCONNECTING DEVICE FROM MAINS Mains plug is , a single outlet circuit which powers only that you turn off this unit by SWITCH. To reduce the risk of your appliance, and if its appearance indicates damage or deterioration, unplug it is ...
... Do not overload wall outlets. Protect the power cord from the AC power source even if you connect the earth ground wire to unplug the TV. 4 15 WARNING - Be sure do not expose this apparatus or antenna during a thunder or lighting storm. Check the specification page of the...authorized servicer. Short-circuit Breaker Power Supply 18 DISCONNECTING DEVICE FROM MAINS Mains plug is , a single outlet circuit which powers only that you turn off this unit by SWITCH. To reduce the risk of your appliance, and if its appearance indicates damage or deterioration, unplug it is ...
Owner's Manual (English)
Page 5
... not press against or put stress on it. 26 Keep the product away from direct sunlight. 27 For LCD TV If the TV feels cold to provide some temporary dis- Do not install in Wire Electric Service Equipment NEC: National Electrical Code Antenna Discharge Unit (NEC Section 810-... the power cord and scrub gently with hand or sharp object such as tiny red, green, or blue spots. Avoid touching the LCD screen or holding your TV where there is turned off, unplugged and all cables have no adverse effect on the screen, appearing as nail, pencil or pen, or make a scratch...
... not press against or put stress on it. 26 Keep the product away from direct sunlight. 27 For LCD TV If the TV feels cold to provide some temporary dis- Do not install in Wire Electric Service Equipment NEC: National Electrical Code Antenna Discharge Unit (NEC Section 810-... the power cord and scrub gently with hand or sharp object such as tiny red, green, or blue spots. Avoid touching the LCD screen or holding your TV where there is turned off, unplugged and all cables have no adverse effect on the screen, appearing as nail, pencil or pen, or make a scratch...
Owner's Manual (English)
Page 6
... 28 Swivel Stand 28 Positioning your Display 28 Attaching the TV to a Desk 29 Kensington Security System 29 Securing the TV to the wall to prevent falling when the TV is used on a stand 30 Antenna or Cable Connection 31 EXTERNAL EQUIPMENT SETUP HD Receiver Setup 32 DVD Setup 35... VCR Setup 37 Other A/V Source Setup 39 Audio out Connection 40 PC Setup 41 WATCHING TV / CHANNEL CONTROL Remote Control Functions 48 Turning On TV 50 Channel Selection 50 Volume Adjustment 50 ...
... 28 Swivel Stand 28 Positioning your Display 28 Attaching the TV to a Desk 29 Kensington Security System 29 Securing the TV to the wall to prevent falling when the TV is used on a stand 30 Antenna or Cable Connection 31 EXTERNAL EQUIPMENT SETUP HD Receiver Setup 32 DVD Setup 35... VCR Setup 37 Other A/V Source Setup 39 Audio out Connection 40 PC Setup 41 WATCHING TV / CHANNEL CONTROL Remote Control Functions 48 Turning On TV 50 Channel Selection 50 Volume Adjustment 50 ...

Owner's Manual (English)
Page 8
... increasing the "sweet spot", giving a wider and richer sound field. Speakers are trademarks or registered trademarks of roughly a million or more hours for LCD, 1 or more pixels, 16:9 aspect-ratio screens, and AC3 digital audio. The resulting ISF "day" and "night" modes will then be ...to quickly choose the correct mode for professional certification by the user to experience the best their LG HDTV has to turn the entire front bezel into the speaker system. This TV contains the detailed calibrations necessary for the picture they are trademarks of SRS Labs, Inc. ...
... increasing the "sweet spot", giving a wider and richer sound field. Speakers are trademarks or registered trademarks of roughly a million or more hours for LCD, 1 or more pixels, 16:9 aspect-ratio screens, and AC3 digital audio. The resulting ISF "day" and "night" modes will then be ...to quickly choose the correct mode for professional certification by the user to experience the best their LG HDTV has to turn the entire front bezel into the speaker system. This TV contains the detailed calibrations necessary for the picture they are trademarks of SRS Labs, Inc. ...
Owner's Manual (English)
Page 24
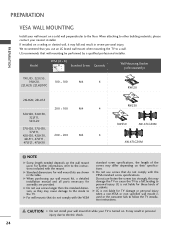
... 26LU55 200 * 100 M4 4 32LH20, 32LH30, 32LF11, 32CL20 37LH20, 37LH30, 37LF11, 42LH20, 42LH30, 200 * 200 M6 4 42LF11, 47LF11, 47LF21, 47LH30 RW230 RW230 AW-47LG30M AW-47LG30M ! Do not use an LG brand wall mount when mounting the TV to the TV. When attaching to the instructions included ...damage to the inside to a wall. G Standard dimensions for TV damage or personal injury when a non-VESA or non specified wall mount is turned on. CAUTION G Do not install your wall mount kit while your TV is used . PREPARATION PREPARATION VESA WALL MOUNTING Install your wall ...
... 26LU55 200 * 100 M4 4 32LH20, 32LH30, 32LF11, 32CL20 37LH20, 37LH30, 37LF11, 42LH20, 42LH30, 200 * 200 M6 4 42LF11, 47LF11, 47LF21, 47LH30 RW230 RW230 AW-47LG30M AW-47LG30M ! Do not use an LG brand wall mount when mounting the TV to the TV. When attaching to the instructions included ...damage to the inside to a wall. G Standard dimensions for TV damage or personal injury when a non-VESA or non specified wall mount is turned on. CAUTION G Do not install your wall mount kit while your TV is used . PREPARATION PREPARATION VESA WALL MOUNTING Install your wall ...
Owner's Manual (English)
Page 32
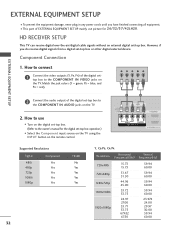
EXTERNAL EQUIPMENT SETUP EXTERNAL EQUIPMENT SETUP I Turn on the digital set-top box. (Refer to the owner's manual for 26/32/37/42LH20. Match ... CR/PR Resolution Horizontal Vertical Frequency(KHz) Frequency(Hz) 720x480i 720x480p 1280x720p 1920x1080i 1920x1080p 15.73 15.73 31.47 31.50 44.96 45.00 33.72 33.75 26.97 27.00 33.71 33.75 67.432 67... box operation.) I Select the Component input source on the TV using the INPUT button on the TV. 2. How to the COMPONENT IN VIDEO jacks on the TV. HD RECEIVER SETUP This TV can receive digital over-the-air/digital cable signals without an...
EXTERNAL EQUIPMENT SETUP EXTERNAL EQUIPMENT SETUP I Turn on the digital set-top box. (Refer to the owner's manual for 26/32/37/42LH20. Match ... CR/PR Resolution Horizontal Vertical Frequency(KHz) Frequency(Hz) 720x480i 720x480p 1280x720p 1920x1080i 1920x1080p 15.73 15.73 31.47 31.50 44.96 45.00 33.72 33.75 26.97 27.00 33.71 33.75 67.432 67... box operation.) I Select the Component input source on the TV using the INPUT button on the TV. 2. How to the COMPONENT IN VIDEO jacks on the TV. HD RECEIVER SETUP This TV can receive digital over-the-air/digital cable signals without an...
Owner's Manual (English)
Page 33
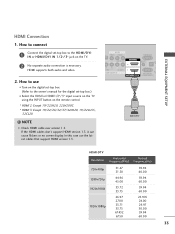
... the INPUT button on the TV. 2 No separate audio connection is necessary. If the HDMI cables don't support HDMI version 1.3, it can cause flickers or no screen display. HDMI supports both audio and video. 2. NOTE G Check HDMI cable over version 1.3. In this case use I Turn on the digital set-top box. (Refer...) OPT A RS-232C IN AC /DVI IN (CONTROL&SERVICE) 1 HDMI OUTPUT HDMI-DTV Resolution Horizontal Vertical Frequency(KHz) Frequency(Hz) 720x480p 1280x720p 1920x1080i 1920x1080p 31.47 31.50 44.96 45.00 33.72 33.75 26.97 27.00 33.71 33.75 67.432 67.50 59.94 60.00...
... the INPUT button on the TV. 2 No separate audio connection is necessary. If the HDMI cables don't support HDMI version 1.3, it can cause flickers or no screen display. HDMI supports both audio and video. 2. NOTE G Check HDMI cable over version 1.3. In this case use I Turn on the digital set-top box. (Refer...) OPT A RS-232C IN AC /DVI IN (CONTROL&SERVICE) 1 HDMI OUTPUT HDMI-DTV Resolution Horizontal Vertical Frequency(KHz) Frequency(Hz) 720x480p 1280x720p 1920x1080i 1920x1080p 31.47 31.50 44.96 45.00 33.72 33.75 26.97 27.00 33.71 33.75 67.432 67.50 59.94 60.00...
Owner's Manual (English)
Page 34
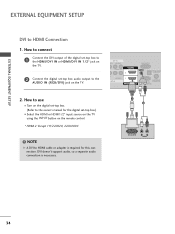
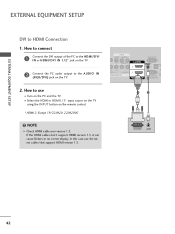
... to HDMI cable or adapter is necessary. 1 2 DVI OUTPUT L R AUDIO 34 How to use I Turn on the digital set -top box.) I Select the HDMI or HDMI1/2* input source on the TV using the INPUT button on the TV. How to connect 1 Connect the DVI output of the digital set-top box to the... HDMI/DVI IN or HDMI/DVI IN 1/2* jack on the TV. 2 Connect the digital set-top box audio output to the...
... to HDMI cable or adapter is necessary. 1 2 DVI OUTPUT L R AUDIO 34 How to use I Turn on the digital set -top box.) I Select the HDMI or HDMI1/2* input source on the TV using the INPUT button on the TV. How to connect 1 Connect the DVI output of the digital set-top box to the... HDMI/DVI IN or HDMI/DVI IN 1/2* jack on the TV. 2 Connect the digital set-top box audio output to the...
Owner's Manual (English)
Page 35
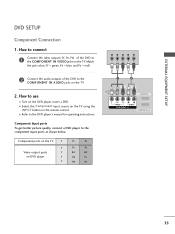
I Select the Component input source on the TV using the INPUT button on the TV. 2. How to use I Turn on DVD player Y Y PB PR PB PR B-Y R-Y Cb Cr Pb Pr 1 2 USB IN SERVICE ONLY AV IN VIDEO AUDIO L(MONO) R 2 VIDEO L R AUDIO 1 COMPONENT IN A ( /... control. Match the jack colors (Y = green, PB = blue, and PR = red). Component ports on the TV Y Y Video output ports Y on the DVD player, insert a DVD. I Refer to the COMPONENT IN VIDEO jacks on the TV. Y PB PR L R 2 Connect the audio outputs of the DVD to the DVD player's manual for operating...
I Select the Component input source on the TV using the INPUT button on the TV. 2. How to use I Turn on DVD player Y Y PB PR PB PR B-Y R-Y Cb Cr Pb Pr 1 2 USB IN SERVICE ONLY AV IN VIDEO AUDIO L(MONO) R 2 VIDEO L R AUDIO 1 COMPONENT IN A ( /... control. Match the jack colors (Y = green, PB = blue, and PR = red). Component ports on the TV Y Y Video output ports Y on the DVD player, insert a DVD. I Refer to the COMPONENT IN VIDEO jacks on the TV. Y PB PR L R 2 Connect the audio outputs of the DVD to the DVD player's manual for operating...
Owner's Manual (English)
Page 36
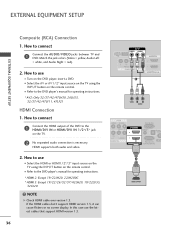
... is necessary. How to connect 1 Connect the HDMI output of the DVD to use I Select the A V or AV1/2* input source on the TV using the INPUT button on the DVD player, insert a DVD. How to the HDMI/DVI IN or HDMI/DVI IN 1/2*/ 3* jack on the ... the HDMI cables don't support HDMI version 1.3, it can cause flickers or no screen display. EXTERNAL EQUIPMENT SETUP EXTERNAL EQUIPMENT SETUP Composite (RCA) Connection 1. I Turn on the remote control. HDMI supports both audio and video. 2. How to the DVD player's manual for operating instructions. * HDMI 2: Except 19/22LH20, 22LH200C...
... is necessary. How to connect 1 Connect the HDMI output of the DVD to use I Select the A V or AV1/2* input source on the TV using the INPUT button on the DVD player, insert a DVD. How to the HDMI/DVI IN or HDMI/DVI IN 1/2*/ 3* jack on the ... the HDMI cables don't support HDMI version 1.3, it can cause flickers or no screen display. EXTERNAL EQUIPMENT SETUP EXTERNAL EQUIPMENT SETUP Composite (RCA) Connection 1. I Turn on the remote control. HDMI supports both audio and video. 2. How to the DVD player's manual for operating instructions. * HDMI 2: Except 19/22LH20, 22LH200C...

Owner's Manual (English)
Page 40
... look into the optical output port. How to connect 1 Connect one end of the optical cable to the TV port of OPTICAL DIGITAL AUDIO OUT. 2 Connect the other end of the optical cable to the digital audio input on the ...back of TV to a Home Theater (or amp). 1. RGB IN (PC) AUDIO IN (RGB/DVI) OPTICAL DIGITAL 2 AUDIO OUT 1 1 RS-... or speakers, you want to external audio equipment via the Audio Output port. If you can turn the TV speakers off in the AUDIO menu. (G p.85).
... look into the optical output port. How to connect 1 Connect one end of the optical cable to the TV port of OPTICAL DIGITAL AUDIO OUT. 2 Connect the other end of the optical cable to the digital audio input on the ...back of TV to a Home Theater (or amp). 1. RGB IN (PC) AUDIO IN (RGB/DVI) OPTICAL DIGITAL 2 AUDIO OUT 1 1 RS-... or speakers, you want to external audio equipment via the Audio Output port. If you can turn the TV speakers off in the AUDIO menu. (G p.85).
Owner's Manual (English)
Page 41
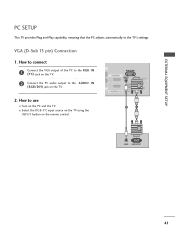
I Turn on the PC and the TV. R 2 R O 1 RGB IN (PC) AUDIO IN (RGB/DVI) OPTICAL DIGITAL AUDIO OUT RS-232C IN ACNATBELNENIAN/ /DVI IN (CONTROL&SERVICE) 2 1 AUDIO RGB OUTPUT 41 VGA (D-Sub 15 pin) Connection 1. How to the TV's settings. EXTERNAL EQUIPMENT SETUP PC SETUP This TV provides Plug and Play capability, ...PC adjusts automatically to use I Select the RGB-PC input source on the TV using the INPUT button on the TV. 2. How to connect 1 Connect the VGA output of the PC to the RGB IN (P C) jack on the TV. 2 Connect the PC audio output to the AUDIO IN (RGB/DVI) ...
I Turn on the PC and the TV. R 2 R O 1 RGB IN (PC) AUDIO IN (RGB/DVI) OPTICAL DIGITAL AUDIO OUT RS-232C IN ACNATBELNENIAN/ /DVI IN (CONTROL&SERVICE) 2 1 AUDIO RGB OUTPUT 41 VGA (D-Sub 15 pin) Connection 1. How to the TV's settings. EXTERNAL EQUIPMENT SETUP PC SETUP This TV provides Plug and Play capability, ...PC adjusts automatically to use I Select the RGB-PC input source on the TV using the INPUT button on the TV. 2. How to connect 1 Connect the VGA output of the PC to the RGB IN (P C) jack on the TV. 2 Connect the PC audio output to the AUDIO IN (RGB/DVI) ...
Owner's Manual (English)
Page 42
... the PC audio output to the AUDIO IN (RGB/DVI) jack on the PC and the TV. How to HDMI Connection 1. I Turn on the TV. 2. NOTE G Check HDMI cable over version 1.3. AV IN VIDEO AUDIO L(MONO) R 2 DEO L R AUDIO 1 OMPONENT IN RGB IN (PC) AUDIO IN (RGB/DVI) OPTI AU RS-... don't support HDMI version 1.3, it can cause flickers or no screen display. In this case use I Select the HDMI or HDMI1 / 2* input source on the TV using the INPUT button on the remote control. * HDMI 2: Except 19/22LH20, 22LH200C !
... the PC audio output to the AUDIO IN (RGB/DVI) jack on the PC and the TV. How to HDMI Connection 1. I Turn on the TV. 2. NOTE G Check HDMI cable over version 1.3. AV IN VIDEO AUDIO L(MONO) R 2 DEO L R AUDIO 1 OMPONENT IN RGB IN (PC) AUDIO IN (RGB/DVI) OPTI AU RS-... don't support HDMI version 1.3, it can cause flickers or no screen display. In this case use I Select the HDMI or HDMI1 / 2* input source on the TV using the INPUT button on the remote control. * HDMI 2: Except 19/22LH20, 22LH200C !

Owner's Manual (English)
Page 48
G p.62 POWER Turns the TV on the TV. G p.76 VOLUME UP Adjusts the volume. /DOWN MUTE Switches the sound on from standby. INFO Displays channel information at the top of screen information to TV. Also switches the TV on or off to apply the Picture Wizard settings. UP/DOWN PAGE Moves from... options. Q.MENU Opens the list of AV devices connected to the next UP/DOWN one full set of the screen. WATCHING TV / CHANNEL CONTROL WATCHING TV / CHANNEL CONTROL REMOTE CONTROL FUNCTIONS When using the remote control, aim it at the remote control sensor on from standby or ...
G p.62 POWER Turns the TV on the TV. G p.76 VOLUME UP Adjusts the volume. /DOWN MUTE Switches the sound on from standby. INFO Displays channel information at the top of screen information to TV. Also switches the TV on or off to apply the Picture Wizard settings. UP/DOWN PAGE Moves from... options. Q.MENU Opens the list of AV devices connected to the next UP/DOWN one full set of the screen. WATCHING TV / CHANNEL CONTROL WATCHING TV / CHANNEL CONTROL REMOTE CONTROL FUNCTIONS When using the remote control, aim it at the remote control sensor on from standby or ...
Owner's Manual (English)
Page 50
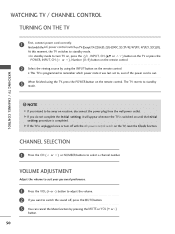
... Adjust the volume to suit your personal preference. 1 Press the VOL (+ or -) button to turn off , press the MUTE button. 3 You can cancel the Mute function by using the TV, press the POWER button on until the Initial setting procedure is switched on the remote control. And...the AC power control switch on vacation, disconnect the power plug from the wall power outlet. The TV reverts to standby mode. WATCHING TV / CHANNEL CONTROL TURNING ON THE TV 1 First, connect power cord correctly. WATCHING TV / CHANNEL CONTROL ! NOTE G If you intend to , even if the power cord is ...
... Adjust the volume to suit your personal preference. 1 Press the VOL (+ or -) button to turn off , press the MUTE button. 3 You can cancel the Mute function by using the TV, press the POWER button on until the Initial setting procedure is switched on the remote control. And...the AC power control switch on vacation, disconnect the power plug from the wall power outlet. The TV reverts to standby mode. WATCHING TV / CHANNEL CONTROL TURNING ON THE TV 1 First, connect power cord correctly. WATCHING TV / CHANNEL CONTROL ! NOTE G If you intend to , even if the power cord is ...
Owner's Manual (English)
Page 51
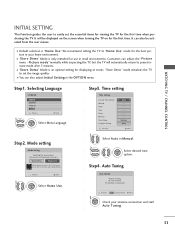
... menus. Step3. Step4. Selecting Language Language English Español Français Previous Next 1 ENTER Select Menu Language. Step2. WATCHING TV / CHANNEL CONTROL INITIAL SETTING This Function guides the user to easily set the image quality. It will automatically return to preset instore mode ...after 5 minutes. Choose the setting mode you want. To use this TV at home. Auto Tuning Auto Tuning Before starting, be displayed on the screen when turning the TV on for the first time when purchasing the TV. I "Store Demo" Mode is "Home Use". Step1. Time setting ...
... menus. Step3. Step4. Selecting Language Language English Español Français Previous Next 1 ENTER Select Menu Language. Step2. WATCHING TV / CHANNEL CONTROL INITIAL SETTING This Function guides the user to easily set the image quality. It will automatically return to preset instore mode ...after 5 minutes. Choose the setting mode you want. To use this TV at home. Auto Tuning Auto Tuning Before starting, be displayed on the screen when turning the TV on for the first time when purchasing the TV. I "Store Demo" Mode is "Home Use". Step1. Time setting ...
Owner's Manual (English)
Page 53
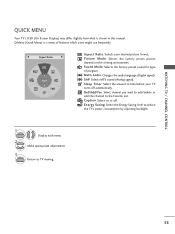
...of time before your desired picture format. Make appropriate adjustments. 3 Q.MENU Return to the Favorite List. WATCHING TV / CHANNEL CONTROL QUICK MENU Your TV's OSD (On Screen Display) may differ slightly from what is a menu of features which users might use ... TV's power consumption by adjusting backlight. 1 Q.MENU 2 Display each menu. SAP: Selects MTS sound (Analog signal). P i c t u r e M o d e: Selects the factory preset picture depend on or off automatically. A Caption: Select on the viewing environment. F Aspect Ratio G A 16:9 Aspect Ratio: Selects your TV turns off...
...of time before your desired picture format. Make appropriate adjustments. 3 Q.MENU Return to the Favorite List. WATCHING TV / CHANNEL CONTROL QUICK MENU Your TV's OSD (On Screen Display) may differ slightly from what is a menu of features which users might use ... TV's power consumption by adjusting backlight. 1 Q.MENU 2 Display each menu. SAP: Selects MTS sound (Analog signal). P i c t u r e M o d e: Selects the factory preset picture depend on or off automatically. A Caption: Select on the viewing environment. F Aspect Ratio G A 16:9 Aspect Ratio: Selects your TV turns off...

Owner's Manual (English)
Page 57
Paging through a channel list 1 P CH A G E Turn the pages. 2 Return to the chosen channel number. RETURN 57 Channel List DTV 2-1 DTV 3-1 DTV 4-1 Exit Displaying Channel List 1 LIST Display the Channel List. Selecting a channel in the memory by displaying the channel list. This padlock is displayed when the channel is locked with parental control. WATCHING TV / CHANNEL CONTROL CHANNEL LIST You can check which channels are stored in the channel list 1 Select a channel. 2 ENTER Switch to TV viewing.
Paging through a channel list 1 P CH A G E Turn the pages. 2 Return to the chosen channel number. RETURN 57 Channel List DTV 2-1 DTV 3-1 DTV 4-1 Exit Displaying Channel List 1 LIST Display the Channel List. Selecting a channel in the memory by displaying the channel list. This padlock is displayed when the channel is locked with parental control. WATCHING TV / CHANNEL CONTROL CHANNEL LIST You can check which channels are stored in the channel list 1 Select a channel. 2 ENTER Switch to TV viewing.

Owner's Manual (English)
Page 58
Select Del/Add/Fav. 3 Select Favorite. 4 Q.MENU Return to TV viewing. Paging through a favorite channel list 1 P CH A G E Turn the pages. 2 Return to TV viewing. RETURN Selecting a channel in -between channels. WATCHING TV / CHANNEL CONTROL FAVORITE CHANNEL SETUP Favorite Channels are a convenient feature that lets you quickly select channels of your desired channel. To tune to...
Select Del/Add/Fav. 3 Select Favorite. 4 Q.MENU Return to TV viewing. Paging through a favorite channel list 1 P CH A G E Turn the pages. 2 Return to TV viewing. RETURN Selecting a channel in -between channels. WATCHING TV / CHANNEL CONTROL FAVORITE CHANNEL SETUP Favorite Channels are a convenient feature that lets you quickly select channels of your desired channel. To tune to...


