Owner's Manual (English)
Page 6
... DVD Setup 24 VCR Setup 26 Other A/V Source Setup 28 Digital Audio Output 28 PC Setup 29 WATCHING TV / CHANNEL CONTROL Remote Control Functions 32 Turning On TV 34 Channel Selection 34 Volume Adjustment 34 On-Screen Menus Selection 35 Channel Setup 36 - Preset 46 Manual ...Advanced - Digital Broadcasting System Captions 63 Caption Options 64 User Mode 47 Color Tone - Color Tone - Black (Darkness) Level 51 Picture Reset 52 Low-Power Picture Mode 52 Image Sticking Minimization( ISM) Method 53 SOUND & LANGUAGE CONTROL Auto Volume Leveler (EZ SoundRite 54 Preset Sound...
... DVD Setup 24 VCR Setup 26 Other A/V Source Setup 28 Digital Audio Output 28 PC Setup 29 WATCHING TV / CHANNEL CONTROL Remote Control Functions 32 Turning On TV 34 Channel Selection 34 Volume Adjustment 34 On-Screen Menus Selection 35 Channel Setup 36 - Preset 46 Manual ...Advanced - Digital Broadcasting System Captions 63 Caption Options 64 User Mode 47 Color Tone - Color Tone - Black (Darkness) Level 51 Picture Reset 52 Low-Power Picture Mode 52 Image Sticking Minimization( ISM) Method 53 SOUND & LANGUAGE CONTROL Auto Volume Leveler (EZ SoundRite 54 Preset Sound...
Owner's Manual (English)
Page 7
... & General 78 TV Rating English & French 79 APPENDIX Troubleshooting 80 Maintenance 82 Product Specifications 83 Programming the Remote Control 84 Set ID 86 IR Codes 87 5 TIME SETTING ... Shut-off Setting 68 Sleep Timer Setting 69 SCREEN ADJUSTMENT Auto Configure (RGB(PC) Mode only 70 Manual Configure 71 Selecting XGA Mode 72 Initializing (Reset to Original Factory Settings) . 73 PARENTAL CONTROL / RATINGS Set Password & Lock System 74 - Setting up Your Password 74 Set Password 75 Lock System 75 Channel...
... & General 78 TV Rating English & French 79 APPENDIX Troubleshooting 80 Maintenance 82 Product Specifications 83 Programming the Remote Control 84 Set ID 86 IR Codes 87 5 TIME SETTING ... Shut-off Setting 68 Sleep Timer Setting 69 SCREEN ADJUSTMENT Auto Configure (RGB(PC) Mode only 70 Manual Configure 71 Selecting XGA Mode 72 Initializing (Reset to Original Factory Settings) . 73 PARENTAL CONTROL / RATINGS Set Password & Lock System 74 - Setting up Your Password 74 Set Password 75 Lock System 75 Channel...

Owner's Manual (English)
Page 14
...RJP INTERFACE 11 Power Cord Socket For operation with AC power. This part mainly use picture for the LCD TV models. Note: In standby mode, these ports do not work. 3 13 M.P.I . 4 RESET 5 SERVICE ONLY REMOTE CONTROL UPDATE OUT RGB IN 6 RJP INTERFACE 10 VIDEO AUDIO COMPONENT IN 9 ...or DTV. 7 SPEAKER OUT 8Ω 8 AV (Audio/Video) IN 1 Connect audio/video output from your TV. ANTENNA IN M.P.I. 13 12 1 HDMI/DVI IN 1(DVI) 2 DIGITAL AUDIO OUT (OPTICAL) 2 3 M.P.I 4 RESET/UPDATE/REMOTE CONTROL OUT 5 SERVICE ONLY 6 RGB IN (PC) Connect the output from an S-VIDEO device. 9...
...RJP INTERFACE 11 Power Cord Socket For operation with AC power. This part mainly use picture for the LCD TV models. Note: In standby mode, these ports do not work. 3 13 M.P.I . 4 RESET 5 SERVICE ONLY REMOTE CONTROL UPDATE OUT RGB IN 6 RJP INTERFACE 10 VIDEO AUDIO COMPONENT IN 9 ...or DTV. 7 SPEAKER OUT 8Ω 8 AV (Audio/Video) IN 1 Connect audio/video output from your TV. ANTENNA IN M.P.I. 13 12 1 HDMI/DVI IN 1(DVI) 2 DIGITAL AUDIO OUT (OPTICAL) 2 3 M.P.I 4 RESET/UPDATE/REMOTE CONTROL OUT 5 SERVICE ONLY 6 RGB IN (PC) Connect the output from an S-VIDEO device. 9...
Owner's Manual (English)
Page 25
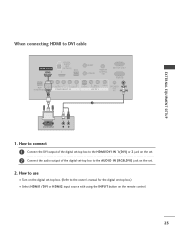
... or HDMI2 input source with using the INPUT button on the set -top box to DVI cable HDMI/DVI IN 1(DVI) DIGITAL AUDIO OUT (OPTICAL) 2 M.P.I. RESET UPDATE REMOTE CONTROL OUT SERVICE ONLY RGB IN RJP INTERFACE 1 VIDEO AUDIO COMPONENT IN S-VIDEO (MONO) AUDIO AV IN 1 VIDEO SPEAKER AUDIO OUT IN 8 (RGB...
... or HDMI2 input source with using the INPUT button on the set -top box to DVI cable HDMI/DVI IN 1(DVI) DIGITAL AUDIO OUT (OPTICAL) 2 M.P.I. RESET UPDATE REMOTE CONTROL OUT SERVICE ONLY RGB IN RJP INTERFACE 1 VIDEO AUDIO COMPONENT IN S-VIDEO (MONO) AUDIO AV IN 1 VIDEO SPEAKER AUDIO OUT IN 8 (RGB...
Owner's Manual (English)
Page 27
... the remote control. ■ If connected to AV IN2, select A V 2 input source. ■ Refer to the DVD player's manual for operating instructions. 1 2 GITAL UDIO OUT RESET TICAL) M.P.I. HDMI supports both audio and video. 2. How to use ■ Turn on the DVD player, insert a DVD. ■ Select A V 1 input source with using the...
... the remote control. ■ If connected to AV IN2, select A V 2 input source. ■ Refer to the DVD player's manual for operating instructions. 1 2 GITAL UDIO OUT RESET TICAL) M.P.I. HDMI supports both audio and video. 2. How to use ■ Turn on the DVD player, insert a DVD. ■ Select A V 1 input source with using the...
Owner's Manual (English)
Page 29
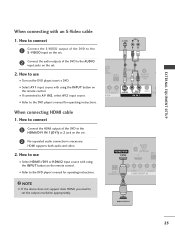
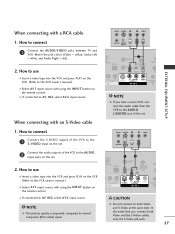
... connecting with a RCA cable ANT IN S-VIDEO L R VIDEO EXTERNAL EQUIPMENT SETUP 1. RESET UPDATE 1 REMOTE CONTROL OUT SERV R AUDIO T IN S-VIDEO (MONO) AUDIO AV IN...the AUDIO L/MONO jack of the VCR to the AUDIO input jacks on the set . How to use 1 2 GITAL AUDIO OUT RESET PTICAL) M.P.I. CAUTION G Do not connect to AV IN2, select A V 2 input source. How to the VCR owner's manual... input on the VCR. (Refer to connect 1 Connect the AUDIO/VIDEO jacks between TV and VCR. ( ) When connecting with an S-Video cable ANT OUT OUTPUT SWITCH TAL DIO UT CAL) M.P.I.
... connecting with a RCA cable ANT IN S-VIDEO L R VIDEO EXTERNAL EQUIPMENT SETUP 1. RESET UPDATE 1 REMOTE CONTROL OUT SERV R AUDIO T IN S-VIDEO (MONO) AUDIO AV IN...the AUDIO L/MONO jack of the VCR to the AUDIO input jacks on the set . How to use 1 2 GITAL AUDIO OUT RESET PTICAL) M.P.I. CAUTION G Do not connect to AV IN2, select A V 2 input source. How to the VCR owner's manual... input on the VCR. (Refer to connect 1 Connect the AUDIO/VIDEO jacks between TV and VCR. ( ) When connecting with an S-Video cable ANT OUT OUTPUT SWITCH TAL DIO UT CAL) M.P.I.

Owner's Manual (English)
Page 37
...VIDEO SETUP VIDEO AUDIO TIME OPTION SCREEN LOCK EZ Picture Color Temperature XD Advanced Reset AUDIO SETUP Audio Language VIDEO EZ SoundRite AUDIO EZ Sound TIME Balance 0 OPTION TV Speakers SCREEN LOCK WATCHING TV / CHANNEL CONTROL LOCK For USA SETUP VIDEO AUDIO TIME OPTION SCREEN LOCK ...Lock System Set Password Block Channel Movie Rating TV Rating-Children TV Rating-General Aux. Block Downloadable Rating SCREEN SETUP VIDEO AUDIO TIME OPTION SCREEN LOCK Auto config. XGA Mode Reset TIME SETUP VIDEO AUDIO TIME OPTION SCREEN LOCK Auto Clock Manual ...
...VIDEO SETUP VIDEO AUDIO TIME OPTION SCREEN LOCK EZ Picture Color Temperature XD Advanced Reset AUDIO SETUP Audio Language VIDEO EZ SoundRite AUDIO EZ Sound TIME Balance 0 OPTION TV Speakers SCREEN LOCK WATCHING TV / CHANNEL CONTROL LOCK For USA SETUP VIDEO AUDIO TIME OPTION SCREEN LOCK ...Lock System Set Password Block Channel Movie Rating TV Rating-Children TV Rating-General Aux. Block Downloadable Rating SCREEN SETUP VIDEO AUDIO TIME OPTION SCREEN LOCK Auto config. XGA Mode Reset TIME SETUP VIDEO AUDIO TIME OPTION SCREEN LOCK Auto Clock Manual ...

Owner's Manual (English)
Page 47
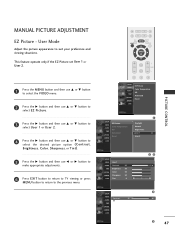
...sharpness, tint. 1 Press the EZ PIC button repeatedly to adjust EZ Picture. Preset EZ Picture adjusts the TV for the optimum picture quality at the factory and are not adjustable. Daylight, Normal, Night Time Settings are... preset for the best picture appearance. INPUT TV POWER MODE TV INPUT DVD MULTI VCR PIP PIP CH - In the User1 and User2 modes only, user ...AUDIO TIME OPTION SCREEN LOCK EZ Picture Color Temperature XD Advanced Reset SETUP VIDEO AUDIO TIME OPTION SCREEN LOCK EZ Picture G Color Temperature XD Advanced...
...sharpness, tint. 1 Press the EZ PIC button repeatedly to adjust EZ Picture. Preset EZ Picture adjusts the TV for the optimum picture quality at the factory and are not adjustable. Daylight, Normal, Night Time Settings are... preset for the best picture appearance. INPUT TV POWER MODE TV INPUT DVD MULTI VCR PIP PIP CH - In the User1 and User2 modes only, user ...AUDIO TIME OPTION SCREEN LOCK EZ Picture Color Temperature XD Advanced Reset SETUP VIDEO AUDIO TIME OPTION SCREEN LOCK EZ Picture G Color Temperature XD Advanced...

Owner's Manual (English)
Page 48
... MUTE CH PAGE 1 2 3 SETUP VIDEO AUDIO TIME OPTION SCREEN LOCK EZ Picture Color Temperature XD Advanced Reset 1 SETUP EZ Picture VIDEO Color Temperature G AUDIO XD TIME Advanced OPTION Reset SCREEN LOCK Cool Normal Warm User 23 46 When selecting EZ Picture (User 1 and User 2), you can... CH choose the Color Temperature. 1 2 3 4 5 6 7 8 9 0 1 Press the MENU button and then use D or E button to select either Cool, Normal, Warm or User. 4 Press EXIT button to return to TV...
... MUTE CH PAGE 1 2 3 SETUP VIDEO AUDIO TIME OPTION SCREEN LOCK EZ Picture Color Temperature XD Advanced Reset 1 SETUP EZ Picture VIDEO Color Temperature G AUDIO XD TIME Advanced OPTION Reset SCREEN LOCK Cool Normal Warm User 23 46 When selecting EZ Picture (User 1 and User 2), you can... CH choose the Color Temperature. 1 2 3 4 5 6 7 8 9 0 1 Press the MENU button and then use D or E button to select either Cool, Normal, Warm or User. 4 Press EXIT button to return to TV...
Owner's Manual (English)
Page 49
... 2 3 SETUP VIDEO AUDIO TIME OPTION SCREEN LOCK EZ Picture Color Temperature XD Advanced Reset PICTURE CONTROL 1 SETUP EZ Picture Daylight VIDEO Color Temperature Normal AUDIO XD Night Time TIME Advanced User 1 G OPTION Reset User 2 SCREEN LOCK SETUP VIDEO User1 AUDIO Contrast 85 TIME Brightness 50 OPTION Color ...n t r a s t, Brightness, Color, Sharpness, or Tint). 5 Press the G button and then use F or G button to make appropriate adjustments. 6 Press EXIT button to return to TV viewing or press MENU button to return to suit your preference and viewing situations.
... 2 3 SETUP VIDEO AUDIO TIME OPTION SCREEN LOCK EZ Picture Color Temperature XD Advanced Reset PICTURE CONTROL 1 SETUP EZ Picture Daylight VIDEO Color Temperature Normal AUDIO XD Night Time TIME Advanced User 1 G OPTION Reset User 2 SCREEN LOCK SETUP VIDEO User1 AUDIO Contrast 85 TIME Brightness 50 OPTION Color ...n t r a s t, Brightness, Color, Sharpness, or Tint). 5 Press the G button and then use F or G button to make appropriate adjustments. 6 Press EXIT button to return to TV viewing or press MENU button to return to suit your preference and viewing situations.

Owner's Manual (English)
Page 50
...VOL TIMER MUTE CH PAGE 1 2 3 SETUP VIDEO AUDIO TIME OPTION SCREEN LOCK EZ Picture Color Temperature XD Advanced Reset 1 SETUP EZ Picture VIDEO Color Temperature Cool AUDIO XD Normal TIME Advanced Warm OPTION Reset User G SCREEN LOCK SETUP VIDEO User AUDIO Red 0 TIME Green 0 OPTION Blue 0 SCREEN LOCK 23 G ...F or G button to make appropriate adjustments. ■ The adjustment range of R e d, G r e e n, or B l u e is -40 ~ +40. 6 Press EXIT button to return to TV viewing or press MENU button to return to select the VIDEO menu. PICTURE CONTROL Color Tone -
...VOL TIMER MUTE CH PAGE 1 2 3 SETUP VIDEO AUDIO TIME OPTION SCREEN LOCK EZ Picture Color Temperature XD Advanced Reset 1 SETUP EZ Picture VIDEO Color Temperature Cool AUDIO XD Normal TIME Advanced Warm OPTION Reset User G SCREEN LOCK SETUP VIDEO User AUDIO Red 0 TIME Green 0 OPTION Blue 0 SCREEN LOCK 23 G ...F or G button to make appropriate adjustments. ■ The adjustment range of R e d, G r e e n, or B l u e is -40 ~ +40. 6 Press EXIT button to return to TV viewing or press MENU button to return to select the VIDEO menu. PICTURE CONTROL Color Tone -
Owner's Manual (English)
Page 51
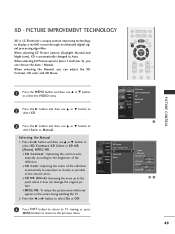
...Auto or Manual. Press the F or G button to select O n or O f f. 1 SETUP VIDEO AUDIO TIME OPTION SCREEN LOCK EZ Picture Color Temperature XD Advanced Reset G Auto Manual XD Contrast On XD Color On XD NR Off MPEG NR 0 23 4 Press EXIT button to return to...original picture. ■ MPEG NR: To reduce the picture noise which may appear on the screen during watching the TV. 2. When selecting EZ Picture options (Daylight, Normal and Night time), XD is LG Electronic's unique picture improving technology to select X D. CH When selecting the Manual, you can adjust the XD Contrast...
...Auto or Manual. Press the F or G button to select O n or O f f. 1 SETUP VIDEO AUDIO TIME OPTION SCREEN LOCK EZ Picture Color Temperature XD Advanced Reset G Auto Manual XD Contrast On XD Color On XD NR Off MPEG NR 0 23 4 Press EXIT button to return to...original picture. ■ MPEG NR: To reduce the picture noise which may appear on the screen during watching the TV. 2. When selecting EZ Picture options (Daylight, Normal and Night time), XD is LG Electronic's unique picture improving technology to select X D. CH When selecting the Manual, you can adjust the XD Contrast...
Owner's Manual (English)
Page 52
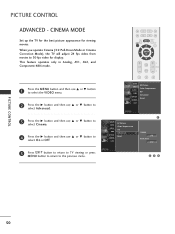
...480i mode. 1 2 3 4 5 6 7 8 0 9 1 Press the MENU button and then use D or E button to select O n or O f f. 5 Press EXIT button to return to TV viewing or press MENU button to return to the previous menu. PICTURE CONTROL 2 Press the G button and then use D or E button to select Advanced. 3 Press... VOL TIMER MUTE CH PAGE 1 2 3 SETUP VIDEO AUDIO TIME OPTION SCREEN LOCK EZ Picture Color Temperature XD Advanced Reset 1 SETUP VIDEO AUDIO TIME OPTION SCREEN LOCK EZ Picture Color Temperature XD Advanced G Reset Cinema Off Black level Low 234 50 CINEMA MODE Set up the...
...480i mode. 1 2 3 4 5 6 7 8 0 9 1 Press the MENU button and then use D or E button to select O n or O f f. 5 Press EXIT button to return to TV viewing or press MENU button to return to the previous menu. PICTURE CONTROL 2 Press the G button and then use D or E button to select Advanced. 3 Press... VOL TIMER MUTE CH PAGE 1 2 3 SETUP VIDEO AUDIO TIME OPTION SCREEN LOCK EZ Picture Color Temperature XD Advanced Reset 1 SETUP VIDEO AUDIO TIME OPTION SCREEN LOCK EZ Picture Color Temperature XD Advanced G Reset Cinema Off Black level Low 234 50 CINEMA MODE Set up the...
Owner's Manual (English)
Page 53
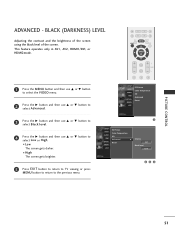
...MUTE CH PAGE 1 2 3 SETUP VIDEO AUDIO TIME OPTION SCREEN LOCK EZ Picture Color Temperature XD Advanced Reset 1 SETUP VIDEO AUDIO TIME OPTION SCREEN LOCK EZ Picture Color Temperature XD Advanced G Reset Cinema Off Black level Low 234 51 This feature operates only in AV1, AV2, HDMI1/DVI, or ...to select L o w or High. ■ Low The screen gets darker. ■ High The screen gets brighter. 5 Press EXIT button to return to TV viewing or press MENU button to return to the previous menu. BLACK (DARKNESS) LEVEL Adjusting the contrast and the brightness of the screen using the...
...MUTE CH PAGE 1 2 3 SETUP VIDEO AUDIO TIME OPTION SCREEN LOCK EZ Picture Color Temperature XD Advanced Reset 1 SETUP VIDEO AUDIO TIME OPTION SCREEN LOCK EZ Picture Color Temperature XD Advanced G Reset Cinema Off Black level Low 234 51 This feature operates only in AV1, AV2, HDMI1/DVI, or ...to select L o w or High. ■ Low The screen gets darker. ■ High The screen gets brighter. 5 Press EXIT button to return to TV viewing or press MENU button to return to the previous menu. BLACK (DARKNESS) LEVEL Adjusting the contrast and the brightness of the screen using the...

Owner's Manual (English)
Page 54
...AUDIO TIME OPTION SCREEN LOCK EZ Picture Color Temperature XD Advanced Reset SETUP VIDEO AUDIO TIME OPTION SCREEN LOCK EZ Picture Color Temperature XD Advanced Reset G 1 To set PICTURE CONTROL 23 LOW-POWER PICTURE MODE (Only Plasma TV model) Low power reduces the plasma display power consumption. 1 ...Options Language ISM Method Low Power Set ID 3 Press the G button and then use D or E button to 2 select Reset. 3 Press the G button to reset the Video menu options to the previous menu. 1 SETUP VIDEO AUDIO Aspect Ratio Caption/Text Caption Options TIME Language OPTION ISM ...
...AUDIO TIME OPTION SCREEN LOCK EZ Picture Color Temperature XD Advanced Reset SETUP VIDEO AUDIO TIME OPTION SCREEN LOCK EZ Picture Color Temperature XD Advanced Reset G 1 To set PICTURE CONTROL 23 LOW-POWER PICTURE MODE (Only Plasma TV model) Low power reduces the plasma display power consumption. 1 ...Options Language ISM Method Low Power Set ID 3 Press the G button and then use D or E button to 2 select Reset. 3 Press the G button to reset the Video menu options to the previous menu. 1 SETUP VIDEO AUDIO Aspect Ratio Caption/Text Caption Options TIME Language OPTION ISM ...

Owner's Manual (English)
Page 68
... TIME menu. 2 Press the G button and then use the D or E button to set the year, date, and time option. 4 Press EXIT button to return to TV viewing or press MENU button to return to select either the year, date, or time option. TIME SETTING Manual Clock Setup If the current time...
... TIME menu. 2 Press the G button and then use the D or E button to set the year, date, and time option. 4 Press EXIT button to return to TV viewing or press MENU button to return to select either the year, date, or time option. TIME SETTING Manual Clock Setup If the current time...

Owner's Manual (English)
Page 72
..., O K will be adjusted more after Auto adjustment in RGB (PC), you can adjust the Manual c o n f i g .. 5 Press the EXIT button to return to TV viewing or press the MENU button to return to start Auto config.. ■ When Auto config. VOL TIMER MUTE CH PAGE 1 2 3 SETUP VIDEO AUDIO TIME... OPTION SCREEN LOCK Auto config. Although the image is still not correct, your set 23 70 Manual config. AUDIO XGA Mode TIME Reset OPTION SCREEN LOCK 1 To set is still not correct, try Auto adjustment again. 4 If the picture needs to be shown on screen. ■...
..., O K will be adjusted more after Auto adjustment in RGB (PC), you can adjust the Manual c o n f i g .. 5 Press the EXIT button to return to TV viewing or press the MENU button to return to start Auto config.. ■ When Auto config. VOL TIMER MUTE CH PAGE 1 2 3 SETUP VIDEO AUDIO TIME... OPTION SCREEN LOCK Auto config. Although the image is still not correct, your set 23 70 Manual config. AUDIO XGA Mode TIME Reset OPTION SCREEN LOCK 1 To set is still not correct, try Auto adjustment again. 4 If the picture needs to be shown on screen. ■...

Owner's Manual (English)
Page 73
... ■ Phase This function allows you prefer. 4 Press the F or G button to make appropriate adjustments. 5 Press the EXIT button to return to TV viewing or press the MENU button to return to minimize any vertical bars or stripes visible on the screen background. VIDEO Manual config. XGA Mode... Reset 1 SETUP Auto config. CC EXIT RATIO MENU SAP ENTER VOL TIMER MUTE CH PAGE 1 2 3 SETUP VIDEO AUDIO TIME OPTION SCREEN LOCK ...
... ■ Phase This function allows you prefer. 4 Press the F or G button to make appropriate adjustments. 5 Press the EXIT button to return to TV viewing or press the MENU button to return to minimize any vertical bars or stripes visible on the screen background. VIDEO Manual config. XGA Mode... Reset 1 SETUP Auto config. CC EXIT RATIO MENU SAP ENTER VOL TIMER MUTE CH PAGE 1 2 3 SETUP VIDEO AUDIO TIME OPTION SCREEN LOCK ...

Owner's Manual (English)
Page 74
... E button to select the desired XGA resolution. 4 Press EX I T button to return to TV viewing or press MENU button to return to the previous menu. XGA Mode Reset 1 SETUP VIDEO AUDIO TIME OPTION SCREEN LOCK Auto config. XGA Mode Reset G 1024 x 768 1280 x 768 1360 x 768 1366 x 768 SCREEN ADJUSTMENT 23 72 Manual...
... E button to select the desired XGA resolution. 4 Press EX I T button to return to TV viewing or press MENU button to return to the previous menu. XGA Mode Reset 1 SETUP VIDEO AUDIO TIME OPTION SCREEN LOCK Auto config. XGA Mode Reset G 1024 x 768 1280 x 768 1360 x 768 1366 x 768 SCREEN ADJUSTMENT 23 72 Manual...

Owner's Manual (English)
Page 75
... ORIGINAL FACTORY SETTINGS) This function operates in current mode. VIDEO Manual config. Manual config. AUDIO XGA Mode TIME Reset G OPTION SCREEN LOCK 1 To set 23 SCREEN ADJUSTMENT 73 CC EXIT RATIO MENU SAP ENTER CH 2 3 5 6 8 9 0 1 Press the M E N U button and then use D or E ...button to select the SCREEN menu. 2 Press the G button and then use D or E button to select Reset. 3 Press the G button. VOL TIMER MUTE CH PAGE 1 2 3 SETUP VIDEO AUDIO TIME OPTION SCREEN LOCK Auto config. XGA Mode...
... ORIGINAL FACTORY SETTINGS) This function operates in current mode. VIDEO Manual config. Manual config. AUDIO XGA Mode TIME Reset G OPTION SCREEN LOCK 1 To set 23 SCREEN ADJUSTMENT 73 CC EXIT RATIO MENU SAP ENTER CH 2 3 5 6 8 9 0 1 Press the M E N U button and then use D or E ...button to select the SCREEN menu. 2 Press the G button and then use D or E button to select Reset. 3 Press the G button. VOL TIMER MUTE CH PAGE 1 2 3 SETUP VIDEO AUDIO TIME OPTION SCREEN LOCK Auto config. XGA Mode...


