Owners Manual
Page 6
...68 Sleep Timer Setting 69 SCREEN ADJUSTMENT Auto Configure (RGB(PC) Mode only 70 Manual Configure 71 Selecting XGA Mode 72 Initializing (Reset to a Desk 18 VESA Wall Mounting 19 Desktop Pedestal Installation 19 Antenna or Cable Connection 20 EXTERNAL EQUIPMENT SETUP HD Receiver Setup... 21 DVD Setup 24 VCR Setup 26 Other A/V Source Setup 28 Digital Audio Output 28 PC Setup 29 WATCHING TV / CHANNEL CONTROL Remote Control Functions 32 Turning On TV 34 Channel Selection 34 Volume Adjustment 34 On-Screen Menus Selection 35 Channel Setup 36 - CONTENTS WARNING / CAUTION A...
...68 Sleep Timer Setting 69 SCREEN ADJUSTMENT Auto Configure (RGB(PC) Mode only 70 Manual Configure 71 Selecting XGA Mode 72 Initializing (Reset to a Desk 18 VESA Wall Mounting 19 Desktop Pedestal Installation 19 Antenna or Cable Connection 20 EXTERNAL EQUIPMENT SETUP HD Receiver Setup... 21 DVD Setup 24 VCR Setup 26 Other A/V Source Setup 28 Digital Audio Output 28 PC Setup 29 WATCHING TV / CHANNEL CONTROL Remote Control Functions 32 Turning On TV 34 Channel Selection 34 Volume Adjustment 34 On-Screen Menus Selection 35 Channel Setup 36 - CONTENTS WARNING / CAUTION A...
Owners Manual
Page 12
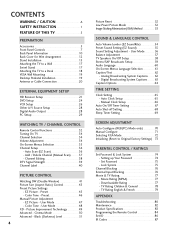
... PANEL INFORMATION ■ Here shown may be somewhat different from your TV. 32/37/42LC5DC*,32/37/42LC50C*, 42LB5DC, 42LB50C S-VIDEO 32LX5DC*, 32LX50C* 42PX8DC S-VIDEO R AUDIO L/MONO VIDEO R VIDEO L/MONO AUDIO R PREPARATION 8 11 AV IN 2 11 ANTENNA IN M.P.I. 42PG60C, 42PG65C NTENNA IN M.P.I . ( ) RESET 5 SERVICE ONLY REMOTE CONTROL UPDATE OUT RGB IN 6 ( ) RJP INTERFACE 10...
... PANEL INFORMATION ■ Here shown may be somewhat different from your TV. 32/37/42LC5DC*,32/37/42LC50C*, 42LB5DC, 42LB50C S-VIDEO 32LX5DC*, 32LX50C* 42PX8DC S-VIDEO R AUDIO L/MONO VIDEO R VIDEO L/MONO AUDIO R PREPARATION 8 11 AV IN 2 11 ANTENNA IN M.P.I. 42PG60C, 42PG65C NTENNA IN M.P.I . ( ) RESET 5 SERVICE ONLY REMOTE CONTROL UPDATE OUT RGB IN 6 ( ) RJP INTERFACE 10...
Owners Manual
Page 13
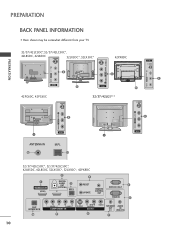
...TV on DC power. 12 ANTENNA IN Connect over-the air signals to this jack. 11 AUDIO IN (RGB, DVI) Connect the audio from a PC or DTV. 7 SPEAKER OUT 8Ω 8 AV (Audio/Video) IN Connect audio/video output from an external device to these ports do not work. 3 13 M.P.I 4 RESET... AUDIO OUT REMOTE CONTROL OPTICAL OUT 1 4 HDMI IN SERVICE ONLY RESET UPDATE S-VIDEO AV IN 1 2 1 DVI IN COMPONENT IN L R VIDEO 9 AUDIO 5 AUDIO VIDEO L(MONO) R 8 32/37/42LG5*** 1 HDMI/DVI IN 1(DVI) 2 RJP INTERFACE 10 4 2 6 RESET UPDATE OPTICAL DIGITAL AUDIO OUT RGB(PC) AUDIO (RGB/DVI) RS...
...TV on DC power. 12 ANTENNA IN Connect over-the air signals to this jack. 11 AUDIO IN (RGB, DVI) Connect the audio from a PC or DTV. 7 SPEAKER OUT 8Ω 8 AV (Audio/Video) IN Connect audio/video output from an external device to these ports do not work. 3 13 M.P.I 4 RESET... AUDIO OUT REMOTE CONTROL OPTICAL OUT 1 4 HDMI IN SERVICE ONLY RESET UPDATE S-VIDEO AV IN 1 2 1 DVI IN COMPONENT IN L R VIDEO 9 AUDIO 5 AUDIO VIDEO L(MONO) R 8 32/37/42LG5*** 1 HDMI/DVI IN 1(DVI) 2 RJP INTERFACE 10 4 2 6 RESET UPDATE OPTICAL DIGITAL AUDIO OUT RGB(PC) AUDIO (RGB/DVI) RS...

Owners Manual
Page 25
... control. 23 How to use ■ Turn on the digital set-top box. (Refer to DVI cable HDMI/DVI IN 1(DVI) DIGITAL AUDIO OUT (OPTICAL) 2 M.P.I. RESET UPDATE REMOTE CONTROL OUT SERVICE ONLY RGB IN RJP INTERFACE 1 VIDEO AUDIO COMPONENT IN S-VIDEO (MONO) AUDIO AV IN 1 VIDEO SPEAKER AUDIO OUT IN 8 (RGB...
... control. 23 How to use ■ Turn on the digital set-top box. (Refer to DVI cable HDMI/DVI IN 1(DVI) DIGITAL AUDIO OUT (OPTICAL) 2 M.P.I. RESET UPDATE REMOTE CONTROL OUT SERVICE ONLY RGB IN RJP INTERFACE 1 VIDEO AUDIO COMPONENT IN S-VIDEO (MONO) AUDIO AV IN 1 VIDEO SPEAKER AUDIO OUT IN 8 (RGB...

Owners Manual
Page 27
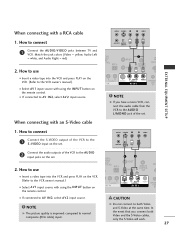
... with an S-Video cable 1. How to connect 1 Connect the S-VIDEO output of the DVD to the DVD player's manual for operating instructions. 1 2 GITAL UDIO OUT RESET TICAL) M.P.I ■ Select HDMI1/DVI or HDMI2 input source with using the INPUT button on the remote control. ■ If connected to AV IN2, select...
... with an S-Video cable 1. How to connect 1 Connect the S-VIDEO output of the DVD to the DVD player's manual for operating instructions. 1 2 GITAL UDIO OUT RESET TICAL) M.P.I ■ Select HDMI1/DVI or HDMI2 input source with using the INPUT button on the remote control. ■ If connected to AV IN2, select...
Owners Manual
Page 29
... 1 VIDEO SPEAK OUT 8 ■ If connected to connect 1 Connect the AUDIO/VIDEO jacks between TV and VCR. In the event that you have a mono VCR, connect the audio cable from the VCR to use 1 2 GITAL AUDIO OUT RESET PTICAL) M.P.I . 2. RESET UPDATE 1 REMOTE CONTROL OUT SERV R AUDIO T IN S-VIDEO (MONO) AUDIO AV IN 1 VIDEO...
... 1 VIDEO SPEAK OUT 8 ■ If connected to connect 1 Connect the AUDIO/VIDEO jacks between TV and VCR. In the event that you have a mono VCR, connect the audio cable from the VCR to use 1 2 GITAL AUDIO OUT RESET PTICAL) M.P.I . 2. RESET UPDATE 1 REMOTE CONTROL OUT SERV R AUDIO T IN S-VIDEO (MONO) AUDIO AV IN 1 VIDEO...
Owners Manual
Page 37
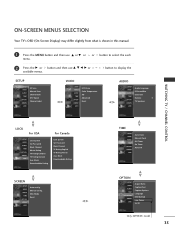
... AUDIO TIME OPTION SCREEN LOCK Auto config. Block Downloadable Rating For Canada Lock System Set Password Block Channel TV Rating-English TV Rating-French Aux. XGA Mode Reset TIME SETUP VIDEO AUDIO TIME OPTION SCREEN LOCK Auto Clock Manual Clock Off Timer On Timer Auto Off OPTION... VIDEO SETUP VIDEO AUDIO TIME OPTION SCREEN LOCK EZ Picture Color Temperature XD Advanced Reset AUDIO SETUP Audio Language VIDEO EZ SoundRite AUDIO EZ Sound TIME Balance 0 OPTION TV Speakers SCREEN LOCK WATCHING TV / CHANNEL CONTROL LOCK For USA SETUP VIDEO AUDIO TIME OPTION SCREEN LOCK Lock...
... AUDIO TIME OPTION SCREEN LOCK Auto config. Block Downloadable Rating For Canada Lock System Set Password Block Channel TV Rating-English TV Rating-French Aux. XGA Mode Reset TIME SETUP VIDEO AUDIO TIME OPTION SCREEN LOCK Auto Clock Manual Clock Off Timer On Timer Auto Off OPTION... VIDEO SETUP VIDEO AUDIO TIME OPTION SCREEN LOCK EZ Picture Color Temperature XD Advanced Reset AUDIO SETUP Audio Language VIDEO EZ SoundRite AUDIO EZ Sound TIME Balance 0 OPTION TV Speakers SCREEN LOCK WATCHING TV / CHANNEL CONTROL LOCK For USA SETUP VIDEO AUDIO TIME OPTION SCREEN LOCK Lock...

Owners Manual
Page 47
...models): Daylight, Normal, Night Time, User1, and User2 (your own settings). 2 Press the EXIT or RETURN button to save and return to TV viewing. ■ You can also use the VIDEO menu to adjust EZ Picture. PRESET PICTURE SETTINGS EZ Picture - Daylight, Normal, Night Time ...OPTION SCREEN LOCK EZ Picture Color Temperature XD Advanced Reset SETUP VIDEO AUDIO TIME OPTION SCREEN LOCK EZ Picture G Color Temperature XD Advanced Reset Daylight Normal Night time User 1 User 2 PICTURE CONTROL 45 Preset EZ Picture adjusts the TV for the optimum picture quality at the factory ...
...models): Daylight, Normal, Night Time, User1, and User2 (your own settings). 2 Press the EXIT or RETURN button to save and return to TV viewing. ■ You can also use the VIDEO menu to adjust EZ Picture. PRESET PICTURE SETTINGS EZ Picture - Daylight, Normal, Night Time ...OPTION SCREEN LOCK EZ Picture Color Temperature XD Advanced Reset SETUP VIDEO AUDIO TIME OPTION SCREEN LOCK EZ Picture G Color Temperature XD Advanced Reset Daylight Normal Night time User 1 User 2 PICTURE CONTROL 45 Preset EZ Picture adjusts the TV for the optimum picture quality at the factory ...

Owners Manual
Page 48
... Cool, Normal, Warm or U s e r. 4 Press EXIT or RETURN button to return to TV view- SETUP VIDEO AUDIO TIME OPTION SCREEN LOCK EZ Picture Color Temperature XD Advanced Reset 1 SETUP EZ Picture VIDEO Color Temperature G AUDIO XD TIME Advanced OPTION Reset SCREEN LOCK Cool Normal Warm User 23 PICTURE CONTROL 46 PICTURE CONTROL Color...
... Cool, Normal, Warm or U s e r. 4 Press EXIT or RETURN button to return to TV view- SETUP VIDEO AUDIO TIME OPTION SCREEN LOCK EZ Picture Color Temperature XD Advanced Reset 1 SETUP EZ Picture VIDEO Color Temperature G AUDIO XD TIME Advanced OPTION Reset SCREEN LOCK Cool Normal Warm User 23 PICTURE CONTROL 46 PICTURE CONTROL Color...

Owners Manual
Page 49
... or button and then use F or G or or button to make appropriate adjustments. 6 Press EXIT or RETURN button to return to TV viewing or press MENU button to return to suit your preference and viewing situations. SETUP VIDEO AUDIO TIME OPTION SCREEN LOCK EZ Picture Color Temperature... XD Advanced Reset PICTURE CONTROL 1 SETUP EZ Picture Daylight VIDEO Color Temperature Normal AUDIO XD Night Time TIME Advanced User 1 G OPTION Reset User 2 SCREEN LOCK SETUP VIDEO User1 AUDIO Contrast 85 TIME Brightness 50 ...
... or button and then use F or G or or button to make appropriate adjustments. 6 Press EXIT or RETURN button to return to TV viewing or press MENU button to return to suit your preference and viewing situations. SETUP VIDEO AUDIO TIME OPTION SCREEN LOCK EZ Picture Color Temperature... XD Advanced Reset PICTURE CONTROL 1 SETUP EZ Picture Daylight VIDEO Color Temperature Normal AUDIO XD Night Time TIME Advanced User 1 G OPTION Reset User 2 SCREEN LOCK SETUP VIDEO User1 AUDIO Contrast 85 TIME Brightness 50 ...

Owners Manual
Page 50
... can also adjust the detailed settings (Red, Green, Blue) by selecting the Color Temperature-User menu. ing or press MENU button to return to TV view- PICTURE CONTROL 1 Press the MENU button and then use D or E or or button to select the VIDEO menu. 2 Press the G... to the previous menu. 48 SETUP VIDEO AUDIO TIME OPTION SCREEN LOCK EZ Picture Color Temperature XD Advanced Reset 1 SETUP EZ Picture VIDEO Color Temperature Cool AUDIO XD Normal TIME Advanced Warm OPTION Reset User G SCREEN LOCK SETUP VIDEO User AUDIO Red 0 TIME Green 0 OPTION Blue 0 SCREEN LOCK 23...
... can also adjust the detailed settings (Red, Green, Blue) by selecting the Color Temperature-User menu. ing or press MENU button to return to TV view- PICTURE CONTROL 1 Press the MENU button and then use D or E or or button to select the VIDEO menu. 2 Press the G... to the previous menu. 48 SETUP VIDEO AUDIO TIME OPTION SCREEN LOCK EZ Picture Color Temperature XD Advanced Reset 1 SETUP EZ Picture VIDEO Color Temperature Cool AUDIO XD Normal TIME Advanced Warm OPTION Reset User G SCREEN LOCK SETUP VIDEO User AUDIO Red 0 TIME Green 0 OPTION Blue 0 SCREEN LOCK 23...
Owners Manual
Page 51
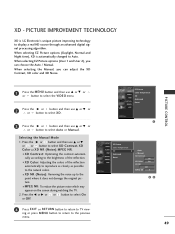
...■ MPEG NR: To reduce the picture noise which may appear on the screen during watching the TV. 2. When selecting the Manual, you can adjust the XD Contrast, XD color and XD Noise....Manual Mode 1. When selecting EZ Picture options (Daylight, Normal and Night time), XD is LG Electronic's unique picture improving technology to select Auto or Manual. PICTURE CONTROL SETUP VIDEO AUDIO TIME... SCREEN LOCK EZ Picture Color Temperature XD Advanced Reset 1 SETUP VIDEO AUDIO TIME OPTION SCREEN LOCK EZ Picture Color Temperature XD Advanced Reset G Auto Manual XD Contrast On XD Color On...
...■ MPEG NR: To reduce the picture noise which may appear on the screen during watching the TV. 2. When selecting the Manual, you can adjust the XD Contrast, XD color and XD Noise....Manual Mode 1. When selecting EZ Picture options (Daylight, Normal and Night time), XD is LG Electronic's unique picture improving technology to select Auto or Manual. PICTURE CONTROL SETUP VIDEO AUDIO TIME... SCREEN LOCK EZ Picture Color Temperature XD Advanced Reset 1 SETUP VIDEO AUDIO TIME OPTION SCREEN LOCK EZ Picture Color Temperature XD Advanced Reset G Auto Manual XD Contrast On XD Color On...

Owners Manual
Page 52
...TIME OPTION SCREEN LOCK EZ Picture Color Temperature XD Advanced Reset 1 SETUP VIDEO AUDIO TIME OPTION SCREEN LOCK EZ Picture Color Temperature XD Advanced G Reset Cinema Off Black level Low 234 PICTURE CONTROL 50 CINEMA MODE Set up the TV for the best picture appearance for display. This feature ... Press the G or button and then use D or E or or button to select O n or O f f. 5 Press EXIT or RETURN button to return to TV viewing or press MENU button to return to 30 fps video for viewing movies. When you operate Cinema (3:2 Pull-Down Mode or Cinema Correction Mode...
...TIME OPTION SCREEN LOCK EZ Picture Color Temperature XD Advanced Reset 1 SETUP VIDEO AUDIO TIME OPTION SCREEN LOCK EZ Picture Color Temperature XD Advanced G Reset Cinema Off Black level Low 234 PICTURE CONTROL 50 CINEMA MODE Set up the TV for the best picture appearance for display. This feature ... Press the G or button and then use D or E or or button to select O n or O f f. 5 Press EXIT or RETURN button to return to TV viewing or press MENU button to return to 30 fps video for viewing movies. When you operate Cinema (3:2 Pull-Down Mode or Cinema Correction Mode...

Owners Manual
Page 53
ing or press MENU button to return to TV view- SETUP VIDEO AUDIO TIME OPTION SCREEN LOCK EZ Picture Color Temperature XD Advanced Reset 1 SETUP VIDEO AUDIO TIME OPTION SCREEN LOCK EZ Picture Color Temperature XD Advanced G Reset Cinema Off Black level Low 234 51 BLACK (DARKNESS) LEVEL Adjusting the contrast and the brightness...
ing or press MENU button to return to TV view- SETUP VIDEO AUDIO TIME OPTION SCREEN LOCK EZ Picture Color Temperature XD Advanced Reset 1 SETUP VIDEO AUDIO TIME OPTION SCREEN LOCK EZ Picture Color Temperature XD Advanced G Reset Cinema Off Black level Low 234 51 BLACK (DARKNESS) LEVEL Adjusting the contrast and the brightness...

Owners Manual
Page 54
ing or press MENU button to return to TV view- Press the G or button and then use D or E or or button to select the VIDEO menu. PICTURE CONTROL PICTURE RESET Use to quickly reset all the Video menu options to their original factory preset values. 1 Press the MENU button and then use D... or E or 2 or button to select Reset. 3 Press the G or button to reset the Video menu options to original values. SETUP VIDEO AUDIO TIME OPTION SCREEN LOCK Aspect Ratio Caption/Text Caption Options Language ISM Method...
ing or press MENU button to return to TV view- Press the G or button and then use D or E or or button to select the VIDEO menu. PICTURE CONTROL PICTURE RESET Use to quickly reset all the Video menu options to their original factory preset values. 1 Press the MENU button and then use D... or E or 2 or button to select Reset. 3 Press the G or button to reset the Video menu options to original values. SETUP VIDEO AUDIO TIME OPTION SCREEN LOCK Aspect Ratio Caption/Text Caption Options Language ISM Method...

Owners Manual
Page 68
... MENU button to return to select either the year, date, or time option. TIME SETTING Manual Clock Setup If the current time setting is wrong, reset the clock manually. 1 Press the MENU button and then use D or E or or button to select the TIME menu. 2 Press the G or button and then... button and then use the D or E or or button to set the year, date, and time option. 4 Press EXIT or RETURN button to return to TV view- Once selected, use F or G or or to the previous menu.
... MENU button to return to select either the year, date, or time option. TIME SETTING Manual Clock Setup If the current time setting is wrong, reset the clock manually. 1 Press the MENU button and then use D or E or or button to select the TIME menu. 2 Press the G or button and then... button and then use the D or E or or button to set the year, date, and time option. 4 Press EXIT or RETURN button to return to TV view- Once selected, use F or G or or to the previous menu.

Owners Manual
Page 72
... still not correct, your set 23 70 XGA Mode Reset SETUP Auto config. has finished, O K will be adjusted more after Auto adjustment in RGB (PC), you can adjust the Manual c o n f i g .. 5 Press the EXIT or RETURN button to return to TV viewing or press the MENU button to return to start... use D or E or or button to select Auto config.. 3 Press the G or button to the previous menu. Manual config. AUDIO XGA Mode TIME Reset OPTION SCREEN LOCK 1 To set is still not correct, try Auto adjustment again. 4 If the picture needs to be shown on screen. ■ If ...
... still not correct, your set 23 70 XGA Mode Reset SETUP Auto config. has finished, O K will be adjusted more after Auto adjustment in RGB (PC), you can adjust the Manual c o n f i g .. 5 Press the EXIT or RETURN button to return to TV viewing or press the MENU button to return to start... use D or E or or button to select Auto config.. 3 Press the G or button to the previous menu. Manual config. AUDIO XGA Mode TIME Reset OPTION SCREEN LOCK 1 To set is still not correct, try Auto adjustment again. 4 If the picture needs to be shown on screen. ■ If ...

Owners Manual
Page 73
or button to make appro- 5 Press the EXIT or RETURN button to return to TV viewing or press the MENU button to return to remove any vertical bars or stripes visible on the screen background. Manual config. VIDEO Manual...Phase, Clock, H-position or V-position. ■ Phase This function allows you prefer. 4 Press the F or G or priate adjustments. G Phase 0 AUDIO XGA Mode Clock 0 TIME Reset H-Position 0 OPTION V-Position 0 SCREEN LOCK 23 4 SCREEN ADJUSTMENT 71 MANUAL CONFIGURE If the picture isn't clear after auto adjustment and especially if characters are still...
or button to make appro- 5 Press the EXIT or RETURN button to return to TV viewing or press the MENU button to return to remove any vertical bars or stripes visible on the screen background. Manual config. VIDEO Manual...Phase, Clock, H-position or V-position. ■ Phase This function allows you prefer. 4 Press the F or G or priate adjustments. G Phase 0 AUDIO XGA Mode Clock 0 TIME Reset H-Position 0 OPTION V-Position 0 SCREEN LOCK 23 4 SCREEN ADJUSTMENT 71 MANUAL CONFIGURE If the picture isn't clear after auto adjustment and especially if characters are still...

Owners Manual
Page 74
ing or press M E NU button to return to TV view- Manual config. XGA Mode Reset 1 SETUP VIDEO AUDIO TIME OPTION SCREEN LOCK Auto config. Manual config. tion. 4 Press EXIT or RETURN button to return to the previous menu. XGA Mode Reset G 1024 x 768 1280 x 768 1360 x 768 1366 x 768 23 SCREEN ADJUSTMENT 72 SETUP...
ing or press M E NU button to return to TV view- Manual config. XGA Mode Reset 1 SETUP VIDEO AUDIO TIME OPTION SCREEN LOCK Auto config. Manual config. tion. 4 Press EXIT or RETURN button to return to the previous menu. XGA Mode Reset G 1024 x 768 1280 x 768 1360 x 768 1366 x 768 23 SCREEN ADJUSTMENT 72 SETUP...

Owners Manual
Page 75
XGA Mode Reset SETUP Auto config. AUDIO XGA Mode TIME Reset G OPTION SCREEN LOCK 1 To set 23 SCREEN ADJUSTMENT 73 VIDEO Manual config. INITIALIZING (RESET TO ORIGINAL FACTORY SETTINGS) This function operates in current mode. Manual config. SETUP VIDEO AUDIO TIME OPTION SCREEN LOCK Auto config. To initialize the adjusted value. 1 Press the M E N U button and then use D or E or or button to select the SCREEN menu. 2 Press the G or button and then use D or E or or button to select Reset. 3 Press the G or button.
XGA Mode Reset SETUP Auto config. AUDIO XGA Mode TIME Reset G OPTION SCREEN LOCK 1 To set 23 SCREEN ADJUSTMENT 73 VIDEO Manual config. INITIALIZING (RESET TO ORIGINAL FACTORY SETTINGS) This function operates in current mode. Manual config. SETUP VIDEO AUDIO TIME OPTION SCREEN LOCK Auto config. To initialize the adjusted value. 1 Press the M E N U button and then use D or E or or button to select the SCREEN menu. 2 Press the G or button and then use D or E or or button to select Reset. 3 Press the G or button.


