
Owners Manual
Page 5
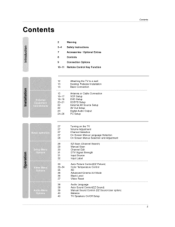
... Language Selection On Screen Menus Selection and Adjustment EZ Scan (Channel Search) Manual Scan Channei Edit DTV Signal Strength Input Source Input Label Auto Picture Control(EZ Picture) Color Temperature Control XD Advanced-Cinema 3:2 Mode Black Level Video Reset Audio Language Auto Sound Control(EZ Sound) Manual Sound Control (EZ SoundoUser Balance...
... Language Selection On Screen Menus Selection and Adjustment EZ Scan (Channel Search) Manual Scan Channei Edit DTV Signal Strength Input Source Input Label Auto Picture Control(EZ Picture) Color Temperature Control XD Advanced-Cinema 3:2 Mode Black Level Video Reset Audio Language Auto Sound Control(EZ Sound) Manual Sound Control (EZ SoundoUser Balance...
Owners Manual
Page 8
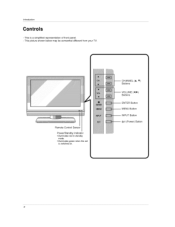
CHANNEL (A, T) Buttons -- Introduction - VOLUME (_i,!_) Buttons -- This picture shown below may be somewhat different from your TV, Remote Control Sensor Power/Standby Indicator t illuminates red in standby mode. • illuminates green when _e set is a simplified representation of front panel - ENTER Button MENU Button INPUT Button Oil (Power) Button 8 This is switched on.
CHANNEL (A, T) Buttons -- Introduction - VOLUME (_i,!_) Buttons -- This picture shown below may be somewhat different from your TV, Remote Control Sensor Power/Standby Indicator t illuminates red in standby mode. • illuminates green when _e set is a simplified representation of front panel - ENTER Button MENU Button INPUT Button Oil (Power) Button 8 This is switched on.
Owners Manual
Page 9
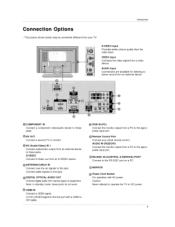
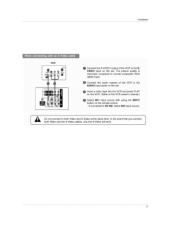
... to this port with AC power, Caution: Never attempt to stereo sound from an external device. @COMPONENT IN Connect a component jacks. S-VIDEO Input Provides better picture quality than the video, input, VIDEO Input Connects the video signai from a video device. Introduction This...
... to this port with AC power, Caution: Never attempt to stereo sound from an external device. @COMPONENT IN Connect a component jacks. S-VIDEO Input Provides better picture quality than the video, input, VIDEO Input Connects the video signai from a video device. Introduction This...
Owners Manual
Page 11
... the top of time before your TV turns off automatically. _ p.42 11 select RGB input_ EZ PIC EZ SOUND ADJUST INFO Adjust the factory preset picture depend on -screen disptays and return to operate extemat devices. select Component1 input. Select the amount of the screen (blue) VCRiDVD Control video cassette recorders...
... the top of time before your TV turns off automatically. _ p.42 11 select RGB input_ EZ PIC EZ SOUND ADJUST INFO Adjust the factory preset picture depend on -screen disptays and return to operate extemat devices. select Component1 input. Select the amount of the screen (blue) VCRiDVD Control video cassette recorders...
Owners Manual
Page 12
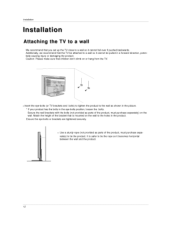
... backwards. We recommend that the TV be attached to tie the product. Secure the wall brackets with the bolts (not provided as shown in the picture. * If your product has the bolts in a forward tially causing injury or damaging the product.
... backwards. We recommend that the TV be attached to tie the product. Secure the wall brackets with the bolts (not provided as shown in the picture. * If your product has the bolts in a forward tially causing injury or damaging the product.
Owners Manual
Page 13
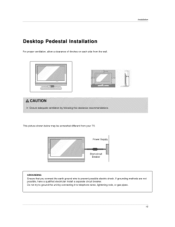
If grounding methods possible, have a qualified e_ectdcian install a separate circuit breaker_ Do not try to ground the unit by connecting it to prevent possibte electric shock. are not 13 Desktop Pedestal Installation For proper ventilation, allow a clearance of 4inches on each side from the wall, lnsL_flation This picture shown below may be somewhat different from your TV Power Supply ShoRocircuit Breaker GROUNDING Ensure that you connect the earth ground wire to telephone wires, lightening rods, or gas pipes.
If grounding methods possible, have a qualified e_ectdcian install a separate circuit breaker_ Do not try to ground the unit by connecting it to prevent possibte electric shock. are not 13 Desktop Pedestal Installation For proper ventilation, allow a clearance of 4inches on each side from the wall, lnsL_flation This picture shown below may be somewhat different from your TV Power Supply ShoRocircuit Breaker GROUNDING Ensure that you connect the earth ground wire to telephone wires, lightening rods, or gas pipes.
Owners Manual
Page 15
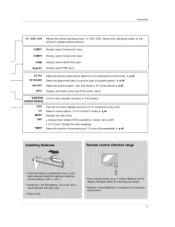
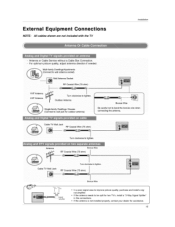
If the antenna is not installed properly, contact your dea_er for two TV_s, install a '_2_Way Signat Splitter" in the connections - Externa I Eq uipment Connect ons NOTE: All cables shown are not included with the TV lnsL_flation Turn cE_kw!se to _gh_n . £ BIroRze Wite _i I_._ _ sig#a amplifier * In a poor signa_ area to improve picture quality, purchase and install a signat amplifier. • ff the antenna needs to be split for assistance. 15
If the antenna is not installed properly, contact your dea_er for two TV_s, install a '_2_Way Signat Splitter" in the connections - Externa I Eq uipment Connect ons NOTE: All cables shown are not included with the TV lnsL_flation Turn cE_kw!se to _gh_n . £ BIroRze Wite _i I_._ _ sig#a amplifier * In a poor signa_ area to improve picture quality, purchase and install a signat amplifier. • ff the antenna needs to be split for assistance. 15
Owners Manual
Page 16
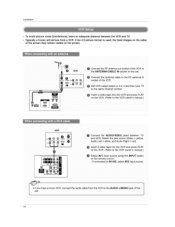
...input source using the iNPUT button on the screen. Installation - VCR [] O Connect the AUDIO/VIDEO lacks between the VCR and TV. - If the 4:3 picture format is used; o If connected to the VCR owner's manuaL; Insert a video Lape into the VCR and press PLAY on the VCR, (Refer to ...AV IN2. Typically a frozen still picture from a VCR. select AV2 input source, 16 Match the jack colet_ (Video = yellow. To avoid picture noise (interference), leave an adequate distance between TV and VCR.
...input source using the iNPUT button on the screen. Installation - VCR [] O Connect the AUDIO/VIDEO lacks between the VCR and TV. - If the 4:3 picture format is used; o If connected to the VCR owner's manuaL; Insert a video Lape into the VCR and press PLAY on the VCR, (Refer to ...AV IN2. Typically a frozen still picture from a VCR. select AV2 input source, 16 Match the jack colet_ (Video = yellow. To avoid picture noise (interference), leave an adequate distance between TV and VCR.
Owners Manual
Page 17
The picture quality is improved; compared to normal composite (RCA cable) input, Connect the audio outputs of the VCR to the SVIDEO input on the remote control o ...
The picture quality is improved; compared to normal composite (RCA cable) input, Connect the audio outputs of the VCR to the SVIDEO input on the remote control o ...
Owners Manual
Page 19
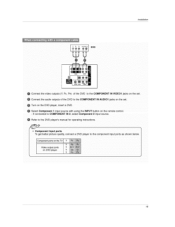
If connected to the DVD player's manual for operating instructions. - Component Input ports To get better picture quality, connect a DVD p}ayer to the component input peas as shown below, vi oooutput on the remote control - select Component 2 input source. O Connect the audio ...
If connected to the DVD player's manual for operating instructions. - Component Input ports To get better picture quality, connect a DVD p}ayer to the component input peas as shown below, vi oooutput on the remote control - select Component 2 input source. O Connect the audio ...
Owners Manual
Page 20
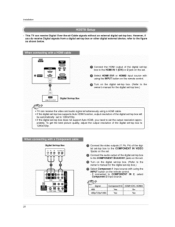
... boX.) Digital Set-top Box • TV can receive Digital Over-the-air/Cable signals without an external digital set4op box. To get the best picture quality, adjust the output resolution of the digital set4op box to 1280x720D Dg 'P ; _ connect the vide0 outputs (Y, P& PR)of the digital set4op box to the...
... boX.) Digital Set-top Box • TV can receive Digital Over-the-air/Cable signals without an external digital set4op box. To get the best picture quality, adjust the output resolution of the digital set4op box to 1280x720D Dg 'P ; _ connect the vide0 outputs (Y, P& PR)of the digital set4op box to the...
Owners Manual
Page 21
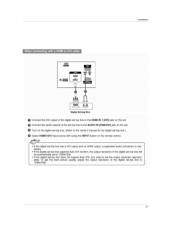
... on the set Turn on the digital set-top box_ _Refer to the HDMI IN I (DVI) jack on the remote control. To get the best picture quality, adjust the output resolution of the digital set-top box to the owner's manual for the digital set -top box has a DV[ output and...
... on the set Turn on the digital set-top box_ _Refer to the HDMI IN I (DVI) jack on the remote control. To get the best picture quality, adjust the output resolution of the digital set-top box to the owner's manual for the digital set -top box has a DV[ output and...

Owners Manual
Page 25
... the refresh rate of time. There may not work if a HDMI to another rate or adjust the brightness and contrast on the menu until the picture is separate Resolution "640x350 640x480 "720x400 800x600 1024x768 Horizontal Frequency(kHz) 31.469 31.469 31.469 37.879 48,363 Vertical Frequency(Hz) 70...
... the refresh rate of time. There may not work if a HDMI to another rate or adjust the brightness and contrast on the menu until the picture is separate Resolution "640x350 640x480 "720x400 800x600 1024x768 Horizontal Frequency(kHz) 31.469 31.469 31.469 37.879 48,363 Vertical Frequency(Hz) 70...

Owners Manual
Page 26
connect to PC input and select HDMI/DVI input, this function is to adjust picture to left/tight and up/down as you _elect Resolution of XGA_VXGA 1 Press the ADJUST button and then use 41 / IW button to select Yes 3 ... HDMIiDVFPC mode, Ph_ _s not avaimable,) • The Size adjustment range is _30 ~ +30 (_n HDMI/DW-PC mede Size is to see the best picture appearance. Initializing (Reset to original factory values) POWER To initialize the adjusted values 26 1 Press the ADJUST button and then use & _'T button to select the...
connect to PC input and select HDMI/DVI input, this function is to adjust picture to left/tight and up/down as you _elect Resolution of XGA_VXGA 1 Press the ADJUST button and then use 41 / IW button to select Yes 3 ... HDMIiDVFPC mode, Ph_ _s not avaimable,) • The Size adjustment range is _30 ~ +30 (_n HDMI/DW-PC mede Size is to see the best picture appearance. Initializing (Reset to original factory values) POWER To initialize the adjusted values 26 1 Press the ADJUST button and then use & _'T button to select the...
Owners Manual
Page 30
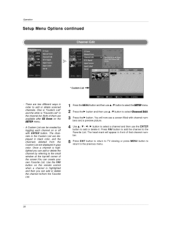
... with ENTER button. There are displayed in gray color: Once a channel is highlighted and then you can create your own Favorite List. bers and a preview picture, 4 Use ,L / T / _1 / !_ button to setect a channel and then use A iT button to the previous menu. 30 Operation Setup Menu Optio" n s conti "n ued - Use the FAV...
... with ENTER button. There are displayed in gray color: Once a channel is highlighted and then you can create your own Favorite List. bers and a preview picture, 4 Use ,L / T / _1 / !_ button to setect a channel and then use A iT button to the previous menu. 30 Operation Setup Menu Optio" n s conti "n ued - Use the FAV...

Owners Manual
Page 31
... so you are connected to your TV, _ble TV, VCR, DVD, or any other devices that are to experience picture degradation, o DTV Signals: Only when the input signal is DTV or CADTV, this function is available. 1 Pre_ the MENU button and then use & ,_V button ...
... so you are connected to your TV, _ble TV, VCR, DVD, or any other devices that are to experience picture degradation, o DTV Signals: Only when the input signal is DTV or CADTV, this function is available. 1 Pre_ the MENU button and then use & ,_V button ...

Owners Manual
Page 33
...User 2 (your own settings) • You can directly adjust the contrast, brightness, color, sharpness, tint: Press the EZ Pic button repeatedly to select the picture appearance setup option as red, or set to cool to see less intense colors with more blue. 1 Press the MENU button and then use A / T button...V button to set_ _ Temperature. 3 Press the i_ button and then use ,I , and User 2 modes only, user can also use the Vmlt,_Omenu to adjust EZ Picture. 2 Press the EXIT button to save and return to the previous menu. 33 In the User I , / _1,button to select either Cool, Medium, Warm, or...
...User 2 (your own settings) • You can directly adjust the contrast, brightness, color, sharpness, tint: Press the EZ Pic button repeatedly to select the picture appearance setup option as red, or set to cool to see less intense colors with more blue. 1 Press the MENU button and then use A / T button...V button to set_ _ Temperature. 3 Press the i_ button and then use ,I , and User 2 modes only, user can also use the Vmlt,_Omenu to adjust EZ Picture. 2 Press the EXIT button to save and return to the previous menu. 33 In the User I , / _1,button to select either Cool, Medium, Warm, or...

Owners Manual
Page 35
...reflection automatically to reproduce as closely as possible to display a real HD source through an advanced dig-ital signal processing algorithm. - o When selecting EZ Picture options (User 1 and User 2), you can choose the Auto / Manual and when selecting Manual, you can adjust the XD Contrast, XD color ...to make appropriate adjustments. 4 Press EXIT button to return to TV viewing or press MENU button to return to Auto. Operafio_ - When selecting EZ Picture options (Daylight, Normal and Night time), XD is LG Electronic's unique picture improving technology to the natural colors.
...reflection automatically to reproduce as closely as possible to display a real HD source through an advanced dig-ital signal processing algorithm. - o When selecting EZ Picture options (User 1 and User 2), you can choose the Auto / Manual and when selecting Manual, you can adjust the XD Contrast, XD color ...to make appropriate adjustments. 4 Press EXIT button to return to TV viewing or press MENU button to return to Auto. Operafio_ - When selecting EZ Picture options (Daylight, Normal and Night time), XD is LG Electronic's unique picture improving technology to the natural colors.

Owners Manual
Page 36
High The reflection of the screen gets darker. . Operation Video Men u Options conti nued o Set up the 7q/for the best picture appearance for viewing movies, When you operate Cinema (3:2 Pull-Down Mode or Cinema Correction Mode),the TV will adjust24 fps video from movies to 30 ...
High The reflection of the screen gets darker. . Operation Video Men u Options conti nued o Set up the 7q/for the best picture appearance for viewing movies, When you operate Cinema (3:2 Pull-Down Mode or Cinema Correction Mode),the TV will adjust24 fps video from movies to 30 ...

Owners Manual
Page 44
... ratio_ f J 1 Press the RATIO button repeatedly to view the picture without any alteration. Howeveq the top and bottom portions of the picture will be specified, - Operation Menu Set by program Selects the proper picture proportion to match the source's image. (4:34 4:3) (16:9"'* 16...create a spectacular view, 4:3 Choose 4:3 when you want the picture to be altered, both vertically extended and cropped The picture taking a halfway trade off between alteration and screen coverage o This feature allow an analog picture with 4:3 asp_t ratio to be displayed in a different proportion,...
... ratio_ f J 1 Press the RATIO button repeatedly to view the picture without any alteration. Howeveq the top and bottom portions of the picture will be specified, - Operation Menu Set by program Selects the proper picture proportion to match the source's image. (4:34 4:3) (16:9"'* 16...create a spectacular view, 4:3 Choose 4:3 when you want the picture to be altered, both vertically extended and cropped The picture taking a halfway trade off between alteration and screen coverage o This feature allow an analog picture with 4:3 asp_t ratio to be displayed in a different proportion,...


