

Owners Manual
Page 1
P/NO : 3828TUL318C(0504-REV00) Printed in Korea LCD TV OWNER'S MANUAL MODEL: 23LX1RV Internet Home Page : http://www.lge.com http://www.lg.ca Please read this information to your set . See the label attached on the back cover and quote this manual carefully before operating your dealer when you require service. Retain it for future reference. Record model number and serial number of the set .
P/NO : 3828TUL318C(0504-REV00) Printed in Korea LCD TV OWNER'S MANUAL MODEL: 23LX1RV Internet Home Page : http://www.lge.com http://www.lg.ca Please read this information to your set . See the label attached on the back cover and quote this manual carefully before operating your dealer when you require service. Retain it for future reference. Record model number and serial number of the set .
Owners Manual
Page 4
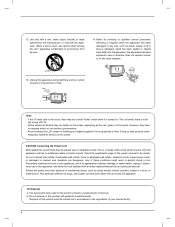
...the cord of your appliance, and if its appearance indicates damage or deterioration, unplug it for long periods of mercury. Disposal of this owner's manual to the regulations of time. Doing so may be carried out in a door, or walked upon a dedicated circuit; However, they be certain...use caution when moving the cart / apparatus combination to rain or moisture, does not operate normally, or has been dropped. 13. Use only with TV. - b. Protect the power cord from tip-over. 14. This is normal, there is damaged, liquid has been spilled or objects have no ...
...the cord of your appliance, and if its appearance indicates damage or deterioration, unplug it for long periods of mercury. Disposal of this owner's manual to the regulations of time. Doing so may be carried out in a door, or walked upon a dedicated circuit; However, they be certain...use caution when moving the cart / apparatus combination to rain or moisture, does not operate normally, or has been dropped. 13. Use only with TV. - b. Protect the power cord from tip-over. 14. This is normal, there is damaged, liquid has been spilled or objects have no ...
Owners Manual
Page 5
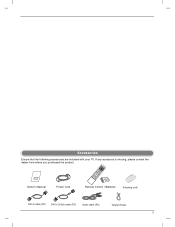
... accessory is missing, please contact the dealer from where you purchased the product. Accessories Ensure that the following accessories are included with your TV. Owner's Manual Power Cord SKIP MENU TV/AV MULTIMEDIA STOVPIDEO FCPROWER PLAY AUDIO SCAN PAUSE/STEP ARC SCAN OPEN/CLOSE CCAUDMIOTRSEPEAT SKIP EXIT DISC MENU ENTER 1 VOL TITLE MUTE...
... accessory is missing, please contact the dealer from where you purchased the product. Accessories Ensure that the following accessories are included with your TV. Owner's Manual Power Cord SKIP MENU TV/AV MULTIMEDIA STOVPIDEO FCPROWER PLAY AUDIO SCAN PAUSE/STEP ARC SCAN OPEN/CLOSE CCAUDMIOTRSEPEAT SKIP EXIT DISC MENU ENTER 1 VOL TITLE MUTE...
Owners Manual
Page 6
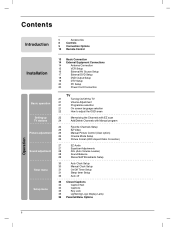
... Turning On/Off the TV 21 Volume Adjustment 21 Programme selection 21 On screen language selection 22 How to adjust the OSD sreen 23 Memorizing the Channels with EZ scan 24 Add/Delete Channels with Manual program 24 Favorite Channels Setup 25 EZ Video 25 Manual Picture Control (User option)... EZ Audio 27 Equalizer Adjustments 28 AVL (Auto Volume Leveler) 28 Sound Balance 29 Stereo/SAP Broadcasts Setup 30 Auto Clock Setup 30 Manual Clock Setup 31 On/Off Timer Setup 31 Sleep timer Setup 32 Auto off 33 Closed Captions 34 Caption/Text 34 Captions 35 Key ...
... Turning On/Off the TV 21 Volume Adjustment 21 Programme selection 21 On screen language selection 22 How to adjust the OSD sreen 23 Memorizing the Channels with EZ scan 24 Add/Delete Channels with Manual program 24 Favorite Channels Setup 25 EZ Video 25 Manual Picture Control (User option)... EZ Audio 27 Equalizer Adjustments 28 AVL (Auto Volume Leveler) 28 Sound Balance 29 Stereo/SAP Broadcasts Setup 30 Auto Clock Setup 30 Manual Clock Setup 31 On/Off Timer Setup 31 Sleep timer Setup 32 Auto off 33 Closed Captions 34 Caption/Text 34 Captions 35 Key ...

Owners Manual
Page 15
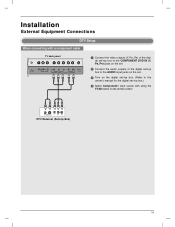
...white, and Audio Right = red) 2 Insert a video tape into the VCR and press PLAY on the VCR. (Refer to the VCR owner's manual.) When connecting with using the TV/AV button on the remote control. • If you have a mono VCR, connect the audio cable from a VCR. Installation External Equipment Connections VCR...VCR. (Refer to the Antenna socket on the screen. the fixed images on the sides of the VCR to the VCR owner's manual.) 3 Select Video input source with a RCA cable TV Back panel 1 ANT IN ANT OUT S-VIDEO OUT (R) AUDIO (L) VIDEO IN VCR 1 Connect the AUDIO/VIDEO jacks between the ...
...white, and Audio Right = red) 2 Insert a video tape into the VCR and press PLAY on the VCR. (Refer to the VCR owner's manual.) When connecting with using the TV/AV button on the remote control. • If you have a mono VCR, connect the audio cable from a VCR. Installation External Equipment Connections VCR...VCR. (Refer to the Antenna socket on the screen. the fixed images on the sides of the VCR to the VCR owner's manual.) 3 Select Video input source with a RCA cable TV Back panel 1 ANT IN ANT OUT S-VIDEO OUT (R) AUDIO (L) VIDEO IN VCR 1 Connect the AUDIO/VIDEO jacks between the ...

Owners Manual
Page 16
...VIDEO OUT (R) AUDIO (L) VIDEO IN VCR 1 Connect the an S-VIDEO output of the VCR to the VCR owner's manual.) 4 Select S-Video input source with using the TV/AV button on the remote control. The picture quality is improved; Do not connect to external equipment operating guide. Video... Game Set 16 Refer to both Video and S-Video at the same time. External AV Source Setup TV side panel 1 2 S-VIDEO R AUDIO L VIDEO External Equipment Camcorder 1 Connect the S-VIDEO output of the external equipment to the S-VIDEO input ...
...VIDEO OUT (R) AUDIO (L) VIDEO IN VCR 1 Connect the an S-VIDEO output of the VCR to the VCR owner's manual.) 4 Select S-Video input source with using the TV/AV button on the remote control. The picture quality is improved; Do not connect to external equipment operating guide. Video... Game Set 16 Refer to both Video and S-Video at the same time. External AV Source Setup TV side panel 1 2 S-VIDEO R AUDIO L VIDEO External Equipment Camcorder 1 Connect the S-VIDEO output of the external equipment to the S-VIDEO input ...

Owners Manual
Page 17
... button on the remote control. - If connected to COMPONENT2 IN select Component2 input source. 5 Refer to the DVD player's manual for operating instructions. (R) AUDIO (L) B R DVD TV side panel • Component Input ports To get better picture quality, connect a DVD player to the AUDIO input jacks on the set . 2 ...Connect the audio outputs of the DVD to the COMPONENT DVD IN (Y, PB, PR) jacks on the TV Y PB PR 1 2 (R) AUDIO (L) DVD B R 17 Video output ports on DVD player Y Pb Pr Y B-Y R-Y Y Cb Cr Y PB PR Component ports on the set . 3...
... button on the remote control. - If connected to COMPONENT2 IN select Component2 input source. 5 Refer to the DVD player's manual for operating instructions. (R) AUDIO (L) B R DVD TV side panel • Component Input ports To get better picture quality, connect a DVD player to the AUDIO input jacks on the set . 2 ...Connect the audio outputs of the DVD to the COMPONENT DVD IN (Y, PB, PR) jacks on the TV Y PB PR 1 2 (R) AUDIO (L) DVD B R 17 Video output ports on DVD player Y Pb Pr Y B-Y R-Y Y Cb Cr Y PB PR Component ports on the set . 3...

Owners Manual
Page 18
...has a digital audio input optical port, you to hook up a second TV or monitor. 1 Connect the second TV or monitor to the TV's DVD OUT (VIDEO) and DVD OUT (AUDIO) jacks. 2 See the Operating Manual of the second TV or monitor for further details regarding that device's input settings. 1 Connect the...output of the DVD to the S-VIDEO input on the remote control. 5 Refer to the DVD player's manual for further details regarding that device's input settings. DVD Output Setup The TV has a special signal output capability which allows you can connect it 's impossible to use DVD digital sound ...
...has a digital audio input optical port, you to hook up a second TV or monitor. 1 Connect the second TV or monitor to the TV's DVD OUT (VIDEO) and DVD OUT (AUDIO) jacks. 2 See the Operating Manual of the second TV or monitor for further details regarding that device's input settings. 1 Connect the...output of the DVD to the S-VIDEO input on the remote control. 5 Refer to the DVD player's manual for further details regarding that device's input settings. DVD Output Setup The TV has a special signal output capability which allows you can connect it 's impossible to use DVD digital sound ...
Owners Manual
Page 19
Installation External Equipment Connections DTV Setup When connecting with a component cable TV back panel 1 1 Connect the video outputs (Y, PB, PR) of the digital set-top box to the COMPONENT DVD IN (Y, PB, PR) jacks on the set. 2 Connect the audio outputs of the digital set-top box to the AUDIO input jacks on the set. 3 Turn on the digital set-top box. (Refer to the owner's manual for the digital set-top box.) 4 Select Component1 input source with using the TV/AV button on the remote control. (R) AUDIO (L) B R DTV Receiver (Set-top Box) 19
Installation External Equipment Connections DTV Setup When connecting with a component cable TV back panel 1 1 Connect the video outputs (Y, PB, PR) of the digital set-top box to the COMPONENT DVD IN (Y, PB, PR) jacks on the set. 2 Connect the audio outputs of the digital set-top box to the AUDIO input jacks on the set. 3 Turn on the digital set-top box. (Refer to the owner's manual for the digital set-top box.) 4 Select Component1 input source with using the TV/AV button on the remote control. (R) AUDIO (L) B R DTV Receiver (Set-top Box) 19
Owners Manual
Page 20
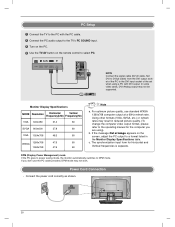
... remote control to select PC. b. DPM (Display Power Management) mode If the PC goes to power saving mode, the monitor automatically switches to the operating manual for Horizontal and Vertical frequencies is separate. If you are using a PC with the PC cable. 2 Connect the PC audio output to the... TV's PC SOUND input. 3 Turn on the PC. 4 Use the TV/AV button on the screen, adjust the PC output to a format listed in reduced picture quality. (To change the computer video...
... remote control to select PC. b. DPM (Display Power Management) mode If the PC goes to power saving mode, the monitor automatically switches to the operating manual for Horizontal and Vertical frequencies is separate. If you are using a PC with the PC cable. 2 Connect the PC audio output to the... TV's PC SOUND input. 3 Turn on the PC. 4 Use the TV/AV button on the screen, adjust the PC output to a format listed in reduced picture quality. (To change the computer video...

Owners Manual
Page 22
... each menu. 2 Press the G button and then D / E button to the higher level menu by pressing the ENTER or MENU button. Favorite ch. Channel EZ Scan Manual prog. Picture EZ Video User Cinema Sound EZ Audio AVL Balance D E F G OK MENU Channel menu D E FG OK MENU Picture menu D E FG OK MENU... Key lock Parental Logo D E FG OK MENU Special menu Timer Clock Off timer On timer Auto off D E FG OK MENU Timer menu Note In the TV, Video, S-Video, DVD, Component 1, Component 2 and mode, the PC menu(option) is not displayed. 22 You can move to select a menu item. 3 ...
... each menu. 2 Press the G button and then D / E button to the higher level menu by pressing the ENTER or MENU button. Favorite ch. Channel EZ Scan Manual prog. Picture EZ Video User Cinema Sound EZ Audio AVL Balance D E F G OK MENU Channel menu D E FG OK MENU Picture menu D E FG OK MENU... Key lock Parental Logo D E FG OK MENU Special menu Timer Clock Off timer On timer Auto off D E FG OK MENU Timer menu Note In the TV, Video, S-Video, DVD, Component 1, Component 2 and mode, the PC menu(option) is not displayed. 22 You can move to select a menu item. 3 ...

Owners Manual
Page 23
... for auto program to complete the channel search cycle before choosing a channel. b. ming up TV stations Channel EZ Scan Manual prog. Memorizing the Channels with EZ scan Channel EZ Scan Manual prog. If you press the ENTER button in auto programming, the function will remain. c. Note a.... For Auto program to work, the programming source must be connected to the TV and the TV must be receiving programming signals either overthe-...
... for auto program to complete the channel search cycle before choosing a channel. b. ming up TV stations Channel EZ Scan Manual prog. Memorizing the Channels with EZ scan Channel EZ Scan Manual prog. If you press the ENTER button in auto programming, the function will remain. c. Note a.... For Auto program to work, the programming source must be connected to the TV and the TV must be receiving programming signals either overthe-...

Owners Manual
Page 24
TV 30 Memory The current channel number is added to Memory or Erased from the channel list. The current channel is displayed. Favorite Channels Setup Channel EZ Scan Manual prog. D E FG OK MENU D E F G OK MENU EXIT - You can manually include or erase individual channels. 1 Press the MENU button ... save . TV/AV OPEN/CLOSE POWER MULTIMEDIA VIDEO STOP FFCCRR AUDIO PLAY PAUSE/STEP CC AUDIO MTS REPEAT SKIP SCAN SCAN SKIP 24 Favorite Ch. Channel EZ Scan Manual prog. D E FG OK MENU EXIT 1 Press the MENU button and then use D / E button to select the ...
TV 30 Memory The current channel number is added to Memory or Erased from the channel list. The current channel is displayed. Favorite Channels Setup Channel EZ Scan Manual prog. D E FG OK MENU D E F G OK MENU EXIT - You can manually include or erase individual channels. 1 Press the MENU button ... save . TV/AV OPEN/CLOSE POWER MULTIMEDIA VIDEO STOP FFCCRR AUDIO PLAY PAUSE/STEP CC AUDIO MTS REPEAT SKIP SCAN SCAN SKIP 24 Favorite Ch. Channel EZ Scan Manual prog. D E FG OK MENU EXIT 1 Press the MENU button and then use D / E button to select the ...

Owners Manual
Page 25
..., sharpness and tint to make appropriate adjustments. • Contrast, Brightness, Color, and Sharpness are displayed in PC mode. 25 Note a. Manual Picture Control (User option) Picture EZ Video User Cinema D E FG OK MENU - Only Contrast and Brightness are adjustable from 0 to 100.... • Tint is adjustable from - 50 to + 50. 5 Press the ENTER button to save . This function adjusts the TV for the best picture appearance. Picture EZ Video User Cinema Contrast G Brightness G Color G Sharpness G Tint G D Contrast 85 F G E D E FG...
..., sharpness and tint to make appropriate adjustments. • Contrast, Brightness, Color, and Sharpness are displayed in PC mode. 25 Note a. Manual Picture Control (User option) Picture EZ Video User Cinema D E FG OK MENU - Only Contrast and Brightness are adjustable from 0 to 100.... • Tint is adjustable from - 50 to + 50. 5 Press the ENTER button to save . This function adjusts the TV for the best picture appearance. Picture EZ Video User Cinema Contrast G Brightness G Color G Sharpness G Tint G D Contrast 85 F G E D E FG...

Owners Manual
Page 30
...D / E button to select the Timer menu. 2 Press the G button and then D / E button to select Clock. 3 Press the G button and then D / E button to select Manual. 4 Press the G button and then D / E button to set the hour. 5 Press the G button and then D / E button to set the minute. 6 Press the ENTER button ... time on whether or not your local PBS TV station. The time can be automatically set D.S.T. (Daylight Savings Time) Auto, Off or On, depending on the clock is incorrect, reset the clock manually. Timer Clock Off timer On timer Auto off Manual Clock Setup Timer Clock Off timer On timer ...
...D / E button to select the Timer menu. 2 Press the G button and then D / E button to select Clock. 3 Press the G button and then D / E button to select Manual. 4 Press the G button and then D / E button to set the hour. 5 Press the G button and then D / E button to set the minute. 6 Press the ENTER button ... time on whether or not your local PBS TV station. The time can be automatically set D.S.T. (Daylight Savings Time) Auto, Off or On, depending on the clock is incorrect, reset the clock manually. Timer Clock Off timer On timer Auto off Manual Clock Setup Timer Clock Off timer On timer ...

Owners Manual
Page 39
... to discs. If this happens, try reburning another CD after setting up the disc writing parameters correctly on your TV display during operation and indicates that the function explained in this Manual DVD-V VCD CD MP3 WMA JPEG DivX DVD and finalized DVD±R/RW Video CDs Audio CDs MP3 Discs WMA... and dust such as thinner, benzine, commercially available cleaners or antistatic spray for vinyl LPs. DVD operation Notes on Discs Symbol Used in this owner's manual is not available on that do not have these numbers. •Title: When two or more movies are recorded on a disc, the disc is ...
... to discs. If this happens, try reburning another CD after setting up the disc writing parameters correctly on your TV display during operation and indicates that the function explained in this Manual DVD-V VCD CD MP3 WMA JPEG DivX DVD and finalized DVD±R/RW Video CDs Audio CDs MP3 Discs WMA... and dust such as thinner, benzine, commercially available cleaners or antistatic spray for vinyl LPs. DVD operation Notes on Discs Symbol Used in this owner's manual is not available on that do not have these numbers. •Title: When two or more movies are recorded on a disc, the disc is ...

Owners Manual
Page 40
..."ALL". If you try to water (dripping or splashing) and no objects filled with liquids, such as vases, should not be placed on the TV screen. To ensure proper use of procedures other discs, the message "Check Regional Code" will appear on the apparatus. Use of controls, adjustments, ...or the performance of this product, please read this owner's manual carefully and retain for playback of Playable Discs • DVD (8 cm / 12 cm disc) • Video CD (VCD) (8 cm / 12 cm disc) ...
..."ALL". If you try to water (dripping or splashing) and no objects filled with liquids, such as vases, should not be placed on the TV screen. To ensure proper use of procedures other discs, the message "Check Regional Code" will appear on the apparatus. Use of controls, adjustments, ...or the performance of this product, please read this owner's manual carefully and retain for playback of Playable Discs • DVD (8 cm / 12 cm disc) • Video CD (VCD) (8 cm / 12 cm disc) ...


