
Operation Guide
Page 5
... Cable Connection 10 HD Receiver Setup 11 DVD Setup 13 VCR Setup 14 PC Setup 16 Pillow Speaker Setup 18 User Remote Control Button Functions .......... 19 Installer Remote Control Button Functions ..... 20 On-Screen Menus Selection 21 Channel Search 22 Clock Setting 26 Daylight Saving 28 Time Zone Settings 28 TV Activation Time...
... Cable Connection 10 HD Receiver Setup 11 DVD Setup 13 VCR Setup 14 PC Setup 16 Pillow Speaker Setup 18 User Remote Control Button Functions .......... 19 Installer Remote Control Button Functions ..... 20 On-Screen Menus Selection 21 Channel Search 22 Clock Setting 26 Daylight Saving 28 Time Zone Settings 28 TV Activation Time...

Operation Guide
Page 6
.... The LT2002 Quickset II Clone Programmer is an optional remote control available for the product. m © z Owner's Manual Power Cord CD Manual User Remote Control. See your LG dealer if you need an installer's remote and the LT2002 Quickset II Clone Programmer - Batteries (Optional) Installer Remote Control. both are included with the TV. • However...
.... The LT2002 Quickset II Clone Programmer is an optional remote control available for the product. m © z Owner's Manual Power Cord CD Manual User Remote Control. See your LG dealer if you need an installer's remote and the LT2002 Quickset II Clone Programmer - Batteries (Optional) Installer Remote Control. both are included with the TV. • However...

Operation Guide
Page 7
... Operation Press the POWER button to turn the TV on from your preference. "D Front Panel Controls rfl Power / Standby Indicator Glows red in Sleep Timer Remote Control Sensor and/or Alarm mode. LED Color RED GREEN is flashing GREEN ORANGE Action/Status Power is Off (Standby) Power On sequence is processing...
... Operation Press the POWER button to turn the TV on from your preference. "D Front Panel Controls rfl Power / Standby Indicator Glows red in Sleep Timer Remote Control Sensor and/or Alarm mode. LED Color RED GREEN is flashing GREEN ORANGE Action/Status Power is Off (Standby) Power On sequence is processing...
Operation Guide
Page 11
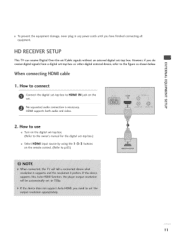
... digital set-top box. (Refer to the owner's manual for the digital set-top box.) Select HDMI input source by using the 1 -3-3 buttons on the remote control. (Refer to HDMI IN jack on the z -4 set -top box to p.65) 11 rT1 x -4 rT1 _o When connecting HDM[ cable z m _D 1. m -4 c No separated audio...
... digital set-top box. (Refer to the owner's manual for the digital set-top box.) Select HDMI input source by using the 1 -3-3 buttons on the remote control. (Refer to HDMI IN jack on the z -4 set -top box to p.65) 11 rT1 x -4 rT1 _o When connecting HDM[ cable z m _D 1. m -4 c No separated audio...
Operation Guide
Page 12
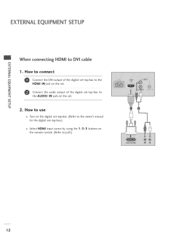
EXTERNALEQUIPMENT SETUP When connecting HDMi to DVi cable m x -4 m _o z • How to p.6S) 12 mO m z t_ Connect the audio output of the digital set-top box to the _D c HDMI IN jack on the set. m Connect the DVI output of the digital set . m -4 C • How to use Turn on the digital set-top box. (Refer to the owner's manual for the digital set-top box.) Select HDMI input source by using the 1 -3-3 buttons on the set -top box to -4 the AUDIO IN jack on the remote control. (Refer to connect r--
EXTERNALEQUIPMENT SETUP When connecting HDMi to DVi cable m x -4 m _o z • How to p.6S) 12 mO m z t_ Connect the audio output of the digital set-top box to the _D c HDMI IN jack on the set. m Connect the DVI output of the digital set . m -4 C • How to use Turn on the digital set-top box. (Refer to the owner's manual for the digital set-top box.) Select HDMI input source by using the 1 -3-3 buttons on the set -top box to -4 the AUDIO IN jack on the remote control. (Refer to connect r--

Operation Guide
Page 13
z -4 HDMI supports both audio and video. DVD SETUP When connecting HDMJ cabJe m x -4 m 1. How to use Select HDMI input source by using the 1 -3-3 buttons on the remote control. (Refer to p.65) Refer to the HDMI IN c jack on the set. How to connect z m £3 Connect the HDMI output of the DVD to the DVD player's manual for operating instructions. 13 m -4 c 2. "10 m No separated audio connection is necessary.
z -4 HDMI supports both audio and video. DVD SETUP When connecting HDMJ cabJe m x -4 m 1. How to use Select HDMI input source by using the 1 -3-3 buttons on the remote control. (Refer to p.65) Refer to the HDMI IN c jack on the set. How to connect z m £3 Connect the HDMI output of the DVD to the DVD player's manual for operating instructions. 13 m -4 c 2. "10 m No separated audio connection is necessary.

Operation Guide
Page 15
How to use c "O Insert a video tape into the VCR and press PLAY on the VCR. (Refer to the VCR owner's manual.) Select AV input source by using the 1 -3-1 buttons on the remote control. (Refer to connect z Connect the VIDEO jacks between TV and VCR. How to p.65) 1S When connecting with a RCA cable m x m 1. Match m _D the jack colors (Video = yellow, Audio Left = white, and c Audio Right = red) -O m z m 2.
How to use c "O Insert a video tape into the VCR and press PLAY on the VCR. (Refer to the VCR owner's manual.) Select AV input source by using the 1 -3-1 buttons on the remote control. (Refer to connect z Connect the VIDEO jacks between TV and VCR. How to p.65) 1S When connecting with a RCA cable m x m 1. Match m _D the jack colors (Video = yellow, Audio Left = white, and c Audio Right = red) -O m z m 2.

Operation Guide
Page 16
How to connect I" m /O c jCacoknnoenct thteheseDt.VI output of the PC to the HDMI IN -O m z Connect the PC audio output to p.6S) 16 Select HDMI input source by using the 1 -3-3 buttons on the remote control. (Refer to the AUDIO IN jack on the PC and the TV. m --4 C "O 2. How to DVi cable m x --4 m _o z 1. EXTERNALEQUIPMENT SETUP PC SETUP When connecting HDMi to use Turn on --4 the set.
How to connect I" m /O c jCacoknnoenct thteheseDt.VI output of the PC to the HDMI IN -O m z Connect the PC audio output to p.6S) 16 Select HDMI input source by using the 1 -3-3 buttons on the remote control. (Refer to the AUDIO IN jack on the PC and the TV. m --4 C "O 2. How to DVi cable m x --4 m _o z 1. EXTERNALEQUIPMENT SETUP PC SETUP When connecting HDMi to use Turn on --4 the set.

Operation Guide
Page 18
...with a low-impedance pad-type volume control. Select PILLOW SPEAKER on the Sound menu. I_pillow speaker switch is set to previous LG models using the 5-Wire Interface except that only +7 volts DC was supplied and current draw was only 2.5 mA.) Current draw... : [ _ l T4V Back i[[ J _:' , "_. Pillow Speaker Interface This connector furnishes three control lines and an audio output. A patient-pendant remote control, or entertainment audio and nurse call system may be somewhat different from oxygen equipment." Impedance to earth ground is set to control On/Off...
...with a low-impedance pad-type volume control. Select PILLOW SPEAKER on the Sound menu. I_pillow speaker switch is set to previous LG models using the 5-Wire Interface except that only +7 volts DC was supplied and current draw was only 2.5 mA.) Current draw... : [ _ l T4V Back i[[ J _:' , "_. Pillow Speaker Interface This connector furnishes three control lines and an audio output. A patient-pendant remote control, or entertainment audio and nurse call system may be somewhat different from oxygen equipment." Impedance to earth ground is set to control On/Off...

Operation Guide
Page 19
...SAP in the Main channel number followed by the -> [-] -> then the sub channel number. Select available channels. TV/CHANNEL CONTROL USER REMOTE CONTROL BUTTON FUNCTIONS A brief list of the buttons on the back of the TV as a source). Analog channels do . POWER Turns ... channel viewed. O r""" FLASHBK (Flashback) Use to return to select a Channel Memory Bank - - 1,2, 3, or 4 (Standby). Optional Patient Remote Control 19 Determines the code set V-Chip blocks to restrict both analog and digital programming. • Aux Channel allows the guest to display current program...
...SAP in the Main channel number followed by the -> [-] -> then the sub channel number. Select available channels. TV/CHANNEL CONTROL USER REMOTE CONTROL BUTTON FUNCTIONS A brief list of the buttons on the back of the TV as a source). Analog channels do . POWER Turns ... channel viewed. O r""" FLASHBK (Flashback) Use to return to select a Channel Memory Bank - - 1,2, 3, or 4 (Standby). Optional Patient Remote Control 19 Determines the code set V-Chip blocks to restrict both analog and digital programming. • Aux Channel allows the guest to display current program...

Operation Guide
Page 20
... TV On or Off. GUIDE Use to the Alarm menu. VOLUME / CHANNEL / OK (Enter) Increase or decrease sound level. Optional Installer Remote Control ALARM Use to go to view DTV program information. Switch setting must correspond to select a Channel C_ Memory Bank - - 1,2, 3 ...or 4 (Standby). --4 SAP N Selects MTS sound: Mono, Stereo, and "1" SAP in the TV's Installer Menu. 20 BANK Z Press and repeat to item 2Z HOSPITAL MODE setting in analog mode. Z rrl r""" N CHANNEL PREVIEW O Displays available TV channels, and (if Z --4 active) the Guest Parental Control...
... TV On or Off. GUIDE Use to the Alarm menu. VOLUME / CHANNEL / OK (Enter) Increase or decrease sound level. Optional Installer Remote Control ALARM Use to go to view DTV program information. Switch setting must correspond to select a Channel C_ Memory Bank - - 1,2, 3 ...or 4 (Standby). --4 SAP N Selects MTS sound: Mono, Stereo, and "1" SAP in the TV's Installer Menu. 20 BANK Z Press and repeat to item 2Z HOSPITAL MODE setting in analog mode. Z rrl r""" N CHANNEL PREVIEW O Displays available TV channels, and (if Z --4 active) the Guest Parental Control...

Operation Guide
Page 21
... time before TV shutoff. Guide Display Press the GUIDE to access these menus and displays. V-Chip Press the CC. ON-SCREEN MENUS SELECTION Use the remote keys indicated below to view DTV program information. are just generic examples Volume Display Press VOLUME. Sleep Timer Menu Press TIMER. Set a time for the...
... time before TV shutoff. Guide Display Press the GUIDE to access these menus and displays. V-Chip Press the CC. ON-SCREEN MENUS SELECTION Use the remote keys indicated below to view DTV program information. are just generic examples Volume Display Press VOLUME. Sleep Timer Menu Press TIMER. Set a time for the...

Operation Guide
Page 22
N O Z Press the OK (Enter) button to turn the TV on. -1- z C_ --4 With the optional Installer remote control in the selected Tuning Band. After finding all of analog and digital channels found. When finished, press MENU repeatedly to highlight the Channel menu ...
N O Z Press the OK (Enter) button to turn the TV on. -1- z C_ --4 With the optional Installer remote control in the selected Tuning Band. After finding all of analog and digital channels found. When finished, press MENU repeatedly to highlight the Channel menu ...

Operation Guide
Page 31
O f a password has been entered, key it in using the remote control. This is set , enter the 4 digits password (0-9) using the number keypad. The TV is the PIN. Enter the digits password. Use the ADJ • ...
O f a password has been entered, key it in using the remote control. This is set , enter the 4 digits password (0-9) using the number keypad. The TV is the PIN. Enter the digits password. Use the ADJ • ...
Operation Guide
Page 47
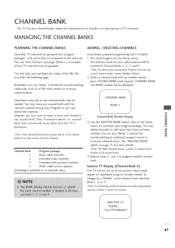
...may leave any unused bank. The "ADD/DEL/BLNK" Channel Bank 1 Program package Basic cable channels 2 Extended cable channels 3 Extended with an installer remote - - Repeat steps 2, and 3 to customize your program package. The user then chooses a package. You may want to be inactive; Remember, ... can also "Blank" a channel for accommodating audio-only, such as an example only.) option on your packages by using an installer remote to change to the end user. MANAGING THE CHANNEL BANKS PLANNING THE CHANNEL BANKS ADDING / DELETING CHANNELS Generally, TV channels are proposed ...
...may leave any unused bank. The "ADD/DEL/BLNK" Channel Bank 1 Program package Basic cable channels 2 Extended cable channels 3 Extended with an installer remote - - Repeat steps 2, and 3 to customize your program package. The user then chooses a package. You may want to be inactive; Remember, ... can also "Blank" a channel for accommodating audio-only, such as an example only.) option on your packages by using an installer remote to change to the end user. MANAGING THE CHANNEL BANKS PLANNING THE CHANNEL BANKS ADDING / DELETING CHANNELS Generally, TV channels are proposed ...

Operation Guide
Page 50
... cloning may not be successful. N J Refer to the appropriate section in the Manual for the TV you need to know how to enter the 20LH1DC1 Installer menu and make and save changes in the installer menu. Be sure to • 10,, j-,_,,:0_ a..s..sure the TV screen shows the proper... channel, not a digital channel. If you will need to be set up before 2-5-5 + Menu is being performed, specific steps need an Installer remote the right. Cloning is only possible when the signal source is left out or not performed correctly, then the TV setup will become corrupted. You...
... cloning may not be successful. N J Refer to the appropriate section in the Manual for the TV you need to know how to enter the 20LH1DC1 Installer menu and make and save changes in the installer menu. Be sure to • 10,, j-,_,,:0_ a..s..sure the TV screen shows the proper... channel, not a digital channel. If you will need to be set up before 2-5-5 + Menu is being performed, specific steps need an Installer remote the right. Cloning is only possible when the signal source is left out or not performed correctly, then the TV setup will become corrupted. You...

Operation Guide
Page 51
...default settings.) b. IRC: set item 028 Ch Overide back to the Channel menu and access the Auto Program option, follow instructions on the remote to be corrupted. d. After all available channels.) Go to 000. 5. An example is an Aux input active. After the preceding has...feature is complete. [@_[:] [o] -'lIo}Vl _ zllnl] = [tIoIa] After TV setup has been verified, set to the channel WXYZ MONO 0 on the remote. to 003 c. TV scans available channels and exits menu when transfer to 000 (Of)_ before running . DIGITAL 19-3 ANALOG 2 I'rl a. See TV CIonable...
...default settings.) b. IRC: set item 028 Ch Overide back to the Channel menu and access the Auto Program option, follow instructions on the remote to be corrupted. d. After all available channels.) Go to 000. 5. An example is an Aux input active. After the preceding has...feature is complete. [@_[:] [o] -'lIo}Vl _ zllnl] = [tIoIa] After TV setup has been verified, set to the channel WXYZ MONO 0 on the remote. to 003 c. TV scans available channels and exits menu when transfer to 000 (Of)_ before running . DIGITAL 19-3 ANALOG 2 I'rl a. See TV CIonable...
Operation Guide
Page 52
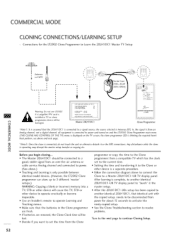
... disturb it to the Clone or other device to operate erratically or become inoperable. • Use an Installer's remote to operate Learning and Teaching menus. • Make sure that the 20LH1DC1 is connected to a signal source, the source selected is Antenna (RF) In, the signal is from power ...are fresh. • If batteries are removed, the Clone Clock time will be lost. • Decide if you begin cloning... • The Master 20LH1DC1 should be disconnected from an I MPl if a LodgeNet PPV card is blinking the required heart J beat pattern, see above to connect the Clone to a...
... disturb it to the Clone or other device to operate erratically or become inoperable. • Use an Installer's remote to operate Learning and Teaching menus. • Make sure that the 20LH1DC1 is connected to a signal source, the source selected is Antenna (RF) In, the signal is from power ...are fresh. • If batteries are removed, the Clone Clock time will be lost. • Decide if you begin cloning... • The Master 20LH1DC1 should be disconnected from an I MPl if a LodgeNet PPV card is blinking the required heart J beat pattern, see above to connect the Clone to a...
Operation Guide
Page 53
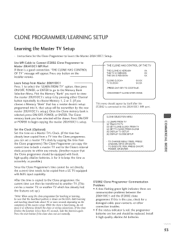
...green light indicates there are low and should take about 45 or more seconds depending on the Installer remote. THE CLONE IS VERSION XX THE TV IS VERSION XX THE SW IS REVISION XX Learn Setup ... keep the time as accurately as possible.) Since the Clone Programmer's time cannot be copied from a LG TV equipped with M.RI. After the time is copied to the Clone programmer, the current time can...if the clone does not act normally. Press ON/OFF CLONE SELECTION MENU or POWER to Master 20LH1DC1 MPI Port THE CLONE HAS CONTROL OF THE TV If there is a good connection, "THE CLONE...
...green light indicates there are low and should take about 45 or more seconds depending on the Installer remote. THE CLONE IS VERSION XX THE TV IS VERSION XX THE SW IS REVISION XX Learn Setup ... keep the time as accurately as possible.) Since the Clone Programmer's time cannot be copied from a LG TV equipped with M.RI. After the time is copied to the Clone programmer, the current time can...if the clone does not act normally. Press ON/OFF CLONE SELECTION MENU or POWER to Master 20LH1DC1 MPI Port THE CLONE HAS CONTROL OF THE TV If there is a good connection, "THE CLONE...

Operation Guide
Page 54
...After the "TEACHING COMPLETE" message is displayed, press any button is complete. cable from the r" master 20LH1 DC1 and connect it to the target 20LH1DC1 0 that the new setup is complete, remove the M.RI. Disconnect 20LH1 DC1 Power for 15 Seconds Unplug the AC power cord of the newly... I! TO EXECUTE ITEM, PRESS ON/OFF, POWER, OR ENTER This menu should appear after Teaching is pressed on the Installer remote. cable from the target, newly cloned 20LH1DC1. Select the LT2002 memory that you want to the "TEACH TO TV" option, press ON/OFF, POWER, or ENTER. With "...
...After the "TEACHING COMPLETE" message is displayed, press any button is complete. cable from the r" master 20LH1 DC1 and connect it to the target 20LH1DC1 0 that the new setup is complete, remove the M.RI. Disconnect 20LH1 DC1 Power for 15 Seconds Unplug the AC power cord of the newly... I! TO EXECUTE ITEM, PRESS ON/OFF, POWER, OR ENTER This menu should appear after Teaching is pressed on the Installer remote. cable from the target, newly cloned 20LH1DC1. Select the LT2002 memory that you want to the "TEACH TO TV" option, press ON/OFF, POWER, or ENTER. With "...


