Operation Guide
Page 3
... by the patient. 2. When used if the cord is the disconnecting device. Main plug is approved by removing dust with liquids, such as vases, shall not be used outside of U.S., other power supply cords may be placed on a wall. OBSERVING THE SIMPLE PRECAUTIONS DISCUSSED IN THIS MANUAL CAN HELP YOU GET MANY YEARS OF ENJOYMENT AND SAFE OPERATION THAT ARE BUILT INTO...
... by the patient. 2. When used if the cord is the disconnecting device. Main plug is approved by removing dust with liquids, such as vases, shall not be used outside of U.S., other power supply cords may be placed on a wall. OBSERVING THE SIMPLE PRECAUTIONS DISCUSSED IN THIS MANUAL CAN HELP YOU GET MANY YEARS OF ENJOYMENT AND SAFE OPERATION THAT ARE BUILT INTO...

Operation Guide
Page 5
...Deactivation Time Settings 29 Auto Off 30 Set Password & Lock System 31 Movie & TV Ratings 33 Caption / Text 37 Preset Sound Settings 39 Sound Setting Adjustment-user Mode ...... 39 Sound Balance Setup 40 Automatic Volume Control Settings ........ 40 Analog Audio Settings 41 Digital Audio Language 41 Using External Speakers 42 Menu Language 42 Menu Transparency Settings 43 Set ID 43 Preset Picture Settings 44 Screen Format Adjustments 4S Noise Reduction 46 Film Mode Options 46 Managing the Channel Banks 47 Installer Overview...
...Deactivation Time Settings 29 Auto Off 30 Set Password & Lock System 31 Movie & TV Ratings 33 Caption / Text 37 Preset Sound Settings 39 Sound Setting Adjustment-user Mode ...... 39 Sound Balance Setup 40 Automatic Volume Control Settings ........ 40 Analog Audio Settings 41 Digital Audio Language 41 Using External Speakers 42 Menu Language 42 Menu Transparency Settings 43 Set ID 43 Preset Picture Settings 44 Screen Format Adjustments 4S Noise Reduction 46 Film Mode Options 46 Managing the Channel Banks 47 Installer Overview...

Operation Guide
Page 6
The installer remote allows access to duplicate a TV's setup and install it on the Setup menu. both are included with the TV. • However, both the User and Installer remotes can be purchased separately, see your LG dealer. The LT2002 Quickset II Clone Programmer is missing, please contact the dealer where you purchased the product. m © z Owner's Manual Power Cord CD Manual User Remote Control. The installer remote has Menu, Select, and Adjust Keys...
The installer remote allows access to duplicate a TV's setup and install it on the Setup menu. both are included with the TV. • However, both the User and Installer remotes can be purchased separately, see your LG dealer. The LT2002 Quickset II Clone Programmer is missing, please contact the dealer where you purchased the product. m © z Owner's Manual Power Cord CD Manual User Remote Control. The installer remote has Menu, Select, and Adjust Keys...
Operation Guide
Page 11
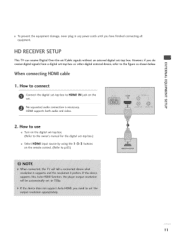
... use Turn on the remote control. (Refer to the figure as shown below. However, if you have finished connecting all equipment. m -4 c No separated audio connection is necessary. -O HDMI supports both audio and video. . rT1 x -4 rT1 _o When connecting HDM[ cable z m _D 1. To prevent the equipment damage, never plug in any power cords until you do receive digital signals from a digital set -top box.) Select HDMI input source by using the 1 -3-3 buttons on the digital set-top box. (Refer to the owner's manual...
... use Turn on the remote control. (Refer to the figure as shown below. However, if you have finished connecting all equipment. m -4 c No separated audio connection is necessary. -O HDMI supports both audio and video. . rT1 x -4 rT1 _o When connecting HDM[ cable z m _D 1. To prevent the equipment damage, never plug in any power cords until you do receive digital signals from a digital set -top box.) Select HDMI input source by using the 1 -3-3 buttons on the digital set-top box. (Refer to the owner's manual...
Operation Guide
Page 12
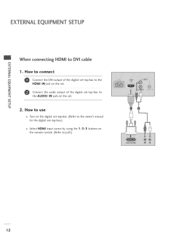
m -4 C • How to use Turn on the digital set-top box. (Refer to -4 the AUDIO IN jack on the remote control. (Refer to connect r-- m Connect the DVI output of the digital set-top box to the owner's manual for the digital set . EXTERNALEQUIPMENT SETUP When connecting HDMi to DVi cable m x -4 m _o z • How to p.6S) 12 mO m z t_ Connect the audio output of the digital set-top box to the _D c HDMI IN jack on the set -top box.) Select HDMI input source by using the 1 -3-3 buttons on the set.
m -4 C • How to use Turn on the digital set-top box. (Refer to -4 the AUDIO IN jack on the remote control. (Refer to connect r-- m Connect the DVI output of the digital set-top box to the owner's manual for the digital set . EXTERNALEQUIPMENT SETUP When connecting HDMi to DVi cable m x -4 m _o z • How to p.6S) 12 mO m z t_ Connect the audio output of the digital set-top box to the _D c HDMI IN jack on the set -top box.) Select HDMI input source by using the 1 -3-3 buttons on the set.

Operation Guide
Page 18
... set to the Pillow Speaker position, Auto Volume will be heard from the AC power line and earth ground. (Opto-isolators isolate the control lines, and a transformer isolates the audio. External Channel Down switch. Isolated audio output. How to this 6-pin jack. Nominal 14-ohm source impedance with a low-impedance pad-type volume control. All lines are no sound will be grayed out and not accessible on the rear panel...
... set to the Pillow Speaker position, Auto Volume will be heard from the AC power line and earth ground. (Opto-isolators isolate the control lines, and a transformer isolates the audio. External Channel Down switch. Isolated audio output. How to this 6-pin jack. Nominal 14-ohm source impedance with a low-impedance pad-type volume control. All lines are no sound will be grayed out and not accessible on the rear panel...

Operation Guide
Page 19
... to view DTV program information. CC (Closed Captioning) N Press to display current program information. -4 N "1" Increase or decrease sound level. POWER Turns TV On or Off. Z INFO C_ Press to access closed captions. -1- Select available channels. Use to go to select a Channel Memory Bank - - 1,2, 3, or 4 (Standby). Change the audio language in DTV mode. [-] BUTTON When selecting a digital broadcast channel, key in the TV's Installer Menu. Determines the code set V-Chip blocks to restrict both analog and digital programming. • Aux Channel...
... to view DTV program information. CC (Closed Captioning) N Press to display current program information. -4 N "1" Increase or decrease sound level. POWER Turns TV On or Off. Z INFO C_ Press to access closed captions. -1- Select available channels. Use to go to select a Channel Memory Bank - - 1,2, 3, or 4 (Standby). Change the audio language in DTV mode. [-] BUTTON When selecting a digital broadcast channel, key in the TV's Installer Menu. Determines the code set V-Chip blocks to restrict both analog and digital programming. • Aux Channel...

Operation Guide
Page 20
... or decrease sound level. Analog channels do . Optional Installer Remote Control ALARM Use to go to display current program information. INFO Press to the Alarm menu. BED 1/BED 2 (*See Note Below) Determines the code set V-Chip blocks to item 2Z HOSPITAL MODE setting in DTV mode. NUUseMBfoEr RdireBcUt TTcOhaNnSnel entry. WATCHING TV/CHANNEL CONTROL INSTALLERREMOTE CONTROL BUTTON FUNCTIONS A brief list of the TV as a source). Change the audio Z language in the TV's Installer Menu. 20 POWER Turns TV On...
... or decrease sound level. Analog channels do . Optional Installer Remote Control ALARM Use to go to display current program information. INFO Press to the Alarm menu. BED 1/BED 2 (*See Note Below) Determines the code set V-Chip blocks to item 2Z HOSPITAL MODE setting in DTV mode. NUUseMBfoEr RdireBcUt TTcOhaNnSnel entry. WATCHING TV/CHANNEL CONTROL INSTALLERREMOTE CONTROL BUTTON FUNCTIONS A brief list of the TV as a source). Change the audio Z language in the TV's Installer Menu. 20 POWER Turns TV On...

Operation Guide
Page 26
... I_ buttons to set the year, month, day, hours and minutes. -4 rT1 rT1 -4 -4 Press the MENU button and then use the ADJ • or • button to highlight Manual and press the OK (Enter) button. On-Off Timers Setup Set the On-Off Timers using the procedures described above. 26 Press the OK (Enter) button to remove the menus. If manual is selected, on the menu next...
... I_ buttons to set the year, month, day, hours and minutes. -4 rT1 rT1 -4 -4 Press the MENU button and then use the ADJ • or • button to highlight Manual and press the OK (Enter) button. On-Off Timers Setup Set the On-Off Timers using the procedures described above. 26 Press the OK (Enter) button to remove the menus. If manual is selected, on the menu next...
Operation Guide
Page 47
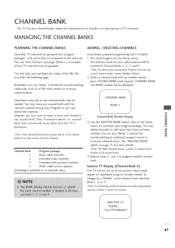
... prepared programming chart is 3. CHANNEL BANK Sometimes, only one or two channel banks may be grouped. or, you have not been > entered. menu) to customize your packages by using an installer remote to change to the end user. Inactive TV Display (Channel Bank 4) The TV can also "Blank" a channel for accommodating audio-only, such as an example only.) option on your cable/antenna will be...
... prepared programming chart is 3. CHANNEL BANK Sometimes, only one or two channel banks may be grouped. or, you have not been > entered. menu) to customize your packages by using an installer remote to change to the end user. Inactive TV Display (Channel Bank 4) The TV can also "Blank" a channel for accommodating audio-only, such as an example only.) option on your cable/antenna will be...

Operation Guide
Page 51
... channel scan. a _ Zl _'-;][_,1 [i]oIo] - DIGITAL 19-3 ANALOG 2 I :_.'I_ll71.'Id_ [l[0)[( (See Picture, Sound, Setup menus etc. Do this point, verify that affect your requirements. If the Aux sources will appear between the highest Analog and lowest Digital channel number with digital captions. Transfer TV Setup to readily know what common networks are found in I'rl Channel Label option, follow on-screen instructions. COMMERCIAL MODE SETUP This page provides an overview of the screen. 2-5-4 + Menu...
... channel scan. a _ Zl _'-;][_,1 [i]oIo] - DIGITAL 19-3 ANALOG 2 I :_.'I_ll71.'Id_ [l[0)[( (See Picture, Sound, Setup menus etc. Do this point, verify that affect your requirements. If the Aux sources will appear between the highest Analog and lowest Digital channel number with digital captions. Transfer TV Setup to readily know what common networks are found in I'rl Channel Label option, follow on-screen instructions. COMMERCIAL MODE SETUP This page provides an overview of the screen. 2-5-4 + Menu...
Operation Guide
Page 52
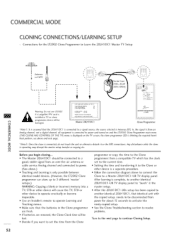
...; See the Clone Troubleshooting section to resolve problems. Turn to the next page to power and turned on and the LT2002 Clone Programmer main menu N (THE CLONE HAS CONTROL OF THE TV) menu is displayed on the TV screen, the clone programmer LED is blinking the required heart J beat pattern, see above to connect the Clone to a Master 20LH1 DC1-UB TV display panel. After learning...
...; See the Clone Troubleshooting section to resolve problems. Turn to the next page to power and turned on and the LT2002 Clone Programmer main menu N (THE CLONE HAS CONTROL OF THE TV) menu is displayed on the TV screen, the clone programmer LED is blinking the required heart J beat pattern, see above to connect the Clone to a Master 20LH1 DC1-UB TV display panel. After learning...
Operation Guide
Page 55
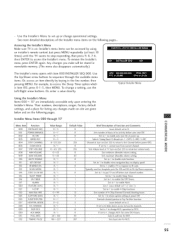
...Leave default set to enable V-Chip functions. 022 MAX BLK HRS 0 ~ 99 12 025 CAPTION LOCK 0/ 1 0 025 FUNCTION PRE. 0~1 1 027 HOSPITAL MODE 0 ~2 2 Sets number of V-Chip (Parental Control) blocking hours. To change operational settings. Typical Installer Menu Using the Installer's Menu Items 000 ~ 117 are given below start channel number. 015 SLEEP TIMER 0/ 1 1 016 EN TIMER 0/ 1 1 017 ALARM 0/ 1 1 Set to 1 to change M.RI. Installer Menu Items OOO through the available menu items. Or, access an item directly by using an installer's remote control. Set...
...Leave default set to enable V-Chip functions. 022 MAX BLK HRS 0 ~ 99 12 025 CAPTION LOCK 0/ 1 0 025 FUNCTION PRE. 0~1 1 027 HOSPITAL MODE 0 ~2 2 Sets number of V-Chip (Parental Control) blocking hours. To change operational settings. Typical Installer Menu Using the Installer's Menu Items 000 ~ 117 are given below start channel number. 015 SLEEP TIMER 0/ 1 1 016 EN TIMER 0/ 1 1 017 ALARM 0/ 1 1 Set to 1 to change M.RI. Installer Menu Items OOO through the available menu items. Or, access an item directly by using an installer's remote control. Set...

Operation Guide
Page 56
.... Set to disable Channel-Time display. Not O, sets Minor channel number. 0 106 ASP RATIO LOCK 0/ 1 0 To retain set to enable custom color for M.RI. Set to 1 to 1. Chooses custom foreground color for NTSC. COMMERCIAL MODE INSTALLERMENU - Installer Menu Items 055 through 117 Menu Item Function Value Range Default Value Brief Description of M.RI. Set to 0 to disable. 039 REAR AUX EN 0/ 1 046 STRT AUX SRCE 1 ~ 3,255 047 AUX STATUS 0/ 1 1 Set to 1 to enable display panel Video 1 input...
.... Set to disable Channel-Time display. Not O, sets Minor channel number. 0 106 ASP RATIO LOCK 0/ 1 0 To retain set to enable custom color for M.RI. Set to 1 to 1. Chooses custom foreground color for NTSC. COMMERCIAL MODE INSTALLERMENU - Installer Menu Items 055 through 117 Menu Item Function Value Range Default Value Brief Description of M.RI. Set to 0 to disable. 039 REAR AUX EN 0/ 1 046 STRT AUX SRCE 1 ~ 3,255 047 AUX STATUS 0/ 1 1 Set to 1 to enable display panel Video 1 input...
Operation Guide
Page 58
... (Parental Control); FUNCTION PRE. (Function Preview) SCAN MODE C ha ra cteristics Set to 0 to suppress CHANNEL PREVIEW from the 0 Channel up /down keys change FUNCTION menu with systems from On Command Corpora tion. CH. order to use Timers.) (Continued on every 20LH1DC1. *Note: The maximum volume level cannot have it available to end user to filter and control or otherwise restrict programming content that are accessible, while...
... (Parental Control); FUNCTION PRE. (Function Preview) SCAN MODE C ha ra cteristics Set to 0 to suppress CHANNEL PREVIEW from the 0 Channel up /down keys change FUNCTION menu with systems from On Command Corpora tion. CH. order to use Timers.) (Continued on every 20LH1DC1. *Note: The maximum volume level cannot have it available to end user to filter and control or otherwise restrict programming content that are accessible, while...

Operation Guide
Page 59
... at default setting unless changed by M.RI. command. *Note: Not linked to Color Chart. 0 = Black 1 = Red 3 = Yellow 6 = Cyan 4 = Blue 7 = White 2 = Green 5 = Violet 051 - EN. When set to 1 to 17 I ) x 1) sec 2 055 - for time required to have TV turn off to enable display panel rear AUX (Video 1) available in memory. REAR AUX EN. (Rear Aux Enable) directly accessing a channel not in the channel scan list Set to 1 to be reported as a 0 = disable channel number instead of Installer Menu Items...
... at default setting unless changed by M.RI. command. *Note: Not linked to Color Chart. 0 = Black 1 = Red 3 = Yellow 6 = Cyan 4 = Blue 7 = White 2 = Green 5 = Violet 051 - EN. When set to 1 to 17 I ) x 1) sec 2 055 - for time required to have TV turn off to enable display panel rear AUX (Video 1) available in memory. REAR AUX EN. (Rear Aux Enable) directly accessing a channel not in the channel scan list Set to 1 to be reported as a 0 = disable channel number instead of Installer Menu Items...
Operation Guide
Page 63
... one time. 0 accessing installer menu item 117 FACT DEFAULT, set the tuning band at the indicated times to 1 and press "ENTER". N J input active. 1. The value will also need to include the Free-To-Guest Channels only. 5. With menu displayed, back to the 20LH1DC1. Within the Installer menu, set the clonable • Did you adjust all have problems. As the cloning procedure is important to do 2-5-5 + MENU once. Exit the Installer menu. •...
... one time. 0 accessing installer menu item 117 FACT DEFAULT, set the tuning band at the indicated times to 1 and press "ENTER". N J input active. 1. The value will also need to include the Free-To-Guest Channels only. 5. With menu displayed, back to the 20LH1DC1. Within the Installer menu, set the clonable • Did you adjust all have problems. As the cloning procedure is important to do 2-5-5 + MENU once. Exit the Installer menu. •...

Operation Guide
Page 66
... Auto Program, Channel List, Clock, etc. *Note: 2-5-4 + MENU can be done more than once. @ After Auto Program and Channel List, etc. device. @ Try another channel. If it is available, redo channel scan. Display Panel Picture 66 @ Connect Antenna/Cable signal source to 20LH1 DC1. ® Check connections on the TV screen. -o -o z X @ See troubleshooting flow chart. cable to internal TV controller. press 2-5-5 + MENU to transfer channels and TV setup to M.RI. APPENDIX TROUBLESHOOTING Some quick and easy tips to resolving problems Software Problems ® Remove power cord...
... Auto Program, Channel List, Clock, etc. *Note: 2-5-4 + MENU can be done more than once. @ After Auto Program and Channel List, etc. device. @ Try another channel. If it is available, redo channel scan. Display Panel Picture 66 @ Connect Antenna/Cable signal source to 20LH1 DC1. ® Check connections on the TV screen. -o -o z X @ See troubleshooting flow chart. cable to internal TV controller. press 2-5-5 + MENU to transfer channels and TV setup to M.RI. APPENDIX TROUBLESHOOTING Some quick and easy tips to resolving problems Software Problems ® Remove power cord...

Operation Guide
Page 68
... a limited screen display capability. x ÷ 20LH1DC1 must be damaged. PLEASE READ THE FOLLOWING... Monitor LED on the quick setup sheet supplied with TVs con-raining the 221-01006 and later processors. Use with 20LH1DC1. Transferring the master TV setup to disconnect power from the target TV for clone to work. @ Install 4 fresh AA high-quality alkaline batteries. @ Connect 20LH1DC1 to a reliable Analog channel signal source. @ Set time on a TV, copy time to Clone...
... a limited screen display capability. x ÷ 20LH1DC1 must be damaged. PLEASE READ THE FOLLOWING... Monitor LED on the quick setup sheet supplied with TVs con-raining the 221-01006 and later processors. Use with 20LH1DC1. Transferring the master TV setup to disconnect power from the target TV for clone to work. @ Install 4 fresh AA high-quality alkaline batteries. @ Connect 20LH1DC1 to a reliable Analog channel signal source. @ Set time on a TV, copy time to Clone...

Operation Guide
Page 72
... transporting three-color video signals. RGB (Red, Green, Blue) Connection input or output port available for producing a video image using three separate colors: Red, Green, and Blue. 2ND AUDIO PROGRAMMING/SAP Second Audio Programming (SAP) is one speaker, all the speakers play the same audio. They are used for stereo playback of videocassettes and for higher quality picture and sound from a TV, VCR, DVD Player or other Audio/Video device. HDMI High-definition multimedia interface. HDSTB High-definition set top box. INPUT Refers...
... transporting three-color video signals. RGB (Red, Green, Blue) Connection input or output port available for producing a video image using three separate colors: Red, Green, and Blue. 2ND AUDIO PROGRAMMING/SAP Second Audio Programming (SAP) is one speaker, all the speakers play the same audio. They are used for stereo playback of videocassettes and for higher quality picture and sound from a TV, VCR, DVD Player or other Audio/Video device. HDMI High-definition multimedia interface. HDSTB High-definition set top box. INPUT Refers...


