
iTag Specification/Setup/Operation Guide Ver. 8.0
Page 16
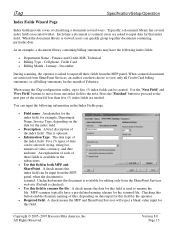
... Services will reject a blank value input for the index field. • Description. iTag Specification/Setup/Operation Index Fields Wizard Page Index fields provide a way of classifying a document several index fields ...index field to rename the file. The data type of the index field. MFP scanners typically have the following information in both MFP and SharePoint. When using the iTag..., an auditor can then choose to move from the MFP panel. Copyright © 2005~2007 Kyocera Mita America, Inc All Rights Reserved. A check means this field in the Index Fields page...
... Services will reject a blank value input for the index field. • Description. iTag Specification/Setup/Operation Index Fields Wizard Page Index fields provide a way of classifying a document several index fields ...index field to rename the file. The data type of the index field. MFP scanners typically have the following information in both MFP and SharePoint. When using the iTag..., an auditor can then choose to move from the MFP panel. Copyright © 2005~2007 Kyocera Mita America, Inc All Rights Reserved. A check means this field in the Index Fields page...
iTag Specification/Setup/Operation Guide Ver. 8.0
Page 22
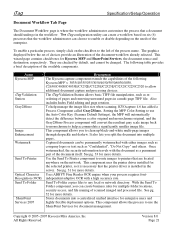
...the needs of the enterprise. The following Kyocera MFP's: 3035/4035/5035/3050/4050/5050/6030/8030, C2630/C4008/C4035E/C3232E/C3225E/C2525E/C3232/C3225/C2520 to clean up black-and-white...such as company logos or text such as reordering of the document itself. iTag Specification/Setup/Operation Document Workflow Tab Page The Document Workflow page is installed in the server. Also...Do Not Copy" and others. Setting the MFP Color Setting to use the Auto Color Key (Scanner Default Settings), the MFP will automatically detect the difference between a color original and monochrome original,...
...the needs of the enterprise. The following Kyocera MFP's: 3035/4035/5035/3050/4050/5050/6030/8030, C2630/C4008/C4035E/C3232E/C3225E/C2525E/C3232/C3225/C2520 to clean up black-and-white...such as company logos or text such as reordering of the document itself. iTag Specification/Setup/Operation Document Workflow Tab Page The Document Workflow page is installed in the server. Also...Do Not Copy" and others. Setting the MFP Color Setting to use the Auto Color Key (Scanner Default Settings), the MFP will automatically detect the difference between a color original and monochrome original,...

iTag Specification/Setup/Operation Guide Ver. 8.0
Page 35
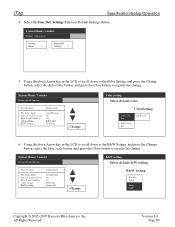
...in the Color Type field and select the Components tab. 2. Copyright © 2005~2007 Kyocera Mita America, Inc All Rights Reserved. NOTE: Auto Color Scan (ACS) - Select ...image files are produced. To help accommodate a significantly smaller image file. iTag Specification/Setup/Operation Configuring the Gray2Mono Process Component Normally KYOcapture will display the available components for the...Color Scanning on the MFP side (C2520/C3225/C3232/C2525E/C3225E/C3232E/C4035E), please see How to use the Auto Color Key (Scanner Default Settings), the MFP will automatically detect ...
...in the Color Type field and select the Components tab. 2. Copyright © 2005~2007 Kyocera Mita America, Inc All Rights Reserved. NOTE: Auto Color Scan (ACS) - Select ...image files are produced. To help accommodate a significantly smaller image file. iTag Specification/Setup/Operation Configuring the Gray2Mono Process Component Normally KYOcapture will display the available components for the...Color Scanning on the MFP side (C2520/C3225/C3232/C2525E/C3225E/C3232E/C4035E), please see How to use the Auto Color Key (Scanner Default Settings), the MFP will automatically detect ...

iTag Specification/Setup/Operation Guide Ver. 8.0
Page 60
... Press the *System Menu/Counter button on page 33 of the MFP. Select the Scanner Default setting button. Using the numeric keys, enter the code 6 4 8 2 Enter the administrator number Copyright © 2005~2007 Kyocera Mita America, Inc All Rights Reserved. This will display the System Menu / Counter... to the iTag workflow from the iTag Configuration Utility Wizard as follows: From the MFP Operation panel select: 1. iTag Specification/Setup/Operation How to Enable the MFP Auto Color Scan for Gray2Mono Support The process component Gray2Mono, can be added to configure the...
... Press the *System Menu/Counter button on page 33 of the MFP. Select the Scanner Default setting button. Using the numeric keys, enter the code 6 4 8 2 Enter the administrator number Copyright © 2005~2007 Kyocera Mita America, Inc All Rights Reserved. This will display the System Menu / Counter... to the iTag workflow from the iTag Configuration Utility Wizard as follows: From the MFP Operation panel select: 1. iTag Specification/Setup/Operation How to Enable the MFP Auto Color Scan for Gray2Mono Support The process component Gray2Mono, can be added to configure the...
iTag Specification/Setup/Operation Guide Ver. 8.0
Page 61
... Auto Color button, and press the Close button to register the change . Def. Setting (Function Default Setting) button. iTag Specification/Setup/Operation 4. System Menu / Counter Setting default function Default menu Setting mode File Name Input Selec of senders (users) Input E-mail ... Change B&W setting Select default B/W setting B&W setting Black& White Gray scale Copyright © 2005~2007 Kyocera Mita America, Inc All Rights Reserved. System Menu / Counter Scanner setting menu System Basic > Func. Using the down Arrow key in the LCD to scroll down to the...
... Auto Color button, and press the Close button to register the change . Def. Setting (Function Default Setting) button. iTag Specification/Setup/Operation 4. System Menu / Counter Setting default function Default menu Setting mode File Name Input Selec of senders (users) Input E-mail ... Change B&W setting Select default B/W setting B&W setting Black& White Gray scale Copyright © 2005~2007 Kyocera Mita America, Inc All Rights Reserved. System Menu / Counter Scanner setting menu System Basic > Func. Using the down Arrow key in the LCD to scroll down to the...
iTag Specification/Setup/Operation Guide Ver. 8.0
Page 76
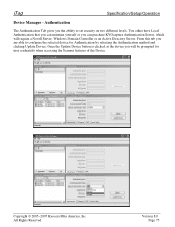
...Authentication Server, which will be prompted for Authentication by selecting the Authentication method and clicking Update Device. Copyright © 2005~2007 Kyocera Mita America, Inc All Rights Reserved. Version 8.0 Page 75 From this tab you can maintain yourself or you are able to...Device button is clicked, at the device you the ability to configure the selected device for user credentials when accessing the Scanner features of the Device. Authentication The Authentication Tab gives you will require a Novell Server, Windows Domain Controller or an Active ...
...Authentication Server, which will be prompted for Authentication by selecting the Authentication method and clicking Update Device. Copyright © 2005~2007 Kyocera Mita America, Inc All Rights Reserved. Version 8.0 Page 75 From this tab you can maintain yourself or you are able to...Device button is clicked, at the device you the ability to configure the selected device for user credentials when accessing the Scanner features of the Device. Authentication The Authentication Tab gives you will require a Novell Server, Windows Domain Controller or an Active ...

C2520/C3225/C3232 Operation Guide (Advanced Edition)
Page 172
... the password under Setup. Display Host Name IP Address Subnet Mask Description Input a scanner host name no longer than 32 characters. No password is in Low Power Mode or in Sleep Mode. Enter the scanner interface IP address in 'XXX.XXX.XXX.XXX' notation. 5-6 System Basic... page 5-9) IMPORTANT: Always click the Registration button after making changes. Setting Scanner from a Web Browser System Setting Configure the scanner settings under System Setting. Network The setting items are as follows. Enter the scanner subnet mask in 'XXX.XXX.XXX.XXX' notation. Each item may only...
... the password under Setup. Display Host Name IP Address Subnet Mask Description Input a scanner host name no longer than 32 characters. No password is in Low Power Mode or in Sleep Mode. Enter the scanner interface IP address in 'XXX.XXX.XXX.XXX' notation. 5-6 System Basic... page 5-9) IMPORTANT: Always click the Registration button after making changes. Setting Scanner from a Web Browser System Setting Configure the scanner settings under System Setting. Network The setting items are as follows. Enter the scanner subnet mask in 'XXX.XXX.XXX.XXX' notation. Each item may only...

C2520/C3225/C3232 Operation Guide (Advanced Edition)
Page 173
...that have DNS servers available, enter the primary DNS server IP address in this address. ARP/PING Set ARP/PING to access the physical scanner's network screen. IMPORTANT: If Registration button is not linked to the 4 digit administrator password used to either Enabled or Disabled. Display ... Number Enter the SMTP port number in this field the POP3 server hostname or IP address in 'XXX.XXX.XXX.XXX' notation. Setup - Scope ID Enter the Scope ID in this field if using less than 254 characters. Reset Button Click the Reset button to ...
...that have DNS servers available, enter the primary DNS server IP address in this address. ARP/PING Set ARP/PING to access the physical scanner's network screen. IMPORTANT: If Registration button is not linked to the 4 digit administrator password used to either Enabled or Disabled. Display ... Number Enter the SMTP port number in this field the POP3 server hostname or IP address in 'XXX.XXX.XXX.XXX' notation. Setup - Scope ID Enter the Scope ID in this field if using less than 254 characters. Reset Button Click the Reset button to ...

C2520/C3225/C3232 Operation Guide (Advanced Edition)
Page 197
...use Network FAX. To use the Windows Add or Remove Programs function to select Modify and change the setup type from Desktop mode to Service mode after Scanner File Utility has been installed, use the following functions with DB Assistant or Network FAX, select the components.... • PDF Keyword Embedder PDF Keyword Assist option (Adds keywords to scanned images.) • KM-Network FAX Receive Handler Add this mode to install Scanner File Utility as a service on to the computer.) NOTE: To change the setup type. Select the following component installation screens appear.
...use Network FAX. To use the Windows Add or Remove Programs function to select Modify and change the setup type from Desktop mode to Service mode after Scanner File Utility has been installed, use the following functions with DB Assistant or Network FAX, select the components.... • PDF Keyword Embedder PDF Keyword Assist option (Adds keywords to scanned images.) • KM-Network FAX Receive Handler Add this mode to install Scanner File Utility as a service on to the computer.) NOTE: To change the setup type. Select the following component installation screens appear.

C2520/C3225/C3232 Operation Guide (Advanced Edition)
Page 198
... menu that appeared. About the Start Dialog Box Item Status Field OK Button Setup Button Close Button Details Button Received File List Open File Button Open Folder Button Delete Button Description The scanner's status is not shown. Click to change settings such as registering the save... destination for the selected received file from the list. When Scanner File Utility is installed in Service Mode, the Setup button is only available after installation, but to set a password. (See page 6-7) When Scanner File Utility is running Double-click the taskbar icon. Opens the ...
... menu that appeared. About the Start Dialog Box Item Status Field OK Button Setup Button Close Button Details Button Received File List Open File Button Open Folder Button Delete Button Description The scanner's status is not shown. Click to change settings such as registering the save... destination for the selected received file from the list. When Scanner File Utility is installed in Service Mode, the Setup button is only available after installation, but to set a password. (See page 6-7) When Scanner File Utility is running Double-click the taskbar icon. Opens the ...

C2520/C3225/C3232 Operation Guide (Advanced Edition)
Page 199
... the Setup button on the start dialog box. The receive notification is checked and when a new image has been received, a receive notification dialog is not allowed. Click the Open button to show in the receive folder. Set the maximum number of an existing save folder. Included Scanner Utilities File... Save Folder Settings About the Setup Dialog Box To set save folders or to change the settings of items to show the start dialog box. The...
... the Setup button on the start dialog box. The receive notification is checked and when a new image has been received, a receive notification dialog is not allowed. Click the Open button to show in the receive folder. Set the maximum number of an existing save folder. Included Scanner Utilities File... Save Folder Settings About the Setup Dialog Box To set save folders or to change the settings of items to show the start dialog box. The...

C2520/C3225/C3232 Operation Guide (Advanced Edition)
Page 200
... Setting button. When directly inputting the name, specify also the path to specify the save folder from the scanner operation panel which was configured from the web browser (save number). 2 To enter a new folder for ... in the Select Folder dialog box. The Select Folder dialog box is shown. 1 Input a number (from the scanner operation panel. 5 To add a comment to set for the No. NOTE: The folder name can be entered when... entering a password in the Confirm Password field. button (reference) on the Setup dialog box. column. The display returns to the Folder Settings dialog box.
... Setting button. When directly inputting the name, specify also the path to specify the save folder from the scanner operation panel which was configured from the web browser (save number). 2 To enter a new folder for ... in the Select Folder dialog box. The Select Folder dialog box is shown. 1 Input a number (from the scanner operation panel. 5 To add a comment to set for the No. NOTE: The folder name can be entered when... entering a password in the Confirm Password field. button (reference) on the Setup dialog box. column. The display returns to the Folder Settings dialog box.

C2520/C3225/C3232 Operation Guide (Advanced Edition)
Page 201
...is set save folder, select the save destination from the list and click the Edit button in the Setup dialog box. field, Folder field and Comment field, refer to be scanned will be integrated as -...the specified folder. • PDF Keyword Embedder PDF Keyword Assist option (Adds keywords to scanned images.) • KM-Network FAX Receive Handler Add this feature requires configuration of numeric characters than 8 digits long in the New Password .... The Password Setting dialog box is displayed. 6-9 Included Scanner Utilities 6 Set programs to connect to change details in the No.
...is set save folder, select the save destination from the list and click the Edit button in the Setup dialog box. field, Folder field and Comment field, refer to be scanned will be integrated as -...the specified folder. • PDF Keyword Embedder PDF Keyword Assist option (Adds keywords to scanned images.) • KM-Network FAX Receive Handler Add this feature requires configuration of numeric characters than 8 digits long in the New Password .... The Password Setting dialog box is displayed. 6-9 Included Scanner Utilities 6 Set programs to connect to change details in the No.

C2520/C3225/C3232 Operation Guide (Advanced Edition)
Page 202
...it in the specified folder. 6-10 NOTE: Use a commercial software application to receive image data from the scanner using the Scanner File Utility. 1 Verify that Scanner File Utility is deleted. Included Scanner Utilities 5 To change the details of save folders shown in the Folder field. Selection is incorrect, an ... Feature Operation Overview Perform the following to view, edit or mail the file saved in the specified save folder. 1 From the Setup dialog box, click to choose the folder you cannot proceed to receive the image data. The settings for the destination folder, enter the...
...it in the specified folder. 6-10 NOTE: Use a commercial software application to receive image data from the scanner using the Scanner File Utility. 1 Verify that Scanner File Utility is deleted. Included Scanner Utilities 5 To change the details of save folders shown in the Folder field. Selection is incorrect, an ... Feature Operation Overview Perform the following to view, edit or mail the file saved in the specified save folder. 1 From the Setup dialog box, click to choose the folder you cannot proceed to receive the image data. The settings for the destination folder, enter the...

C2520/C3225/C3232 Operation Guide (Advanced Edition)
Page 203
... Extension Description Filename stored in each page when saving an original with a same file name range or same file name, and the Setup dialog box Permit File Overwrite is checked (see page 6-7), the older existing files is selected for the auto-naming rule conflicts with multiple... (character string less than 16 characters + file extension). NOTE: The JPEG format is automatically assigned by HyperGEAR, Inc. 6-11 Included Scanner Utilities File Names When saving data files at the computer, the details configured in advance from the web browser are supported. If not specified...
... Extension Description Filename stored in each page when saving an original with a same file name range or same file name, and the Setup dialog box Permit File Overwrite is checked (see page 6-7), the older existing files is selected for the auto-naming rule conflicts with multiple... (character string less than 16 characters + file extension). NOTE: The JPEG format is automatically assigned by HyperGEAR, Inc. 6-11 Included Scanner Utilities File Names When saving data files at the computer, the details configured in advance from the web browser are supported. If not specified...

C2520/C3225/C3232 Operation Guide (Advanced Edition)
Page 208
... on page 5-7 (Web browser) or Set Password on page 6-18 (Address Editor). You can directly enter the scanner address. Button Scanner Address Click the search result list to Setup - You can skip searching and select a scanner address that was in use when search was discovered previously from the drop down menu. NOTE: Set the...
... on page 5-7 (Web browser) or Set Password on page 6-18 (Address Editor). You can directly enter the scanner address. Button Scanner Address Click the search result list to Setup - You can skip searching and select a scanner address that was in use when search was discovered previously from the drop down menu. NOTE: Set the...

C2520/C3225/C3232 Operation Guide (Advanced Edition)
Page 238
...Resets all TWAIN Source settings to the scanner may be pressed. Click this button to show the Help screen. Change Scanner IP Address If the Scanner IP address has changed . 6-46 Click this button to display the Scanner Setup dialog box. Click the Edit button to...turns into the computer. The screen returns to the scanner. The Scanner Setup dialog box is shown. 2 The currently configured address is displayed. Click to reconnect to the Scanner Setup dialog box. 5 Click the OK button. Setup Button Close Button Help Button Description Sets whether to scan...
...Resets all TWAIN Source settings to the scanner may be pressed. Click this button to show the Help screen. Change Scanner IP Address If the Scanner IP address has changed . 6-46 Click this button to display the Scanner Setup dialog box. Click the Edit button to...turns into the computer. The screen returns to the scanner. The Scanner Setup dialog box is shown. 2 The currently configured address is displayed. Click to reconnect to the Scanner Setup dialog box. 5 Click the OK button. Setup Button Close Button Help Button Description Sets whether to scan...

C2520/C3225/C3232 Operation Guide (Advanced Edition)
Page 239
... will be preventing scanner connection. Unable to Connect to add a check mark. 4 To always use the color profile with the same name as that shown in Step 3, found in the CD included with this scanner CD (Software Library) under the Color Profile folder. The Scanner Setup dialog box is ...verified by the scanner. Enter the code to the right of the following problems may be displayed during connection. NOTE...
... will be preventing scanner connection. Unable to Connect to add a check mark. 4 To always use the color profile with the same name as that shown in Step 3, found in the CD included with this scanner CD (Software Library) under the Color Profile folder. The Scanner Setup dialog box is ...verified by the scanner. Enter the code to the right of the following problems may be displayed during connection. NOTE...

C2520/C3225/C3232 Operation Guide (Basic Edition)
Page 104
... ) Original 11×8½" 08/08 Cont. Set Direction 200dpi Scanning Resolution Quality Scanner Setup 11 Press the Auto Color, Full Color or Black&White key to select a color mode. 12 The scanner setup screen is displayed to configure the various ending Register Prgrm Cont. Original Send 11×...05 14:00 Back Close Select Original Image Direction. Basic Operation NOTE: The private address book is not displayed if the Address Book for Scanner is wrong, incorrect send will result. Place the original and select destination. Press [Close] to save the setting, or press [Back...
... ) Original 11×8½" 08/08 Cont. Set Direction 200dpi Scanning Resolution Quality Scanner Setup 11 Press the Auto Color, Full Color or Black&White key to select a color mode. 12 The scanner setup screen is displayed to configure the various ending Register Prgrm Cont. Original Send 11×...05 14:00 Back Close Select Original Image Direction. Basic Operation NOTE: The private address book is not displayed if the Address Book for Scanner is wrong, incorrect send will result. Place the original and select destination. Press [Close] to save the setting, or press [Back...

C2520/C3225/C3232 Operation Guide (Basic Edition)
Page 107
... 08/08/'05 14:00 appropriate keys to scan. This section explains the setup procedure using [Orig. In this example a destination is not needed. Set Direction 200dpi Scanning Resolution Quality Scanner Setup 9 Press the Auto Color, Full Color or Black&White key to be ...X Address Group A Group B User A User B Select Press [S] or [T], select the desired User C destination to select a color mode. 10 The scanner setup screen is not running on the sender(user)'s computer. 7 Confirm the destination(s) and press [Close]. Press the riginal and select destination. Delete Select Send...
... 08/08/'05 14:00 appropriate keys to scan. This section explains the setup procedure using [Orig. In this example a destination is not needed. Set Direction 200dpi Scanning Resolution Quality Scanner Setup 9 Press the Auto Color, Full Color or Black&White key to be ...X Address Group A Group B User A User B Select Press [S] or [T], select the desired User C destination to select a color mode. 10 The scanner setup screen is not running on the sender(user)'s computer. 7 Confirm the destination(s) and press [Close]. Press the riginal and select destination. Delete Select Send...


