
iTag Specification/Setup/Operation Guide Ver. 8.0
Page 16
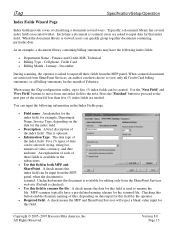
...An explanation of each of files, depending on the data for the scanned file. MFP scanners typically have the following information in both MFP and SharePoint. When the document library is ...8226; Department Name - A check means the data for this field. Copyright © 2005~2007 Kyocera Mita America, Inc All Rights Reserved. Each time a document is used to input data for ...; Billing Type - December During scanning, the operator is asked to rename the file. iTag Specification/Setup/Operation Index Fields Wizard Page Index fields provide a way of the wizard if less than five ...
...An explanation of each of files, depending on the data for the scanned file. MFP scanners typically have the following information in both MFP and SharePoint. When the document library is ...8226; Department Name - A check means the data for this field. Copyright © 2005~2007 Kyocera Mita America, Inc All Rights Reserved. Each time a document is used to input data for ...; Billing Type - December During scanning, the operator is asked to rename the file. iTag Specification/Setup/Operation Index Fields Wizard Page Index fields provide a way of the wizard if less than five ...
iTag Specification/Setup/Operation Guide Ver. 8.0
Page 22
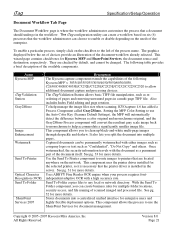
...six (6) processes that the workflow administrator can be changed. The following Kyocera MFP's: 3035/4035/5035/3050/4050/5050/6030/8030, C2630/C4008/C4035E/C3232E/C3225E/C2525E/C3232/C3225/C2520 to ...multiple folder locations, security access, and file naming of the process name. iTag Specification/Setup/Operation Document Workflow Tab Page The Document Workflow page is installed in the server. ... or network directory. Captured documents can choose to use the Auto Color Key (Scanner Default Settings), the MFP will automatically detect the difference between a color original and...
...six (6) processes that the workflow administrator can be changed. The following Kyocera MFP's: 3035/4035/5035/3050/4050/5050/6030/8030, C2630/C4008/C4035E/C3232E/C3225E/C2525E/C3232/C3225/C2520 to ...multiple folder locations, security access, and file naming of the process name. iTag Specification/Setup/Operation Document Workflow Tab Page The Document Workflow page is installed in the server. ... or network directory. Captured documents can choose to use the Auto Color Key (Scanner Default Settings), the MFP will automatically detect the difference between a color original and...

iTag Specification/Setup/Operation Guide Ver. 8.0
Page 35
... the MFP Color Setting to help reduce the image files size, KYOcapture 4.6 has added a Process Component called Gray2Mono. iTag Specification/Setup/Operation Configuring the Gray2Mono Process Component Normally KYOcapture will launch the Configure Gray2Mono dialogue box. 4. To help accommodate a significantly smaller image... in the setting. This will convert the resultant gray scale image back to monochrome to use the Auto Color Key (Scanner Default Settings), the MFP will automatically detect the difference between a color original and monochrome original, and the Gray2Mono Process...
... the MFP Color Setting to help reduce the image files size, KYOcapture 4.6 has added a Process Component called Gray2Mono. iTag Specification/Setup/Operation Configuring the Gray2Mono Process Component Normally KYOcapture will launch the Configure Gray2Mono dialogue box. 4. To help accommodate a significantly smaller image... in the setting. This will convert the resultant gray scale image back to monochrome to use the Auto Color Key (Scanner Default Settings), the MFP will automatically detect the difference between a color original and monochrome original, and the Gray2Mono Process...

iTag Specification/Setup/Operation Guide Ver. 8.0
Page 60
...in the Configuring the Gray2Mono Process Component instructions on the operation panel of this document. System Menu / Counter System Menu Copy Default > Scanner Default > Printer Default > Machine Default > Document Management > 3. Version 8.0 Page 59 Press the *System Menu/Counter button on page ...numeric keys, enter the code 6 4 8 2 Enter the administrator number Copyright © 2005~2007 Kyocera Mita America, Inc All Rights Reserved. iTag Specification/Setup/Operation How to Enable the MFP Auto Color Scan for Gray2Mono Support The process component Gray2Mono, can be ...
...in the Configuring the Gray2Mono Process Component instructions on the operation panel of this document. System Menu / Counter System Menu Copy Default > Scanner Default > Printer Default > Machine Default > Document Management > 3. Version 8.0 Page 59 Press the *System Menu/Counter button on page ...numeric keys, enter the code 6 4 8 2 Enter the administrator number Copyright © 2005~2007 Kyocera Mita America, Inc All Rights Reserved. iTag Specification/Setup/Operation How to Enable the MFP Auto Color Scan for Gray2Mono Support The process component Gray2Mono, can be ...
iTag Specification/Setup/Operation Guide Ver. 8.0
Page 61
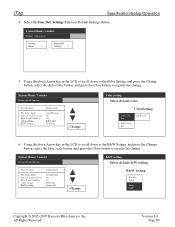
...Color setting Select default color ColorSetting Auto color key Full-Color key B&W key 6. System Menu / Counter Scanner setting menu System Basic > Func. Using the down Arrow key in the LCD to scroll down to ...the Change button, select the Auto Color button, and press the Close button to register the change . iTag Specification/Setup/Operation 4. Setting > 5. Setting (Function Default Setting) button. Version 8.0 Page 60 Using the down Arrow key... B&W setting Black& White Gray scale Copyright © 2005~2007 Kyocera Mita America, Inc All Rights Reserved. Def. Def.
...Color setting Select default color ColorSetting Auto color key Full-Color key B&W key 6. System Menu / Counter Scanner setting menu System Basic > Func. Using the down Arrow key in the LCD to scroll down to ...the Change button, select the Auto Color button, and press the Close button to register the change . iTag Specification/Setup/Operation 4. Setting > 5. Setting (Function Default Setting) button. Version 8.0 Page 60 Using the down Arrow key... B&W setting Black& White Gray scale Copyright © 2005~2007 Kyocera Mita America, Inc All Rights Reserved. Def. Def.
iTag Specification/Setup/Operation Guide Ver. 8.0
Page 76
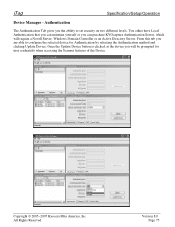
...levels. From this tab you will require a Novell Server, Windows Domain Controller or an Active Directory Server. iTag Specification/Setup/Operation Device Manager - You either have Local Authentication that you can purchase KYOcapture Authentication Server, which will be prompted for... Authentication by selecting the Authentication method and clicking Update Device. Version 8.0 Page 75 Copyright © 2005~2007 Kyocera Mita America, Inc All Rights Reserved. Authentication The Authentication Tab gives you can maintain yourself or you the ability to configure...
...levels. From this tab you will require a Novell Server, Windows Domain Controller or an Active Directory Server. iTag Specification/Setup/Operation Device Manager - You either have Local Authentication that you can purchase KYOcapture Authentication Server, which will be prompted for... Authentication by selecting the Authentication method and clicking Update Device. Version 8.0 Page 75 Copyright © 2005~2007 Kyocera Mita America, Inc All Rights Reserved. Authentication The Authentication Tab gives you can maintain yourself or you the ability to configure...
IB-40 User Guide
Page 1
... main unit, disconnect the power plug from this product and the preparation that to the following protocols. Address Book for Clients - KM-NET for Scanner - However, there is no guarantee that include an IP address in a particular installation. Increase the separation between the equipment and ...unplug it is set up. Be sure to prevent electrocution and power surges. - Failure to Mac - When moving this product. - Quick Setup - LAN network port Ethernet address Ethernet address of the LAN network port on using the product. [ Danger ] "Danger" indicates the existence...
... main unit, disconnect the power plug from this product and the preparation that to the following protocols. Address Book for Clients - KM-NET for Scanner - However, there is no guarantee that include an IP address in a particular installation. Increase the separation between the equipment and ...unplug it is set up. Be sure to prevent electrocution and power surges. - Failure to Mac - When moving this product. - Quick Setup - LAN network port Ethernet address Ethernet address of the LAN network port on using the product. [ Danger ] "Danger" indicates the existence...
Scan System Operation Guide (Functions Edition) Rev-9
Page 2
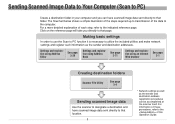
... settings as well as the sender and destination addresses. For information on the reference page will take you can be accomplished at the scanner itself. Making basic settings In order to use the Scan to PC function it is necessary to utilize the included utilities and make ... Book See page 3-71 Settings and registration using an Internet Web browser See page 2-1 Creating destination folders Scanner File Utility See page 3-4 Sending scanned image data Use the scanner to designate a destination and have scanned image data sent directly to that folder. Sending Scanned Image Data ...
... settings as well as the sender and destination addresses. For information on the reference page will take you can be accomplished at the scanner itself. Making basic settings In order to use the Scan to PC function it is necessary to utilize the included utilities and make ... Book See page 3-71 Settings and registration using an Internet Web browser See page 2-1 Creating destination folders Scanner File Utility See page 3-4 Sending scanned image data Use the scanner to designate a destination and have scanned image data sent directly to that folder. Sending Scanned Image Data ...

Scan System Operation Guide (Functions Edition) Rev-9
Page 3
... using Address Book See page 3-71 Settings and registration using an Internet Web browser See page 2-1 Sending scanned image data Use the scanner to designate a destination and have scanned image data sent directly to that location. * Network settings as well as the sender and destination...the included utilities and make network settings and register such information as the sender and destination address registration procedures can be accomplished at the scanner itself. Making basic settings In order to use the Send E-mail function it is necessary to a registered email address. For a...
... using Address Book See page 3-71 Settings and registration using an Internet Web browser See page 2-1 Sending scanned image data Use the scanner to designate a destination and have scanned image data sent directly to that location. * Network settings as well as the sender and destination...the included utilities and make network settings and register such information as the sender and destination address registration procedures can be accomplished at the scanner itself. Making basic settings In order to use the Send E-mail function it is necessary to a registered email address. For a...
Scan System Operation Guide (Functions Edition) Rev-9
Page 6
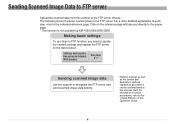
Making basic settings To use Scan to FTP function, you directly to the proper page. * This function is not available by KM-1650/2050/2550/C850. Click on the web browser. v The following shows the basic scanning flow to the indicated reference page. For a more ...server and send scanned image data directly. * Network settings as well as the sender and destination address registration procedures can be accomplished at the scanner itself. For information on these procedures, refer to specify the network settings and register the FTP server on the reference page will take you ...
Making basic settings To use Scan to FTP function, you directly to the proper page. * This function is not available by KM-1650/2050/2550/C850. Click on the web browser. v The following shows the basic scanning flow to the indicated reference page. For a more ...server and send scanned image data directly. * Network settings as well as the sender and destination address registration procedures can be accomplished at the scanner itself. For information on these procedures, refer to specify the network settings and register the FTP server on the reference page will take you ...

Scan System Operation Guide (Functions Edition) Rev-9
Page 12
... and Uninstallation 3-7 (1) Installing the Scanner File Utility 3-7 (2) Uninstalling the Scanner File Utility 3-9 Initial Dialogue Box for the Scanner File Utility 3-10 (1) Accessing the Initial Dialogue Box for the Scanner File Utility ....... 3-10 (2) Contents of the Initial Dialogue Box for the Scanner File Utility ..... 3-11 Destination Folders for Scanned Data 3-13 (1) The Setup Dialogue Box 3-13 (2) Designating...
... and Uninstallation 3-7 (1) Installing the Scanner File Utility 3-7 (2) Uninstalling the Scanner File Utility 3-9 Initial Dialogue Box for the Scanner File Utility 3-10 (1) Accessing the Initial Dialogue Box for the Scanner File Utility ....... 3-10 (2) Contents of the Initial Dialogue Box for the Scanner File Utility ..... 3-11 Destination Folders for Scanned Data 3-13 (1) The Setup Dialogue Box 3-13 (2) Designating...

Scan System Operation Guide (Functions Edition) Rev-9
Page 18
... (1) Starting the scanning operation at your computer 3-110 (2) Starting the scanning operation at the scanner 3-110 Main Dialogue Box 3-111 Changing the Scanner's IP Address 3-115 Copy Management Setting 3-117 Color Profiles ...3-118 If You Can't Connect to the... Scanner 3-119 Maximam image size 3-120 Configuration Tool ...3-121 The Configuration Tool 3-121 Computer Environment 3-121 Using the Quick Setup Wizard 3-122 Using AdminManager 3-124 (1) Installing AdminManager 3-124 (2) Running AdminManager ...
... (1) Starting the scanning operation at your computer 3-110 (2) Starting the scanning operation at the scanner 3-110 Main Dialogue Box 3-111 Changing the Scanner's IP Address 3-115 Copy Management Setting 3-117 Color Profiles ...3-118 If You Can't Connect to the... Scanner 3-119 Maximam image size 3-120 Configuration Tool ...3-121 The Configuration Tool 3-121 Computer Environment 3-121 Using the Quick Setup Wizard 3-122 Using AdminManager 3-124 (1) Installing AdminManager 3-124 (2) Running AdminManager ...
Scan System Operation Guide (Functions Edition) Rev-9
Page 22
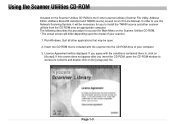
...use this screen does not appear after you insert the CD-ROM, open . 2. Quit all other applications that is the 5 other scanner utilities from the CD-ROM onto an appropriate computer. If this Network Scanning System, it will be open the CD-ROM window to access... its contents and double-click on the [setup.exe] file. Licence Agreement will differ depending upon the model of your scanner. 1. The following describes the procedure to install the TWAIN source and other scanner utilities (Scanner File Utility, Address Editor, Address Book,DB Assistant and TWAIN ...
...use this screen does not appear after you insert the CD-ROM, open . 2. Quit all other applications that is the 5 other scanner utilities from the CD-ROM onto an appropriate computer. If this Network Scanning System, it will be open the CD-ROM window to access... its contents and double-click on the [setup.exe] file. Licence Agreement will differ depending upon the model of your scanner. 1. The following describes the procedure to install the TWAIN source and other scanner utilities (Scanner File Utility, Address Editor, Address Book,DB Assistant and TWAIN ...

Scan System Operation Guide (Functions Edition) Rev-9
Page 27
.... Basic settings Select original size Selects the available original sizes (scanning area). See page 1-14 Orig. set . Using the Scanner Function The following gives an explanation of the scanning functions of the original once the original is set direction Specifies the position of...type Sets the desired format of the transmitted image). For more detailed information regarding the setting procedures for the functions in each different scanner, refer to your Operation Guide. See page 1-13 Select sending size Selects the available image transmission sizes (size of the image...
.... Basic settings Select original size Selects the available original sizes (scanning area). See page 1-14 Orig. set . Using the Scanner Function The following gives an explanation of the scanning functions of the original once the original is set direction Specifies the position of...type Sets the desired format of the transmitted image). For more detailed information regarding the setting procedures for the functions in each different scanner, refer to your Operation Guide. See page 1-13 Select sending size Selects the available image transmission sizes (size of the image...

Scan System Operation Guide (Functions Edition) Rev-9
Page 104
... Utility independently from the desktop mode to share the Scanner File Utility on a File Server, etc. (In this case, the Scanner File Utility will be usable once you can change the type of setup from others. (In this type of setup in order to the server mode by selecting "Repair"...on to your computer.) (Refer to the next step. Page 3-8 Select one of your computer.) * Once the Scanner File Utility has been installed, you are logged off of the following setup types and then proceed to page 3-27.) Install a desktop mode ....... Follow the instructions indicated in the Windows "Add...
... Utility independently from the desktop mode to share the Scanner File Utility on a File Server, etc. (In this case, the Scanner File Utility will be usable once you can change the type of setup from others. (In this type of setup in order to the server mode by selecting "Repair"...on to your computer.) (Refer to the next step. Page 3-8 Select one of your computer.) * Once the Scanner File Utility has been installed, you are logged off of the following setup types and then proceed to page 3-27.) Install a desktop mode ....... Follow the instructions indicated in the Windows "Add...
Scan System Operation Guide (Functions Edition) Rev-9
Page 206
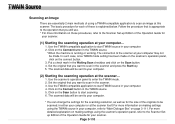
... your computer. (2) Starting the scanning operation at your computer... 1. Use the scanner's operation panel to start scanning. 6. Set the original that you want to scan in the scanner. 3. For more information on making settings using the scanner's operation panel, refer to the Scanner Setup Edition of the Operation Guide for your computer or at this...
... your computer. (2) Starting the scanning operation at your computer... 1. Use the scanner's operation panel to start scanning. 6. Set the original that you want to scan in the scanner. 3. For more information on making settings using the scanner's operation panel, refer to the Scanner Setup Edition of the Operation Guide for your computer or at this...
Scan System Operation Guide (Functions Edition) Rev-9
Page 210
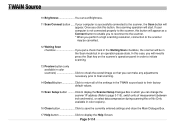
... Preview button (only available in the TWAIN source back to page 3-115). Once you can change the scanner' IP address (Refer to their factory default values. 15 Scan Setup button ......... Click to display the Scanner Setup Dialogue Box in which you can make any adjustments necessary prior to final scanning. 14 Default button Click...
... Preview button (only available in the TWAIN source back to page 3-115). Once you can change the scanner' IP address (Refer to their factory default values. 15 Scan Setup button ......... Click to display the Scanner Setup Dialogue Box in which you can make any adjustments necessary prior to final scanning. 14 Default button Click...
Scan System Operation Guide (Functions Edition) Rev-9
Page 211
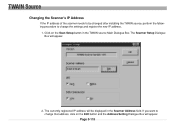
Page 3-115 If you want to change that address, click on the Scan Setup button in the Scanner Address field. The currently registered IP address will be changed after installing the TWAIN source, perform the following procedure to change the settings and register the new IP address. 1. The Scanner Setup Dialogue Box will appear. Click on the Edit button and the Address Setting Dialogue Box will appear. 2. TWAIN Source Changing the Scanner's IP Address If the IP address of the scanner needs to be displayed in the TWAIN source Main Dialogue Box.
Page 3-115 If you want to change that address, click on the Scan Setup button in the Scanner Address field. The currently registered IP address will be changed after installing the TWAIN source, perform the following procedure to change the settings and register the new IP address. 1. The Scanner Setup Dialogue Box will appear. Click on the Edit button and the Address Setting Dialogue Box will appear. 2. TWAIN Source Changing the Scanner's IP Address If the IP address of the scanner needs to be displayed in the TWAIN source Main Dialogue Box.
Scan System Operation Guide (Functions Edition) Rev-9
Page 212
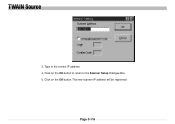
Click on the OK button to return to the Scanner Setup Dialogue Box. 5. Page 3-116 TWAIN Source 3. Click on the OK button. Type in the correct IP address. 4. The new scanner IP address will be registered.
Click on the OK button to return to the Scanner Setup Dialogue Box. 5. Page 3-116 TWAIN Source 3. Click on the OK button. Type in the correct IP address. 4. The new scanner IP address will be registered.

Scan System Operation Guide (Functions Edition) Rev-9
Page 213
The Address Setting Dialogue Box will appear. 2. Page 3-117 The Scanner Setup Dialogue Box will appear. 3. Click on the Scan Setup button in the TWAIN source Main Dialogue Box. For a more detailed explanation, refer to the Operation Guide for entering the code will appear now. If ...
The Address Setting Dialogue Box will appear. 2. Page 3-117 The Scanner Setup Dialogue Box will appear. 3. Click on the Scan Setup button in the TWAIN source Main Dialogue Box. For a more detailed explanation, refer to the Operation Guide for entering the code will appear now. If ...


