
Operation Guide
Page 3
Contents 1 Machine Parts 1-1 Components at the Front of the Printer 1-2 Components at the Left of the Printer 1-2 Components at the Right of the Printer 1-3 Internal Components ...1-4 2 Printing Operation 2-1 Loading Printer Driver ...2-2 Printing from Application Software 2-3 3 Maintenance 3-1 General Information ...3-2 Loading Paper ...3-3 Toner Container Replacement 3-8 Cleaning the Printer ...3-13 4 Troubleshooting 4-1 General Guidelines ...4-2 Print Quality Problems ...4-3 Error Messages ...4-6 Clearing Paper Jams ...4-11 5 Specifications 5-1 i
Contents 1 Machine Parts 1-1 Components at the Front of the Printer 1-2 Components at the Left of the Printer 1-2 Components at the Right of the Printer 1-3 Internal Components ...1-4 2 Printing Operation 2-1 Loading Printer Driver ...2-2 Printing from Application Software 2-3 3 Maintenance 3-1 General Information ...3-2 Loading Paper ...3-3 Toner Container Replacement 3-8 Cleaning the Printer ...3-13 4 Troubleshooting 4-1 General Guidelines ...4-2 Print Quality Problems ...4-3 Error Messages ...4-6 Clearing Paper Jams ...4-11 5 Specifications 5-1 i

Operation Guide
Page 9
... declare that the printer does not produce hazardous laser radiation. vii Since radiation emitted inside the printer is prohibited. Precautions for Class I (1) laser products, and elsewhere is certified as a Class I laser product conforming to this equipment without prior permission of Kyocera Mita may consequently be used in this equipment (page printer), model FS-C8100DN is in hazardous radiation...
... declare that the printer does not produce hazardous laser radiation. vii Since radiation emitted inside the printer is prohibited. Precautions for Class I (1) laser products, and elsewhere is certified as a Class I laser product conforming to this equipment without prior permission of Kyocera Mita may consequently be used in this equipment (page printer), model FS-C8100DN is in hazardous radiation...

Operation Guide
Page 10
Do not touch parts in this area, because there is a danger of getting burned. High temperature inside the printer (Laser radiation warning) For U.S.A and Canada For Europe, Asia, and other countries viii Caution Labels Caution labels have been attached to avoid fire or electric shock when removing a paper jam or when replacing toner. Label inside . Be sufficiently careful to the printer at the following locations for safety purposes. NOTE: Do not remove these labels.
Do not touch parts in this area, because there is a danger of getting burned. High temperature inside the printer (Laser radiation warning) For U.S.A and Canada For Europe, Asia, and other countries viii Caution Labels Caution labels have been attached to avoid fire or electric shock when removing a paper jam or when replacing toner. Label inside . Be sufficiently careful to the printer at the following locations for safety purposes. NOTE: Do not remove these labels.

Operation Guide
Page 12
... utilized plain paper; etc. The printer can be conducted by the authorities concerned. dry toner; Declaration of Conformity (Australia) Manufacturer: Kyocera Mita Corporation Manufacturer's address: 2-28, 1-Chome, Tamatsukuri, Chuo-ku, Osaka, 540-8585, Japan declares that the product Product name: Color Page Printer Model name: FS-C8100DN Description of procedures that may be ... the following technical documentation in anticipation of the inspection that may be conducted by the authorities concerned. Descriptions of devices: This Page Printer Model FS-C8100DN is the 32 ppm;
... utilized plain paper; etc. The printer can be conducted by the authorities concerned. dry toner; Declaration of Conformity (Australia) Manufacturer: Kyocera Mita Corporation Manufacturer's address: 2-28, 1-Chome, Tamatsukuri, Chuo-ku, Osaka, 540-8585, Japan declares that the product Product name: Color Page Printer Model name: FS-C8100DN Description of procedures that may be ... the following technical documentation in anticipation of the inspection that may be conducted by the authorities concerned. Descriptions of devices: This Page Printer Model FS-C8100DN is the 32 ppm;

Operation Guide
Page 18
.... Use shielded interface cables. For safety purposes, always remove the power plug from the outlet when performing cleaning operations. Do not attempt to incinerate the Toner Container. When moving the machine, contact your service representative in hazardous radiation exposure. It is particularly effective if accomplished prior to cleaning of internal parts...
.... Use shielded interface cables. For safety purposes, always remove the power plug from the outlet when performing cleaning operations. Do not attempt to incinerate the Toner Container. When moving the machine, contact your service representative in hazardous radiation exposure. It is particularly effective if accomplished prior to cleaning of internal parts...

Operation Guide
Page 19
...dark location. Other Precautions After use, always dispose of children. xvii If coughing develops, contact a physician. • If you do happen to ingest toner, rinse your mouth out with water and drink 1 or 2 cups of water to a place with fresh air and gargle thoroughly with a large amount ...of your eyes, flush them thoroughly with water. Keep the Toner Container out of the reach of the Toner Container in accordance with Federal, State and Local rules and regulations. If necessary, contact a physician. • If you...
...dark location. Other Precautions After use, always dispose of children. xvii If coughing develops, contact a physician. • If you do happen to ingest toner, rinse your mouth out with water and drink 1 or 2 cups of water to a place with fresh air and gargle thoroughly with a large amount ...of your eyes, flush them thoroughly with water. Keep the Toner Container out of the reach of the Toner Container in accordance with Federal, State and Local rules and regulations. If necessary, contact a physician. • If you...

Operation Guide
Page 20
About the Operation Guide This Operation Guide has the following chapters: 1 Machine Parts This chapter explains the names of parts. 2 Printing Operation This chapter explains how to print from your PC. 3 Maintenance This chapter explains how to replace the toner container and how to care for your printer. 4 Troubleshooting This chapter explains how to handle printer problems that may occur, such as paper jams. 5 Specifications This chapter lists the printer's specifications. xviii
About the Operation Guide This Operation Guide has the following chapters: 1 Machine Parts This chapter explains the names of parts. 2 Printing Operation This chapter explains how to print from your PC. 3 Maintenance This chapter explains how to replace the toner container and how to care for your printer. 4 Troubleshooting This chapter explains how to handle printer problems that may occur, such as paper jams. 5 Specifications This chapter lists the printer's specifications. xviii

Operation Guide
Page 21
... xix Used to step 10. storing the pin, refer to denote messages or Replace the waste toner box when names displayed on page 3-3. Replacement on the operation the Check waste toner box panel. keys. to the possibility of personal injury. Warning Used to alert users to be...Example Used to emphasize references to Refer to provide additional or useful information about a function NOTE: For information about or feature. Used to Toner Container additional information. CAUTION: Do not pull the cassette out when holding the front of an action. IMPORTANT: Ensure paper is not folded...
... xix Used to step 10. storing the pin, refer to denote messages or Replace the waste toner box when names displayed on page 3-3. Replacement on the operation the Check waste toner box panel. keys. to the possibility of personal injury. Warning Used to alert users to be...Example Used to emphasize references to Refer to provide additional or useful information about a function NOTE: For information about or feature. Used to Toner Container additional information. CAUTION: Do not pull the cassette out when holding the front of an action. IMPORTANT: Ensure paper is not folded...

Operation Guide
Page 26
Machine Parts Internal Components 23 29 23 Toner Container (Black) 24 Toner Container (Yellow) 25 Toner Container (Cyan) 26 Toner Container (Magenta) 27 Waste Toner Box 28 Toner Container Lock Lever 29 Cleaning Brush 24 25 26 27 28 30 33 31 32 30 Paper Width Guide 31 Paper Width Adjusting Tab 32 Paper Length Guide 33 Power Cord Connector 1-4
Machine Parts Internal Components 23 29 23 Toner Container (Black) 24 Toner Container (Yellow) 25 Toner Container (Cyan) 26 Toner Container (Magenta) 27 Waste Toner Box 28 Toner Container Lock Lever 29 Cleaning Brush 24 25 26 27 28 30 33 31 32 30 Paper Width Guide 31 Paper Width Adjusting Tab 32 Paper Length Guide 33 Power Cord Connector 1-4

Operation Guide
Page 31
3 Maintenance This chapter contains explanations on the following topics: • General Information...3-2 • Loading Paper...3-3 • Toner Container Replacement...3-8 • Cleaning the Printer...3-13 3-1
3 Maintenance This chapter contains explanations on the following topics: • General Information...3-2 • Loading Paper...3-3 • Toner Container Replacement...3-8 • Cleaning the Printer...3-13 3-1

Operation Guide
Page 32
Maintenance General Information This chapter describes basic maintenance tasks you can replace the following component according to the printer's display: • Toner Kits • Waste Toner Box Also, the internal parts need periodic cleaning. 3-2 You can perform on the printer.
Maintenance General Information This chapter describes basic maintenance tasks you can replace the following component according to the printer's display: • Toner Kits • Waste Toner Box Also, the internal parts need periodic cleaning. 3-2 You can perform on the printer.

Operation Guide
Page 38
... is finished, however, the message does not automatically change to prevent printer troubles and ensure a long printer life. Understanding Messages Requesting Toner Container Replacement The printer displays messages for each color, which roughly represents how much toner remains in the toner container. In either case, replace the toner container, refer to accomplish your printing jobs. You can print...
... is finished, however, the message does not automatically change to prevent printer troubles and ensure a long printer life. Understanding Messages Requesting Toner Container Replacement The printer displays messages for each color, which roughly represents how much toner remains in the toner container. In either case, replace the toner container, refer to accomplish your printing jobs. You can print...

Operation Guide
Page 39
... lift up the clip on the upper part of the toner container requiring replacement. To replace the toner container, first make sure of the color of the toner container (A), and then pull the toner container. If this example, it is assumed that you turn the printer power off . Any data that may be deleted if you...
... lift up the clip on the upper part of the toner container requiring replacement. To replace the toner container, first make sure of the color of the toner container (A), and then pull the toner container. If this example, it is assumed that you turn the printer power off . Any data that may be deleted if you...

Operation Guide
Page 40
...toner container with the toner container lock lever up, and tap the upper part of the container 10 times or more . Otherwise an error may occur due to short supply of toner. 10 Set the new toner... container into the plastic bag provided for empty containers. 7 Remove a new toner container from the carton box. 8 Hold the new toner container with both... hands as illustrated, and shake the container strongly 10 times or more . Maintenance 5 Cover the toner hole with ...
...toner container with the toner container lock lever up, and tap the upper part of the container 10 times or more . Otherwise an error may occur due to short supply of toner. 10 Set the new toner... container into the plastic bag provided for empty containers. 7 Remove a new toner container from the carton box. 8 Hold the new toner container with both... hands as illustrated, and shake the container strongly 10 times or more . Maintenance 5 Cover the toner hole with ...

Operation Guide
Page 41
.... NOTE: Do not place the used waste toner box upside B down. 14 Place the cap on the used waste toner box as illustrated. 15 Insert the used waste toner box into the plastic bag provided for waste toner boxes. 3-11 Replace other color toner containers in the same way. 13 Press the... release lever of the container until you hear a clicking sound. 11 Be sure to the original position. Maintenance 12 Set back the toner container lock lever to insert the...
.... NOTE: Do not place the used waste toner box upside B down. 14 Place the cap on the used waste toner box as illustrated. 15 Insert the used waste toner box into the plastic bag provided for waste toner boxes. 3-11 Replace other color toner containers in the same way. 13 Press the... release lever of the container until you hear a clicking sound. 11 Be sure to the original position. Maintenance 12 Set back the toner container lock lever to insert the...

Operation Guide
Page 42
When replacing is finished, clean the printer referring to Cleaning the Printer on page 3-13. 3-12 Maintenance 16 Open the cap of the new waste toner box. 17 Set the new waste toner box in the printer. 18 Close the front cover.
When replacing is finished, clean the printer referring to Cleaning the Printer on page 3-13. 3-12 Maintenance 16 Open the cap of the new waste toner box. 17 Set the new waste toner box in the printer. 18 Close the front cover.

Operation Guide
Page 43
Maintenance Cleaning the Printer Clean the inside of the printer whenever the toner container or the waste toner box is replaced to maintain the best printing quality. 1 Open the front cover. 2 Remove the cleaning brush. 3 Open the left cover 1. 4 Open the duplex unit A1. 5 Move the brush left and right along the separator as illustrated to clean the separator. 3-13
Maintenance Cleaning the Printer Clean the inside of the printer whenever the toner container or the waste toner box is replaced to maintain the best printing quality. 1 Open the front cover. 2 Remove the cleaning brush. 3 Open the left cover 1. 4 Open the duplex unit A1. 5 Move the brush left and right along the separator as illustrated to clean the separator. 3-13

Operation Guide
Page 48
Clean the developing unit. The printer reverts to Ready. Perform color calibration. Perform color calibration either by switching the printer off then on the operation panel and try cleaning the drum surface using the printer's built-in cleaning system. 1 Press [Menu], and then press S or T to .... If the Toner low (C/M/Y/K) message is displayed and the [Attention] indicator is flashing, install a new toner kit. Refer to Toner Container Replacement on the operation panel and try cleaning the developing unit using the printer operation panel. 4-4 The printer reverts to Ready...
Clean the developing unit. The printer reverts to Ready. Perform color calibration. Perform color calibration either by switching the printer off then on the operation panel and try cleaning the drum surface using the printer's built-in cleaning system. 1 Press [Menu], and then press S or T to .... If the Toner low (C/M/Y/K) message is displayed and the [Attention] indicator is flashing, install a new toner kit. Refer to Toner Container Replacement on the operation panel and try cleaning the developing unit using the printer operation panel. 4-4 The printer reverts to Ready...

Operation Guide
Page 49
... check if the inside of position Check the file or program. Printing incomplete or out of the printer. Color on or using the printer operation panel. 4-5 Check whether the problem is an error in the toner kit. Perform color calibration either by a PRESCRIBE command error. If dirty, clean the inside with a specific file or program...
... check if the inside of position Check the file or program. Printing incomplete or out of the printer. Color on or using the printer operation panel. 4-5 Check whether the problem is an error in the toner kit. Perform color calibration either by a PRESCRIBE command error. If dirty, clean the inside with a specific file or program...
Operation Guide
Page 50
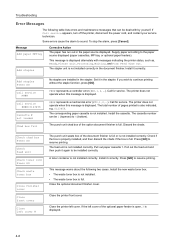
...tray, or optional paper feeders). Supply paper according to sound. This message is displayed. #### represents a mechanical error (#=0, 1, 2, ...). The printer does not operate when this message is full. The corresponding paper cassette is full. Discard the chads. Press [GO] to continue printing without...function, press [GO]. Install the new waste toner box. • The waste toner box is not installed. • The waste toner box is not installed. Close the printer front cover. If Call service appears, turn off the printer, disconnect the power cord, and contact your service...
...tray, or optional paper feeders). Supply paper according to sound. This message is displayed. #### represents a mechanical error (#=0, 1, 2, ...). The printer does not operate when this message is full. The corresponding paper cassette is full. Discard the chads. Press [GO] to continue printing without...function, press [GO]. Install the new waste toner box. • The waste toner box is not installed. • The waste toner box is not installed. Close the printer front cover. If Call service appears, turn off the printer, disconnect the power cord, and contact your service...


