bizhub C220/C280/C360 Security Operations User Guide
Page 19
Contact your Service Representative. 0 Do not leave the machine with the User Mode setting screen left shown on the display. bizhub C360/C280/C220 2-4 If it must first make User Authentication settings before he or she can access User Mode. 2.1 Accessing the Administrator Settings 2 ... Touch [User Name]. 2 Type "admin" in User Name. % Press the [C] key or touch [Undo] to clear the value entered last. % Touch [Delete] to delete the last character entered. % Touch [Shift] to show the upper case/symbol screen. 3 Touch [OK]. 4 Touch [Password]. For details of the User Authentication...
Contact your Service Representative. 0 Do not leave the machine with the User Mode setting screen left shown on the display. bizhub C360/C280/C220 2-4 If it must first make User Authentication settings before he or she can access User Mode. 2.1 Accessing the Administrator Settings 2 ... Touch [User Name]. 2 Type "admin" in User Name. % Press the [C] key or touch [Undo] to clear the value entered last. % Touch [Delete] to delete the last character entered. % Touch [Shift] to show the upper case/symbol screen. 3 Touch [OK]. 4 Touch [Password]. For details of the User Authentication...
bizhub C220/C280/C360 Security Operations User Guide
Page 21
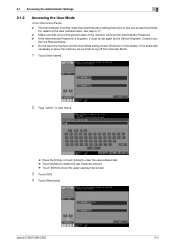
... of the machine will know the Administrator Password. 0 While you are logging onto the Admin Mode using PageScope Web Connection, any operations from the machine's control panel are disabled. 0 If you have logged on the display. bizhub C360/C280/C220 2-6 Click [OK] and try logging on to the Admin Mode after the execution of the...
... of the machine will know the Administrator Password. 0 While you are logging onto the Admin Mode using PageScope Web Connection, any operations from the machine's control panel are disabled. 0 If you have logged on the display. bizhub C360/C280/C220 2-6 Click [OK] and try logging on to the Admin Mode after the execution of the...
bizhub C220/C280/C360 Security Operations User Guide
Page 22
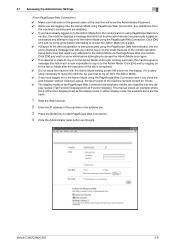
...counted as unauthorized access. If there is no more set by the Service Engineer; bizhub C360/C280/C220 2-7 To cancel the access lock state, settings must be set as that for the machine. 6 Click [OK]. % If a wrong Administrator Password has been entered, the machine gives a message that tells that the machine accepts ... least 10 seconds to log off and on again, the machine may not function properly. If the main power switch is turned off from the Admin Mode. This allows you to turn off the main power switch → Turn on the main power switch → Turn on , the main ...
...counted as unauthorized access. If there is no more set by the Service Engineer; bizhub C360/C280/C220 2-7 To cancel the access lock state, settings must be set as that for the machine. 6 Click [OK]. % If a wrong Administrator Password has been entered, the machine gives a message that tells that the machine accepts ... least 10 seconds to log off and on again, the machine may not function properly. If the main power switch is turned off from the Admin Mode. This allows you to turn off the main power switch → Turn on the main power switch → Turn on , the main ...
bizhub C220/C280/C360 Security Operations User Guide
Page 24
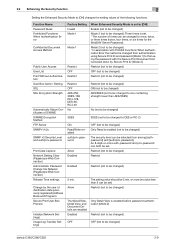
... Prohibited Functions When Authentication Error Confidential Document Access Method Public User Access User List Print Without Authentication User Box Admin. or more auth-password and priv-password can be 5 min. Restrict (not to be changed) OFF (not to be changed) Restrict (not to be changed) ...times can both be changed) * In association with Prohibit Functions When Authentication Error the method is enabled before password authentication (Mode 2) Restrict (not to be changed ) bizhub C360/C280/C220 2-9 An 8-digit-or-more (no value less than AES/3DES) No (not to be changed) 3DES...
... Prohibited Functions When Authentication Error Confidential Document Access Method Public User Access User List Print Without Authentication User Box Admin. or more auth-password and priv-password can be 5 min. Restrict (not to be changed) OFF (not to be changed) Restrict (not to be changed) ...times can both be changed) * In association with Prohibit Functions When Authentication Error the method is enabled before password authentication (Mode 2) Restrict (not to be changed ) bizhub C360/C280/C220 2-9 An 8-digit-or-more (no value less than AES/3DES) No (not to be changed) 3DES...
bizhub C220/C280/C360 Security Operations User Guide
Page 44
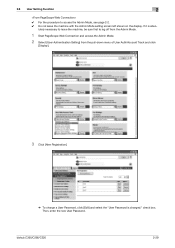
bizhub C360/C280/C220 2-29 Then, enter the new User Password. check box. If it is changed." lutely necessary to leave the machine, be sure first to access the Admin Mode, see page 2-2. 0 Do not leave the machine with the Admin Mode setting screen left shown on the display. 2.8 User Setting Function 2 0 For the procedure to...
bizhub C360/C280/C220 2-29 Then, enter the new User Password. check box. If it is changed." lutely necessary to leave the machine, be sure first to access the Admin Mode, see page 2-2. 0 Do not leave the machine with the Admin Mode setting screen left shown on the display. 2.8 User Setting Function 2 0 For the procedure to...
bizhub C220/C280/C360 Security Operations User Guide
Page 49
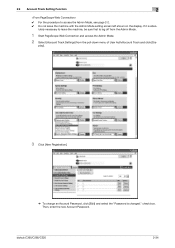
..., see page 2-2. 0 Do not leave the machine with the Admin Mode setting screen left shown on the display. play]. 3 Click [New Registration]. % To change an Account Password, click [Edit] and select the "Password is abso- check box. Then, enter the new Account Password. bizhub C360/C280/C220 2-34 2.9 Account Track Setting Function 2 0 For the procedure to...
..., see page 2-2. 0 Do not leave the machine with the Admin Mode setting screen left shown on the display. play]. 3 Click [New Registration]. % To change an Account Password, click [Edit] and select the "Password is abso- check box. Then, enter the new Account Password. bizhub C360/C280/C220 2-34 2.9 Account Track Setting Function 2 0 For the procedure to...
bizhub C220/C280/C360 Security Operations User Guide
Page 55
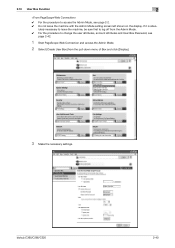
2.10 User Box Function 2 0 For the procedure to change the user attributes, account attributes and User Box Password, see page 2-42. 1 Start PageScope Web Connection and access the Admin Mode. 2 Select [Create User Box] from the Admin Mode. 0 For the procedure to access the Admin Mode, see page 2-2. 0 Do not leave the machine with the Admin Mode setting screen left shown on the display. lutely necessary to leave the machine, be sure first to log off from the pull-down menu of Box and click [Display]. 3 Make the necessary settings. bizhub C360/C280/C220 2-40 If it is abso-
2.10 User Box Function 2 0 For the procedure to change the user attributes, account attributes and User Box Password, see page 2-42. 1 Start PageScope Web Connection and access the Admin Mode. 2 Select [Create User Box] from the Admin Mode. 0 For the procedure to access the Admin Mode, see page 2-2. 0 Do not leave the machine with the Admin Mode setting screen left shown on the display. lutely necessary to leave the machine, be sure first to log off from the pull-down menu of Box and click [Display]. 3 Make the necessary settings. bizhub C360/C280/C220 2-40 If it is abso-
bizhub C220/C280/C360 Security Operations User Guide
Page 89
... boxes marked by the Administrator of the machine. If it is abso- bizhub C360/C280/C220 2-74 2.16 SNMP Setting Function 2 0 For the procedure to access the Admin Mode, see step 7 of page 2-69. % The entry of a wrong SNMP password (auth-password, priv-password) is counted as unauthorized access, if the Enhanced Security Mode is set...
... boxes marked by the Administrator of the machine. If it is abso- bizhub C360/C280/C220 2-74 2.16 SNMP Setting Function 2 0 For the procedure to access the Admin Mode, see step 7 of page 2-69. % The entry of a wrong SNMP password (auth-password, priv-password) is counted as unauthorized access, if the Enhanced Security Mode is set...

bizhub C220/C280/C360 Security Operations User Guide
Page 95
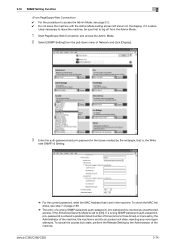
...and access the Admin Mode. 2 Select [WebDAV Settings] from the pull-down menu of Network and click [Display]. 3 Click [WebDAV Server Settings] from the [WebDAV Settings] menu. 4 Click the pull-down menu of WebDAV Settings and select [ON]. 5 Click the [Password is abso- bizhub C360/C280/C220 2-80 If ...it is changed] check box and enter the WebDAV Server Password. lutely necessary to leave the machine, be sure first to access the Admin Mode, see page 2-2. 0 Do not leave the machine ...
...and access the Admin Mode. 2 Select [WebDAV Settings] from the pull-down menu of Network and click [Display]. 3 Click [WebDAV Server Settings] from the [WebDAV Settings] menu. 4 Click the pull-down menu of WebDAV Settings and select [ON]. 5 Click the [Password is abso- bizhub C360/C280/C220 2-80 If ...it is changed] check box and enter the WebDAV Server Password. lutely necessary to leave the machine, be sure first to access the Admin Mode, see page 2-2. 0 Do not leave the machine ...
bizhub C220/C280/C360 Copy Operations User Guide
Page 185
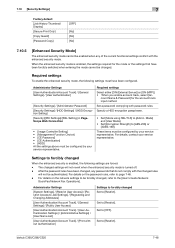
... when entering the mode cannot be configured by your service representative. Settings to [Admin. Set to [Restrict]. 7.10 [Security Settings] 7 Factory default [Job History Thumbnail Display] [Secure Print Only] [Copy Guard] [Password Copy] [OFF] [No] [No] [No] 7.10.5 [Enhanced Security ...mode cannot be enabled when any passwords that have been configured. Set a password complying with the enhanced security mode. The changed , refer to the [User's Guide Network Scan/Fax/Network Fax Operations]. Set to [Restrict]. bizhub C360/C280/C220 7-48 Required settings To enable...
... when entering the mode cannot be configured by your service representative. Settings to [Admin. Set to [Restrict]. 7.10 [Security Settings] 7 Factory default [Job History Thumbnail Display] [Secure Print Only] [Copy Guard] [Password Copy] [OFF] [No] [No] [No] 7.10.5 [Enhanced Security ...mode cannot be enabled when any passwords that have been configured. Set a password complying with the enhanced security mode. The changed , refer to the [User's Guide Network Scan/Fax/Network Fax Operations]. Set to [Restrict]. bizhub C360/C280/C220 7-48 Required settings To enable...

bizhub C220/C280/C360 Security Operations User Guide
Page 18
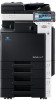
bizhub C360/C280/C220 2-4 2.1 Accessing the Administrator Settings 2 2.1.2 Accessing the User Mode 0 The Administrator must be sure first to log off from the User Mode. 1 Touch [User Name]. 2 Type "admin" in User Name. % Press the [C] key or touch [Undo] to clear the value entered last. % Touch [Delete] to delete the...User Authentication, see page 2-17. 0 Make sure that none of the general users of the machine will know the Administrator Password. 0 If the Administrator Password is forgotten, it is absolutely necessary to leave the machine, be set again by the Service Engineer.
bizhub C360/C280/C220 2-4 2.1 Accessing the Administrator Settings 2 2.1.2 Accessing the User Mode 0 The Administrator must be sure first to log off from the User Mode. 1 Touch [User Name]. 2 Type "admin" in User Name. % Press the [C] key or touch [Undo] to clear the value entered last. % Touch [Delete] to delete the...User Authentication, see page 2-17. 0 Make sure that none of the general users of the machine will know the Administrator Password. 0 If the Administrator Password is forgotten, it is absolutely necessary to leave the machine, be set again by the Service Engineer.
Security Guide
Page 3
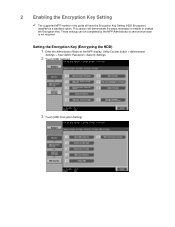
... change the Encryption Key. Setting the Encryption Key (Encrypting the HDD) 1 Enter the Administrator Mode on the MFP display, Utility/Counter button > Administrator Settings > Input Admin Password > Security Settings. 2 Touch [HDD Settings]. 3 Touch [HDD Encryption Setting]. These settings can be completed by the MFP Administrator a service technician is not required.
... change the Encryption Key. Setting the Encryption Key (Encrypting the HDD) 1 Enter the Administrator Mode on the MFP display, Utility/Counter button > Administrator Settings > Input Admin Password > Security Settings. 2 Touch [HDD Settings]. 3 Touch [HDD Encryption Setting]. These settings can be completed by the MFP Administrator a service technician is not required.
Security Guide
Page 5
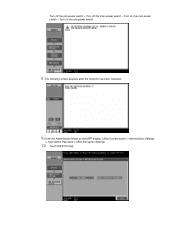
Turn off the sub power switch > Turn off the main power switch > Turn on the main power switch > Turn on the sub power switch 8 The following screen appears after the machine has been restarted. 9 Enter the Administrator Mode on the MFP display, Utility/Counter button > Administrator Settings > Input Admin Password > HDD Encryption Settings. 10 Touch [HDD Format].
Turn off the sub power switch > Turn off the main power switch > Turn on the main power switch > Turn on the sub power switch 8 The following screen appears after the machine has been restarted. 9 Enter the Administrator Mode on the MFP display, Utility/Counter button > Administrator Settings > Input Admin Password > HDD Encryption Settings. 10 Touch [HDD Format].
Security Guide
Page 7
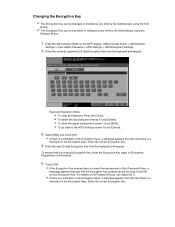
... the Administrator using the Release Button. 1 Enter the Administrator Mode on the MFP display, Utility/Counter button > Administrator Settings > Input Admin Password > HDD Settings > HDD Encryption Settings. 2 Enter the currently registered 20-digit Encryption Key from the keyboard and keypad. Keyboard Operation ...Notes: To clear all characters Press the [C] key. For details of the Password Rules, see Appendix C. If there is a mismatch in the Encryption Keys, a message appears that tells that there is a mismatch...
... the Administrator using the Release Button. 1 Enter the Administrator Mode on the MFP display, Utility/Counter button > Administrator Settings > Input Admin Password > HDD Settings > HDD Encryption Settings. 2 Enter the currently registered 20-digit Encryption Key from the keyboard and keypad. Keyboard Operation ...Notes: To clear all characters Press the [C] key. For details of the Password Rules, see Appendix C. If there is a mismatch in the Encryption Keys, a message appears that tells that there is a mismatch...
Security Guide
Page 9
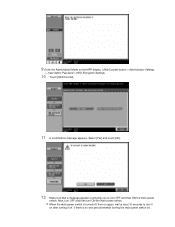
When the main power switch is no wait period between turning the main power switch off . Now, turn OFF and then turn OFF and then ON the main power switch. Select [Yes] and touch [OK]. 12 Make sure that a message appears prompting you to turn it on the MFP display, Utility/Counter button > Administrator Settings > Input Admin Password > HDD Encryption Settings. 10 Touch [HDD Format]. 11 A confirmation message appears. 9 Enter the Administrator Mode on after turning it off , if there is turned off, then on again, wait at least 10 seconds to turn ON the main power switch.
When the main power switch is no wait period between turning the main power switch off . Now, turn OFF and then turn OFF and then ON the main power switch. Select [Yes] and touch [OK]. 12 Make sure that a message appears prompting you to turn it on the MFP display, Utility/Counter button > Administrator Settings > Input Admin Password > HDD Encryption Settings. 10 Touch [HDD Format]. 11 A confirmation message appears. 9 Enter the Administrator Mode on after turning it off , if there is turned off, then on again, wait at least 10 seconds to turn ON the main power switch.
Security Guide
Page 11
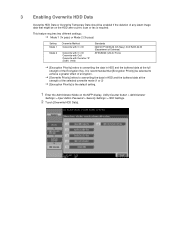
... the HDD after a print, scan or fax is the default setting. 1 Enter the Administrator Mode on the MFP display, Utility/Counter button > Administrator Settings > Input Admin Password > Security Settings > HDD Settings. 2 Touch [Overwrite HDD Data].
... the HDD after a print, scan or fax is the default setting. 1 Enter the Administrator Mode on the MFP display, Utility/Counter button > Administrator Settings > Input Admin Password > Security Settings > HDD Settings. 2 Touch [Overwrite HDD Data].
Security Guide
Page 13
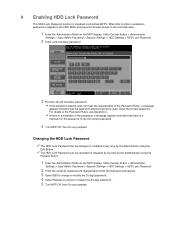
...the Password Rules, see Appendix C. If there is a mismatch in the password. Enter the correct password. For details of the Password Rules, a message appears that tells that there is a mismatch in all bizhub MFP's. Changing the HDD Lock Password The HDD Lock Password ... Administrator Settings > Input Admin Password > Security Settings > HDD Settings > HDD Lock Password 2 Enter a 20 character password. 3 Re-enter the 20 character password. Enter the correct password. 4 Turn MFP Off, then On as prompted 4 Enabling HDD Lock Password The HDD Lock Password function is applied to the...
...the Password Rules, see Appendix C. If there is a mismatch in the password. Enter the correct password. For details of the Password Rules, a message appears that tells that there is a mismatch in all bizhub MFP's. Changing the HDD Lock Password The HDD Lock Password ... Administrator Settings > Input Admin Password > Security Settings > HDD Settings > HDD Lock Password 2 Enter a 20 character password. 3 Re-enter the 20 character password. Enter the correct password. 4 Turn MFP Off, then On as prompted 4 Enabling HDD Lock Password The HDD Lock Password function is applied to the...
Security Guide
Page 15
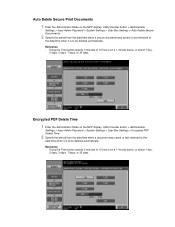
... 30 days. Reference - Encrypted PDF Delete Time 1 Enter the Administrator Mode on the MFP display, Utility/Counter button > Administrator Settings > Input Admin Password > System Settings > User Box Settings > Auto Delete Secure Documnents. 2 Specify the period from the date/time when a document was saved or... Auto Delete Secure Print Documents 1 Enter the Administrator Mode on the MFP display, Utility/Counter button > Administrator Settings > Input Admin Password > System Settings > User Box Settings > Encrypted PDF Delete Time. 2 Specify the period from the date/time when a secure...
... 30 days. Reference - Encrypted PDF Delete Time 1 Enter the Administrator Mode on the MFP display, Utility/Counter button > Administrator Settings > Input Admin Password > System Settings > User Box Settings > Auto Delete Secure Documnents. 2 Specify the period from the date/time when a document was saved or... Auto Delete Secure Print Documents 1 Enter the Administrator Mode on the MFP display, Utility/Counter button > Administrator Settings > Input Admin Password > System Settings > User Box Settings > Encrypted PDF Delete Time. 2 Specify the period from the date/time when a secure...
Security Guide
Page 16
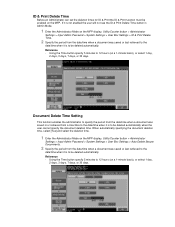
...Yes] and select the deletion time. 1 Enter the Administrator Mode on the MFP display, Utility/Counter button > Administrator Settings > Input Admin Password > System Settings > User Box Settings > Auto Delete Secure Documnents. 2 Specify the period from the date/time when a document was saved in..., 7 days, or 30 days. Using the Time button specify 5 minutes to 12 hours (on the MFP display, Utility/Counter button > Administrator Settings > Input Admin Password > System Settings > User Box Settings > ID & Print Delete Time. 2 Specify the period from a User Box to the date/time when it is to ...
...Yes] and select the deletion time. 1 Enter the Administrator Mode on the MFP display, Utility/Counter button > Administrator Settings > Input Admin Password > System Settings > User Box Settings > Auto Delete Secure Documnents. 2 Specify the period from the date/time when a document was saved in..., 7 days, or 30 days. Using the Time button specify 5 minutes to 12 hours (on the MFP display, Utility/Counter button > Administrator Settings > Input Admin Password > System Settings > User Box Settings > ID & Print Delete Time. 2 Specify the period from a User Box to the date/time when it is to ...
Security Guide
Page 18
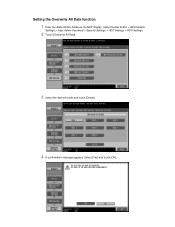
Select [Yes] and touch [OK]. Setting the Overwrite All Data function 1 Enter the Administrator Mode on the MFP display, Utility/Counter button > Administrator Settings > Input Admin Password > Security Settings > HDD Settings > HDD Settings. 2 Touch [Overwrite All Data]. 3 Select the desired mode and touch [Delete]. 4 A confirmation message appears.
Select [Yes] and touch [OK]. Setting the Overwrite All Data function 1 Enter the Administrator Mode on the MFP display, Utility/Counter button > Administrator Settings > Input Admin Password > Security Settings > HDD Settings > HDD Settings. 2 Touch [Overwrite All Data]. 3 Select the desired mode and touch [Delete]. 4 A confirmation message appears.


