bizhub 423 Password - Konica Minolta
bizhub 423 Password
View Results Below
Free Konica Minolta bizhub 423 manuals!
Problems with Konica Minolta bizhub 423?
Ask a Question
Free Konica Minolta bizhub 423 manuals!
Problems with Konica Minolta bizhub 423?
Ask a Question
Related Manual Pages

Similar Questions

Password Problem
Please Helpi have konica Minolta bizhub 423 i have change its developer, toner. and blude. but i don...
Please Helpi have konica Minolta bizhub 423 i have change its developer, toner. and blude. but i don...
(Posted by rashidameen111 7 years ago)


Password On Copier
How do I put a password on my copier in order to pervent excessive coping?
How do I put a password on my copier in order to pervent excessive coping?
(Posted by rosalopez 10 years ago)

How Can I Removed Forgotten Admin Password In My Bizhub C280?
3 years ago, we purchase Konica Minolta Bizahub C280. We dont know the password for administrator be...
3 years ago, we purchase Konica Minolta Bizahub C280. We dont know the password for administrator be...
(Posted by Rodeltorre 10 years ago)

How Do I Get Rid Of The Use Of Users And Passwords?
When we purchased our Bizhub 423 I set it to have a required user name and password before you could...
When we purchased our Bizhub 423 I set it to have a required user name and password before you could...
(Posted by fcccan 11 years ago)
Related Terms
The following terms were also used when searching for bizhub 423 Password - Konica Minolta:- bizhub 423
- bizhub 423 - error codes
- bizhub 423 admin password
- bizhub 423 administrator password
- bizhub 423 brochure
- bizhub 423 copier
- bizhub 423 copier printer scanner
- bizhub 423 cost
- bizhub 423 default admin password
- bizhub 423 default administrator password
- bizhub 423 default password
- bizhub 423 developer
- bizhub 423 developer unit
- bizhub 423 digital copier
- bizhub 423 digital system
- bizhub 423 dimensions
- bizhub 423 download driver
- bizhub 423 driver
- bizhub 423 driver download
- bizhub 423 driver osx
- bizhub 423 driver windows 7
- bizhub 423 driver windows 8
- bizhub 423 driver xp
- bizhub 423 drivers
- bizhub 423 drivers download
- bizhub 423 drivers mac
- bizhub 423 drivers windows 7
- bizhub 423 drivers windows 7 32bit
- bizhub 423 drivers windows xp
- bizhub 423 drum
- bizhub 423 drum and developer replacement
- bizhub 423 drum unit
- bizhub 423 email setup
- bizhub 423 error codes
- bizhub 423 ethernet port
- bizhub 423 exchange
- bizhub 423 factory reset
- bizhub 423 failed to complete job
- bizhub 423 failed to print job
- bizhub 423 fax
- bizhub 423 fax confirmation
- bizhub 423 fax driver
- bizhub 423 fax drivers
- bizhub 423 fax manual
- bizhub 423 fax problems
- bizhub 423 fax setup
- bizhub 423 firmware
- bizhub 423 for sale
- bizhub 423 fuser
- bizhub 423 fuser unit
- bizhub 423 fusing unit parts
- bizhub 423 guide
- bizhub 423 how to scan multiple addresses
- bizhub 423 how to scan to email
- bizhub 423 import address book
- bizhub 423 ink
- bizhub 423 input password
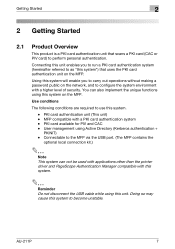
- bizhub 423 install
- bizhub 423 instructions
- bizhub 423 keyboard
- bizhub 423 mac driver
- bizhub 423 manual
- bizhub 423 manual adding email
- bizhub 423 manual pdf
- bizhub 423 memory overflow fax
- bizhub 423 mfp
- bizhub 423 mfp users guide
- bizhub 423 network
- bizhub 423 network settings
- bizhub 423 no smb settings
- bizhub 423 online user guide
- bizhub 423 owner's manual
- bizhub 423 owners manual
- bizhub 423 paper curl
- bizhub 423 parts catalog
- bizhub 423 parts manual
- bizhub 423 password
- bizhub 423 pdf
- bizhub 423 price
- bizhub 423 price in india
- bizhub 423 prices
- bizhub 423 pricing
- bizhub 423 print driver
- bizhub 423 print drivers
- bizhub 423 printer
- bizhub 423 printer driver
- bizhub 423 printer drivers
- bizhub 423 printer staples
- bizhub 423 problem
- bizhub 423 quick guide
- bizhub 423 red light
- bizhub 423 replace staples
- bizhub 423 reset password
- bizhub 423 review
- bizhub 423 reviews
- bizhub 423 rip off
- bizhub 423 scan
- bizhub 423 scan email
- bizhub 423 scan folder
- bizhub 423 scan settings
- bizhub 423 scan to email
- bizhub 423 scan to folder
- bizhub 423 scan to smb
- bizhub 423 scan to usb
- bizhub 423 secure print
- bizhub 423 series
- bizhub 423 series driver
- bizhub 423 series drivers
- bizhub 423 series pcl driver
- bizhub 423 server connection error
- bizhub 423 service manual
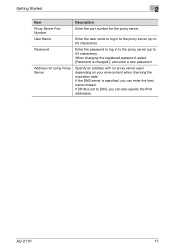
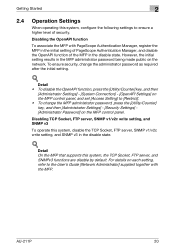
- bizhub 423 smtp settings
- bizhub 423 software
- bizhub 423 spec
- bizhub 423 specification
- bizhub 423 specifications
- bizhub 423 specs
- bizhub 423 staple cartridge
- bizhub 423 staple type
- bizhub 423 staples
- bizhub 423 support
- bizhub 423 switch print tray number
- bizhub 423 technical service manual
- bizhub 423 toner
- bizhub 423 transfer roller
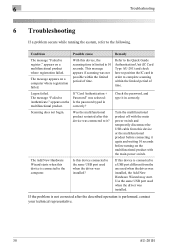
- bizhub 423 troubleshooting
- bizhub 423 user guide
- bizhub 423 user manual
- bizhub 423 user's manual
- bizhub 423 windows 7
- bizhub 423 windows 7 driver
- bizhub 423 windows 7 drivers
- bizhub 423 x64 driver
- bizhub 423 xp driver
- bizhub 423 xp drivers
- bizhub 423/363/283/223
- bizhub 423/363/283/223 driver
- bizhub 423/363/283/223 field service manual
- bizhub 423/363/283/223 ip address
- bizhub 423/363/283/223 manual
- bizhub 423/363/283/223 user guide
- bizhub423
- bizhub423 manual
- bizhub423 usb
- bizhub423/363/283/223
- driver for bizhub 423
- km bizhub 423
- konica bizhub 423
- konica bizhub 423 driver
- konica bizhub 423 toner
- konica minolta bizhub 423
- konica minolta bizhub 423 brochure
- konica minolta bizhub 423 copier
- konica minolta bizhub 423 copier printer scanner
- konica minolta bizhub 423 cost
- konica minolta bizhub 423 default admin password
- konica minolta bizhub 423 default password
- konica minolta bizhub 423 developer
- konica minolta bizhub 423 digital copier
- konica minolta bizhub 423 driver
- konica minolta bizhub 423 driver download
- konica minolta bizhub 423 driver windows 7
- konica minolta bizhub 423 drivers
- konica minolta bizhub 423 drivers mac
- konica minolta bizhub 423 drivers windows 7
- konica minolta bizhub 423 drivers windows 7 32bit
- konica minolta bizhub 423 drivers windows xp
- konica minolta bizhub 423 drum unit
- konica minolta bizhub 423 email setup
- konica minolta bizhub 423 error codes
- konica minolta bizhub 423 factory reset
- konica minolta bizhub 423 fax
- konica minolta bizhub 423 fax driver
- konica minolta bizhub 423 fax drivers
- konica minolta bizhub 423 fax setup
- konica minolta bizhub 423 firmware
- konica minolta bizhub 423 for sale
- konica minolta bizhub 423 fuser unit
- konica minolta bizhub 423 ink
- konica minolta bizhub 423 instructions
- konica minolta bizhub 423 keyboard
- konica minolta bizhub 423 mac driver
- konica minolta bizhub 423 manual
- konica minolta bizhub 423 manual adding email
- konica minolta bizhub 423 manual pdf
- konica minolta bizhub 423 mfp
- konica minolta bizhub 423 mfp users guide
- konica minolta bizhub 423 network settings
- konica minolta bizhub 423 no smb settings
- konica minolta bizhub 423 online user guide
- konica minolta bizhub 423 parts manual
- konica minolta bizhub 423 price
- konica minolta bizhub 423 price in india
- konica minolta bizhub 423 pricing
- konica minolta bizhub 423 printer driver
- konica minolta bizhub 423 printer drivers
- konica minolta bizhub 423 problem
- konica minolta bizhub 423 quick guide
- konica minolta bizhub 423 reset password
- konica minolta bizhub 423 reviews
- konica minolta bizhub 423 rip off
- konica minolta bizhub 423 scan folder
- konica minolta bizhub 423 scan to email
- konica minolta bizhub 423 scan to folder
- konica minolta bizhub 423 scan to smb
- konica minolta bizhub 423 scan to usb
- konica minolta bizhub 423 series drivers
- konica minolta bizhub 423 series pcl driver
- konica minolta bizhub 423 server connection error
- konica minolta bizhub 423 service manual
- konica minolta bizhub 423 software
- konica minolta bizhub 423 specification
- konica minolta bizhub 423 specifications
- konica minolta bizhub 423 specs
- konica minolta bizhub 423 staple cartridge
- konica minolta bizhub 423 staple type
- konica minolta bizhub 423 staples
- konica minolta bizhub 423 toner
- konica minolta bizhub 423 troubleshooting
- konica minolta bizhub 423 user guide
- konica minolta bizhub 423 user manual
- konica minolta bizhub 423 user's manual
- konica minolta bizhub 423 windows 7 driver
- konica minolta bizhub 423 windows 7 drivers
- konica minolta bizhub 423 x64 driver
- konica minolta bizhub 423/363/283/223
- konica minolta bizhub423
- minolta bizhub 423
- minolta bizhub 423 copier
- staples for bizhub 423
- toner bizhub 423