ScanDIVA User Guide
Page 11
No part of this manual are subject to disassemble or remodel the system. The contents of the system the manual does not cover. ix Please follow the instructions given in this manual when handling the system and do not touch any part of this manual may be quoted, reproduced, or translated into any other language. NEVER attempt to change without notice.
No part of this manual are subject to disassemble or remodel the system. The contents of the system the manual does not cover. ix Please follow the instructions given in this manual when handling the system and do not touch any part of this manual may be quoted, reproduced, or translated into any other language. NEVER attempt to change without notice.
ScanDIVA User Guide
Page 12
... operator's manual includes precautions for installation/operation of the Scanner, a system outline, an explanation of your authorized dealer when you familiarize yourself thoroughly with the unit's operation and features. Please keep this manual and use of the Driver software, operation procedures for a Class A digital device, pursuant to FCC regulations, and any interference received, including interference that may arise. Call your unit, read this unit conform to Part...
... operator's manual includes precautions for installation/operation of the Scanner, a system outline, an explanation of your authorized dealer when you familiarize yourself thoroughly with the unit's operation and features. Please keep this manual and use of the Driver software, operation procedures for a Class A digital device, pursuant to FCC regulations, and any interference received, including interference that may arise. Call your unit, read this unit conform to Part...
ScanDIVA User Guide
Page 14
... found to users of the scanner. Unauthorized scanning into a computer and subsequent printing of the following is assumed for the software. Badges, Identification Card, Passes or Insignia carried by law under some circumstances. 1. KMBS provides this equipment and software for legitimate and lawful purposes only, and specifically instructs you have doubt, consult your lawyer. Paper Money of the United States or...
... found to users of the scanner. Unauthorized scanning into a computer and subsequent printing of the following is assumed for the software. Badges, Identification Card, Passes or Insignia carried by law under some circumstances. 1. KMBS provides this equipment and software for legitimate and lawful purposes only, and specifically instructs you have doubt, consult your lawyer. Paper Money of the United States or...

ScanDIVA User Guide
Page 16
... by quotation marks " ". Chapter 5 Troubleshooting Describes error and warning messages that appear on the Personal Computer, and procedures for eliminating these chapters before using the Scanner. Organization This manual consists of the image acquisition screen for each function. Chapters 1 and 2 contain basic information about the Scanner, including safety precautions for satisfactory operation of the Scanner. Chapter 3 ScanDIVA TWAIN Driver Describes installation, start-up procedures and explanation...
... by quotation marks " ". Chapter 5 Troubleshooting Describes error and warning messages that appear on the Personal Computer, and procedures for eliminating these chapters before using the Scanner. Organization This manual consists of the image acquisition screen for each function. Chapters 1 and 2 contain basic information about the Scanner, including safety precautions for satisfactory operation of the Scanner. Chapter 3 ScanDIVA TWAIN Driver Describes installation, start-up procedures and explanation...
ScanDIVA User Guide
Page 17
...2-2 2 Part Identification and Functions 2-3 Chapter 3 ScanDIVA TWAIN Driver 3-1 1 ScanDIVA TWAIN Driver Setup 3-2 1.1 Trademark Acknowledgments 3-2 1.2 System Environment 3-2 1.3 Installation Procedure 3-3 2 Setup of the Scanner 3-7 2.1 Installation of Stitching Labels 3-7 2.2 Disabling User Account Control 3-8 2.3 Aging - 10min 3-10 2.4 CCD Gain 3-12 2.5 Exposure Time 3-15 2.6 Black Shading 3-16 2.7 White Shading 3-17 2.8 White Balance 3-19 2.9 Tone Curve 3-20 2.10 Image Registration 3-26 3 Deletion of ScanDIVA TWAIN Driver 3-27 4 Driver start-up 3-30 5 Book Scanner Screen...
...2-2 2 Part Identification and Functions 2-3 Chapter 3 ScanDIVA TWAIN Driver 3-1 1 ScanDIVA TWAIN Driver Setup 3-2 1.1 Trademark Acknowledgments 3-2 1.2 System Environment 3-2 1.3 Installation Procedure 3-3 2 Setup of the Scanner 3-7 2.1 Installation of Stitching Labels 3-7 2.2 Disabling User Account Control 3-8 2.3 Aging - 10min 3-10 2.4 CCD Gain 3-12 2.5 Exposure Time 3-15 2.6 Black Shading 3-16 2.7 White Shading 3-17 2.8 White Balance 3-19 2.9 Tone Curve 3-20 2.10 Image Registration 3-26 3 Deletion of ScanDIVA TWAIN Driver 3-27 4 Driver start-up 3-30 5 Book Scanner Screen...
ScanDIVA User Guide
Page 18
... with Folds, wrinkles or warps 4-18 7.4 Bound with special binding 4-19 8 Using the optional Glass Plate Unit 4-20 Chapter 5 Troubleshooting 5-1 1 Problems with the Scanner 5-2 2 Troubleshooting 5-3 2.1 Errors shown on the Personal Computer screen 5-3 2.2 Errors shown on the Operation Panel 5-4 3 Trouble when scanning an image 5-5 Chapter 6 Maintenance 6-1 1 Maintenance 6-2 1.1 Daily checks 6-2 1.2 Cleaning 6-2 Chapter 7 Product Specifications 7-1 1 Major Specifications 7-2 2 Appendix 7-4 2.1 Assembling the Adjustment Plate 7-4 2.2 Placing the Adjustment Plate 7-5 xvi
... with Folds, wrinkles or warps 4-18 7.4 Bound with special binding 4-19 8 Using the optional Glass Plate Unit 4-20 Chapter 5 Troubleshooting 5-1 1 Problems with the Scanner 5-2 2 Troubleshooting 5-3 2.1 Errors shown on the Personal Computer screen 5-3 2.2 Errors shown on the Operation Panel 5-4 3 Trouble when scanning an image 5-5 Chapter 6 Maintenance 6-1 1 Maintenance 6-2 1.1 Daily checks 6-2 1.2 Cleaning 6-2 Chapter 7 Product Specifications 7-1 1 Major Specifications 7-2 2 Appendix 7-4 2.1 Assembling the Adjustment Plate 7-4 2.2 Placing the Adjustment Plate 7-5 xvi
ScanDIVA User Guide
Page 20
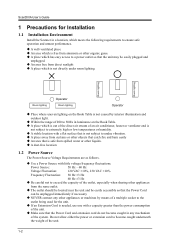
... outlet being used for Installation 1.1 Installation Environment Install the Scanner in any other appliances from the same outlet. The outlet should be located near the unit and be easily accessible so that the Power Cord can be unplugged immediately if necessary. NEVER connect any mechanism of the unit. 1-2 Room lighting Room lighting Room lighting Operator Room lighting Operator Place where uneven lighting on the Book Table...
... outlet being used for Installation 1.1 Installation Environment Install the Scanner in any other appliances from the same outlet. The outlet should be located near the unit and be easily accessible so that the Power Cord can be unplugged immediately if necessary. NEVER connect any mechanism of the unit. 1-2 Room lighting Room lighting Room lighting Operator Room lighting Operator Place where uneven lighting on the Book Table...
ScanDIVA User Guide
Page 22
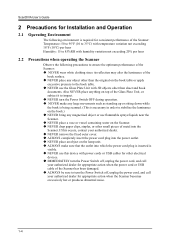
... bring any object other than sheet and book documents. If this device with power cords or USB cables for other electrical devices. IMMEDIATELY turn the Power Switch off, unplug the power cord, and call your authorized dealer for appropriate action when the power cord or USB cable of the book surface. NEVER place any magnetized object or use flammable sprays/liquids near the Scanner. NEVER place a vase or...
... bring any object other than sheet and book documents. If this device with power cords or USB cables for other electrical devices. IMMEDIATELY turn the Power Switch off, unplug the power cord, and call your authorized dealer for appropriate action when the power cord or USB cable of the book surface. NEVER place any magnetized object or use flammable sprays/liquids near the Scanner. NEVER place a vase or...

ScanDIVA User Guide
Page 29
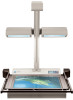
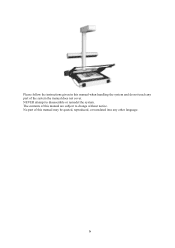
Operation Panel: 4. Power Cord Socket: 7. Place the original (book, sheet) face up on this socket. Turns the Scanner ON/OFF. Connect the Manual Switch (option). This sensor scans the original. See pages 4-8 through 4-13 for accurate scanning. Connect the USB Cable that is housed in this unit. Enables enhanced scanning of book originals by adjusting to the contours of the Scanner, and is used to set scanning conditions. Plug the Power Cord into this table. USB Connector: 8. Manual Switch Connector: The...
Operation Panel: 4. Power Cord Socket: 7. Place the original (book, sheet) face up on this socket. Turns the Scanner ON/OFF. Connect the Manual Switch (option). This sensor scans the original. See pages 4-8 through 4-13 for accurate scanning. Connect the USB Cable that is housed in this unit. Enables enhanced scanning of book originals by adjusting to the contours of the Scanner, and is used to set scanning conditions. Plug the Power Cord into this table. USB Connector: 8. Manual Switch Connector: The...

ScanDIVA User Guide
Page 30
... surface being scanned. 2-4 ScanDIVA User's Guide 9. Used with sheet documents that have curls or folds, and with this mark. Glass Plate Unit (Option): Connects the Scanner to the Personal Computer. USB Cable: 11. Adjust the center of the "SCAN" button on the "Book Scanner" screen to this position. Press this switch instead of the original to start scanning. Manual Switch (Option): 12. Center Mark: 14. Used as the reference position for the original. Power Cord: 10.
... surface being scanned. 2-4 ScanDIVA User's Guide 9. Used with sheet documents that have curls or folds, and with this mark. Glass Plate Unit (Option): Connects the Scanner to the Personal Computer. USB Cable: 11. Adjust the center of the "SCAN" button on the "Book Scanner" screen to this position. Press this switch instead of the original to start scanning. Manual Switch (Option): 12. Center Mark: 14. Used as the reference position for the original. Power Cord: 10.

ScanDIVA User Guide
Page 32
... Application software compatible with basic Windows operations. The operator should be installed on the Personal Computer connected to the Scanner to install the Driver. This chapter describes the system requirements of the Personal Computer and the installation procedure of 1,920 x 1,080 3-2 Computer OS CPU Memory Hard disk drive Interface Optical disc drive Display Application software Compatible with IBM PC/AT Windows 7: 32 bit, 64 bit Windows Vista: 32 bit, 64 bit...
... Application software compatible with basic Windows operations. The operator should be installed on the Personal Computer connected to the Scanner to install the Driver. This chapter describes the system requirements of the Personal Computer and the installation procedure of 1,920 x 1,080 3-2 Computer OS CPU Memory Hard disk drive Interface Optical disc drive Display Application software Compatible with IBM PC/AT Windows 7: 32 bit, 64 bit Windows Vista: 32 bit, 64 bit...

ScanDIVA User Guide
Page 33
... CD-ROM and start Windows. When the "Auto Play" function of the Personal Computer, and start . 3-3 Click "Run launcher.exe". Chapter 3 ScanDIVA TWAIN Driver 1.3 Installation Procedure The following procedure shows the driver installation for the driver installation. Administrative rights are turned OFF. Do not turn the Power Switch of the Personal Computer. Please execute "launcher.exe" in the CD-ROM drive of the Scanner ON at this screen will automatically appear...
... CD-ROM and start Windows. When the "Auto Play" function of the Personal Computer, and start . 3-3 Click "Run launcher.exe". Chapter 3 ScanDIVA TWAIN Driver 1.3 Installation Procedure The following procedure shows the driver installation for the driver installation. Administrative rights are turned OFF. Do not turn the Power Switch of the Personal Computer. Please execute "launcher.exe" in the CD-ROM drive of the Scanner ON at this screen will automatically appear...

ScanDIVA User Guide
Page 34
... of the computer. 3-4 ScanDIVA User's Guide 5 When the installation screen appears, click "ScanDIVA Ver.*.*.*.*" to User's Guide of ImageDIVA Touch for the installation and the operation of the Application. Version of the Application and the Driver might be different from the screen display. The 32-bit version of the driver will automatically be installed in a 64-bit OS. 6 If the "User Account Control" screen appears, click the "Yes" button.
... of the computer. 3-4 ScanDIVA User's Guide 5 When the installation screen appears, click "ScanDIVA Ver.*.*.*.*" to User's Guide of ImageDIVA Touch for the installation and the operation of the Application. Version of the Application and the Driver might be different from the screen display. The 32-bit version of the driver will automatically be installed in a 64-bit OS. 6 If the "User Account Control" screen appears, click the "Yes" button.
ScanDIVA User Guide
Page 36
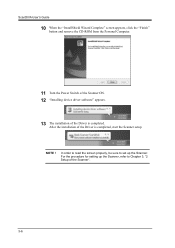
ScanDIVA User's Guide 10 When the "InstallShield Wizard Complete" screen appears, click the "Finish" button and remove the CD-ROM from the Personal Computer. 11 Turn the Power Switch of the Scanner ON. 12 "Installing device driver software" appears. 13 The installation of the Scanner". 3-6 In order to read the screen properly, be sure to Chapter 3, "2 Setup of the Driver is completed, start the Scanner setup. NOTE ! For the procedure for setting up the Scanner, refer to set up the Scanner. After the installation of the Driver is completed.
ScanDIVA User's Guide 10 When the "InstallShield Wizard Complete" screen appears, click the "Finish" button and remove the CD-ROM from the Personal Computer. 11 Turn the Power Switch of the Scanner ON. 12 "Installing device driver software" appears. 13 The installation of the Scanner". 3-6 In order to read the screen properly, be sure to Chapter 3, "2 Setup of the Driver is completed, start the Scanner setup. NOTE ! For the procedure for setting up the Scanner, refer to set up the Scanner. After the installation of the Driver is completed.
ScanDIVA User Guide
Page 37
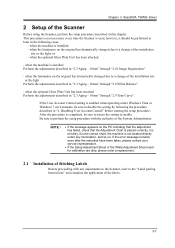
... light; Disabling User Account Control" before starting the setup procedure. when the optional Glass Plate Unit has been attached Perform the adjustments described in "2.3 Aging - 10min" through "2.9 Tone Curve". This procedure is not necessary every time the Scanner is not located directly under Windows Vista or Windows 7 environments, be performed at least in the following the procedure described in this chapter. If the error message...
... light; Disabling User Account Control" before starting the setup procedure. when the optional Glass Plate Unit has been attached Perform the adjustments described in "2.3 Aging - 10min" through "2.9 Tone Curve". This procedure is not necessary every time the Scanner is not located directly under Windows Vista or Windows 7 environments, be performed at least in the following the procedure described in this chapter. If the error message...
ScanDIVA User Guide
Page 57
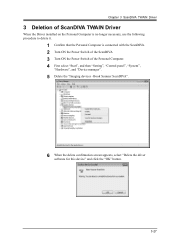
Chapter 3 ScanDIVA TWAIN Driver 3 Deletion of ScanDIVA TWAIN Driver When the Driver installed on the Personal Computer is no longer necessary, use the following procedure to delete it. 1 Confirm that the Personal Computer is connected with the ScanDIVA. 2 Turn ON the Power Switch of the ScanDIVA. 3 Turn ON the Power Switch of the Personal Computer. 4 First select "Start", and then "Setting", "Control panel", "System", "Hardware", and "Device manager". 5 Delete the "Imaging devices -Book Scanner ScanDIVA". 6 When the delete confirmation screen appears...
Chapter 3 ScanDIVA TWAIN Driver 3 Deletion of ScanDIVA TWAIN Driver When the Driver installed on the Personal Computer is no longer necessary, use the following procedure to delete it. 1 Confirm that the Personal Computer is connected with the ScanDIVA. 2 Turn ON the Power Switch of the ScanDIVA. 3 Turn ON the Power Switch of the Personal Computer. 4 First select "Start", and then "Setting", "Control panel", "System", "Hardware", and "Device manager". 5 Delete the "Imaging devices -Book Scanner ScanDIVA". 6 When the delete confirmation screen appears...
ScanDIVA User Guide
Page 98
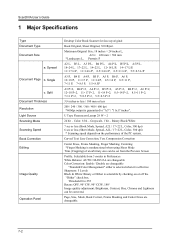
... selected when it is selectable by checking on the performance of an arbitrary size can be set from the Preview Screen Profile: Selectable from 3 modes in Preferences White Balance: AUTO / MANUAL are changeable Color Correction: Enable / Disable are changeable. 7-2 Grayscale, 1 bit - Split Document Thickness Resolution Light Source Scanning Mode Scanning Speed Book Correction Editing Image Quality Operation Panel Desktop Color Book Scanner for face-up original Book Original, Sheet Original, 3D Object Maximum Original...
... selected when it is selectable by checking on the performance of an arbitrary size can be set from the Preview Screen Profile: Selectable from 3 modes in Preferences White Balance: AUTO / MANUAL are changeable Color Correction: Enable / Disable are changeable. 7-2 Grayscale, 1 bit - Split Document Thickness Resolution Light Source Scanning Mode Scanning Speed Book Correction Editing Image Quality Operation Panel Desktop Color Book Scanner for face-up original Book Original, Sheet Original, 3D Object Maximum Original...

ImageDIVA Touch User Guide
Page 2
... Software 2-7 3 Operation of Application 3-1 3-1 Application Start-Up 3-1 3-2 Application Shutdown 3-1 3-3 Application Window 3-2 3-4 Scan Mode 3-3 3-5 Image Mode 3-4 3-6 Image Adjustment 3-4 3-7 File Format 3-5 3-8 Scan 3-6 3-9 Preview Area 3-6 3-10 Output Buttons 3-7 3-11 E-Mail 3-8 E-Mail ...3-8 Address Book 3-9 Edit ...3-10 3-12 Batch Scan Mode 3-11 Start of Batch Scan 3-12 Close of Batch Scan 3-12 4 Application Settings 4-1 4-1 Keyboard Shortcuts 4-1 4-2 Input Serial Number 4-2 4-3 Select Scanner 4-2 4-4 Open the TWAIN Driver screen 4-3 4-5 Display of the Scanned...
... Software 2-7 3 Operation of Application 3-1 3-1 Application Start-Up 3-1 3-2 Application Shutdown 3-1 3-3 Application Window 3-2 3-4 Scan Mode 3-3 3-5 Image Mode 3-4 3-6 Image Adjustment 3-4 3-7 File Format 3-5 3-8 Scan 3-6 3-9 Preview Area 3-6 3-10 Output Buttons 3-7 3-11 E-Mail 3-8 E-Mail ...3-8 Address Book 3-9 Edit ...3-10 3-12 Batch Scan Mode 3-11 Start of Batch Scan 3-12 Close of Batch Scan 3-12 4 Application Settings 4-1 4-1 Keyboard Shortcuts 4-1 4-2 Input Serial Number 4-2 4-3 Select Scanner 4-2 4-4 Open the TWAIN Driver screen 4-3 4-5 Display of the Scanned...
ImageDIVA Touch User Guide
Page 6
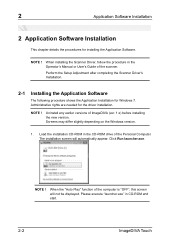
...", this screen will automatically appear. NOTE ! NOTE ! When the "Auto Play" function of the Personal Computer. Perform the Setup Adjustment after completing the Scanner Driver's Installation. 2-1 Installing the Application Software The following procedure shows the Application Installation for the driver installation. Click Run launcher.exe. Uninstall any earlier versions of the scanner. NOTE ! When installing the Scanner Driver, follow the procedure in the Operator's Manual or User's Guide of ImageDIVA...
...", this screen will automatically appear. NOTE ! NOTE ! When the "Auto Play" function of the Personal Computer. Perform the Setup Adjustment after completing the Scanner Driver's Installation. 2-1 Installing the Application Software The following procedure shows the Application Installation for the driver installation. Click Run launcher.exe. Uninstall any earlier versions of the scanner. NOTE ! When installing the Scanner Driver, follow the procedure in the Operator's Manual or User's Guide of ImageDIVA...

ImageDIVA Touch User Guide
Page 14
... settings for Scan Size, Resolution, Book Correction, and Auto Cropping. See Section 3.4 Scan Mode Select the image type to be adjusted by dragging the rectangular handles. The scanned image is printed, saved, or e-mailed. See Section 3.9 Output Buttons The Help file is pressed. 3-2 ImageDIVA Touch The Help file is also displayed when the "F1" key on the keyboard is displayed. 3 3-3 Application Window 6 1 2 3 4 5 Operation of the output file or printer...
... settings for Scan Size, Resolution, Book Correction, and Auto Cropping. See Section 3.4 Scan Mode Select the image type to be adjusted by dragging the rectangular handles. The scanned image is printed, saved, or e-mailed. See Section 3.9 Output Buttons The Help file is pressed. 3-2 ImageDIVA Touch The Help file is also displayed when the "F1" key on the keyboard is displayed. 3 3-3 Application Window 6 1 2 3 4 5 Operation of the output file or printer...


