Cube3 User Guide
Page 5
...: • Upload your creations • Purchase creations • Get your creations with others in all areas. The 3D Systems logo, 3D Systems, Cube and Cubify are designed to provide reasonable protection against harmful interference in a residential installation. NOTE: Changes or modifications... to this equipment not specifically approved by 3D Systems may cause undesired operation of the device. CAN ICES-3 (B)/NMB-3(B) This device complies with a plug and print design ...
...: • Upload your creations • Purchase creations • Get your creations with others in all areas. The 3D Systems logo, 3D Systems, Cube and Cubify are designed to provide reasonable protection against harmful interference in a residential installation. NOTE: Changes or modifications... to this equipment not specifically approved by 3D Systems may cause undesired operation of the device. CAN ICES-3 (B)/NMB-3(B) This device complies with a plug and print design ...
Cube3 User Guide
Page 6
...our standard warranty are covered by consumer protection laws or regulations in their country of residence, the benefits conferred by anyone except 3D Systems or its authorized service provider), and (iii) repairs required during the warranty period because of the use of defects during the... (such as Material Cartridges), (ii) repairs required during the warranty period because of the 3D Printer, to 3D Systems. Please retain your Cube 3D printer is shipped from 3D Systems to ship the defective 3D Printer, or certain parts of abnormal use or conditions (such as riots, floods, misuse,...
...our standard warranty are covered by consumer protection laws or regulations in their country of residence, the benefits conferred by anyone except 3D Systems or its authorized service provider), and (iii) repairs required during the warranty period because of the use of defects during the... (such as Material Cartridges), (ii) repairs required during the warranty period because of the 3D Printer, to 3D Systems. Please retain your Cube 3D printer is shipped from 3D Systems to ship the defective 3D Printer, or certain parts of abnormal use or conditions (such as riots, floods, misuse,...
Cube3 User Guide
Page 7
... UTILITY POWER. SHOCK WARNING: INDICATES A POTENTIAL SHOCK HAZARD. ranty. • Use of print materials, or 3D prints other than 3D Systems' print materials and genuine 3D Systems' components may happen that could cause personal injury. SHOCK WARNING: DUE TO RISK OF SHOCK, AVOID CONTACT WITH...your Cube. AVOID CONTACT WITH THESE AREAS. Caution: Indicates a pinch point hazard that could cause loss of and avoid hot surfaces. 3D Systems, Inc. 3 2 IMPORTANT SAFETY INFORMATION SAFETY SYMBOLS AND DEFINITIONS HOT SURFACE HAZARD: A HOT SURFACE IS ACCESSIBLE IN THE VICINITY OF THIS...
... UTILITY POWER. SHOCK WARNING: INDICATES A POTENTIAL SHOCK HAZARD. ranty. • Use of print materials, or 3D prints other than 3D Systems' print materials and genuine 3D Systems' components may happen that could cause personal injury. SHOCK WARNING: DUE TO RISK OF SHOCK, AVOID CONTACT WITH...your Cube. AVOID CONTACT WITH THESE AREAS. Caution: Indicates a pinch point hazard that could cause loss of and avoid hot surfaces. 3D Systems, Inc. 3 2 IMPORTANT SAFETY INFORMATION SAFETY SYMBOLS AND DEFINITIONS HOT SURFACE HAZARD: A HOT SURFACE IS ACCESSIBLE IN THE VICINITY OF THIS...
Cube3 User Guide
Page 8
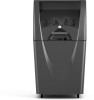
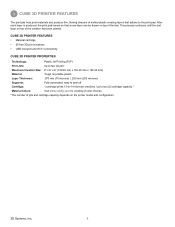
This process continues until the last layer on top of the last. CUBE 3D PRINTER FEATURES • Material cartridge • 25 free 3D print creations • USB inlet port and Wi-Fi connectivity CUBE 3D PRINTER PROPERTIES Technology: Plastic Jet Printing (PJP) Print Jets: Up to -14 ....com for a listing of color choices. *The number of jets and cartridge capacity depends on the printer model and configuration. 3D Systems, Inc. 4 3 CUBE 3D PRINTER FEATURES The print jets heat print materials and produce thin, flowing streams of melted plastic creating layers that a new layer can...
This process continues until the last layer on top of the last. CUBE 3D PRINTER FEATURES • Material cartridge • 25 free 3D print creations • USB inlet port and Wi-Fi connectivity CUBE 3D PRINTER PROPERTIES Technology: Plastic Jet Printing (PJP) Print Jets: Up to -14 ....com for a listing of color choices. *The number of jets and cartridge capacity depends on the printer model and configuration. 3D Systems, Inc. 4 3 CUBE 3D PRINTER FEATURES The print jets heat print materials and produce thin, flowing streams of melted plastic creating layers that a new layer can...

Cube3 User Guide
Page 9
4 AT A GLANCE B C F A G B C J D H H E KI A Print Jets B Print Jet Tubes C Material Cartridges D Print Pad E Print Platform F Touchscreen Display I K G On / Off Button H USB Inlet Port (Mass Storage Device) I Power Inlet J Refuse Bins K USB B Port (for future use) 3D Systems, Inc. 5
4 AT A GLANCE B C F A G B C J D H H E KI A Print Jets B Print Jet Tubes C Material Cartridges D Print Pad E Print Platform F Touchscreen Display I K G On / Off Button H USB Inlet Port (Mass Storage Device) I Power Inlet J Refuse Bins K USB B Port (for future use) 3D Systems, Inc. 5
Cube3 User Guide
Page 10
... Rating: 100 - 240 Volts, at room temperature: 16-29° C (60 - 85° F) • Non-condensing relative humidity: 5% - 25% 3D Systems, Inc. 6 These applications generate .cube3 file for printing on 32- OPENGL VERSION • OpenGLES 2.0+ on mobile platforms • Open GL 3.0+ on Windows and...802.11b/g with WPS Infrastructure • Ad Hoc mode USB MASS STORAGE DEVICE • USB mass storage device (supplied with time. and 64-bit operating systems • Windows 7, 8 and 8.1 • Minimum screen resolution: 1024 x 768 • Windows is needed. • Store at 50/60 Hz ...
... Rating: 100 - 240 Volts, at room temperature: 16-29° C (60 - 85° F) • Non-condensing relative humidity: 5% - 25% 3D Systems, Inc. 6 These applications generate .cube3 file for printing on 32- OPENGL VERSION • OpenGLES 2.0+ on mobile platforms • Open GL 3.0+ on Windows and...802.11b/g with WPS Infrastructure • Ad Hoc mode USB MASS STORAGE DEVICE • USB mass storage device (supplied with time. and 64-bit operating systems • Windows 7, 8 and 8.1 • Minimum screen resolution: 1024 x 768 • Windows is needed. • Store at 50/60 Hz ...
Cube3 User Guide
Page 12
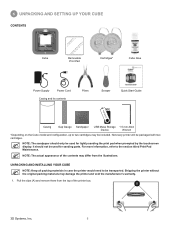
... display. For more information, refer to be packaged with two cartridges. Pull the clips (A) and remove them from the illustrations. It should only be included. A 3D Systems, Inc. 8 6 UNPACKING AND SETTING UP YOUR CUBE CONTENTS Cube Removable Print Pad Cartridges* Cube Glue Power Supply Power Cord Casing and its contents Pliers Scraper...
... display. For more information, refer to be packaged with two cartridges. Pull the clips (A) and remove them from the illustrations. It should only be included. A 3D Systems, Inc. 8 6 UNPACKING AND SETTING UP YOUR CUBE CONTENTS Cube Removable Print Pad Cartridges* Cube Glue Power Supply Power Cord Casing and its contents Pliers Scraper...
Cube3 User Guide
Page 13
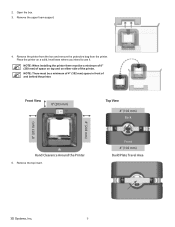
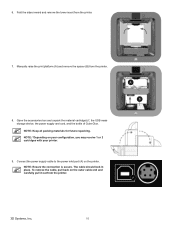
NOTE: There must be a minimum of 4" (102 mm) space in front of the printer. Front 4" (102 mm) Build Plate Travel Area 3D Systems, Inc. 9 Place the printer on either side of and behind the printer. Open the box. 3. Remove the upper foam support. 4. NOTE: When installing the printer ...
NOTE: There must be a minimum of 4" (102 mm) space in front of the printer. Front 4" (102 mm) Build Plate Travel Area 3D Systems, Inc. 9 Place the printer on either side of and behind the printer. Open the box. 3. Remove the upper foam support. 4. NOTE: When installing the printer ...
Cube3 User Guide
Page 14
... all packing materials for future repacking. The cable should lock in place. NOTE: *Depending on your configuration, you may receive 1 or 2 cartridges with your printer. 9. A B A 3D Systems, Inc. 10 Fold the sides inward and remove the lower insert from the printer. 8. 6.
... all packing materials for future repacking. The cable should lock in place. NOTE: *Depending on your configuration, you may receive 1 or 2 cartridges with your printer. 9. A B A 3D Systems, Inc. 10 Fold the sides inward and remove the lower insert from the printer. 8. 6.
Cube3 User Guide
Page 15
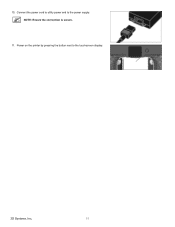
Connect the power cord to utility power and to the touchscreen display. 3D Systems, Inc. 11 Power on the printer by pressing the button next to the power supply. 10. NOTE: Ensure the connection is secure. 11.
Connect the power cord to utility power and to the touchscreen display. 3D Systems, Inc. 11 Power on the printer by pressing the button next to the power supply. 10. NOTE: Ensure the connection is secure. 11.
Cube3 User Guide
Page 16
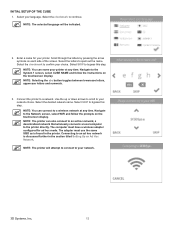
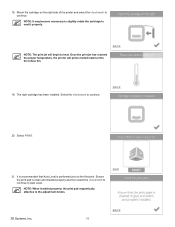
... connects a local computer to the printer directly. INITIAL SETUP OF THE CUBE 1. Navigate to confirm your language. Select your choice. Select the checkmark to the System 1 screen, select CUBE NAME and follow the prompts on each side of the screen. Select SKIP to continue. Select the checkmark to bypass this step...
... connects a local computer to the printer directly. INITIAL SETUP OF THE CUBE 1. Navigate to confirm your language. Select your choice. Select the checkmark to the System 1 screen, select CUBE NAME and follow the prompts on each side of the screen. Select SKIP to continue. Select the checkmark to bypass this step...
Cube3 User Guide
Page 17
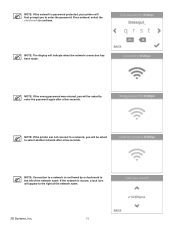
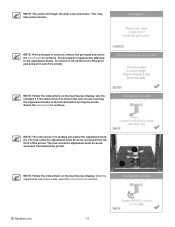
Once entered, select the checkmark to the left of the network name. 3D Systems, Inc. 13 If the network is password protected, your printer will first prompt you to enter the password. NOTE: If the wrong password was entered, ...
Once entered, select the checkmark to the left of the network name. 3D Systems, Inc. 13 If the network is password protected, your printer will first prompt you to enter the password. NOTE: If the wrong password was entered, ...
Cube3 User Guide
Page 18
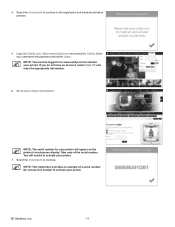
... enter the appropriate information. 6. Select the checkmark to www.cubify.com/activate. NOTE: This illustration provides an example of the serial number. Enter your printer. 3D Systems, Inc. 14 Go to continue. NOTE: The serial number for your printer will need it to activate your username and password and select Login. NOTE...
... enter the appropriate information. 6. Select the checkmark to www.cubify.com/activate. NOTE: This illustration provides an example of the serial number. Enter your printer. 3D Systems, Inc. 14 Go to continue. NOTE: The serial number for your printer will need it to activate your username and password and select Login. NOTE...
Cube3 User Guide
Page 19
... and select the checkmark to activate the printer. 9. This will appear. 8. NOTE: Your 4-digit activation code will bypass the print pad calibration and test print. 3D Systems, Inc. 15
... and select the checkmark to activate the printer. 9. This will appear. 8. NOTE: Your 4-digit activation code will bypass the print pad calibration and test print. 3D Systems, Inc. 15
Cube3 User Guide
Page 20
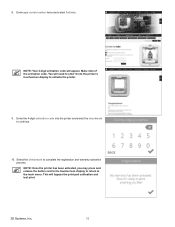
... rotate the print jet, ensure the print jet tube is tucked under the top of the printer and select the checkmark to seat it properly. 3D Systems, Inc. 16
... rotate the print jet, ensure the print jet tube is tucked under the top of the printer and select the checkmark to seat it properly. 3D Systems, Inc. 16
Cube3 User Guide
Page 21
... is tucked under the top of the printer) into the refuse bin. 15. NOTE: The printer will begin to continue. Select the checkmark to heat. A 3D Systems, Inc. 17 Once the print jet has reached the proper temperature, the printer will be mounted on the right side of the printer cover.
... is tucked under the top of the printer) into the refuse bin. 15. NOTE: The printer will begin to continue. Select the checkmark to heat. A 3D Systems, Inc. 17 Once the print jet has reached the proper temperature, the printer will be mounted on the right side of the printer cover.
Cube3 User Guide
Page 22
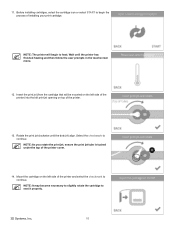
Mount the cartridge on the right side of the printer and select the checkmark to the adjustment knobs. 3D Systems, Inc. 18 NOTE: The print jet will prime melted material into the refuse bin. 19. Select PRINT. 21. It is recommended that Auto Level is ...
Mount the cartridge on the right side of the printer and select the checkmark to the adjustment knobs. 3D Systems, Inc. 18 NOTE: The print jet will prime melted material into the refuse bin. 19. Select PRINT. 21. It is recommended that Auto Level is ...
Cube3 User Guide
Page 23
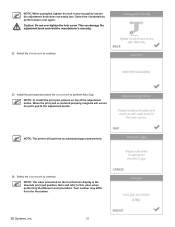
... turning the knobs. Use the included 1.5 mm Allen wrench to loosen the lock screws securing the adjustment knobs to continue. Select the checkmark to continue. 2 1 3D Systems, Inc. 19 Once the adjustments have been made, select the checkmark to continue. To remove it, lift up the front of the print pad and...
... turning the knobs. Use the included 1.5 mm Allen wrench to loosen the lock screws securing the adjustment knobs to continue. Select the checkmark to continue. 2 1 3D Systems, Inc. 19 Once the adjustments have been made, select the checkmark to continue. To remove it, lift up the front of the print pad and...
Cube3 User Guide
Page 24
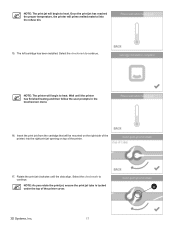
... damage the adjustment knob and void the manufacturer's warranty. 22. Select the checkmark to perform Auto Level again. Your number may differ from the illustration. 3D Systems, Inc. 20 Select the checkmark to continue. 23. Install the print pad and select the checkmark to perform Auto Gap. NOTE: The value presented on...
... damage the adjustment knob and void the manufacturer's warranty. 22. Select the checkmark to perform Auto Level again. Your number may differ from the illustration. 3D Systems, Inc. 20 Select the checkmark to continue. 23. Install the print pad and select the checkmark to perform Auto Gap. NOTE: The value presented on...

Cube3 User Guide
Page 25
...a square area of printing the welcome message test print. NOTE: For more information about applying glue to the print pad, refer to the System 1 screen and select TEST PRINT. NOTE: Apply enough glue to the test print. Select AUTO LEVEL to continue. Select the checkmark to ...continue. Refer to heat and then begin printing the welcome message test print. 3D Systems, Inc. 21 Once the Manual Gap Adjustment procedure has been performed, note the final reading for more information, refer to bypass this ...
...a square area of printing the welcome message test print. NOTE: For more information about applying glue to the print pad, refer to the System 1 screen and select TEST PRINT. NOTE: Apply enough glue to the test print. Select AUTO LEVEL to continue. Select the checkmark to ...continue. Refer to heat and then begin printing the welcome message test print. 3D Systems, Inc. 21 Once the Manual Gap Adjustment procedure has been performed, note the final reading for more information, refer to bypass this ...


