
Cube3 User Guide
Page 2
... 1 COPYRIGHT INFORMATION 1 FCC NOTICE 1 KCC 1 COMPLIANCE 1 WARRANTY 2 LIMITATION OF LIABILITY 2 EXTENDED WARRANTY 2 2 IMPORTANT SAFETY INFORMATION 3 Safety Symbols and Definitions 3 Safety Guidelines 3 3 CUBE 3D PRINTER FEATURES 4 Cube 3D Printer Features 4 Cube 3D Printer Properties 4 4 AT A GLANCE 5 5 SPECIFICATIONS AND REQUIREMENTS 6 Weight 6 Software 6 OpenGL Version 6 Windows Requirements 6 MAC OS X Requirements 6 Android 6 iOS 6 Wireless Options 6 USB Mass...
... 1 COPYRIGHT INFORMATION 1 FCC NOTICE 1 KCC 1 COMPLIANCE 1 WARRANTY 2 LIMITATION OF LIABILITY 2 EXTENDED WARRANTY 2 2 IMPORTANT SAFETY INFORMATION 3 Safety Symbols and Definitions 3 Safety Guidelines 3 3 CUBE 3D PRINTER FEATURES 4 Cube 3D Printer Features 4 Cube 3D Printer Properties 4 4 AT A GLANCE 5 5 SPECIFICATIONS AND REQUIREMENTS 6 Weight 6 Software 6 OpenGL Version 6 Windows Requirements 6 MAC OS X Requirements 6 Android 6 iOS 6 Wireless Options 6 USB Mass...
Cube3 User Guide
Page 5
...for a Class B digital device, pursuant to part 15 of the following two conditions: (1) this device may cause undesired operation of 3D Systems, Inc. This document is copyrighted and contains proprietary information that is no guarantee that interference will not occur in the family to ... de l'appareil doit accepter tout brouillage radioélectrique subi, même si le brouillage est susceptible d'en compromettre le fonctionnement. 3D Systems, Inc. 1 FCC NOTICE This equipment has been tested and found to comply with Industry Canada license-exempt RSS standard(s). With ...
...for a Class B digital device, pursuant to part 15 of the following two conditions: (1) this device may cause undesired operation of 3D Systems, Inc. This document is copyrighted and contains proprietary information that is no guarantee that interference will not occur in the family to ... de l'appareil doit accepter tout brouillage radioélectrique subi, même si le brouillage est susceptible d'en compromettre le fonctionnement. 3D Systems, Inc. 1 FCC NOTICE This equipment has been tested and found to comply with Industry Canada license-exempt RSS standard(s). With ...
Cube3 User Guide
Page 6
... WARRANTIES ARE EXPRESS, IMPLIED OR STATUTORY, INCLUDING WARRANTIES OF MERCHANTABILITY AND FITNESS FOR INTENDED OR PARTICULAR PURPOSES. You may also directly contact 3D Systems using the numbers or email addresses below: Warranty Hotline from Europe +44 1442 279 839 (UK) or +49 6151 357 499...), and (iii) repairs required during the applicable warranty period, when used if You need to these additional rights. LIMITATION OF LIABILITY 3D SYSTEMS WILL NOT BE RESPONSIBLE FOR CONSEQUENTIAL, EXEMPLARY OR INCIDENTAL DAMAGES (SUCH AS LOSS OF PROFIT OR EMPLOYEE'S TIME) REGARDLESS OF THE...
... WARRANTIES ARE EXPRESS, IMPLIED OR STATUTORY, INCLUDING WARRANTIES OF MERCHANTABILITY AND FITNESS FOR INTENDED OR PARTICULAR PURPOSES. You may also directly contact 3D Systems using the numbers or email addresses below: Warranty Hotline from Europe +44 1442 279 839 (UK) or +49 6151 357 499...), and (iii) repairs required during the applicable warranty period, when used if You need to these additional rights. LIMITATION OF LIABILITY 3D SYSTEMS WILL NOT BE RESPONSIBLE FOR CONSEQUENTIAL, EXEMPLARY OR INCIDENTAL DAMAGES (SUCH AS LOSS OF PROFIT OR EMPLOYEE'S TIME) REGARDLESS OF THE...
Cube3 User Guide
Page 7
...and warnings in this may damage the Cube. Caution: Indicates a pinch point hazard that could cause loss of and avoid hot surfaces. 3D Systems, Inc. 3 PRIOR TO ANY PART REPLACEMENT PROCEDURE, THE PRINTER MUST BE POWERED OFF AND DISCONNECTED FROM UTILITY POWER. To ensure safety..., please exercise caution when operating your Cube 3D Printer to setting up the printer. Caution: Indicates something may void the warranty. • Adult supervision is prohibited and voids the ...
...and warnings in this may damage the Cube. Caution: Indicates a pinch point hazard that could cause loss of and avoid hot surfaces. 3D Systems, Inc. 3 PRIOR TO ANY PART REPLACEMENT PROCEDURE, THE PRINTER MUST BE POWERED OFF AND DISCONNECTED FROM UTILITY POWER. To ensure safety..., please exercise caution when operating your Cube 3D Printer to setting up the printer. Caution: Indicates something may void the warranty. • Adult supervision is prohibited and voids the ...
Cube3 User Guide
Page 8
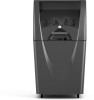
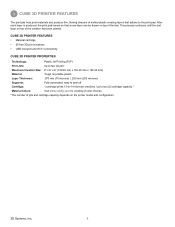
... -14 mid-size creations. This process continues until the last layer on top of jets and cartridge capacity depends on the printer model and configuration. 3D Systems, Inc. 4 Up to two (2) jets* Maximum Creation Size: 6" x 6" x 6" (152.40 mm x 152.40 mm x 152.40 mm) Material:...070 mm (70 microns) | .200 mm (200 microns) Supports: Fully automated; CUBE 3D PRINTER FEATURES • Material cartridge • 25 free 3D print creations • USB inlet port and Wi-Fi connectivity CUBE 3D PRINTER PROPERTIES Technology: Plastic Jet Printing (PJP) Print Jets: Up to two (2) cartridge ...
... -14 mid-size creations. This process continues until the last layer on top of jets and cartridge capacity depends on the printer model and configuration. 3D Systems, Inc. 4 Up to two (2) jets* Maximum Creation Size: 6" x 6" x 6" (152.40 mm x 152.40 mm x 152.40 mm) Material:...070 mm (70 microns) | .200 mm (200 microns) Supports: Fully automated; CUBE 3D PRINTER FEATURES • Material cartridge • 25 free 3D print creations • USB inlet port and Wi-Fi connectivity CUBE 3D PRINTER PROPERTIES Technology: Plastic Jet Printing (PJP) Print Jets: Up to two (2) cartridge ...

Cube3 User Guide
Page 9
4 AT A GLANCE B C F A G B C J D H H E KI A Print Jets B Print Jet Tubes C Material Cartridges D Print Pad E Print Platform F Touchscreen Display I K G On / Off Button H USB Inlet Port (Mass Storage Device) I Power Inlet J Refuse Bins K USB B Port (for future use) 3D Systems, Inc. 5
4 AT A GLANCE B C F A G B C J D H H E KI A Print Jets B Print Jet Tubes C Material Cartridges D Print Pad E Print Platform F Touchscreen Display I K G On / Off Button H USB Inlet Port (Mass Storage Device) I Power Inlet J Refuse Bins K USB B Port (for future use) 3D Systems, Inc. 5
Cube3 User Guide
Page 10
... submission. ELECTRICAL REQUIREMENTS Outlet Requirements Electrical Rating: 100 - 240 Volts, at room temperature: 16-29° C (60 - 85° F) • Non-condensing relative humidity: 5% - 25% 3D Systems, Inc. 6 5 SPECIFICATIONS AND REQUIREMENTS WEIGHT Maximum Cube Weight (with time. MAC OS X REQUIREMENTS • OS X 10.8 and 10.9 • Minimum screen resolution: 1400 x 900...
... submission. ELECTRICAL REQUIREMENTS Outlet Requirements Electrical Rating: 100 - 240 Volts, at room temperature: 16-29° C (60 - 85° F) • Non-condensing relative humidity: 5% - 25% 3D Systems, Inc. 6 5 SPECIFICATIONS AND REQUIREMENTS WEIGHT Maximum Cube Weight (with time. MAC OS X REQUIREMENTS • OS X 10.8 and 10.9 • Minimum screen resolution: 1400 x 900...
Cube3 User Guide
Page 12
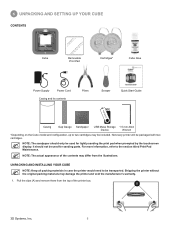
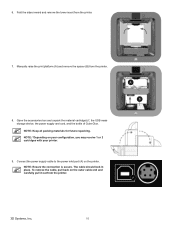
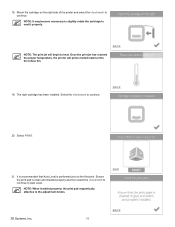
... every printer will be used for lightly sanding the print pad when prompted by the touchscreen display. NOTE: The actual appearance of the printer box. A 3D Systems, Inc. 8 Shipping the printer without the original packing materials may differ from the illustrations. For more information, refer to two cartridges may be included...
... every printer will be used for lightly sanding the print pad when prompted by the touchscreen display. NOTE: The actual appearance of the printer box. A 3D Systems, Inc. 8 Shipping the printer without the original packing materials may differ from the illustrations. For more information, refer to two cartridges may be included...
Cube3 User Guide
Page 13
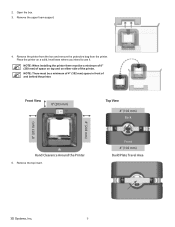
NOTE: There must be a minimum of 4" (102 mm) space in front of the printer. Front 4" (102 mm) Build Plate Travel Area 3D Systems, Inc. 9 Place the printer on either side of and behind the printer. Open the box. 3. Front View 8" (203 mm) Top View 4" (102 mm) Back 8" (...
NOTE: There must be a minimum of 4" (102 mm) space in front of the printer. Front 4" (102 mm) Build Plate Travel Area 3D Systems, Inc. 9 Place the printer on either side of and behind the printer. Open the box. 3. Front View 8" (203 mm) Top View 4" (102 mm) Back 8" (...
Cube3 User Guide
Page 14
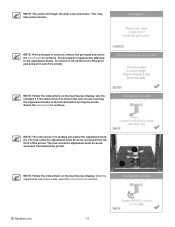
..., pull back on your configuration, you may receive 1 or 2 cartridges with your printer. 9. Fold the sides inward and remove the lower insert from the printer. 8. A B A 3D Systems, Inc. 10 Connect the power supply cable to the power inlet port (A) on the printer. The cable should lock in place. Manually raise the...
..., pull back on your configuration, you may receive 1 or 2 cartridges with your printer. 9. Fold the sides inward and remove the lower insert from the printer. 8. A B A 3D Systems, Inc. 10 Connect the power supply cable to the power inlet port (A) on the printer. The cable should lock in place. Manually raise the...
Cube3 User Guide
Page 15
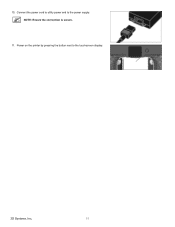
Power on the printer by pressing the button next to the power supply. NOTE: Ensure the connection is secure. 11. Connect the power cord to utility power and to the touchscreen display. 3D Systems, Inc. 11 10.
Power on the printer by pressing the button next to the power supply. NOTE: Ensure the connection is secure. 11. Connect the power cord to utility power and to the touchscreen display. 3D Systems, Inc. 11 10.
Cube3 User Guide
Page 16
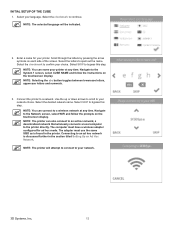
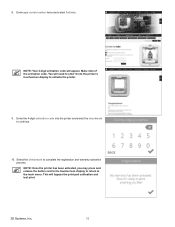
... side of the screen. Navigate to an ad hoc network is found in the section titled Setting Up an Ad Hoc Network. Select your network. 3D Systems, Inc. 12 Connecting to the System 1 screen, select CUBE NAME and follow the prompts on the touchscreen display.
... side of the screen. Navigate to an ad hoc network is found in the section titled Setting Up an Ad Hoc Network. Select your network. 3D Systems, Inc. 12 Connecting to the System 1 screen, select CUBE NAME and follow the prompts on the touchscreen display.
Cube3 User Guide
Page 17
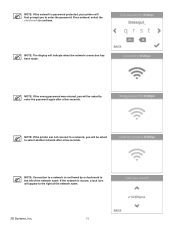
...: The display will first prompt you to the right of the network name. Once entered, select the checkmark to the left of the network name. 3D Systems, Inc. 13 NOTE: Connection to a network is secure, a lock icon will appear to enter the password. NOTE: If the wrong password was entered, you...
...: The display will first prompt you to the right of the network name. Once entered, select the checkmark to the left of the network name. 3D Systems, Inc. 13 NOTE: Connection to a network is secure, a lock icon will appear to enter the password. NOTE: If the wrong password was entered, you...
Cube3 User Guide
Page 18
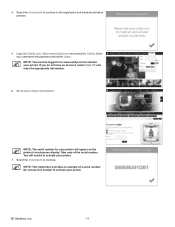
....com and select My Cubify. NOTE: You must be logged in to activate your printer. 7. Log in to www.cubify.com to activate your printer. 3D Systems, Inc. 14 Do not use this number to Cubify.com.
....com and select My Cubify. NOTE: You must be logged in to activate your printer. 7. Log in to www.cubify.com to activate your printer. 3D Systems, Inc. 14 Do not use this number to Cubify.com.
Cube3 User Guide
Page 19
.... Enter your serial number twice and select Activate. Select the checkmark to the main menu. You will bypass the print pad calibration and test print. 3D Systems, Inc. 15 This will need to enter it into the printer and select the checkmark to activate the printer. 9. 8. Enter the 4-digit activation code...
.... Enter your serial number twice and select Activate. Select the checkmark to the main menu. You will bypass the print pad calibration and test print. 3D Systems, Inc. 15 This will need to enter it into the printer and select the checkmark to activate the printer. 9. 8. Enter the 4-digit activation code...
Cube3 User Guide
Page 20
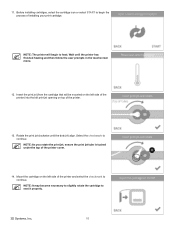
... print jet opening on the left side of the printer. 13. Before installing cartridges, select the cartridge icon or select START to seat it properly. 3D Systems, Inc. 16
... print jet opening on the left side of the printer. 13. Before installing cartridges, select the cartridge icon or select START to seat it properly. 3D Systems, Inc. 16
Cube3 User Guide
Page 21
... be mounted on top of the printer cover. Insert the print jet (from the cartridge that will begin to heat. Wait until the dots align. A 3D Systems, Inc. 17
... be mounted on top of the printer cover. Insert the print jet (from the cartridge that will begin to heat. Wait until the dots align. A 3D Systems, Inc. 17
Cube3 User Guide
Page 22
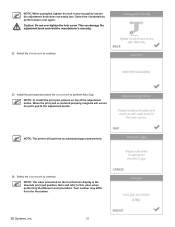
... cartridge to continue. 20. Select the checkmark to seat it properly. Select PRINT. 21. Ensure the print pad is performed prior to the adjustment knobs. 3D Systems, Inc. 18 18. The right cartridge has been installed.
... cartridge to continue. 20. Select the checkmark to seat it properly. Select PRINT. 21. Ensure the print pad is performed prior to the adjustment knobs. 3D Systems, Inc. 18 18. The right cartridge has been installed.
Cube3 User Guide
Page 23
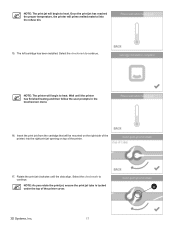
... checkmark to the bracket before turning the knobs. Use the included 1.5 mm Allen wrench to loosen the lock screws securing the adjustment knobs to continue. 2 1 3D Systems, Inc. 19 This may take a few minutes. NOTE: Follow the instructions on the touchscreen display.
... checkmark to the bracket before turning the knobs. Use the included 1.5 mm Allen wrench to loosen the lock screws securing the adjustment knobs to continue. 2 1 3D Systems, Inc. 19 This may take a few minutes. NOTE: Follow the instructions on the touchscreen display.
Cube3 User Guide
Page 24
... select the checkmark to continue. Select the checkmark to perform Auto Gap. Note and refer to continue. 23. Your number may differ from the illustration. 3D Systems, Inc. 20 Select the checkmark to this value when performing the Manual Level procedure. NOTE: The value presented on top of the adjustment knobs...
... select the checkmark to continue. Select the checkmark to perform Auto Gap. Note and refer to continue. 23. Your number may differ from the illustration. 3D Systems, Inc. 20 Select the checkmark to this value when performing the Manual Level procedure. NOTE: The value presented on top of the adjustment knobs...