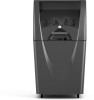

Cube3 User Guide
Page 3
Standard 50 Print Settings - Draft 52 Connecting Cubify To Your Printer 54 Connecting Cubify To Your Printer Manually 54 Printing A Model Via Wireless Connection 62 Printing From A Desktop Application 62 Printing From A Mobile Application 65 Saving A Model to A Mass Storage Device 69 Desktop ...
Standard 50 Print Settings - Draft 52 Connecting Cubify To Your Printer 54 Connecting Cubify To Your Printer Manually 54 Printing A Model Via Wireless Connection 62 Printing From A Desktop Application 62 Printing From A Mobile Application 65 Saving A Model to A Mass Storage Device 69 Desktop ...
Cube3 User Guide
Page 4
Print Pad Calibration 81 Auto Level 81 Gap Verification 84 Manual Gap Adjustment 85 Print Pad Maintenance 86 Clean The Print Pad 86 Test Print 87 Cube Name 88 Updating the Cube Firmware 89 Updating Firmware Using Wi-F.i 89 Updating Firmware Using USB 92 Repacking the Printer 94 Contacting Support 96 12 CUBIFY SUSTAINABILITY PROGRAM 97
Print Pad Calibration 81 Auto Level 81 Gap Verification 84 Manual Gap Adjustment 85 Print Pad Maintenance 86 Clean The Print Pad 86 Test Print 87 Cube Name 88 Updating the Cube Firmware 89 Updating Firmware Using Wi-F.i 89 Updating Firmware Using USB 92 Repacking the Printer 94 Contacting Support 96 12 CUBIFY SUSTAINABILITY PROGRAM 97
Cube3 User Guide
Page 14
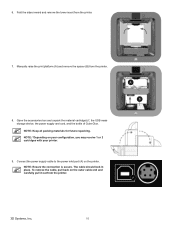
... the power inlet port (A) on the outer cable end and carefully pull it out from the printer. NOTE: Keep all packing materials for future repacking. Manually raise the print platform (A) and remove the spacer (B) from the printer. 7. 6. NOTE: *Depending on your configuration, you may receive 1 or 2 cartridges with your printer. 9. NOTE...
... the power inlet port (A) on the outer cable end and carefully pull it out from the printer. NOTE: Keep all packing materials for future repacking. Manually raise the print platform (A) and remove the spacer (B) from the printer. 7. 6. NOTE: *Depending on your configuration, you may receive 1 or 2 cartridges with your printer. 9. NOTE...
Cube3 User Guide
Page 24
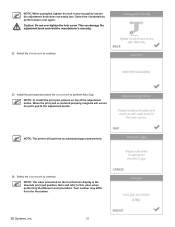
... and refer to continue. This can damage the adjustment knob and void the manufacturer's warranty. 22. Select the checkmark to this value when performing the Manual Level procedure. NOTE: When prompted, tighten the lock screw enough to perform Auto Level again. Your number may differ from the illustration. 3D Systems, Inc...
... and refer to continue. This can damage the adjustment knob and void the manufacturer's warranty. 22. Select the checkmark to this value when performing the Manual Level procedure. NOTE: When prompted, tighten the lock screw enough to perform Auto Level again. Your number may differ from the illustration. 3D Systems, Inc...

Cube3 User Guide
Page 25
...performed, perform Auto Level and Auto Gap. Select PRINT. NOTE: The printer will continue the process of Cube Glue to the section titled Manual Gap Adjustment for future reference. 25. Gently squeeze the bottle and apply two thin layers of printing the welcome message test print. Refer ... to continue. 26. For more information about applying glue to the print pad, refer to the section titled Print Pad Maintenance. Once the Manual Gap Adjustment procedure has been performed, note the final reading for more information. Follow the prompts in the touchscreen display. NOTE: For more ...
...performed, perform Auto Level and Auto Gap. Select PRINT. NOTE: The printer will continue the process of Cube Glue to the section titled Manual Gap Adjustment for future reference. 25. Gently squeeze the bottle and apply two thin layers of printing the welcome message test print. Refer ... to continue. 26. For more information about applying glue to the print pad, refer to the section titled Print Pad Maintenance. Once the Manual Gap Adjustment procedure has been performed, note the final reading for more information. Follow the prompts in the touchscreen display. NOTE: For more ...

Cube3 User Guide
Page 27
... touchscreen will void the manufacturer's warranty. CAUTION: When navigating the touchscreen display, use the adjustment screws to level the print pad. You can perform the Manual Gap procedure. 3D Systems, Inc. 23 CHANGE CARTRIDGE Selecting CHANGE CARTRIDGE allows you to view the type and color of the print pad. If the...
... touchscreen will void the manufacturer's warranty. CAUTION: When navigating the touchscreen display, use the adjustment screws to level the print pad. You can perform the Manual Gap procedure. 3D Systems, Inc. 23 CHANGE CARTRIDGE Selecting CHANGE CARTRIDGE allows you to view the type and color of the print pad. If the...
Cube3 User Guide
Page 57
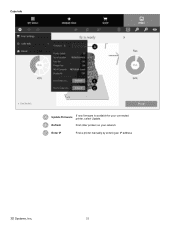
B Refresh Find other printers on your connected printer, select Update. Cube Info A B C A Update Firmware If new firmware is available for your network C Enter IP Find a printer manually by entering an IP address 3D Systems, Inc. 53
B Refresh Find other printers on your connected printer, select Update. Cube Info A B C A Update Firmware If new firmware is available for your network C Enter IP Find a printer manually by entering an IP address 3D Systems, Inc. 53
Cube3 User Guide
Page 58
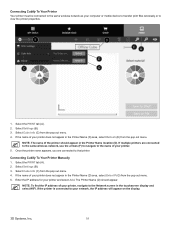
... that printer. Select Cube Info (C) from the pop out menu. 4. If multiple printers are connected to view the printer properties. Connecting Cubify To Your Printer Manually 1. Select Settings (B). 3. Select Settings (B). 3. B C D E G FA 1. If the name of your printer does not appear in the Printer Name location (D). The Printer Name (D) should appear in...
... that printer. Select Cube Info (C) from the pop out menu. 4. If multiple printers are connected to view the printer properties. Connecting Cubify To Your Printer Manually 1. Select Settings (B). 3. Select Settings (B). 3. B C D E G FA 1. If the name of your printer does not appear in the Printer Name location (D). The Printer Name (D) should appear in...
Cube3 User Guide
Page 86
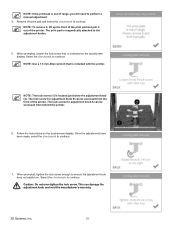
... the printer. 1 6. NOTE: To remove it, lift up the front of the print pad and pull it out of range, you will need to perform a manual adjustment. 4. NOTE: Use a 1.5 mm Allen wrench that is included with the printer. Follow the instructions on the touchscreen display. Select the checkmark to continue. Remove...
... the printer. 1 6. NOTE: To remove it, lift up the front of the print pad and pull it out of range, you will need to perform a manual adjustment. 4. NOTE: Use a 1.5 mm Allen wrench that is included with the printer. Follow the instructions on the touchscreen display. Select the checkmark to continue. Remove...
Cube3 User Guide
Page 87
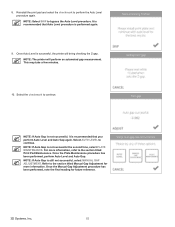
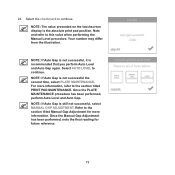
.... It is recommended that you perform Auto Level and Auto Gap again. Once the Manual Gap Adjustment procedure has been performed, note the final reading for more information, refer to the section titled Manual Gap Adjustment for future reference. 3D Systems, Inc. 83 NOTE: If Auto Gap... is not successful, it is recommended that Auto Level procedure is still not successful, select MANUAL GAP ADJUSTMENT. Once the Plate Maintenance procedure has been performed, perform Auto Level and Auto Gap. NOTE: If Auto Gap is performed again. ...
.... It is recommended that you perform Auto Level and Auto Gap again. Once the Manual Gap Adjustment procedure has been performed, note the final reading for more information, refer to the section titled Manual Gap Adjustment for future reference. 3D Systems, Inc. 83 NOTE: If Auto Gap... is not successful, it is recommended that Auto Level procedure is still not successful, select MANUAL GAP ADJUSTMENT. Once the Plate Maintenance procedure has been performed, perform Auto Level and Auto Gap. NOTE: If Auto Gap is performed again. ...
Cube3 User Guide
Page 89
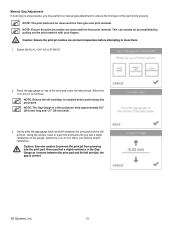
... If Auto Gap is unsuccessful, you may perform a manual gap adjustment to ensure the first layer of the print pad under the left print jet. This can usually be clean and free from glue ... print jet, the gap is correct. 3D Systems, Inc. 85 NOTE: Ensure the print jet nozzles are at room temperature before performing this procedure. Select MANUAL GAP ADJUSTMENT. 2. Once you feel a slight resistance on top of the part prints properly. Place the gap gauge on the gauge. Using the arrows, raise...
... If Auto Gap is unsuccessful, you may perform a manual gap adjustment to ensure the first layer of the print pad under the left print jet. This can usually be clean and free from glue ... print jet, the gap is correct. 3D Systems, Inc. 85 NOTE: Ensure the print jet nozzles are at room temperature before performing this procedure. Select MANUAL GAP ADJUSTMENT. 2. Once you feel a slight resistance on top of the part prints properly. Place the gap gauge on the gauge. Using the arrows, raise...

Cube3 Quick Start Guide
Page 3
... start making your Creation from the Print Pad 23 Removing Supports and Rafts (If Required 23 MAINTENANCE...24 Print Pad Maintenance...24 Gap Verification...26 Manual Gap Adjustment...28
... start making your Creation from the Print Pad 23 Removing Supports and Rafts (If Required 23 MAINTENANCE...24 Print Pad Maintenance...24 Gap Verification...26 Manual Gap Adjustment...28
Cube3 Quick Start Guide
Page 22
.... NOTE: If Auto Gap is not successful, it is not successful the second time, select PLATE MAINTENANCE. Select AUTO LEVEL to continue. 24. Once the Manual Gap Adjustment has been performed, note the final reading for more information, refer to this value when performing the... Auto Gap again. Once the PLATE MAINTENANCE procedure has been performed, perform Auto Level and Auto Gap. For more information. Refer to the section titled Manual Gap Adjustment for future reference. 19 Select the checkmark to continue. Note and refer to the section titled PRINT PAD MAINTENANCE.
.... NOTE: If Auto Gap is not successful, it is not successful the second time, select PLATE MAINTENANCE. Select AUTO LEVEL to continue. 24. Once the Manual Gap Adjustment has been performed, note the final reading for more information, refer to this value when performing the... Auto Gap again. Once the PLATE MAINTENANCE procedure has been performed, perform Auto Level and Auto Gap. For more information. Refer to the section titled Manual Gap Adjustment for future reference. 19 Select the checkmark to continue. Note and refer to the section titled PRINT PAD MAINTENANCE.
Cube3 Quick Start Guide
Page 31
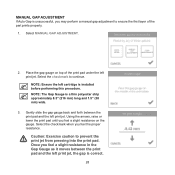
... pad until you feel a slight resistance on top of the print pad under the left print jet, the gap is unsuccessful, you may perform a manual gap adjustment to ensure the first layer of the part prints properly. 1. Once you feel a slight resistance in the Gap Gauge as it moves between... the print pad and the left cartridge is a thin polyester strip approximately 8.5" (216 mm) long and 1.5" (38 mm) wide. 3. MANUAL GAP ADJUSTMENT If Auto Gap is correct. 28 Select the checkmark to prevent the print jet from pressing into the print pad. Place the gap...
... pad until you feel a slight resistance on top of the print pad under the left print jet, the gap is unsuccessful, you may perform a manual gap adjustment to ensure the first layer of the part prints properly. 1. Once you feel a slight resistance in the Gap Gauge as it moves between... the print pad and the left cartridge is a thin polyester strip approximately 8.5" (216 mm) long and 1.5" (38 mm) wide. 3. MANUAL GAP ADJUSTMENT If Auto Gap is correct. 28 Select the checkmark to prevent the print jet from pressing into the print pad. Place the gap...

