
User Manual
Page 2
ENGLISH ᕣ Loading the battery Kodak Li-Ion rechargeable digital camera battery KLIC-8000 Kodak lithium digital camera battery CRV3 (non-rechargeable) See the Extended user guide www.kodak.com/go/z1015support 2 www.kodak.com/go/easysharecenter
ENGLISH ᕣ Loading the battery Kodak Li-Ion rechargeable digital camera battery KLIC-8000 Kodak lithium digital camera battery CRV3 (non-rechargeable) See the Extended user guide www.kodak.com/go/z1015support 2 www.kodak.com/go/easysharecenter

User Manual
Page 3
Note: This charger charges the battery; Important: DO NOT plug this cable into a computer. ENGLISH Charging the KLIC-8000 battery 1 Turn OFF the camera. 2 Connect the cable. Charging light • Blinking: charging • Steady: finished charging (approximately 3.5 hours) See the Extended user guide www.kodak.com/go/z1015support www.kodak.com/go/z1015support 3 it does not power the camera.
Note: This charger charges the battery; Important: DO NOT plug this cable into a computer. ENGLISH Charging the KLIC-8000 battery 1 Turn OFF the camera. 2 Connect the cable. Charging light • Blinking: charging • Steady: finished charging (approximately 3.5 hours) See the Extended user guide www.kodak.com/go/z1015support www.kodak.com/go/z1015support 3 it does not power the camera.
User Manual
Page 4
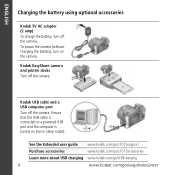
.../go/z1015accessories Learn more about USB charging www.kodak.com/go/USBcharging 4 www.kodak.com/go/easysharecenter Kodak USB cable and a USB computer port Turn off the camera. Kodak EasyShare camera and printer docks Turn off the camera. To power the camera (without charging the battery), turn off the camera. Ensure that the USB cable is connected to a powered USB port...
.../go/z1015accessories Learn more about USB charging www.kodak.com/go/USBcharging 4 www.kodak.com/go/easysharecenter Kodak USB cable and a USB computer port Turn off the camera. Kodak EasyShare camera and printer docks Turn off the camera. To power the camera (without charging the battery), turn off the camera. Ensure that the USB cable is connected to a powered USB port...

User Manual
Page 10
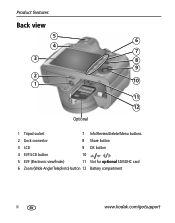
ENGLISH Back view 5 6 4 7 3 8 9 2 1 10 11 12 Optional 1 Tripod socket 7 Info/Review/Delete/Menu buttons 2 Dock connector 8 Share button 3 LCD 9 OK button 4 EVF/LCD button 10 5 EVF (Electronic viewfinder) 11 Slot for optional SD/SDHC card 6 Zoom (Wide Angle/Telephoto) button 12 Battery compartment 10 www.kodak.com/go/easysharecenter
ENGLISH Back view 5 6 4 7 3 8 9 2 1 10 11 12 Optional 1 Tripod socket 7 Info/Review/Delete/Menu buttons 2 Dock connector 8 Share button 3 LCD 9 OK button 4 EVF/LCD button 10 5 EVF (Electronic viewfinder) 11 Slot for optional SD/SDHC card 6 Zoom (Wide Angle/Telephoto) button 12 Battery compartment 10 www.kodak.com/go/easysharecenter
User Manual
Page 17
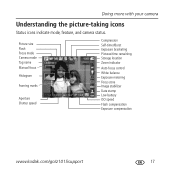
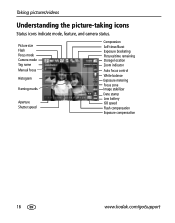
Picture size Flash Focus mode Camera mode Tag name Manual focus Histogram Framing marks Aperture Shutter speed Compression Self-timer/Burst Exposure bracketing Pictures/time remaining Storage location Zoom indicator Auto focus control White balance Exposure metering Focus zone Image stabilizer Date stamp Low battery ISO speed Flash compensation Exposure compensation www.kodak.com/go/z1015support 17 Doing more with your camera Understanding the picture-taking icons Status icons indicate mode, feature, and camera status.
Picture size Flash Focus mode Camera mode Tag name Manual focus Histogram Framing marks Aperture Shutter speed Compression Self-timer/Burst Exposure bracketing Pictures/time remaining Storage location Zoom indicator Auto focus control White balance Exposure metering Focus zone Image stabilizer Date stamp Low battery ISO speed Flash compensation Exposure compensation www.kodak.com/go/z1015support 17 Doing more with your camera Understanding the picture-taking icons Status icons indicate mode, feature, and camera status.

User Manual
Page 19
Working with pictures/videos Understanding the review icons Pictures Email tag Protected Favorite tag Review mode Selected picture Print tag/number of prints Perfect Touch tech. Picture number Image storage location Relative picture position Tag Scroll arrows Videos Email tag Protected Favorite tag Review mode Selected video Low battery Video length Video number Image storage location Relative video position Tag Scroll arrows Low battery www.kodak.com/go/z1015support 19
Working with pictures/videos Understanding the review icons Pictures Email tag Protected Favorite tag Review mode Selected picture Print tag/number of prints Perfect Touch tech. Picture number Image storage location Relative picture position Tag Scroll arrows Videos Email tag Protected Favorite tag Review mode Selected video Low battery Video length Video number Image storage location Relative video position Tag Scroll arrows Low battery www.kodak.com/go/z1015support 19

User Manual
Page 24
...to shock and/or electrical or mechanical hazards. For approved accessories, visit www.kodak.com/go /easysharecenter Visit www.kodak.com/go/kes. ■ Do not charge non-rechargeable batteries. 24 www.kodak.com/go /accessories. ■ Use only a USB-certified computer equipped with... unlikely event that is not recommended by the battery manufacturer. ■ Use only batteries approved for this product; In the unlikely event that battery fluid leaks inside . Contact your local Kodak customer support. ■ Dispose of time. Contact Kodak customer support. ■ The use only. ...
...to shock and/or electrical or mechanical hazards. For approved accessories, visit www.kodak.com/go /easysharecenter Visit www.kodak.com/go/kes. ■ Do not charge non-rechargeable batteries. 24 www.kodak.com/go /accessories. ■ Use only a USB-certified computer equipped with... unlikely event that is not recommended by the battery manufacturer. ■ Use only batteries approved for this product; In the unlikely event that battery fluid leaks inside . Contact your local Kodak customer support. ■ Dispose of time. Contact Kodak customer support. ■ The use only. ...

User Manual
Page 25
... or 90 days after the duration of purchase. Appendix For more information on batteries, see www.kodak.com/go /z1015support 25 Limited warranty coverage Warranty service is Kodak's only obligation. If replacement parts are warranted for any conditions and/or limitations... to be one year from within the country where the Products were originally purchased. Limited Warranty Kodak warrants Kodak consumer electronic products and accessories ("Products"), excluding batteries, to any special, consequential or incidental damages (including but not limited to the authorized service ...
... or 90 days after the duration of purchase. Appendix For more information on batteries, see www.kodak.com/go /z1015support 25 Limited warranty coverage Warranty service is Kodak's only obligation. If replacement parts are warranted for any conditions and/or limitations... to be one year from within the country where the Products were originally purchased. Limited Warranty Kodak warrants Kodak consumer electronic products and accessories ("Products"), excluding batteries, to any special, consequential or incidental damages (including but not limited to the authorized service ...
Extended User Guide
Page 4
Product features Back view 5 6 4 7 3 8 9 2 10 1 11 12 Optional 1 Tripod socket 7 Info/Review/Delete/Menu buttons 2 Dock connector 8 Share button 3 LCD 9 OK button 4 EVF/LCD button 10 5 EVF (Electronic viewfinder) 11 Slot for optional SD/SDHC card 6 Zoom (Wide Angle/Telephoto) button 12 Battery compartment ii www.kodak.com/go/support
Product features Back view 5 6 4 7 3 8 9 2 10 1 11 12 Optional 1 Tripod socket 7 Info/Review/Delete/Menu buttons 2 Dock connector 8 Share button 3 LCD 9 OK button 4 EVF/LCD button 10 5 EVF (Electronic viewfinder) 11 Slot for optional SD/SDHC card 6 Zoom (Wide Angle/Telephoto) button 12 Battery compartment ii www.kodak.com/go/support

Extended User Guide
Page 5
Table of contents 1 1 Setting up your camera 1 Attaching the strap 1 Loading the battery 1 Turning on the camera 4 Setting the language, date/time 4 Storing pictures on an optional SD or SDHC card 5 2 Taking pictures/videos 6 Taking a picture 6 Capture modes 8 Using the 15X ...videos 17 Reviewing pictures/videos 17 Deleting pictures/videos 18 Using the menu button in Review 20 Adding sound tags 20 Cropping pictures 21 Using Kodak Perfect Touch technology 22 Using the RAW Develop feature 22 Editing videos 23 Running a slide show 25 Viewing pictures/videos in different ways 28...
Table of contents 1 1 Setting up your camera 1 Attaching the strap 1 Loading the battery 1 Turning on the camera 4 Setting the language, date/time 4 Storing pictures on an optional SD or SDHC card 5 2 Taking pictures/videos 6 Taking a picture 6 Capture modes 8 Using the 15X ...videos 17 Reviewing pictures/videos 17 Deleting pictures/videos 18 Using the menu button in Review 20 Adding sound tags 20 Cropping pictures 21 Using Kodak Perfect Touch technology 22 Using the RAW Develop feature 22 Editing videos 23 Running a slide show 25 Viewing pictures/videos in different ways 28...
Extended User Guide
Page 6
Table of contents Understanding the review icons 30 4 Doing more with your camera 31 Using the Menu button to change settings 31 P, A, S, and M modes 38 Using exposure compensation with exposure bracketing 40 Using the histogram to view picture ... help from your camera 52 Getting help on the Web 53 Getting help on the telephone 54 8 Appendix 55 Camera specifications 55 Storage capacities 58 Upgrading your software and firmware 58 Important safety instructions 58 Battery life 59 Care and maintenance 60 Limited warranty 60 Regulatory compliance 62 iv www.kodak.com/go/support
Table of contents Understanding the review icons 30 4 Doing more with your camera 31 Using the Menu button to change settings 31 P, A, S, and M modes 38 Using exposure compensation with exposure bracketing 40 Using the histogram to view picture ... help from your camera 52 Getting help on the Web 53 Getting help on the telephone 54 8 Appendix 55 Camera specifications 55 Storage capacities 58 Upgrading your software and firmware 58 Important safety instructions 58 Battery life 59 Care and maintenance 60 Limited warranty 60 Regulatory compliance 62 iv www.kodak.com/go/support

Extended User Guide
Page 8
it does not power the camera. Note: This charger charges the battery; www.kodak.com/go/support Charging light • Blinking: charging • Steady: finished charging (approximately 3.5 hours) 2 Important: DO NOT plug this cable into a computer. Setting up your camera Charging the KLIC-8000 battery 1 Turn OFF the camera. 2 Connect the cable.
it does not power the camera. Note: This charger charges the battery; www.kodak.com/go/support Charging light • Blinking: charging • Steady: finished charging (approximately 3.5 hours) 2 Important: DO NOT plug this cable into a computer. Setting up your camera Charging the KLIC-8000 battery 1 Turn OFF the camera. 2 Connect the cable.
Extended User Guide
Page 9
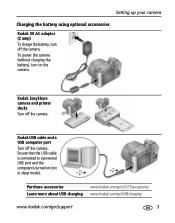
... cable is connected to a powered USB port and the computer is turned on the camera. To power the camera (without charging the battery), turn off the camera. Kodak EasyShare camera and printer docks Turn off the camera. Setting up your camera Charging the battery using optional accessories Kodak 5V AC adapter (2 amp) To charge the battery, turn on (not in sleep mode).
... cable is connected to a powered USB port and the computer is turned on the camera. To power the camera (without charging the battery), turn off the camera. Kodak EasyShare camera and printer docks Turn off the camera. Setting up your camera Charging the battery using optional accessories Kodak 5V AC adapter (2 amp) To charge the battery, turn on (not in sleep mode).
Extended User Guide
Page 22
Taking pictures/videos Understanding the picture-taking icons Status icons indicate mode, feature, and camera status. Picture size Flash Focus mode Camera mode Tag name Manual focus Histogram Framing marks Aperture Shutter speed Compression Self-timer/Burst Exposure bracketing Pictures/time remaining Storage location Zoom indicator Auto focus control White balance Exposure metering Focus zone Image stabilizer Date stamp Low battery ISO speed Flash compensation Exposure compensation 16 www.kodak.com/go/support
Taking pictures/videos Understanding the picture-taking icons Status icons indicate mode, feature, and camera status. Picture size Flash Focus mode Camera mode Tag name Manual focus Histogram Framing marks Aperture Shutter speed Compression Self-timer/Burst Exposure bracketing Pictures/time remaining Storage location Zoom indicator Auto focus control White balance Exposure metering Focus zone Image stabilizer Date stamp Low battery ISO speed Flash compensation Exposure compensation 16 www.kodak.com/go/support

Extended User Guide
Page 32
...3 Press the Menu button. Begin Show creates a multimedia slide show , press OK. The slide show repeats until you change it . 26 www.kodak.com/go/support To interrupt the slide show file. to highlight Multimedia Slide Show, then 4 Press to highlight Interval, then press OK. 2 Select.... To scroll through the seconds quickly, press and hold . 3 Press OK. Running a continuous slide show loop When you press OK or battery power is exhausted. Working with pictures/videos Changing the slide show display interval You can set the display interval from 3-60 seconds. 1 On the...
...3 Press the Menu button. Begin Show creates a multimedia slide show , press OK. The slide show repeats until you change it . 26 www.kodak.com/go/support To interrupt the slide show file. to highlight Multimedia Slide Show, then 4 Press to highlight Interval, then press OK. 2 Select.... To scroll through the seconds quickly, press and hold . 3 Press OK. Running a continuous slide show loop When you press OK or battery power is exhausted. Working with pictures/videos Changing the slide show display interval You can set the display interval from 3-60 seconds. 1 On the...

Extended User Guide
Page 36
Picture number Image storage location Relative picture position Tag Scroll arrows Videos Email tag Protected Favorite tag Review mode Selected video Low battery Video length Video number Image storage location Relative video position Tag Scroll arrows Low battery 30 www.kodak.com/go/support Working with pictures/videos Understanding the review icons Pictures Email tag Protected Favorite tag Review mode Selected picture Print tag/number of prints Perfect Touch tech.
Picture number Image storage location Relative picture position Tag Scroll arrows Videos Email tag Protected Favorite tag Review mode Selected video Low battery Video length Video number Image storage location Relative video position Tag Scroll arrows Low battery 30 www.kodak.com/go/support Working with pictures/videos Understanding the review icons Pictures Email tag Protected Favorite tag Review mode Selected picture Print tag/number of prints Perfect Touch tech.

Extended User Guide
Page 52
...capable, print pictures that you can print directly to the computer or printer. 46 www.kodak.com/go /z1015accessories.) Printing from an EasyShare all-in-one printer 1 Turn on the camera. Choose the number of copies. Current Picture-Press to choose a printing option, then...capable, choose a print size. All Pictures-Print all pictures. You need: ■ Camera with fully charged battery ■ PictBridge enabled printer ■ USB cable (may be sold separately) Connecting the camera to an EasyShare all-in-one printer 1 Turn off , press any button to redisplay it. 2 ...
...capable, print pictures that you can print directly to the computer or printer. 46 www.kodak.com/go /z1015accessories.) Printing from an EasyShare all-in-one printer 1 Turn on the camera. Choose the number of copies. Current Picture-Press to choose a printing option, then...capable, choose a print size. All Pictures-Print all pictures. You need: ■ Camera with fully charged battery ■ PictBridge enabled printer ■ USB cable (may be sold separately) Connecting the camera to an EasyShare all-in-one printer 1 Turn off , press any button to redisplay it. 2 ...

Extended User Guide
Page 54
... the most from your camera, see page 1). Camera does not ■ Remove the battery, then reinsert or replace it. Continue taking a picture. 6 Troubleshooting IMPORTANT: Your camera offers an on . Camera problems If Try one or more of the following Camera does not ■ Install new battery (see page 52. not function, visit www.kodak.com/go /z1015support and...
... the most from your camera, see page 1). Camera does not ■ Remove the battery, then reinsert or replace it. Continue taking a picture. 6 Troubleshooting IMPORTANT: Your camera offers an on . Camera problems If Try one or more of the following Camera does not ■ Install new battery (see page 52. not function, visit www.kodak.com/go /z1015support and...

Extended User Guide
Page 56
...see page 1) or charge rechargeable battery. Close all open applications. Close all software applications, reconnect camera. Camera/computer communications If Try one or more of the following The computer does ■ Turn on the camera (see page 44). 50 www.kodak.com/go/support Close all ...open applications. Close all open applications. not communicate ■ Install new battery (see page 37). Memory card and internal memory full. &#...
...see page 1) or charge rechargeable battery. Close all open applications. Close all software applications, reconnect camera. Camera/computer communications If Try one or more of the following The computer does ■ Turn on the camera (see page 44). 50 www.kodak.com/go/support Close all ...open applications. Close all open applications. not communicate ■ Install new battery (see page 37). Memory card and internal memory full. &#...

Extended User Guide
Page 62
Kodak EasyShare docks Burst mode-Maximum 3 pictures @ 2.1 fps in 1/3 steps Flash modes-Auto, Fill, Red-eye,... RAW; Auto Exposure, Auto Focus, Auto White Balance executed for first shot only Self-timer-2 seconds, 10 seconds, or 2-shot 56 www.kodak.com/go/support working range in Smart Capture mode (ISO 400): 5.0 m (16.4 ft) @ wide; 3.2 m (10.5 ft) @... +/- 0.3 EV steps Electronic flash-Auto flash; Video output-NTSC or PAL selectable Power-1 Kodak Li-Ion rechargeable digital camera battery KLIC-8000; 1 Kodak lithium digital camera battery CRV3 (non-rechargeable); 5V AC adapter; Guide no. 9;
Kodak EasyShare docks Burst mode-Maximum 3 pictures @ 2.1 fps in 1/3 steps Flash modes-Auto, Fill, Red-eye,... RAW; Auto Exposure, Auto Focus, Auto White Balance executed for first shot only Self-timer-2 seconds, 10 seconds, or 2-shot 56 www.kodak.com/go/support working range in Smart Capture mode (ISO 400): 5.0 m (16.4 ft) @ wide; 3.2 m (10.5 ft) @... +/- 0.3 EV steps Electronic flash-Auto flash; Video output-NTSC or PAL selectable Power-1 Kodak Li-Ion rechargeable digital camera battery KLIC-8000; 1 Kodak lithium digital camera battery CRV3 (non-rechargeable); 5V AC adapter; Guide no. 9;


