User Manual
Page 7
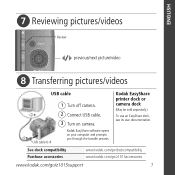
See dock compatibility Purchase accessories www.kodak.com/go/dockcompatibility www.kodak.com/go/z1015accessories www.kodak.com/go/z1015support 7 ENGLISH ᕧ Reviewing pictures/videos Review previous/next picture/video ᕨ Transferring pictures/videos USB cable USB cable U-8 1 Turn off camera. 2 Connect USB cable. 3 Turn on your computer and prompts you through the transfer process. Kodak EasyShare software opens on camera. Kodak EasyShare printer dock or camera dock (May be sold separately.) To use an EasyShare dock, see its user documentation.
See dock compatibility Purchase accessories www.kodak.com/go/dockcompatibility www.kodak.com/go/z1015accessories www.kodak.com/go/z1015support 7 ENGLISH ᕧ Reviewing pictures/videos Review previous/next picture/video ᕨ Transferring pictures/videos USB cable USB cable U-8 1 Turn off camera. 2 Connect USB cable. 3 Turn on your computer and prompts you through the transfer process. Kodak EasyShare software opens on camera. Kodak EasyShare printer dock or camera dock (May be sold separately.) To use an EasyShare dock, see its user documentation.

User Manual
Page 10
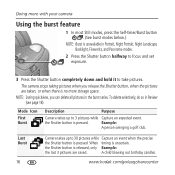
ENGLISH Back view 5 6 4 7 3 8 9 2 1 10 11 12 Optional 1 Tripod socket 7 Info/Review/Delete/Menu buttons 2 Dock connector 8 Share button 3 LCD 9 OK button 4 EVF/LCD button 10 5 EVF (Electronic viewfinder) 11 Slot for optional SD/SDHC card 6 Zoom (Wide Angle/Telephoto) button 12 Battery compartment 10 www.kodak.com/go/easysharecenter
ENGLISH Back view 5 6 4 7 3 8 9 2 1 10 11 12 Optional 1 Tripod socket 7 Info/Review/Delete/Menu buttons 2 Dock connector 8 Share button 3 LCD 9 OK button 4 EVF/LCD button 10 5 EVF (Electronic viewfinder) 11 Slot for optional SD/SDHC card 6 Zoom (Wide Angle/Telephoto) button 12 Battery compartment 10 www.kodak.com/go/easysharecenter
User Manual
Page 16
... golf club. A child blowing out birthday candles. To delete selectively, do so in the burst series. www.kodak.com/go/easysharecenter Mode Icon First Burst Description Purpose Camera takes up to 30 pictures while Capture an event when the precise the Shutter button is uncertain. When timing is... pressed. The camera stops taking pictures when you can delete all pictures in Review (see page 18). Doing more ...
... golf club. A child blowing out birthday candles. To delete selectively, do so in the burst series. www.kodak.com/go/easysharecenter Mode Icon First Burst Description Purpose Camera takes up to 30 pictures while Capture an event when the precise the Shutter button is uncertain. When timing is... pressed. The camera stops taking pictures when you can delete all pictures in Review (see page 18). Doing more ...

User Manual
Page 18
To get the most from your camera, see page 23. 18 www.kodak.com/go/easysharecenter Using the menu button in Review 1 Press the Review button, then the Menu button. 2 Press to choose a tab: ■ Review to view pictures/videos ■ Edit to edit pictures/videos ■ Setup for other camera settings 3 Press to find a picture/video...
To get the most from your camera, see page 23. 18 www.kodak.com/go/easysharecenter Using the menu button in Review 1 Press the Review button, then the Menu button. 2 Press to choose a tab: ■ Review to view pictures/videos ■ Edit to edit pictures/videos ■ Setup for other camera settings 3 Press to find a picture/video...

User Manual
Page 19
Picture number Image storage location Relative picture position Tag Scroll arrows Videos Email tag Protected Favorite tag Review mode Selected video Low battery Video length Video number Image storage location Relative video position Tag Scroll arrows Low battery www.kodak.com/go/z1015support 19 Working with pictures/videos Understanding the review icons Pictures Email tag Protected Favorite tag Review mode Selected picture Print tag/number of prints Perfect Touch tech.
Picture number Image storage location Relative picture position Tag Scroll arrows Videos Email tag Protected Favorite tag Review mode Selected video Low battery Video length Video number Image storage location Relative video position Tag Scroll arrows Low battery www.kodak.com/go/z1015support 19 Working with pictures/videos Understanding the review icons Pictures Email tag Protected Favorite tag Review mode Selected picture Print tag/number of prints Perfect Touch tech.
Extended User Guide
Page 4
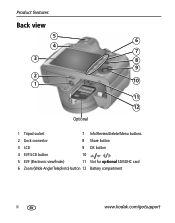
Product features Back view 5 6 4 7 3 8 9 2 10 1 11 12 Optional 1 Tripod socket 7 Info/Review/Delete/Menu buttons 2 Dock connector 8 Share button 3 LCD 9 OK button 4 EVF/LCD button 10 5 EVF (Electronic viewfinder) 11 Slot for optional SD/SDHC card 6 Zoom (Wide Angle/Telephoto) button 12 Battery compartment ii www.kodak.com/go/support
Product features Back view 5 6 4 7 3 8 9 2 10 1 11 12 Optional 1 Tripod socket 7 Info/Review/Delete/Menu buttons 2 Dock connector 8 Share button 3 LCD 9 OK button 4 EVF/LCD button 10 5 EVF (Electronic viewfinder) 11 Slot for optional SD/SDHC card 6 Zoom (Wide Angle/Telephoto) button 12 Battery compartment ii www.kodak.com/go/support

Extended User Guide
Page 5
... the strap 1 Loading the battery 1 Turning on the camera 4 Setting the language, date/time 4 Storing pictures on an optional SD or SDHC card 5 2 Taking pictures/videos 6 Taking a picture 6 Capture modes 8 Using the 15X optical ... panoramic pictures 15 Understanding the picture-taking icons 16 3 Working with pictures/videos 17 Reviewing pictures/videos 17 Deleting pictures/videos 18 Using the menu button in Review 20 Adding sound tags 20 Cropping pictures 21 Using Kodak Perfect Touch technology 22 Using the RAW Develop feature 22 Editing videos 23 Running a slide...
... the strap 1 Loading the battery 1 Turning on the camera 4 Setting the language, date/time 4 Storing pictures on an optional SD or SDHC card 5 2 Taking pictures/videos 6 Taking a picture 6 Capture modes 8 Using the 15X optical ... panoramic pictures 15 Understanding the picture-taking icons 16 3 Working with pictures/videos 17 Reviewing pictures/videos 17 Deleting pictures/videos 18 Using the menu button in Review 20 Adding sound tags 20 Cropping pictures 21 Using Kodak Perfect Touch technology 22 Using the RAW Develop feature 22 Editing videos 23 Running a slide...
Extended User Guide
Page 6
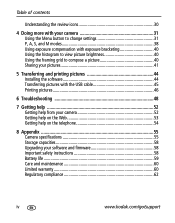
Table of contents Understanding the review icons 30 4 Doing more with your camera 31 Using the Menu button to change settings 31 P, A, S, and M modes 38 Using exposure compensation with exposure bracketing 40 Using the histogram to view picture ... with the USB cable 45 Printing pictures 46 6 Troubleshooting 48 7 Getting help 52 Getting help from your camera 52 Getting help on the Web 53 Getting help on the telephone 54 8 Appendix 55 Camera specifications 55 Storage capacities 58 Upgrading your software and firmware 58 Important safety instructions 58 Battery life 59...
Table of contents Understanding the review icons 30 4 Doing more with your camera 31 Using the Menu button to change settings 31 P, A, S, and M modes 38 Using exposure compensation with exposure bracketing 40 Using the histogram to view picture ... with the USB cable 45 Printing pictures 46 6 Troubleshooting 48 7 Getting help 52 Getting help from your camera 52 Getting help on the Web 53 Getting help on the telephone 54 8 Appendix 55 Camera specifications 55 Storage capacities 58 Upgrading your software and firmware 58 Important safety instructions 58 Battery life 59...

Extended User Guide
Page 20
...During quickview, you release the Shutter button, when the pictures are saved. Example: A child blowing out birthday candles. 14 www.kodak.com/go/support Camera takes up to 3 pictures in Smart Capture mode while the Shutter button is no more storage space. the Shutter button is uncertain.... Mode Icon First Burst Last Burst Description Purpose Camera takes up to take pictures. Example: A person swinging a golf club. When timing is released, only the last 3 pictures are taken...
...During quickview, you release the Shutter button, when the pictures are saved. Example: A child blowing out birthday candles. 14 www.kodak.com/go/support Camera takes up to 3 pictures in Smart Capture mode while the Shutter button is no more storage space. the Shutter button is uncertain.... Mode Icon First Burst Last Burst Description Purpose Camera takes up to take pictures. Example: A person swinging a golf club. When timing is released, only the last 3 pictures are taken...
Extended User Guide
Page 24
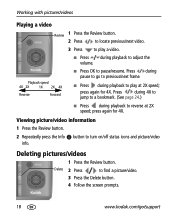
press again for 4X. Viewing picture/video information 1 Press the Review button. 2 Repeatedly press the Info button to find a picture/video. 3 Press the Delete button. 4 Follow the screen prompts. 18 www.kodak.com/go to previous/next frame. ■ Press during playback to reverse at 2X speed; Delete 2 Press to turn on/off...
press again for 4X. Viewing picture/video information 1 Press the Review button. 2 Repeatedly press the Info button to find a picture/video. 3 Press the Delete button. 4 Follow the screen prompts. 18 www.kodak.com/go to previous/next frame. ■ Press during playback to reverse at 2X speed; Delete 2 Press to turn on/off...

Extended User Guide
Page 25
... 2 Press OK. Working with the protected picture/video. ■ Press the Menu button to exit the menu. Protecting pictures/videos from deletion 1 Press the Review button. 2 Press to find a picture/video. 3 Press the Menu button. 4 Press to exit the Delete menu. This feature is available immediately after you... internal memory or an SD or SDHC card deletes all (including protected) pictures/videos. (Formatting internal memory also deletes email addresses.) www.kodak.com/go/support 19 The deleted picture/video appears. 3 Select Exit to highlight Protect, then press OK.
... 2 Press OK. Working with the protected picture/video. ■ Press the Menu button to exit the menu. Protecting pictures/videos from deletion 1 Press the Review button. 2 Press to find a picture/video. 3 Press the Menu button. 4 Press to exit the Delete menu. This feature is available immediately after you... internal memory or an SD or SDHC card deletes all (including protected) pictures/videos. (Formatting internal memory also deletes email addresses.) www.kodak.com/go/support 19 The deleted picture/video appears. 3 Select Exit to highlight Protect, then press OK.
Extended User Guide
Page 26
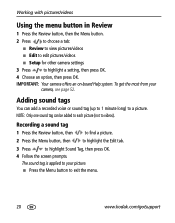
... to 1 minute long) to a picture. IMPORTANT: Your camera offers an on-board Help system. Working with pictures/videos Using the menu button in Review 1 Press the Review button, then the Menu button. 2 Press to choose a tab: ■ Review to view pictures/videos ■ Edit to edit pictures/videos... ■ Setup for other camera settings 3 Press to exit the menu. 20 www.kodak.com/go/support To ...
... to 1 minute long) to a picture. IMPORTANT: Your camera offers an on-board Help system. Working with pictures/videos Using the menu button in Review 1 Press the Review button, then the Menu button. 2 Press to choose a tab: ■ Review to view pictures/videos ■ Edit to edit pictures/videos... ■ Setup for other camera settings 3 Press to exit the menu. 20 www.kodak.com/go/support To ...
Extended User Guide
Page 27
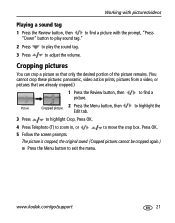
...picture remains. (You cannot crop these pictures: panoramic, video action prints, pictures from a video, or pictures that are already cropped.) 1 Press the Review button, then picture. The picture is cropped, the original saved. (Cropped pictures cannot be cropped again.) ■ Press the Menu button to move ... 4 Press Telephoto (T) to zoom in, or to exit the menu. to find a picture with pictures/videos Playing a sound tag 1 Press the Review button, then to find a Picture Cropped picture 2 Press the Menu button, then to highlight the Edit tab. 3 Press to highlight Crop. www...
...picture remains. (You cannot crop these pictures: panoramic, video action prints, pictures from a video, or pictures that are already cropped.) 1 Press the Review button, then picture. The picture is cropped, the original saved. (Cropped pictures cannot be cropped again.) ■ Press the Menu button to move ... 4 Press Telephoto (T) to zoom in, or to exit the menu. to find a picture with pictures/videos Playing a sound tag 1 Press the Review button, then to find a Picture Cropped picture 2 Press the Menu button, then to highlight the Edit tab. 3 Press to highlight Crop. www...
Extended User Guide
Page 28
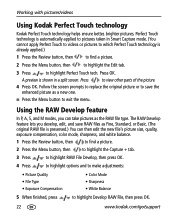
...RAW Develop feature lets you can then edit the new file's picture size, quality, exposure compensation, color mode, sharpness, and white balance. 1 Press the Review button, then to find a picture. 2 Press the Menu button, then to highlight the Edit tab. 3 Press to highlight Develop RAW File, then ...press OK. 22 www.kodak.com/go/support Using the RAW Develop feature In P, A, S, and M modes, you develop, edit, and save the enhanced picture as the RAW file...
...RAW Develop feature lets you can then edit the new file's picture size, quality, exposure compensation, color mode, sharpness, and white balance. 1 Press the Review button, then to find a picture. 2 Press the Menu button, then to highlight the Edit tab. 3 Press to highlight Develop RAW File, then ...press OK. 22 www.kodak.com/go/support Using the RAW Develop feature In P, A, S, and M modes, you develop, edit, and save the enhanced picture as the RAW file...
Extended User Guide
Page 29
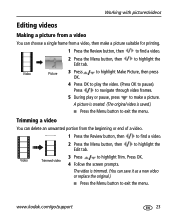
Video Trimmed video 4 Follow the screen prompts. www.kodak.com/go/support 23 Trimming a video You can choose a single frame from the beginning or end of a video. 1 Press the Review button, then to find a video. 2 Press the Menu button, then Edit tab. The video is saved.) ...original.) ■ Press the Menu button to exit the menu. to highlight the 3 Press to make a picture suitable for printing. 1 Press the Review button, then to find a video. 2 Press the Menu button, then Edit tab. Press OK. Working with pictures/videos Editing videos Making a ...
Video Trimmed video 4 Follow the screen prompts. www.kodak.com/go/support 23 Trimming a video You can choose a single frame from the beginning or end of a video. 1 Press the Review button, then to find a video. 2 Press the Menu button, then Edit tab. The video is saved.) ...original.) ■ Press the Menu button to exit the menu. to highlight the 3 Press to make a picture suitable for printing. 1 Press the Review button, then to find a video. 2 Press the Menu button, then Edit tab. Press OK. Working with pictures/videos Editing videos Making a ...
Extended User Guide
Page 30
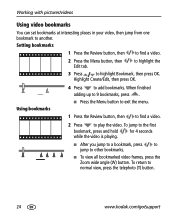
... to highlight the 3 Press to normal view, press the telephoto (T) button. 24 www.kodak.com/go/support When finished adding up to 9 bookmarks, press . ■ Press the Menu button to exit the menu. 1 Press the Review button, then to find a video. 2 Press the Menu button, then Edit tab. Highlight... while the video is playing. ■ After you jump to a bookmark, press to jump to play the video. Setting bookmarks 1 Press the Review button, then to find a video. 2 Press to other bookmarks. ■ To view all bookmarked video frames, press the Zoom wide angle (W) button.
... to highlight the 3 Press to normal view, press the telephoto (T) button. 24 www.kodak.com/go/support When finished adding up to 9 bookmarks, press . ■ Press the Menu button to exit the menu. 1 Press the Review button, then to find a video. 2 Press the Menu button, then Edit tab. Highlight... while the video is playing. ■ After you jump to a bookmark, press to jump to play the video. Setting bookmarks 1 Press the Review button, then to find a video. 2 Press to other bookmarks. ■ To view all bookmarked video frames, press the Zoom wide angle (W) button.

Extended User Guide
Page 31
... Manual: You choose the all the frames. ■ Use Bookmarks: Bookmarked frames are used . www.kodak.com/go/support 25 A 4-, 9-, or 16-up picture Choose an option, then press OK: ■ Auto options: The camera includes the first and last frames, then 2, 7, or 14 equally spaced frames. ■ Manual: You...to highlight Begin Show, then press OK. If you can make a 4-, 9-, or 16-up picture, suitable for a 4 x 6-inch (10 x 15 cm) print. 1 Press the Review button, then to exit the menu. The slide show Use Slide Show to display your pictures/videos on the LCD. 1 Press the...
... Manual: You choose the all the frames. ■ Use Bookmarks: Bookmarked frames are used . www.kodak.com/go/support 25 A 4-, 9-, or 16-up picture Choose an option, then press OK: ■ Auto options: The camera includes the first and last frames, then 2, 7, or 14 equally spaced frames. ■ Manual: You...to highlight Begin Show, then press OK. If you can make a 4-, 9-, or 16-up picture, suitable for a 4 x 6-inch (10 x 15 cm) print. 1 Press the Review button, then to exit the menu. The slide show Use Slide Show to display your pictures/videos on the LCD. 1 Press the...

Extended User Guide
Page 32
...On, then press OK. 3 Press to highlight a choice (Begin Show, Music, Effect, Play Order), then press OK. The slide show . 1 Press the Review button. 2 Select 2-20 pictures (see page 29). 3 Press the Menu button. The interval setting remains until you press OK or battery power is exhausted. Creating...press OK. Working with pictures/videos Changing the slide show plays, you may save a slide show repeats until you change it . 26 www.kodak.com/go/support To interrupt the slide show file. Press press OK. To scroll through the seconds quickly, press and hold . 3 Press OK...
...On, then press OK. 3 Press to highlight a choice (Begin Show, Music, Effect, Play Order), then press OK. The slide show . 1 Press the Review button. 2 Select 2-20 pictures (see page 29). 3 Press the Menu button. The interval setting remains until you press OK or battery power is exhausted. Creating...press OK. Working with pictures/videos Changing the slide show plays, you may save a slide show repeats until you change it . 26 www.kodak.com/go/support To interrupt the slide show file. Press press OK. To scroll through the seconds quickly, press and hold . 3 Press OK...
Extended User Guide
Page 34
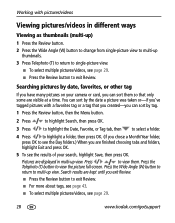
...3 Press Telephoto (T) to return to single-picture view. ■ To select multiple pictures/videos, see the results of your camera or card, you exit Review. ■ Press the Review button to exit Review. ■ For more about tags, see page 43. ■ To select multiple pictures/videos, see page 29. 28 ...www.kodak.com/go/support Pictures are kept until you can sort by date, favorites, or other tag If you...
...3 Press Telephoto (T) to return to single-picture view. ■ To select multiple pictures/videos, see the results of your camera or card, you exit Review. ■ Press the Review button to exit Review. ■ For more about tags, see page 43. ■ To select multiple pictures/videos, see page 29. 28 ...www.kodak.com/go/support Pictures are kept until you can sort by date, favorites, or other tag If you...
Extended User Guide
Page 35
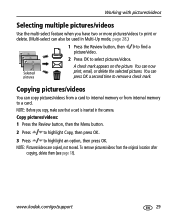
...now print, email, or delete the selected pictures. You can also be used in the camera. To remove pictures/videos from internal memory to highlight an option, then press OK. www.kodak.com/go/support 29 Selected pictures A check mark appears on the picture. Copy pictures/videos...: 1 Press the Review button, then the Menu button. 2 Press to highlight Copy, then press OK. 3...
...now print, email, or delete the selected pictures. You can also be used in the camera. To remove pictures/videos from internal memory to highlight an option, then press OK. www.kodak.com/go/support 29 Selected pictures A check mark appears on the picture. Copy pictures/videos...: 1 Press the Review button, then the Menu button. 2 Press to highlight Copy, then press OK. 3...


