
User Manual
Page 4
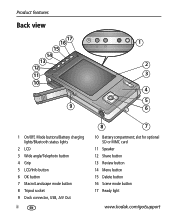
slot for optional SD or MMC card 11 Speaker 12 Share button 13 Review button 14 Menu button 15 Delete button 16 Scene mode button 17 Ready light www.kodak.com/go/support Product features Back view 17 16 1 15 14 13 12 2 11 3 10 4 5 9 6 1 On/Off, Mode buttons/Battery charging lights/Bluetooth status lights 2 LCD 3 Wide angle/Telephoto button 4 Grip 5 LCD/Info button 6 OK button 7 Macro/Landscape mode button 8 Tripod socket 9 Dock connector, USB, A/V Out ii 8 7 10 Battery compartment;
slot for optional SD or MMC card 11 Speaker 12 Share button 13 Review button 14 Menu button 15 Delete button 16 Scene mode button 17 Ready light www.kodak.com/go/support Product features Back view 17 16 1 15 14 13 12 2 11 3 10 4 5 9 6 1 On/Off, Mode buttons/Battery charging lights/Bluetooth status lights 2 LCD 3 Wide angle/Telephoto button 4 Grip 5 LCD/Info button 6 OK button 7 Macro/Landscape mode button 8 Tripod socket 9 Dock connector, USB, A/V Out ii 8 7 10 Battery compartment;
User Manual
Page 5
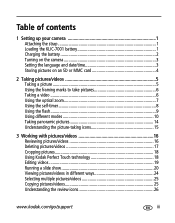
... the strap 1 Loading the KLIC-7001 battery 1 Charging the battery 2 Turning on the camera 3 Setting the language and date/time 3 Storing pictures on an SD or MMC card 4 2 Taking pictures/videos 5 Taking a picture 5 Using the framing ...Using different modes 10 Taking panoramic pictures 14 Understanding the picture-taking icons 15 3 Working with pictures/videos 16 Reviewing pictures/videos 16 Deleting pictures/videos 17 Cropping pictures 18 Using Kodak Perfect Touch technology 18 Editing videos 19 Running a slide show 20 Viewing pictures/videos in different ways 24 Selecting...
... the strap 1 Loading the KLIC-7001 battery 1 Charging the battery 2 Turning on the camera 3 Setting the language and date/time 3 Storing pictures on an SD or MMC card 4 2 Taking pictures/videos 5 Taking a picture 5 Using the framing ...Using different modes 10 Taking panoramic pictures 14 Understanding the picture-taking icons 15 3 Working with pictures/videos 16 Reviewing pictures/videos 16 Deleting pictures/videos 17 Cropping pictures 18 Using Kodak Perfect Touch technology 18 Editing videos 19 Running a slide show 20 Viewing pictures/videos in different ways 24 Selecting...
User Manual
Page 11
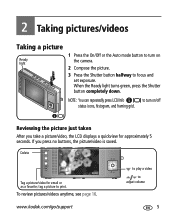
...for approximately 5 seconds. 2 Taking pictures/videos Taking a picture Ready light 1 Press the On/Off or the Auto mode button to turn on the camera. 2 Compose the picture. 3 Press the Shutter button halfway to focus and set exposure. When the Ready light turns green, press the Shutter button ... down. NOTE: You can repeatedly press LCD/Info to turn on /off status icons, histogram, and framing grid. To review pictures/videos anytime, see page 16. tag a picture to adjust volume 5 Reviewing the picture just taken After you press no buttons, the picture/video is saved. www...
...for approximately 5 seconds. 2 Taking pictures/videos Taking a picture Ready light 1 Press the On/Off or the Auto mode button to turn on the camera. 2 Compose the picture. 3 Press the Shutter button halfway to focus and set exposure. When the Ready light turns green, press the Shutter button ... down. NOTE: You can repeatedly press LCD/Info to turn on /off status icons, histogram, and framing grid. To review pictures/videos anytime, see page 16. tag a picture to adjust volume 5 Reviewing the picture just taken After you press no buttons, the picture/video is saved. www...

User Manual
Page 12
...not focusing on foreground subjects, even if the subjects are fixed at Center Wide. The camera enters Video mode. 2 Press the Shutter button completely down to take pictures Framing marks indicate the camera focus area. To stop recording, press and release the Shutter button again. NOTE: ... Zone and set Center Zone, the framing marks are not centered in Landscape or Video mode. The camera attempts to take the picture. To review and edit videos, see page 16. 6 www.kodak.com/go/support Framing marks 1 Press the Shutter button halfway. Taking a video 1 Press the Video...
...not focusing on foreground subjects, even if the subjects are fixed at Center Wide. The camera enters Video mode. 2 Press the Shutter button completely down to take pictures Framing marks indicate the camera focus area. To stop recording, press and release the Shutter button again. NOTE: ... Zone and set Center Zone, the framing marks are not centered in Landscape or Video mode. The camera attempts to take the picture. To review and edit videos, see page 16. 6 www.kodak.com/go/support Framing marks 1 Press the Shutter button halfway. Taking a video 1 Press the Video...

User Manual
Page 22
... pictures with your pictures/videos. 1 Press the Review button. 2 Press to view previous/next picture/video. To save battery power, use a Kodak EasyShare photo frame dock 2 or an EasyShare dock. (Visit www.kodak.com/go /support Press during review 1 Press W/T to magnify 1X-8X. 2 Press... picture. 3 Working with pictures/videos Reviewing pictures/videos Press the Review button to view and work...
... pictures with your pictures/videos. 1 Press the Review button. 2 Press to view previous/next picture/video. To save battery power, use a Kodak EasyShare photo frame dock 2 or an EasyShare dock. (Visit www.kodak.com/go /support Press during review 1 Press W/T to magnify 1X-8X. 2 Press... picture. 3 Working with pictures/videos Reviewing pictures/videos Press the Review button to view and work...

User Manual
Page 23
... a picture. The picture/video is only available immediately after you may be deleted. The Protect icon appears with pictures/videos Deleting pictures/videos 1 Press the Review button. To delete protected pictures/videos, remove protection before deleting. To restore them, see Viewing as thumbnails (multi-up), page 24. CAUTION: Formatting internal memory..., and favorites. Working with the protected picture/video. ■ Press the Menu button to exit the menu. NOTE: To select more than one picture, see EasyShare software Help.) www.kodak.com/go/support 17
... a picture. The picture/video is only available immediately after you may be deleted. The Protect icon appears with pictures/videos Deleting pictures/videos 1 Press the Review button. To delete protected pictures/videos, remove protection before deleting. To restore them, see Viewing as thumbnails (multi-up), page 24. CAUTION: Formatting internal memory..., and favorites. Working with the protected picture/video. ■ Press the Menu button to exit the menu. NOTE: To select more than one picture, see EasyShare software Help.) www.kodak.com/go/support 17
User Manual
Page 24
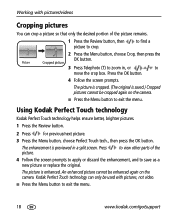
...picture is cropped. (The original is enhanced. to view other parts of the picture remains. 1 Press the Review button, then picture to crop. Kodak Perfect Touch technology can only be used with pictures/videos Cropping pictures You can crop a picture so that only... Telephoto (T) to zoom in a split screen. An enhanced picture cannot be cropped again on the camera. Using Kodak Perfect Touch technology Kodak Perfect Touch technology helps ensure better, brighter pictures. 1 Press the Review button. 2 Press for previous/next picture. 3 Press the Menu button, choose Perfect Touch tech...
...picture is cropped. (The original is enhanced. to view other parts of the picture remains. 1 Press the Review button, then picture to crop. Kodak Perfect Touch technology can only be used with pictures/videos Cropping pictures You can crop a picture so that only... Telephoto (T) to zoom in a split screen. An enhanced picture cannot be cropped again on the camera. Using Kodak Perfect Touch technology Kodak Perfect Touch technology helps ensure better, brighter pictures. 1 Press the Review button. 2 Press for previous/next picture. 3 Press the Menu button, choose Perfect Touch tech...

User Manual
Page 25
...print. Trimming a video You can choose a single frame from a video, then make a picture from the beginning or end of a video. 1 Press the Review button, then to exit the menu. Choose Trim, then press OK. 3 Follow the screen prompts. Video Trimmed video The video is saved.) ■ Press the...exit the menu. Video Picture A picture is created. (The original video is trimmed.(You can do incredible things with your videos! www.kodak.com/go/support 19 Working with pictures/videos Editing videos You can save it as a new video or replace the original.) ■ Press...
...print. Trimming a video You can choose a single frame from a video, then make a picture from the beginning or end of a video. 1 Press the Review button, then to exit the menu. Choose Trim, then press OK. 3 Follow the screen prompts. Video Trimmed video The video is saved.) ■ Press the...exit the menu. Video Picture A picture is created. (The original video is trimmed.(You can do incredible things with your videos! www.kodak.com/go/support 19 Working with pictures/videos Editing videos You can save it as a new video or replace the original.) ■ Press...
User Manual
Page 26
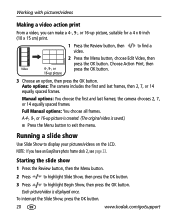
... Manual options: You choose the first and last frames; the camera chooses 2, 7, or 14 equally spaced frames. Running a slide show 1 Press the Review button, then the Menu button. 2 Press to highlight Slide ...the OK button. Working with pictures/videos Making a video action print From a video, you have an EasyShare photo frame dock 2, see page 23. NOTE: If you can make a 4-, 9-, or 16-up.../videos on the LCD. To interrupt the Slide Show, press the OK button. 20 www.kodak.com/go/support Full Manual options: You choose all frames. Choose Action Print, then Video...
... Manual options: You choose the first and last frames; the camera chooses 2, 7, or 14 equally spaced frames. Running a slide show 1 Press the Review button, then the Menu button. 2 Press to highlight Slide ...the OK button. Working with pictures/videos Making a video action print From a video, you have an EasyShare photo frame dock 2, see page 23. NOTE: If you can make a 4-, 9-, or 16-up.../videos on the LCD. To interrupt the Slide Show, press the OK button. 20 www.kodak.com/go/support Full Manual options: You choose all frames. Choose Action Print, then Video...
User Manual
Page 30
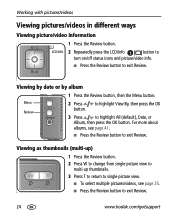
... multi-up thumbnails. 3 Press T to return to single-picture view. ■ To select multiple pictures/videos, see page 41. ■ Press the Review button to exit Review. 24 www.kodak.com/go/support LCD/Info 2 Repeatedly press the LCD/Info button to turn on/off status icons and picture/video info. ■ Press...
... multi-up thumbnails. 3 Press T to return to single-picture view. ■ To select multiple pictures/videos, see page 41. ■ Press the Review button to exit Review. 24 www.kodak.com/go/support LCD/Info 2 Repeatedly press the LCD/Info button to turn on/off status icons and picture/video info. ■ Press...

User Manual
Page 31
...camera's picture storage location is set to print, transfer, delete, etc. (Multi-select is used most effectively in multi-up mode, page 24.) 1 Press the Review button, then picture/video. to find a 2 Press the OK button to highlight an option. 4 Press the OK button. NOTE: Pictures/videos are not copied. www.kodak....com/go/support 25 You can now print, transfer, delete, etc. Protection settings are copied, not moved. Copy pictures/videos: 1 Press the Review button, then the Menu button. 2 Press to highlight Copy...
...camera's picture storage location is set to print, transfer, delete, etc. (Multi-select is used most effectively in multi-up mode, page 24.) 1 Press the Review button, then picture/video. to find a 2 Press the OK button to highlight an option. 4 Press the OK button. NOTE: Pictures/videos are not copied. www.kodak....com/go/support 25 You can now print, transfer, delete, etc. Protection settings are copied, not moved. Copy pictures/videos: 1 Press the Review button, then the Menu button. 2 Press to highlight Copy...

User Manual
Page 32
Working with pictures/videos Understanding the review icons Pictures Print tag/number of prints Favorite tag Email tag Perfect Touch Blur warning Review Selected picture Protected Picture/Video number Image storage location Scroll arrows Videos Video length Favorite tag Email tag Review Low battery Picture/Video number Image storage location Scroll arrows 26 www.kodak.com/go/support
Working with pictures/videos Understanding the review icons Pictures Print tag/number of prints Favorite tag Email tag Perfect Touch Blur warning Review Selected picture Protected Picture/Video number Image storage location Scroll arrows Videos Video length Favorite tag Email tag Review Low battery Picture/Video number Image storage location Scroll arrows 26 www.kodak.com/go/support

User Manual
Page 33
www.kodak.com/go/support 27 White-Print sharpness is turned on a computer monitor before printing.) Red-Picture is sharp enough for an acceptable 4 x 6-inch (10 x 15 cm) print. Working with pictures/videos Understanding the blur warning icons A blur alert icon is displayed during picture review and (if the feature is not determined...
www.kodak.com/go/support 27 White-Print sharpness is turned on a computer monitor before printing.) Red-Picture is sharp enough for an acceptable 4 x 6-inch (10 x 15 cm) print. Working with pictures/videos Understanding the blur warning icons A blur alert icon is displayed during picture review and (if the feature is not determined...
User Manual
Page 34
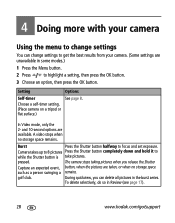
...can delete all pictures in the burst series. During quickview, you release the Shutter Capture an expected event, button, when the pictures are available. Camera takes up to 8 pictures Press the Shutter button completely down and hold it to highlight a setting, then press the OK button. 3 Choose... an option, then press the OK button. golf club. To delete selectively, do so in Review (see page 17). 28 www.kodak.com/go/support 4 Doing more with your camera. (Some settings are unavailable in some modes.) 1 Press the Menu button. 2 Press to while the Shutter ...
...can delete all pictures in the burst series. During quickview, you release the Shutter Capture an expected event, button, when the pictures are available. Camera takes up to 8 pictures Press the Shutter button completely down and hold it to highlight a setting, then press the OK button. 3 Choose... an option, then press the OK button. golf club. To delete selectively, do so in Review (see page 17). 28 www.kodak.com/go/support 4 Doing more with your camera. (Some settings are unavailable in some modes.) 1 Press the Menu button. 2 Press to while the Shutter ...
User Manual
Page 42
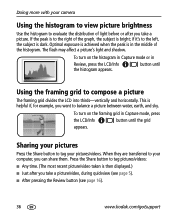
Doing more with your camera Using the histogram to view picture brightness Use the histogram to evaluate the distribution of...When they are transferred to the left, the subject is bright; Optimal exposure is achieved when the peak is in Review, press the LCD/Info the histogram appears. To turn on the histogram in Capture mode or in the middle ...tag your computer, you take a picture/video, during quickview (see page 5). ■ After pressing the Review button (see page 16). 36 www.kodak.com/go/support If the peak is to compose a picture The framing grid divides the LCD into thirds-...
Doing more with your camera Using the histogram to view picture brightness Use the histogram to evaluate the distribution of...When they are transferred to the left, the subject is bright; Optimal exposure is achieved when the peak is in Review, press the LCD/Info the histogram appears. To turn on the histogram in Capture mode or in the middle ...tag your computer, you take a picture/video, during quickview (see page 5). ■ After pressing the Review button (see page 16). 36 www.kodak.com/go/support If the peak is to compose a picture The framing grid divides the LCD into thirds-...
User Manual
Page 47
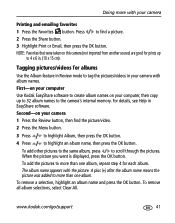
...emailing favorites 1 Press the Favorites button. First-on your computer Use Kodak EasyShare software to create album names on this camera (not imported from another source) are good for prints up to 32 album names to the camera's internal memory. Doing more with your computer, then copy up to...picture you want is displayed, press the OK button. A plus (+) after the album name means the picture was added to 4 x 6 in your camera 1 Press the Review button, then find a picture. 2 Press the Share button. 3 Highlight Print or Email, then press the OK button. Press to find the picture/video...
...emailing favorites 1 Press the Favorites button. First-on your computer Use Kodak EasyShare software to create album names on this camera (not imported from another source) are good for prints up to 32 album names to the camera's internal memory. Doing more with your computer, then copy up to...picture you want is displayed, press the OK button. A plus (+) after the album name means the picture was added to 4 x 6 in your camera 1 Press the Review button, then find a picture. 2 Press the Share button. 3 Highlight Print or Email, then press the OK button. Press to find the picture/video...

User Manual
Page 61
... internal memory (page 32). The camera is almost or entirely full ■ Transfer the pictures to the computer (page 43). ■ Delete pictures from the card or insert a new card. ■ Change the image storage location to ON (page 34). www.kodak.com/go/support 55 Storage location... is operating normally. Camera buttons and controls do not function In Review, a blue or black screen is ■ Set the Orientation Sensor to internal memory (page 32)....
... internal memory (page 32). The camera is almost or entirely full ■ Transfer the pictures to the computer (page 43). ■ Delete pictures from the card or insert a new card. ■ Change the image storage location to ON (page 34). www.kodak.com/go/support 55 Storage location... is operating normally. Camera buttons and controls do not function In Review, a blue or black screen is ■ Set the Orientation Sensor to internal memory (page 32)....
User Manual
Page 74
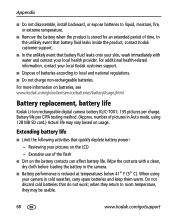
...flash ■ Dirt on batteries, see www.kodak.com/global/en/service/batteries/batteryUsage.jhtml Battery replacement, battery life Kodak Li-Ion rechargeable digital camera battery KLIC-7001: 135 pictures per CIPA testing method. (Approx. Reviewing your local Kodak customer support. ■ Dispose of time. ...the unlikely event that battery fluid leaks inside the product, contact Kodak customer support. ■ In the unlikely event that do not work; Wipe the contacts with water and contact your camera in the camera. ■ Battery performance is stored for an extended period of...
...flash ■ Dirt on batteries, see www.kodak.com/global/en/service/batteries/batteryUsage.jhtml Battery replacement, battery life Kodak Li-Ion rechargeable digital camera battery KLIC-7001: 135 pictures per CIPA testing method. (Approx. Reviewing your local Kodak customer support. ■ Dispose of time. ...the unlikely event that battery fluid leaks inside the product, contact Kodak customer support. ■ In the unlikely event that do not work; Wipe the contacts with water and contact your camera in the camera. ■ Battery performance is stored for an extended period of...
User Manual
Page 82
Index A A/V out, 22 about picture, video, 24 about this camera, 35 accessories, 45 battery, 68 buying, 60 printer dock, 45 SD/MMC card, 4 album set, 31 albums tagging pictures for, 42 auto, 10 enhancement, 18 ..., ii menu, ii OK, ii On/Off, i review, ii, 16 scene, ii share, ii shutter, i video mode, i wide angle, ii zoom, 7 C cable audio/video, 22 USB, 44 camera sounds, 32, 48 Canadian compliance, 72 caring for your camera, 69 children, 12 clock, setting, 3 color mode, 30 computer connecting camera, 43 www.kodak.com/go/support
Index A A/V out, 22 about picture, video, 24 about this camera, 35 accessories, 45 battery, 68 buying, 60 printer dock, 45 SD/MMC card, 4 album set, 31 albums tagging pictures for, 42 auto, 10 enhancement, 18 ..., ii menu, ii OK, ii On/Off, i review, ii, 16 scene, ii share, ii shutter, i video mode, i wide angle, ii zoom, 7 C cable audio/video, 22 USB, 44 camera sounds, 32, 48 Canadian compliance, 72 caring for your camera, 69 children, 12 clock, setting, 3 color mode, 30 computer connecting camera, 43 www.kodak.com/go/support

User Manual
Page 84
... memory capacity, 66 ISO speed, 30 K Kodak EasyShare software installing, 43 upgrading, 69 Kodak Perfect Touch technology, 18 Kodak Web sites, 60 L language, 34 LCD brightness, 33 dimmer, 33 reviewing pictures, 16 reviewing videos, 16 LCD/Info button, ii lens ...cleaning lens, 69 lenses, i light sensor, i loading batteries, 1 78 SD/MMC card, 4 software, 43 long time exposure, 31 M Mac OS, installing software, 43 Macro/Landscape button, ii maintenance, camera...
... memory capacity, 66 ISO speed, 30 K Kodak EasyShare software installing, 43 upgrading, 69 Kodak Perfect Touch technology, 18 Kodak Web sites, 60 L language, 34 LCD brightness, 33 dimmer, 33 reviewing pictures, 16 reviewing videos, 16 LCD/Info button, ii lens ...cleaning lens, 69 lenses, i light sensor, i loading batteries, 1 78 SD/MMC card, 4 software, 43 long time exposure, 31 M Mac OS, installing software, 43 Macro/Landscape button, ii maintenance, camera...


