User Manual
Page 6
... the Bluetooth feature of your camera 48 Making the "set as trusted" choice 49 Getting the best Bluetooth reception 50 Sending pictures to a device 51 Receiving pictures from a device 52 Sending pictures to a printer 53 Sending pictures to a computer 54 7 Troubleshooting 55 8 Getting help 60 9 Appendix 62 Camera specifications 62 Important safety instructions 67 Battery replacement, battery life 68 Upgrading your software and firmware 69 Additional care and maintenance 69...
... the Bluetooth feature of your camera 48 Making the "set as trusted" choice 49 Getting the best Bluetooth reception 50 Sending pictures to a device 51 Receiving pictures from a device 52 Sending pictures to a printer 53 Sending pictures to a computer 54 7 Troubleshooting 55 8 Getting help 60 9 Appendix 62 Camera specifications 62 Important safety instructions 67 Battery replacement, battery life 68 Upgrading your software and firmware 69 Additional care and maintenance 69...
User Manual
Page 9
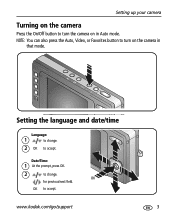
Date/Time: 1 At the prompt, press OK. 2 to accept. OK for previous/next field. OK to change . 2 OK to turn the camera on the camera in Auto mode. NOTE: You can also press the Auto, Video, or Favorites button to accept. Setting the language and date/time Language: 1 to change . www.kodak.com/go/support 3 Setting up your camera Turning on the camera Press the On/Off button to turn on in that mode.
Date/Time: 1 At the prompt, press OK. 2 to accept. OK for previous/next field. OK to change . 2 OK to turn the camera on the camera in Auto mode. NOTE: You can also press the Auto, Video, or Favorites button to accept. Setting the language and date/time Language: 1 to change . www.kodak.com/go/support 3 Setting up your camera Turning on the camera Press the On/Off button to turn on in that mode.
User Manual
Page 11
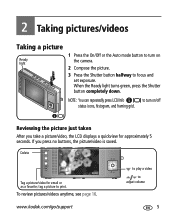
... take a picture/video, the LCD displays a quickview for email or as a favorite; NOTE: You can repeatedly press LCD/Info to turn on /off status icons, histogram, and framing grid. Reviewing the picture just taken After you press no buttons, the picture/video is saved. tag a picture to adjust volume 5 2 Taking pictures/videos Taking a picture Ready light 1 Press the On/Off or the Auto mode button to turn on the camera. 2 Compose the picture. 3 Press the Shutter button halfway to focus and set exposure. To review pictures/videos...
... take a picture/video, the LCD displays a quickview for email or as a favorite; NOTE: You can repeatedly press LCD/Info to turn on /off status icons, histogram, and framing grid. Reviewing the picture just taken After you press no buttons, the picture/video is saved. tag a picture to adjust volume 5 2 Taking pictures/videos Taking a picture Ready light 1 Press the On/Off or the Auto mode button to turn on the camera. 2 Compose the picture. 3 Press the Shutter button halfway to focus and set exposure. To review pictures/videos...

User Manual
Page 15
Using the flash Taking pictures/videos Press the flash button repeatedly to reduce the chance of the lighting conditions. Flash modes Auto Flash fires When the lighting conditions require it. To make the camera: ■ Preflash, turn the Red Eye Preflash on/off . (To turn the Red Eye Preflash on , the camera cannot take a picture, regardless of red eye.) ■ Flash once and automatically remove red eye, turn the Red Eye Preflash off , see page 65. Off Never For flash settings in each mode, see page 34...
Using the flash Taking pictures/videos Press the flash button repeatedly to reduce the chance of the lighting conditions. Flash modes Auto Flash fires When the lighting conditions require it. To make the camera: ■ Preflash, turn the Red Eye Preflash on/off . (To turn the Red Eye Preflash on , the camera cannot take a picture, regardless of red eye.) ■ Flash once and automatically remove red eye, turn the Red Eye Preflash off , see page 65. Off Never For flash settings in each mode, see page 34...

User Manual
Page 20
... the first picture. 4 Compose the second picture. Get 1 panoramic picture. Only the panoramic picture is set with the first picture. Exposure and white balance are automatically stitched together. 1 2 3 Take 2 or 3 pictures. After a quickview, the LCD displays the liveview and an "overlay" from the first picture cover the same portion in the new picture. (You may press the Delete button to stitch them together. NOTE: For printing options, visit the Kodak EasyShare Gallery...
... the first picture. 4 Compose the second picture. Get 1 panoramic picture. Only the panoramic picture is set with the first picture. Exposure and white balance are automatically stitched together. 1 2 3 Take 2 or 3 pictures. After a quickview, the LCD displays the liveview and an "overlay" from the first picture cover the same portion in the new picture. (You may press the Delete button to stitch them together. NOTE: For printing options, visit the Kodak EasyShare Gallery...
User Manual
Page 35
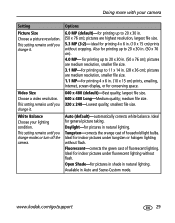
...fluorescent lighting without flash. Open Shade-for general picture taking. pictures are highest resolution, largest file size. 5.3 MP (3:2)- Video Size Choose a video resolution. largest file size. 640 x 480 Long-Medium quality; Auto (default)-automatically corrects white balance. Doing more with your lighting condition. pictures are medium resolution, smaller file size. 1.1 MP-for printing 4 x 6 in. (10 x 15 cm) prints, emailing, Internet, screen display, or for printing 4 x 6 in natural lighting. Fluorescent-corrects the green cast of household light bulbs. This setting...
...fluorescent lighting without flash. Open Shade-for general picture taking. pictures are highest resolution, largest file size. 5.3 MP (3:2)- Video Size Choose a video resolution. largest file size. 640 x 480 Long-Medium quality; Auto (default)-automatically corrects white balance. Doing more with your lighting condition. pictures are medium resolution, smaller file size. 1.1 MP-for printing 4 x 6 in. (10 x 15 cm) prints, emailing, Internet, screen display, or for printing 4 x 6 in natural lighting. Fluorescent-corrects the green cast of household light bulbs. This setting...

User Manual
Page 37
... camera Setting Options AF Control Continuous AF (default for video)-because the camera Choose an auto-focus setting. needed. Set Album Choose, Add, or Delete albums. This setting remains until you change it . This setting remains until you Ideal when precise focus of focus. You can apply different Set Album choices to videos and to give an even Select a large or concentrated picture focus. Single AF (default for general picture taking settings return to press the Shutter button...
... camera Setting Options AF Control Continuous AF (default for video)-because the camera Choose an auto-focus setting. needed. Set Album Choose, Add, or Delete albums. This setting remains until you change it . This setting remains until you Ideal when precise focus of focus. You can apply different Set Album choices to videos and to give an even Select a large or concentrated picture focus. Single AF (default for general picture taking settings return to press the Shutter button...

User Manual
Page 39
most common format. connect the camera to a television or PAL-used in Europe and China. Photo Frame Choose EasyShare photo frame dock 2 settings. other external device. Video Out NTSC (default)-used in North America and Choose the regional setting that lets you Japan; Doing more with your camera Setting Options Bluetooth Set Passcode Security Camera Name Transfer Size Digital Zoom On (default) Off LCD Brightness Choose LCD brightness. Interval (between slide show frames) Loop...
most common format. connect the camera to a television or PAL-used in Europe and China. Photo Frame Choose EasyShare photo frame dock 2 settings. other external device. Video Out NTSC (default)-used in North America and Choose the regional setting that lets you Japan; Doing more with your camera Setting Options Bluetooth Set Passcode Security Camera Name Transfer Size Digital Zoom On (default) Off LCD Brightness Choose LCD brightness. Interval (between slide show frames) Loop...
User Manual
Page 45
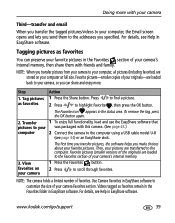
... Action 1 Press the Share button. Favorite pictures-smaller copies of your originals-are loaded to your favorite pictures. www.kodak.com/go/support 39 NOTE: When you transfer pictures from your camera to the addresses you make choices about your camera, so you send them with this camera. (See page 43.) computer 2 Connect the camera to the computer using a USB cable model U-8 (see Help in EasyShare software to the computer. Doing...
... Action 1 Press the Share button. Favorite pictures-smaller copies of your originals-are loaded to your favorite pictures. www.kodak.com/go/support 39 NOTE: When you transfer pictures from your camera to the addresses you make choices about your camera, so you send them with this camera. (See page 43.) computer 2 Connect the camera to the computer using a USB cable model U-8 (see Help in EasyShare software to the computer. Doing...
User Manual
Page 46
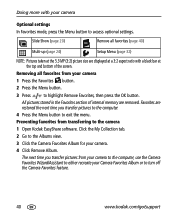
The next time you transfer pictures to the computer. 4 Press the Menu button to the camera 1 Open Kodak EasyShare software. Removing all favorites (page 40) Multi-up (page 24) Setup Menu (page 32) NOTE: Pictures taken at the 5.3 MP (3:2) picture size are displayed at the top and bottom of internal memory are restored the next time you transfer pictures from your camera to the computer, use the Camera Favorites Wizard/Assistant to either recreate your Camera Favorites Album...
The next time you transfer pictures to the computer. 4 Press the Menu button to the camera 1 Open Kodak EasyShare software. Removing all favorites (page 40) Multi-up (page 24) Setup Menu (page 32) NOTE: Pictures taken at the 5.3 MP (3:2) picture size are displayed at the top and bottom of internal memory are restored the next time you transfer pictures from your camera to the computer, use the Camera Favorites Wizard/Assistant to either recreate your Camera Favorites Album...
User Manual
Page 62
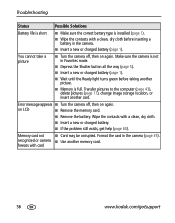
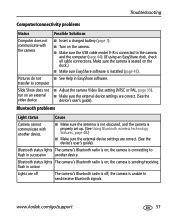
... help (page 60). You cannot take a picture ■ Turn the camera off , then on again. Make sure the camera is full. Error message appears ■ Turn the camera off , then on LCD ■ Remove the memory card. ■ Remove the battery. on again. Format the card in Favorites mode. ■ Depress the Shutter button all the way (page 5). ■ Insert a new or charged battery (page 1). ■ Wait until the Ready light turns green before inserting a battery in the camera...
... help (page 60). You cannot take a picture ■ Turn the camera off , then on again. Make sure the camera is full. Error message appears ■ Turn the camera off , then on LCD ■ Remove the memory card. ■ Remove the battery. on again. Format the card in Favorites mode. ■ Depress the Shutter button all the way (page 5). ■ Insert a new or charged battery (page 1). ■ Wait until the Ready light turns green before inserting a battery in the camera...
User Manual
Page 63
... camera's Bluetooth radio is properly set up. (See Using Bluetooth wireless technology features, page 48.) ■ Make sure the external device settings are correct. (See the device's user's guide). www.kodak.com/go/support 57 transfer to the camera and the computer (page 44). (If using an EasyShare dock, check all cable connections. flash in unison Lights are correct. (See the video device device's user's guide). Pictures do not ■ See Help...
... camera's Bluetooth radio is properly set up. (See Using Bluetooth wireless technology features, page 48.) ■ Make sure the external device settings are correct. (See the device's user's guide). www.kodak.com/go/support 57 transfer to the camera and the computer (page 44). (If using an EasyShare dock, check all cable connections. flash in unison Lights are correct. (See the video device device's user's guide). Pictures do not ■ See Help...

User Manual
Page 66
..., cards, etc.) Download the latest camera firmware and software www.kodak.com/go/v610downloads See online demonstrations of your camera www.kodak.com/go/howto Software Get information on EasyShare software Get help with the Windows operating system and working with digital pictures www.kodak.com/go/easysharesw (or see Help in EasyShare software) www.kodak.com/go/pcbasics Other Get support for cameras, software, accessories, more www.kodak.com/go/support Get information on Kodak EasyShare printer docks www.kodak.com...
..., cards, etc.) Download the latest camera firmware and software www.kodak.com/go/v610downloads See online demonstrations of your camera www.kodak.com/go/howto Software Get information on EasyShare software Get help with the Windows operating system and working with digital pictures www.kodak.com/go/easysharesw (or see Help in EasyShare software) www.kodak.com/go/pcbasics Other Get support for cameras, software, accessories, more www.kodak.com/go/support Get information on Kodak EasyShare printer docks www.kodak.com...
User Manual
Page 70
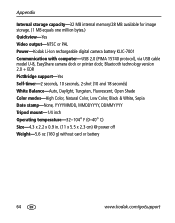
... one million bytes.) Quickview-Yes Video output-NTSC or PAL Power-Kodak Li-Ion rechargeable digital camera battery KLIC-7001 Communication with computer-USB 2.0 (PIMA 15740 protocol), via USB cable model U-8, EasyShare camera dock or printer dock; Bluetooth technology version 2.0 + EDR PictBridge support-Yes Self-timer-2 seconds, 10 seconds, 2-shot (10 and 18 seconds) White Balance-Auto, Daylight, Tungsten, Fluorescent, Open Shade Color modes-High Color, Natural Color, Low Color, Black & White, Sepia Date stamp-None, YYYYMMDD, MMDDYYYY, DDMMYYYY Tripod...
... one million bytes.) Quickview-Yes Video output-NTSC or PAL Power-Kodak Li-Ion rechargeable digital camera battery KLIC-7001 Communication with computer-USB 2.0 (PIMA 15740 protocol), via USB cable model U-8, EasyShare camera dock or printer dock; Bluetooth technology version 2.0 + EDR PictBridge support-Yes Self-timer-2 seconds, 10 seconds, 2-shot (10 and 18 seconds) White Balance-Auto, Daylight, Tungsten, Fluorescent, Open Shade Color modes-High Color, Natural Color, Low Color, Black & White, Sepia Date stamp-None, YYYYMMDD, MMDDYYYY, DDMMYYYY Tripod...

User Manual
Page 71
... Flash, Red Eye Off Auto, Off, Fill Flash, Red Eye Auto, Off, Fill Flash, Red Eye Off, Fill Flash Off Off, Fill Flash Off Auto, Off, Fill Flash, Red Eye Party Children Backlight Panning Shot Candle Light Sunset Custom Red Eye* Auto* Fill Flash Off Off Off Auto* Auto, Off, Fill Flash, Red Eye Auto, Off, Fill Flash, Red Eye Fill Flash Off, Fill Flash Off, Fill Flash, Red Eye, Auto Auto, Off, Fill Flash, Red Eye Auto, Off, Fill Flash, Red Eye * When you change to Auto or Red Eye, it becomes the default until you change it. www.kodak.com/go/support...
... Flash, Red Eye Off Auto, Off, Fill Flash, Red Eye Auto, Off, Fill Flash, Red Eye Off, Fill Flash Off Off, Fill Flash Off Auto, Off, Fill Flash, Red Eye Party Children Backlight Panning Shot Candle Light Sunset Custom Red Eye* Auto* Fill Flash Off Off Off Auto* Auto, Off, Fill Flash, Red Eye Auto, Off, Fill Flash, Red Eye Fill Flash Off, Fill Flash Off, Fill Flash, Red Eye, Auto Auto, Off, Fill Flash, Red Eye Auto, Off, Fill Flash, Red Eye * When you change to Auto or Red Eye, it becomes the default until you change it. www.kodak.com/go/support...

User Manual
Page 76
... warranty is necessary to shipping damage, accident, alteration, modification, unauthorized service, misuse, abuse, use items supplied by jurisdiction. 70 www.kodak.com/go/support Such repair or replacement is ineffective under this product. If replacement parts are used in the Kodak EasyShare digital cameras and accessories User's Guides. The option of replacement is due to replace the entire product, it may contain remanufactured materials. Liability for any...
... warranty is necessary to shipping damage, accident, alteration, modification, unauthorized service, misuse, abuse, use items supplied by jurisdiction. 70 www.kodak.com/go/support Such repair or replacement is ineffective under this product. If replacement parts are used in the Kodak EasyShare digital cameras and accessories User's Guides. The option of replacement is due to replace the entire product, it may contain remanufactured materials. Liability for any...
User Manual
Page 77
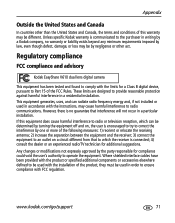
... used with the installation of the product, they must be different. www.kodak.com/go/support 71 These limits are designed to Part 15 of the following measures: 1) reorient or relocate the receiving antenna; 2) increase the separation between the equipment and the receiver; 3) connect the equipment to operate the equipment. Regulatory compliance FCC compliance and advisory Kodak EasyShare V610 dual lens digital camera...
... used with the installation of the product, they must be different. www.kodak.com/go/support 71 These limits are designed to Part 15 of the following measures: 1) reorient or relocate the receiving antenna; 2) increase the separation between the equipment and the receiver; 3) connect the equipment to operate the equipment. Regulatory compliance FCC compliance and advisory Kodak EasyShare V610 dual lens digital camera...

User Manual
Page 83
..., USB / A/V, 22, 44 copy pictures card to memory, 25 memory to card, 25 to computer via USB cable, 43 cropping pictures, 18, 19 customer support, 61 customizing camera settings, 32 D date setting, 3 date stamp, 34 DC-in, i delete button, ii deleting during quickview, 5 from internal memory, 17 from SD/MMC card, 17 protecting pictures, videos, 17 digital zoom, 33 digital zoom, using, 7 displaying slide show, 20 disposal, recycling, 69 dock connector, ii printer, 45 downloading pictures, 43 E EasyShare software, 43 emailing pictures, videos, 38 expected battery life, 68 exposure www.kodak.com...
..., USB / A/V, 22, 44 copy pictures card to memory, 25 memory to card, 25 to computer via USB cable, 43 cropping pictures, 18, 19 customer support, 61 customizing camera settings, 32 D date setting, 3 date stamp, 34 DC-in, i delete button, ii deleting during quickview, 5 from internal memory, 17 from SD/MMC card, 17 protecting pictures, videos, 17 digital zoom, 33 digital zoom, using, 7 displaying slide show, 20 disposal, recycling, 69 dock connector, ii printer, 45 downloading pictures, 43 E EasyShare software, 43 emailing pictures, videos, 38 expected battery life, 68 exposure www.kodak.com...

User Manual
Page 86
... self-timer, 28 with pictures, 8 service and support telephone numbers, 61 setting auto picture rotation, 34 auto power off, 33 auto-focus, 31 Bluetooth, 33 blur warning, 34 camera sounds, 32, 48 color mode, 30 date and time, 3 date stamp, 34 digital zoom, 33 exposure metering, 30 focus zone, 31 image storage, 32 ISO, 30 language, 34 LCD brightness, 33 LCD dimmer, 33 long time exposure, 31 orientation sensor, 34 picture quality, 28, 29 picture-taking mode, 10 80 self-timer, 8, 28 sharpness, 30 sound volume, 32 video date display, 34 video out, 33 white balance...
... self-timer, 28 with pictures, 8 service and support telephone numbers, 61 setting auto picture rotation, 34 auto power off, 33 auto-focus, 31 Bluetooth, 33 blur warning, 34 camera sounds, 32, 48 color mode, 30 date and time, 3 date stamp, 34 digital zoom, 33 exposure metering, 30 focus zone, 31 image storage, 32 ISO, 30 language, 34 LCD brightness, 33 LCD dimmer, 33 long time exposure, 31 orientation sensor, 34 picture quality, 28, 29 picture-taking mode, 10 80 self-timer, 8, 28 sharpness, 30 sound volume, 32 video date display, 34 video out, 33 white balance...

User Manual
Page 87
..., firmware, 69 URLs, Kodak Web sites, 60 USB transferring pictures, 43 V VCCI compliance, 72 video action print, 20 checking settings, 26 copying, 25 date display, 34 www.kodak.com/go/support Index deleting, 17 emailing tagged, 38 out, 33 protecting, 17 reviewing, 16 storage capacities, 66 transfer to computer, 43 viewing, 16 video mode button, i video/self-timer light, i viewing by date, album, 24 viewing picture after taking, 5, 16 viewing picture, video information, 24 volume, 32 W warranty, 69 white balance, 29 wide angle button, ii Windows OS, installing software, 43 Z zoom digital...
..., firmware, 69 URLs, Kodak Web sites, 60 USB transferring pictures, 43 V VCCI compliance, 72 video action print, 20 checking settings, 26 copying, 25 date display, 34 www.kodak.com/go/support Index deleting, 17 emailing tagged, 38 out, 33 protecting, 17 reviewing, 16 storage capacities, 66 transfer to computer, 43 viewing, 16 video mode button, i video/self-timer light, i viewing by date, album, 24 viewing picture after taking, 5, 16 viewing picture, video information, 24 volume, 32 W warranty, 69 white balance, 29 wide angle button, ii Windows OS, installing software, 43 Z zoom digital...


