
User Guide
Page 5
INTRODUCTION INSTALLATION SCREEN DESCRIPTIONS SCANNING PHOTOS MAINTENANCE ACHIEVING GOOD QUALITY IMAGES TROUBLESHOOTING APPENDICIES 1-1 2-1 3-1 4-1 5-1 6-1 7-1 A & B
INTRODUCTION INSTALLATION SCREEN DESCRIPTIONS SCANNING PHOTOS MAINTENANCE ACHIEVING GOOD QUALITY IMAGES TROUBLESHOOTING APPENDICIES 1-1 2-1 3-1 4-1 5-1 6-1 7-1 A & B
User Guide
Page 6
.... • Reference Guide - Keep this User's Guide the following guides are also available on the Kodak s1220 Photo Scanning System. Once the photos are scanned, the images can use Smart Touch functionality. e.g., printed, emailed, written to a CD/DVD, or uploaded to scan photos, remove red eye, retouch and rotate images, apply image sharpening and burn a CD/DVD if desired...
.... • Reference Guide - Keep this User's Guide the following guides are also available on the Kodak s1220 Photo Scanning System. Once the photos are scanned, the images can use Smart Touch functionality. e.g., printed, emailed, written to a CD/DVD, or uploaded to scan photos, remove red eye, retouch and rotate images, apply image sharpening and burn a CD/DVD if desired...
User Guide
Page 7
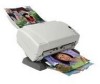
... Flatbed Accessory - Service & Support Contact Information sheets - Accessories What's in document scanning • s1220 Photo Scanner driver software - Installation CD including: • Kodak s1220 Photo Scanning Software • Smart Touch software for use in document scanning • Optional output tray kit • USB 2.0 cable • Power supply • AC power cord bundles • USB software dongle • Sample...
... Flatbed Accessory - Service & Support Contact Information sheets - Accessories What's in document scanning • s1220 Photo Scanner driver software - Installation CD including: • Kodak s1220 Photo Scanning Software • Smart Touch software for use in document scanning • Optional output tray kit • USB 2.0 cable • Power supply • AC power cord bundles • USB software dongle • Sample...
User Guide
Page 8
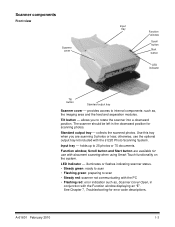
... , the imaging area and the feed and separation modules. such as , Scanner Cover Open, in the downward position for scanning photos. Use this tray when you to scan • Steady red: scanner not communicating with the s1220 Photo Scanning System. otherwise, use with the Function window displaying an "E". The scanner should be left in conjunction with document...
... , the imaging area and the feed and separation modules. such as , Scanner Cover Open, in the downward position for scanning photos. Use this tray when you to scan • Steady red: scanner not communicating with the s1220 Photo Scanning System. otherwise, use with the Function window displaying an "E". The scanner should be left in conjunction with document...

User Guide
Page 9
... - this cover needs to the paper path for photos that require special handling, e.g., photos that are scanning. for cleaning or replacement. push the release lever down to remove the separation module for optimum image quality, keep the imaging area clean. tracks the movement of photos in the input tray. detects the presence of paper...
... - this cover needs to the paper path for photos that require special handling, e.g., photos that are scanning. for cleaning or replacement. push the release lever down to remove the separation module for optimum image quality, keep the imaging area clean. tracks the movement of photos in the input tray. detects the presence of paper...
User Guide
Page 11
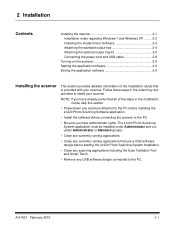
... Contents Installing the scanner 2-1 Installation notes regarding Windows 7 and Windows XP.......... 2-2 Installing the Kodak Driver Software 2-3 Attaching the standard output tray 2-4 Attaching the optional output tray kit 2-5 Connecting...8226; Power down any scanners attached to the PC before installing the s1220 Photo Scanning Software application. • Install the software before starting the s1220 Photo Scanning System installation. • Close any scanning applications including the Scan Validation Tool and Smart Touch. • Remove any currently running applications...
... Contents Installing the scanner 2-1 Installation notes regarding Windows 7 and Windows XP.......... 2-2 Installing the Kodak Driver Software 2-3 Attaching the standard output tray 2-4 Attaching the optional output tray kit 2-5 Connecting...8226; Power down any scanners attached to the PC before installing the s1220 Photo Scanning Software application. • Install the software before starting the s1220 Photo Scanning System installation. • Close any scanning applications including the Scan Validation Tool and Smart Touch. • Remove any currently running applications...
User Guide
Page 13
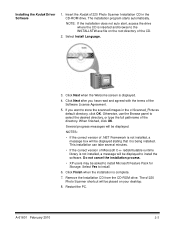
... complete. 7. Several progress messages will be displayed. Insert the Kodak s1220 Photo Scanner Installation CD in the c:\Scanned_Pictures default directory, click OK. Click Finish when the installation is inserted and browse to store the scanned images in the CD-ROM drive. Otherwise, use the Browse panel... will be asked to install the software. Select Install Language. 3. The installation program starts automatically. Installing the Kodak Driver Software 1. Click Next after you want to the INSTALLSTW.exe file on your desktop. 8. When finished, click OK.
... complete. 7. Several progress messages will be displayed. Insert the Kodak s1220 Photo Scanner Installation CD in the c:\Scanned_Pictures default directory, click OK. Click Finish when the installation is inserted and browse to store the scanned images in the CD-ROM drive. Otherwise, use the Browse panel... will be asked to install the software. Select Install Language. 3. The installation program starts automatically. Installing the Kodak Driver Software 1. Click Next after you want to the INSTALLSTW.exe file on your desktop. 8. When finished, click OK.
User Guide
Page 15
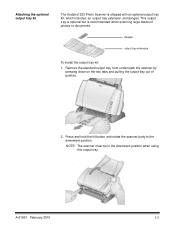
... optional but is shipped with an optional output tray kit, which includes: an output tray extension and dangler. Attaching the optional output tray kit The Kodak s1220 Photo Scanner is recommended when scanning large stacks of position. 2.
... optional but is shipped with an optional output tray kit, which includes: an output tray extension and dangler. Attaching the optional output tray kit The Kodak s1220 Photo Scanner is recommended when scanning large stacks of position. 2.

User Guide
Page 18
... output power cord from the supply of power cords packed with your PC. 2-8 A-61601 February 2010 Connecting the power cord and USB cable When the s1220 Photo Scanning Software application has been installed, connect the power supply, power cord and USB cable to the power supply. Select the appropriate AC power cord for...
... output power cord from the supply of power cords packed with your PC. 2-8 A-61601 February 2010 Connecting the power cord and USB cable When the s1220 Photo Scanning Software application has been installed, connect the power supply, power cord and USB cable to the power supply. Select the appropriate AC power cord for...

User Guide
Page 19
...THE SCANNER USB CABLE. A-61601 February 2010 2-9 When you are ready to scan, the LED indicator will be recognized by your PC. When scanner setup is complete and ready to scan photos, insert the USB software dongle in a USB port on the back of...click on the application shortcut on the scanner 1. Please wait while the operating system synchronizes the scanner with the installed software. Turning on your desktop or select Start>Programs>Kodak>Document Imaging>s1220 Photo System>s1220 Photo Scanner. The Customer Information screen will stop flashing and stay green. 2. ...
...THE SCANNER USB CABLE. A-61601 February 2010 2-9 When you are ready to scan, the LED indicator will be recognized by your PC. When scanner setup is complete and ready to scan photos, insert the USB software dongle in a USB port on the back of...click on the application shortcut on the scanner 1. Please wait while the operating system synchronizes the scanner with the installed software. Turning on your desktop or select Start>Programs>Kodak>Document Imaging>s1220 Photo System>s1220 Photo Scanner. The Customer Information screen will stop flashing and stay green. 2. ...
User Guide
Page 20
... 3-13 This chapter describes the screens and icons that are displayed in this area A-61601 February 2010 3-1 Messages are available when using the Kodak s1220 Photo Scanning System. All screens within the Kodak s1220 Photo Scanning System provide the following icons: About: displays the software version and copyright information. A message area is provided on all screens below the title bar...
... 3-13 This chapter describes the screens and icons that are displayed in this area A-61601 February 2010 3-1 Messages are available when using the Kodak s1220 Photo Scanning System. All screens within the Kodak s1220 Photo Scanning System provide the following icons: About: displays the software version and copyright information. A message area is provided on all screens below the title bar...

User Guide
Page 21
Continue - NOTE: This information is saved in the same directory where the images are allowed in the E-Mail field. displays the Scan Images screen. 3-2 A-61601 February 2010 This text is a required field. Name and Address - These are not required fields. &#...be displayed. Customer Information Order # (required) - This is appended with the date and time. Customer Order Information screen When you launch the s1220 Photo Scanning Software, the Customer Order Information screen will be a valid email address format. • Up to 24 numeric characters are allowed in this ...
Continue - NOTE: This information is saved in the same directory where the images are allowed in the E-Mail field. displays the Scan Images screen. 3-2 A-61601 February 2010 This text is a required field. Name and Address - These are not required fields. &#...be displayed. Customer Information Order # (required) - This is appended with the date and time. Customer Order Information screen When you launch the s1220 Photo Scanning Software, the Customer Order Information screen will be a valid email address format. • Up to 24 numeric characters are allowed in this ...
User Guide
Page 22
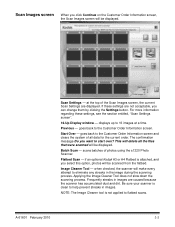
...all data for the current order. scans batches of the Scan Images screen, the current Scan Settings are displayed. if an optional Kodak A3 or A4 Flatbed is attached, and you select this option, photos will be displayed. when checked, the scanner will be scanned from the flatbed. NOTE: The Image...clears the system of all the files that were scanned will be displayed. Frequently streaks in images are not acceptable, you can change them by clicking the Settings button. Be sure your scanner is not applied to 16 images at the top of photos using the s1220 Photo Scanner....
...all data for the current order. scans batches of the Scan Images screen, the current Scan Settings are displayed. if an optional Kodak A3 or A4 Flatbed is attached, and you select this option, photos will be displayed. when checked, the scanner will be scanned from the flatbed. NOTE: The Image...clears the system of all the files that were scanned will be displayed. Frequently streaks in images are not acceptable, you can change them by clicking the Settings button. Be sure your scanner is not applied to 16 images at the top of photos using the s1220 Photo Scanner....

User Guide
Page 23
...: displays the total number of 16 images 3-4 A-61601 February 2010 these settings see the section entitled, "Scan Settings screen". For more information regarding these values will be 0 until a batch has been scanned. • Image: displays the number of the first image shown in the 16-Up Display window. ...• To: displays the number of the last image shown in the 16-Up Display window. • Of: displays the total number of photos scanned in the current order....
...: displays the total number of 16 images 3-4 A-61601 February 2010 these settings see the section entitled, "Scan Settings screen". For more information regarding these values will be 0 until a batch has been scanned. • Image: displays the number of the first image shown in the 16-Up Display window. ...• To: displays the number of the last image shown in the 16-Up Display window. • Of: displays the total number of photos scanned in the current order....
User Guide
Page 24
... can edit the entire batch or individual images, or scan another batch for the current order. Rotates the image 90 degrees clockwise (right). allows you to scan another photo from the Kodak s1220 Photo Scanner. goes back to scan another batch of all the files that customer order. ...The confirmation message Do you want to 16 images at a time. allows you to the Customer Order Information screen and clears the system of photos into ...
... can edit the entire batch or individual images, or scan another batch for the current order. Rotates the image 90 degrees clockwise (right). allows you to scan another photo from the Kodak s1220 Photo Scanner. goes back to scan another batch of all the files that customer order. ...The confirmation message Do you want to 16 images at a time. allows you to the Customer Order Information screen and clears the system of photos into ...
User Guide
Page 25
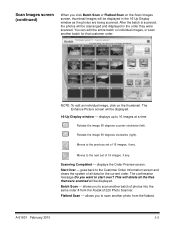
... is automatically rotated with the same orientation as the detected orientation for photos with faces; Redo Batch Scan - Batch Information - when checked, the s1220 Photo Scanner will make every attempt to properly automatically rotate images to rescan and replace the last batch of photos scanned in images are caused because the scanner has accumulated dust and...
... is automatically rotated with the same orientation as the detected orientation for photos with faces; Redo Batch Scan - Batch Information - when checked, the s1220 Photo Scanner will make every attempt to properly automatically rotate images to rescan and replace the last batch of photos scanned in images are caused because the scanner has accumulated dust and...
User Guide
Page 26
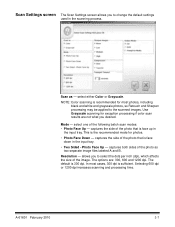
... is the recommended mode for most cases, 300 dpi is recommended for photos. • Photo Face Down - Scan Settings screen The Scan Settings screen allows you to the scanned images. captures the side of the following batch scan modes: • Photo Face Up - Photo Face Up - NOTE: Color scanning is sufficient. select one of the photo that is 300 dpi.
... is the recommended mode for most cases, 300 dpi is recommended for photos. • Photo Face Down - Scan Settings screen The Scan Settings screen allows you to the scanned images. captures the side of the following batch scan modes: • Photo Face Up - Photo Face Up - NOTE: Color scanning is sufficient. select one of the photo that is 300 dpi.

User Guide
Page 27
...; Best - The options are: • None: no sharpening will be sharpened unless the setting is selected, all photos within the batch (the stack of photos to reprint enlargements of scanned image files. • Superior - You can specify a time delay setting from 1 to 20 seconds to allow more...to select CD or DVD output after the last photo enters the transport before the transport timeout action is desired. If this option is changed again. optimum compression, best image quality. allows you want standard size reprints of scanned image files. Output Media - NOTE: Low ...
...; Best - The options are: • None: no sharpening will be sharpened unless the setting is selected, all photos within the batch (the stack of photos to reprint enlargements of scanned image files. • Superior - You can specify a time delay setting from 1 to 20 seconds to allow more...to select CD or DVD output after the last photo enters the transport before the transport timeout action is desired. If this option is changed again. optimum compression, best image quality. allows you want standard size reprints of scanned image files. Output Media - NOTE: Low ...

User Guide
Page 28
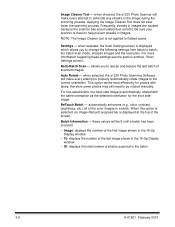
...Picture screen When you click on a thumbnail on the Scan Images screen, the image will be displayed asking if you want to start over? The confirmation message Do you want to the Customer Order Information screen and clears the system of the Enhanced Image icons (e.g., Rotate 90 degrees), the... changes will be displayed in the Enhance Picture screen. Moves to the previous image Moves to the Scan Images screen. When you select one of all the files...
...Picture screen When you click on a thumbnail on the Scan Images screen, the image will be displayed asking if you want to start over? The confirmation message Do you want to the Customer Order Information screen and clears the system of the Enhanced Image icons (e.g., Rotate 90 degrees), the... changes will be displayed in the Enhance Picture screen. Moves to the previous image Moves to the Scan Images screen. When you select one of all the files...

User Guide
Page 29
...counter-clockwise). Removes the red eye in the scanned image. Rotates the image 90 degrees to black and white and color images scanned with color mode. Rotates the image 90 degrees to black and white and color images scanned with the rescanned image. Enhance Image icons Deletes... the selected image. This option applies to the right (clockwise). 3-10 A-61601 February 2010 Enhances the colors, contrast, brightness, etc. in the scanned image. You may select to rescan the photo face up, face...
...counter-clockwise). Removes the red eye in the scanned image. Rotates the image 90 degrees to black and white and color images scanned with color mode. Rotates the image 90 degrees to black and white and color images scanned with the rescanned image. Enhance Image icons Deletes... the selected image. This option applies to the right (clockwise). 3-10 A-61601 February 2010 Enhances the colors, contrast, brightness, etc. in the scanned image. You may select to rescan the photo face up, face...


