

User Manual
Page 5
adjust the volume. Videos Play. press again for 4X. 1 Turn off the camera. 2 Connect the A/V cable. 3 Turn on the camera. 4 Review pictures/videos/slide shows on a television. press again for 4X. Other display devices: •Your computer monitor •Devices equipped with a video input www.kodak.com/go/m893support 5 play at 2X speed; reverse at 2X speed; During playback: OK pause/unpause. ENGLISH ᕧ Reviewing pictures/videos Camera Your television A/V cable (may be sold separately) 1 Press Review. 2 for previous/next picture/video.
adjust the volume. Videos Play. press again for 4X. 1 Turn off the camera. 2 Connect the A/V cable. 3 Turn on the camera. 4 Review pictures/videos/slide shows on a television. press again for 4X. Other display devices: •Your computer monitor •Devices equipped with a video input www.kodak.com/go/m893support 5 play at 2X speed; reverse at 2X speed; During playback: OK pause/unpause. ENGLISH ᕧ Reviewing pictures/videos Camera Your television A/V cable (may be sold separately) 1 Press Review. 2 for previous/next picture/video.

User Manual
Page 9
ENGLISH Back view 1 2 3 45 6 7 16 15 14 optional memory card (sold separately) 8 9 10 11 12 13 1 LCD 2 Review button 3 Ready/Battery charging light 4 Menu button 5 Delete button 6 Zoom button (Wide/Telephoto) 7 Mode dial 9 OK/ 10 Strap post 11 USB port 12 Share button 13 Battery compartment 14 SD/SDHC memory card slot 15 Dock connector 8 DC-In (5V) , for optional AC adapter 16 Tripod socket www.kodak.com/go/m893support 9
ENGLISH Back view 1 2 3 45 6 7 16 15 14 optional memory card (sold separately) 8 9 10 11 12 13 1 LCD 2 Review button 3 Ready/Battery charging light 4 Menu button 5 Delete button 6 Zoom button (Wide/Telephoto) 7 Mode dial 9 OK/ 10 Strap post 11 USB port 12 Share button 13 Battery compartment 14 SD/SDHC memory card slot 15 Dock connector 8 DC-In (5V) , for optional AC adapter 16 Tripod socket www.kodak.com/go/m893support 9

User Manual
Page 12
...-shoot simplicity when taking modes Choose the mode that best suits your subjects and surroundings. Use available light instead of use. Capturing video with your camera Using different picture-taking pictures under special conditions. (See page 13.) People in low-light scenes indoors using a higher ISO. Doing more with sound. (See...
...-shoot simplicity when taking modes Choose the mode that best suits your subjects and surroundings. Use available light instead of use. Capturing video with your camera Using different picture-taking pictures under special conditions. (See page 13.) People in low-light scenes indoors using a higher ISO. Doing more with sound. (See...

User Manual
Page 16
to view other parts of the picture remains. 1 Press the Review button, then picture. to find a Picture 2 Press the Menu button. Press to find Edit. Press OK. 16 www.kodak.com/go/easysharecenter Cropped picture 3 Press to highlight Crop, then press OK. 4 Press Telephoto (T) to move the crop box. to zoom in, or... that only the desired portion of the 4 Press OK to return to magnify 2X-8X. 3 Press picture. 2 Working with pictures/videos Magnifying pictures 1 Press the Review button. 2 Press W/T to 1X.
to view other parts of the picture remains. 1 Press the Review button, then picture. to find a Picture 2 Press the Menu button. Press to find Edit. Press OK. 16 www.kodak.com/go/easysharecenter Cropped picture 3 Press to highlight Crop, then press OK. 4 Press Telephoto (T) to move the crop box. to zoom in, or... that only the desired portion of the 4 Press OK to return to magnify 2X-8X. 3 Press picture. 2 Working with pictures/videos Magnifying pictures 1 Press the Review button. 2 Press W/T to 1X.
User Manual
Page 17
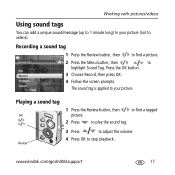
... 4 Press OK to highlight Sound Tag. The sound tag is applied to your picture (not to videos). www.kodak.com/go/m893support 17 Playing a sound tag OK 1 Press the Review button, then picture. Working with pictures/videos Using sound tags You can add a unique sound/message (up to 1... minute long) to your picture. Recording a sound tag 1 Press the Review button, then to find a tagged 2 Press to play the...
... 4 Press OK to highlight Sound Tag. The sound tag is applied to your picture (not to videos). www.kodak.com/go/m893support 17 Playing a sound tag OK 1 Press the Review button, then picture. Working with pictures/videos Using sound tags You can add a unique sound/message (up to 1... minute long) to your picture. Recording a sound tag 1 Press the Review button, then to find a tagged 2 Press to play the...

User Manual
Page 18
...To select multiple pictures/videos, see page 21. to single-picture view. Working with pictures/videos Viewing thumbnails (multi-up) 1 Press the Review button. 2 Press the Zoom Wide Angle (W) button to change from single-picture view to multi-up thumbnails. 3 Press Telephoto (T) to ...of the 4 Press OK. The enhancement is previewed in a split screen. Press picture. Using Kodak Perfect Touch technology Kodak Perfect Touch technology helps ensure better, brighter pictures. 1 Press the Review button, then for previous/next picture. 2 Press the Menu button. NOTE: You cannot enhance ...
...To select multiple pictures/videos, see page 21. to single-picture view. Working with pictures/videos Viewing thumbnails (multi-up) 1 Press the Review button. 2 Press the Zoom Wide Angle (W) button to change from single-picture view to multi-up thumbnails. 3 Press Telephoto (T) to ...of the 4 Press OK. The enhancement is previewed in a split screen. Press picture. Using Kodak Perfect Touch technology Kodak Perfect Touch technology helps ensure better, brighter pictures. 1 Press the Review button, then for previous/next picture. 2 Press the Menu button. NOTE: You cannot enhance ...
User Manual
Page 19
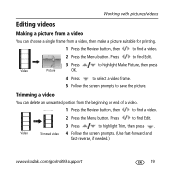
... with pictures/videos Editing videos Making a picture from a video You can delete an unwanted portion from a video, then make a picture suitable for printing. 1 Press the Review button, then to find a video. 2 Press the Menu button. Trimming a video You can choose a single frame from the beginning or end of a video. 1 Press the.... 5 Follow the screen prompts to highlight Trim, then press . Video Trimmed video 4 Follow the screen prompts. (Use fast-forward and fast-reverse, if needed.) www.kodak.com/go/m893support 19 Press to find Edit. 3 Press to save the picture.
... with pictures/videos Editing videos Making a picture from a video You can delete an unwanted portion from a video, then make a picture suitable for printing. 1 Press the Review button, then to find a video. 2 Press the Menu button. Trimming a video You can choose a single frame from the beginning or end of a video. 1 Press the.... 5 Follow the screen prompts to highlight Trim, then press . Video Trimmed video 4 Follow the screen prompts. (Use fast-forward and fast-reverse, if needed.) www.kodak.com/go/m893support 19 Press to find Edit. 3 Press to save the picture.

User Manual
Page 20
... Press the Menu button. To interrupt the Slide Show, press the OK button. 20 www.kodak.com/go/easysharecenter Press Edit Video, then press OK. Working with a video input (see page 5). 1 Press the Review button, then the Menu button. 2 Press to highlight Slide Show, then press the OK ...to display your pictures/videos on the camera, a television, or any device equipped with pictures/videos Making a video action print From a video, you can make a 4-, 9-, or 16-up picture, suitable for a 4 x 6-inch (10 x 15 cm) print. 1 Press the Review button, then to highlight Video Action ...
... Press the Menu button. To interrupt the Slide Show, press the OK button. 20 www.kodak.com/go/easysharecenter Press Edit Video, then press OK. Working with a video input (see page 5). 1 Press the Review button, then the Menu button. 2 Press to highlight Slide Show, then press the OK ...to display your pictures/videos on the camera, a television, or any device equipped with pictures/videos Making a video action print From a video, you can make a 4-, 9-, or 16-up picture, suitable for a 4 x 6-inch (10 x 15 cm) print. 1 Press the Review button, then to highlight Video Action ...

User Manual
Page 21
... Multimedia Slide Show is similar to print, delete, etc. (Multi-select is used most effectively in Multi-Up mode, page 18.) 1 Press the Review button, then picture/video. First, select 2-20 pictures (see page 21). You can press OK a second time to highlight a choice from the menu... the OK button. You can now print, transfer, or delete the selected pictures. Selected pictures A check mark appears on the picture. Then: 1 Press the Review button. 2 Press to highlight Multimedia Slide Show, then press the OK button. 3 Press to remove a check mark. to find a 2 Press the OK...
... Multimedia Slide Show is similar to print, delete, etc. (Multi-select is used most effectively in Multi-Up mode, page 18.) 1 Press the Review button, then picture/video. First, select 2-20 pictures (see page 21). You can press OK a second time to highlight a choice from the menu... the OK button. You can now print, transfer, or delete the selected pictures. Selected pictures A check mark appears on the picture. Then: 1 Press the Review button. 2 Press to highlight Multimedia Slide Show, then press the OK button. 3 Press to remove a check mark. to find a 2 Press the OK...

User Manual
Page 22
The deleted picture (overlaid with pictures/videos Deleting pictures/videos 1 Press the Review button. 2 Press for more pictures, the Delete menu on a blank screen appears. If there are no more information. This feature is available only immediately...highlight Undo Delete. 2 Press OK. Working with the Delete menu) appears. 22 www.kodak.com/go/easysharecenter The Undo Delete option appears. 1 Press to retrieve it. Using the undo delete feature If you delete a picture in Review mode. See Using the undo delete feature for previous/next picture/video. 3 Press the...
The deleted picture (overlaid with pictures/videos Deleting pictures/videos 1 Press the Review button. 2 Press for more pictures, the Delete menu on a blank screen appears. If there are no more information. This feature is available only immediately...highlight Undo Delete. 2 Press OK. Working with the Delete menu) appears. 22 www.kodak.com/go/easysharecenter The Undo Delete option appears. 1 Press to retrieve it. Using the undo delete feature If you delete a picture in Review mode. See Using the undo delete feature for previous/next picture/video. 3 Press the...

User Manual
Page 23
...: Formatting a card deletes all pictures and videos, including protected files. charge using USB charging. rechargeable digital camera battery KLIC-7001. Camera problems If... Try one or more of the flash. Write-once SD cards not supported. I Insert...kodak.com/go /m893support and select Interactive Troubleshooting & Repairs. Battery does not I Limit the following Camera does not I Purchase a certified SD/SDHC card. excessive use of the following activities that quickly deplete battery power: with Kodak Li-Ion reviewing pictures/videos on /off. www.kodak...
...: Formatting a card deletes all pictures and videos, including protected files. charge using USB charging. rechargeable digital camera battery KLIC-7001. Camera problems If... Try one or more of the flash. Write-once SD cards not supported. I Insert...kodak.com/go /m893support and select Interactive Troubleshooting & Repairs. Battery does not I Limit the following Camera does not I Purchase a certified SD/SDHC card. excessive use of the following activities that quickly deplete battery power: with Kodak Li-Ion reviewing pictures/videos on /off. www.kodak...


