

User's Guide
Page 1
Kodak EasyShare LS633 zoom digital camera User's Guide Visit Kodak on the World Wide Web at www.kodak.com
Kodak EasyShare LS633 zoom digital camera User's Guide Visit Kodak on the World Wide Web at www.kodak.com

User's Guide
Page 4
Back View 567 Product Overview 8 9 10 delete 4 AUTO OFF 32 1 11 12 menu 13 review 14 15 1 Camera screen 2 Share button (page 51) 3 Joystick (Move OK button (Press in) 4 Mode dial (page 6) 5 Viewfinder 6 Ready light 7 Delete button 8 Self Timer/Burst button 9 Flash/Status button ) 10 Shutter button 11 Zoom (Wide Angle and Telephoto) 12 Speaker 13 Menu button 14 Review button 15 Wrist strap post ii
Back View 567 Product Overview 8 9 10 delete 4 AUTO OFF 32 1 11 12 menu 13 review 14 15 1 Camera screen 2 Share button (page 51) 3 Joystick (Move OK button (Press in) 4 Mode dial (page 6) 5 Viewfinder 6 Ready light 7 Delete button 8 Self Timer/Burst button 9 Flash/Status button ) 10 Shutter button 11 Zoom (Wide Angle and Telephoto) 12 Speaker 13 Menu button 14 Review button 15 Wrist strap post ii

User's Guide
Page 7
... 2 Package Contents 3 Charging the Battery 4 Loading the Battery 5 Attaching the Wrist Strap 5 Mode Dial Settings 6 Turning On the Camera 7 Setting the Date and Time 8 Checking Camera Status Area 9 Inserting an MMC/SD Card 10 Choosing Internal Memory or MMC/SD Card 11 2 Taking Pictures 13 Auto Mode 13... Sport Mode 14 Night Mode 15 Landscape Mode 16 Close-up Mode 17 Liveview-Framing with the Camera Screen 18 Quickview-Reviewing...
... 2 Package Contents 3 Charging the Battery 4 Loading the Battery 5 Attaching the Wrist Strap 5 Mode Dial Settings 6 Turning On the Camera 7 Setting the Date and Time 8 Checking Camera Status Area 9 Inserting an MMC/SD Card 10 Choosing Internal Memory or MMC/SD Card 11 2 Taking Pictures 13 Auto Mode 13... Sport Mode 14 Night Mode 15 Landscape Mode 16 Close-up Mode 17 Liveview-Framing with the Camera Screen 18 Quickview-Reviewing...

User's Guide
Page 9
... Pictures and Videos 51 Tagging Pictures for Printing 52 Tagging Pictures and Videos for Emailing 53 Tagging Pictures and Videos as Favorites 54 6 Customizing Your Camera Settings 55 To Access Setup Mode/Menus 55 Setup Menus 55 Changing the Default Print Quantity 56 Turning Off Quickview 56 Turning Off Liveview in...
... Pictures and Videos 51 Tagging Pictures for Printing 52 Tagging Pictures and Videos for Emailing 53 Tagging Pictures and Videos as Favorites 54 6 Customizing Your Camera Settings 55 To Access Setup Mode/Menus 55 Setup Menus 55 Changing the Default Print Quantity 56 Turning Off Quickview 56 Turning Off Liveview in...

User's Guide
Page 10
... Memory or MMC/SD Card 60 Viewing Camera Information 61 7 Installing the Software 63 Windows System Requirements 63 Mac OS X System Requirements 64 Mac OS 8.6 and 9.x System Requirements 64 Install the Software 65 8 Connecting Camera to Computer 67 Transferring Pictures with the ...Computer 68 9 Using the Camera Dock 6000 69 Camera Dock 6000 Package Contents 69 Installing the Custom Camera Insert 70 Connecting the Camera Dock 6000 71 Docking the Camera 72 Charging the Battery 73 Transferring Pictures 74 Troubleshooting-Camera Dock 6000 75 Earlier Cameras and Docks 75 Using ...
... Memory or MMC/SD Card 60 Viewing Camera Information 61 7 Installing the Software 63 Windows System Requirements 63 Mac OS X System Requirements 64 Mac OS 8.6 and 9.x System Requirements 64 Install the Software 65 8 Connecting Camera to Computer 67 Transferring Pictures with the ...Computer 68 9 Using the Camera Dock 6000 69 Camera Dock 6000 Package Contents 69 Installing the Custom Camera Insert 70 Connecting the Camera Dock 6000 71 Docking the Camera 72 Charging the Battery 73 Transferring Pictures 74 Troubleshooting-Camera Dock 6000 75 Earlier Cameras and Docks 75 Using ...

User's Guide
Page 11
Camera Dock 6000 Specifications 76 10 Troubleshooting 77 Troubleshooting-Camera 77 11 Getting Help 89 Helpful Web Links 89 Help in this Manual 89 Software Help 89 Telephone Customer Support 90 12 Appendix 93 Camera Specifications 93 Original Factory Settings 95 Upgrading Your Software and Firmware 96 Tips, Safety, Maintenance 96 Storage Capacities 98 Locating Pictures and Videos on a Card 99 Picture Naming Conventions 99 Using the Battery 101 Power-Saving Features 102 FCC Compliance and Advisory 102 ix
Camera Dock 6000 Specifications 76 10 Troubleshooting 77 Troubleshooting-Camera 77 11 Getting Help 89 Helpful Web Links 89 Help in this Manual 89 Software Help 89 Telephone Customer Support 90 12 Appendix 93 Camera Specifications 93 Original Factory Settings 95 Upgrading Your Software and Firmware 96 Tips, Safety, Maintenance 96 Storage Capacities 98 Locating Pictures and Videos on a Card 99 Picture Naming Conventions 99 Using the Battery 101 Power-Saving Features 102 FCC Compliance and Advisory 102 ix
User's Guide
Page 13
1 Getting Started Install Software First Install the software from the Kodak EasyShare software CD before connecting the camera (or camera dock) to load incorrectly. Need This Guide in Larger Print? Failure to do so may cause the software to the computer. See the Quick Start ...Guide or Installing the Software, page 63. For a large print version of this User's Guide: 1 Go to www.kodak.com/go/ls633support...
1 Getting Started Install Software First Install the software from the Kodak EasyShare software CD before connecting the camera (or camera dock) to load incorrectly. Need This Guide in Larger Print? Failure to do so may cause the software to the computer. See the Quick Start ...Guide or Installing the Software, page 63. For a large print version of this User's Guide: 1 Go to www.kodak.com/go/ls633support...

User's Guide
Page 14
... m Take the card to your camera functions. Some Macintosh operating systems may support limited Kodak EasyShare software features. 2 The camera screen offers brilliant color reproduction and low battery consumption. What Can I Do With My Camera? Capture Videos with flash, Self Timer, and zoom features. Set Up -Customize your home printer or Kodak EasyShare printer dock 6000. Print-(see...
... m Take the card to your camera functions. Some Macintosh operating systems may support limited Kodak EasyShare software features. 2 The camera screen offers brilliant color reproduction and low battery consumption. What Can I Do With My Camera? Capture Videos with flash, Self Timer, and zoom features. Set Up -Customize your home printer or Kodak EasyShare printer dock 6000. Print-(see...

User's Guide
Page 15
Contents may change without notice.) 3 Chapter 1 Package Contents 1 3 4 2 5 1 Camera 2 Battery charger 3 USB cable 4 Audio/Video cable 5 Battery Not shown: User's Guide, Quick Start Guide, wrist strap, Kodak EasyShare software CD, custom camera insert. (In some countries, the User's Guide is provided on a CD.
Contents may change without notice.) 3 Chapter 1 Package Contents 1 3 4 2 5 1 Camera 2 Battery charger 3 USB cable 4 Audio/Video cable 5 Battery Not shown: User's Guide, Quick Start Guide, wrist strap, Kodak EasyShare software CD, custom camera insert. (In some countries, the User's Guide is provided on a CD.

User's Guide
Page 16
Charging takes approximately 2 hours. You can also charge the battery using the optional Kodak EasyShare printer dock 6000 or the Kodak EasyShare camera dock 6000 (page 73). Chapter 1 Charging the Battery 1 Insert the battery into the (included) charger. 2 Insert the plug that matches your electrical outlet. 3 Plug the ... indicator light turns red. When the indicator light turns green, remove the battery and unplug the charger. Purchase these and other accessories at a dealer of Kodak products or www.kodak.com/go/accessories. 4
Charging takes approximately 2 hours. You can also charge the battery using the optional Kodak EasyShare printer dock 6000 or the Kodak EasyShare camera dock 6000 (page 73). Chapter 1 Charging the Battery 1 Insert the battery into the (included) charger. 2 Insert the plug that matches your electrical outlet. 3 Plug the ... indicator light turns red. When the indicator light turns green, remove the battery and unplug the charger. Purchase these and other accessories at a dealer of Kodak products or www.kodak.com/go/accessories. 4

User's Guide
Page 17
... 101. NOTE: Slide the battery lock to the side to remove the battery. Chapter 1 Loading the Battery CAUTION: Use only a Kodak EasyShare Li-Ion rechargeable battery. Battery Lock Contacts 1 Turn off the camera. 2 Open the battery door. 3 Orient the battery as shown, and push it in place. 4 Close the battery door. The battery...
... 101. NOTE: Slide the battery lock to the side to remove the battery. Chapter 1 Loading the Battery CAUTION: Use only a Kodak EasyShare Li-Ion rechargeable battery. Battery Lock Contacts 1 Turn off the camera. 2 Open the battery door. 3 Orient the battery as shown, and push it in place. 4 Close the battery door. The battery...

User's Guide
Page 18
..., or 8.6 to 27.5 in. (22 to 70 cm) in motion. Chapter 1 Mode Dial Settings delete AUTO OFF Icon Mode Off Off Purpose Turns off the camera. Captures close and background subjects.
..., or 8.6 to 27.5 in. (22 to 70 cm) in motion. Chapter 1 Mode Dial Settings delete AUTO OFF Icon Mode Off Off Purpose Turns off the camera. Captures close and background subjects.

User's Guide
Page 19
... operations that are in Still Modes, so that it is set to any other position. The Ready light blinks while the camera performs a self-check, then glows green when the camera is ready to take pictures (or videos, if the mode dial is automatically on or Press the OK button. Chapter 1 Turning... light delete Rotate the Mode dial from Off to ). off page 57. after they turn off Turn off the camera Turn the Mode dial to Then do this Turn the camera screen on or off Change the Liveview setting See Turning Off Liveview in process. 7 Mode OK dial Adjusting the Display If...
... operations that are in Still Modes, so that it is set to any other position. The Ready light blinks while the camera performs a self-check, then glows green when the camera is ready to take pictures (or videos, if the mode dial is automatically on or Press the OK button. Chapter 1 Turning... light delete Rotate the Mode dial from Off to ). off page 57. after they turn off Turn off the camera Turn the Mode dial to Then do this Turn the camera screen on or off Change the Liveview setting See Turning Off Liveview in process. 7 Mode OK dial Adjusting the Display If...

User's Guide
Page 20
... 1 Turn on your computer operating system, Kodak EasyShare software may allow your computer to change it. The time is displayed in a 24-hour format. 4 Press to automatically update the camera clock when you connect the camera. See the Kodak EasyShare software Help for an extended time. (Select... Cancel if you want to the NOTE: Depending on the camera. Press next setting. 5 When finished, press the OK button...
... 1 Turn on your computer operating system, Kodak EasyShare software may allow your computer to change it. The time is displayed in a 24-hour format. 4 Press to automatically update the camera clock when you connect the camera. See the Kodak EasyShare software Help for an extended time. (Select... Cancel if you want to the NOTE: Depending on the camera. Press next setting. 5 When finished, press the OK button...

User's Guide
Page 21
...) Auto Sport Night Landscape Close-up Review Video Low battery Exhausted battery (blinking) 9 Screen Icons (Bottom of Camera Screen) Date stamp Burst Self Timer Flash mode Best Best (3:2) 072 Better Good Internal memory Memory Card Custom Quality Pictures remaining ..., see When Can I Tag My Pictures and Videos?, page 51. NOTE: To preserve the camera screen, icons Screen Icon turn the Mode dial from the Off position. Chapter 1 Checking Camera Status Area Status Area To check the current camera settings, turn off after several seconds. To redisplay them, press .
...) Auto Sport Night Landscape Close-up Review Video Low battery Exhausted battery (blinking) 9 Screen Icons (Bottom of Camera Screen) Date stamp Burst Self Timer Flash mode Best Best (3:2) 072 Better Good Internal memory Memory Card Custom Quality Pictures remaining ..., see When Can I Tag My Pictures and Videos?, page 51. NOTE: To preserve the camera screen, icons Screen Icon turn the Mode dial from the Off position. Chapter 1 Checking Camera Status Area Status Area To check the current camera settings, turn off after several seconds. To redisplay them, press .

User's Guide
Page 22
... when the green Ready light is partially ejected, pull it . Purchase accessories at a dealer of card To insert an MMC/SD card: 1 Turn off the camera. 2 Open the card door. 3 Orient the card as shown on the card door. 4 Push the card into the slot to seat the connector. 5 Close ... remove the card, push it in, then release it out. forcing it may damage your pictures, card, or camera. doing so may damage the camera or card. Notched corner of Kodak products or www.kodak.com/go/ls633accessories. 10 See page 98 for pictures and videos. CAUTION: The card can only be inserted one...
... when the green Ready light is partially ejected, pull it . Purchase accessories at a dealer of card To insert an MMC/SD card: 1 Turn off the camera. 2 Open the card door. 3 Orient the card as shown on the card door. 4 Push the card into the slot to seat the connector. 5 Close ... remove the card, push it in, then release it out. forcing it may damage your pictures, card, or camera. doing so may damage the camera or card. Notched corner of Kodak products or www.kodak.com/go/ls633accessories. 10 See page 98 for pictures and videos. CAUTION: The card can only be inserted one...

User's Guide
Page 23
... press the OK button. 4 Press to exit the menu. 11 The number/length of pictures/videos depends on the size of Kodak products or www.kodak.com/go/accessories. If not, the camera uses internal memory. Managing Your Storage Location Setting 1 Turn on a card. The setting remains until you change it and applies...
... press the OK button. 4 Press to exit the menu. 11 The number/length of pictures/videos depends on the size of Kodak products or www.kodak.com/go/accessories. If not, the camera uses internal memory. Managing Your Storage Location Setting 1 Turn on a card. The setting remains until you change it and applies...

User's Guide
Page 24
.../video location Press the Review button. -Picture or video is stored on a card -Picture or video is stored in the status area indicates the camera's storage location. To redisplay them , press . To check the location: Storage location Turn the Mode dial from the Off position. -Memory Card... -Internal Memory NOTE: To preserve the camera screen, icons turn off after several seconds. To redisplay them , press . 12 Chapter 1 Checking Your Storage Setting In Still and Video modes, the...
.../video location Press the Review button. -Picture or video is stored on a card -Picture or video is stored in the status area indicates the camera's storage location. To redisplay them , press . To check the location: Storage location Turn the Mode dial from the Off position. -Memory Card... -Internal Memory NOTE: To preserve the camera screen, icons turn off after several seconds. To redisplay them , press . 12 Chapter 1 Checking Your Storage Setting In Still and Video modes, the...
User's Guide
Page 25
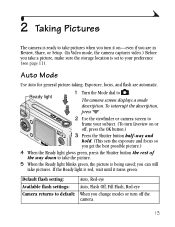
... default: When you change modes or turn Liveview on -even if you are automatic. To interrupt the description, press . 2 Use the viewfinder or camera screen to frame your preference (see page 11). you can still take pictures. Exposure, focus, and flash are in Review, Share, or Setup. ...(In Video mode, the camera captures video.) Before you take a picture, make sure the storage location is red, wait until it turns green. If the Ready light is set ...
... default: When you change modes or turn Liveview on -even if you are automatic. To interrupt the description, press . 2 Use the viewfinder or camera screen to frame your preference (see page 11). you can still take pictures. Exposure, focus, and flash are in Review, Share, or Setup. ...(In Video mode, the camera captures video.) Before you take a picture, make sure the storage location is red, wait until it turns green. If the Ready light is set ...

User's Guide
Page 26
... the picture. Chapter 2 Sport Mode Use this mode when the subject is saved. The Ready light blinks green while the picture is in motion. The camera screen displays a mode description. Default flash setting: Auto Available flash settings: Auto, Flash Off, Fill Flash, Red-eye...
... the picture. Chapter 2 Sport Mode Use this mode when the subject is saved. The Ready light blinks green while the picture is in motion. The camera screen displays a mode description. Default flash setting: Auto Available flash settings: Auto, Flash Off, Fill Flash, Red-eye...


