
User Guide
Page 2
...be installed by qualified personnel . CAUTION: Hot surface, avoid contact POZOR: DIKKAT: CAUTION: Horký povrch -- Supervisors should be kept short, using a hair net if needed, or tying long hair up in a residential area is a Class A product. In a domestic environment this equipment in...long necklaces, etc. • Hair length should review their own expense. July 2003 1 Safety and Installation Information for the Kodak i800 Series Scanners IMPORTANT: Equipment shall be required to the operation of any mechanical device. nedotýkat se Hareketli parçalar, ...
...be installed by qualified personnel . CAUTION: Hot surface, avoid contact POZOR: DIKKAT: CAUTION: Horký povrch -- Supervisors should be kept short, using a hair net if needed, or tying long hair up in a residential area is a Class A product. In a domestic environment this equipment in...long necklaces, etc. • Hair length should review their own expense. July 2003 1 Safety and Installation Information for the Kodak i800 Series Scanners IMPORTANT: Equipment shall be required to the operation of any mechanical device. nedotýkat se Hareketli parçalar, ...

User Guide
Page 3
Taiwan Japan Class A This equipment is in commercial and/or industrial areas. Consequently, when used in a residential area or in an adjacent area thereto, radio interference may be used in commercial and/or industrial areas) and conforms to the standards set by the Voluntary Control Council for correct handling. Read the instructions for Interference by Information Technology Equipment aimed at preventing radio interference in the Class A category (Information Technology Equipment to be caused to radio and TV receivers, etc. Peoples Republic of China Class A July 2003 2
Taiwan Japan Class A This equipment is in commercial and/or industrial areas. Consequently, when used in a residential area or in an adjacent area thereto, radio interference may be used in commercial and/or industrial areas) and conforms to the standards set by the Voluntary Control Council for correct handling. Read the instructions for Interference by Information Technology Equipment aimed at preventing radio interference in the Class A category (Information Technology Equipment to be caused to radio and TV receivers, etc. Peoples Republic of China Class A July 2003 2
User Guide
Page 4
...61169 July 2003 1-1 Chapter 5, Maintenance provides complete maintenance procedures for the i800 Scanner, including replacement procedures for the Kodak i800 Series Scanners. This chapter also instructs how to scan documents. Chapter 6, Troubleshooting/Messages provides... a message listing, a problem solving chart and how to clear a document jam. Chapter 4, Document Printer and Patch Reader provides instructions for use...
...61169 July 2003 1-1 Chapter 5, Maintenance provides complete maintenance procedures for the i800 Scanner, including replacement procedures for the Kodak i800 Series Scanners. This chapter also instructs how to scan documents. Chapter 6, Troubleshooting/Messages provides... a message listing, a problem solving chart and how to clear a document jam. Chapter 4, Document Printer and Patch Reader provides instructions for use...
User Guide
Page 5
... 250- 500-, 750- 1000-document stacks - 3D Multi-feed Detection, using ultrasonic technology, offering outstanding reliability - and edge-aligned - Product description Standard features The Kodak i800 Series Scanners are available • Easily upgradeable models, at your site, with minimal downtime...sheet feeding and operator-assisted document stacks. The following features are standard on the Kodak i800 Series Scanners. • Simultaneous output of color and bi-tonal images (i820 and i840 scanners only) • SurePath paper handling, featuring: - 1,000-sheet QuickSet elevator ...
... 250- 500-, 750- 1000-document stacks - 3D Multi-feed Detection, using ultrasonic technology, offering outstanding reliability - and edge-aligned - Product description Standard features The Kodak i800 Series Scanners are available • Easily upgradeable models, at your site, with minimal downtime...sheet feeding and operator-assisted document stacks. The following features are standard on the Kodak i800 Series Scanners. • Simultaneous output of color and bi-tonal images (i820 and i840 scanners only) • SurePath paper handling, featuring: - 1,000-sheet QuickSet elevator ...
User Guide
Page 10
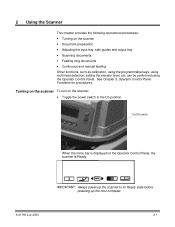
... Continuous and manual feeding Other functions, such as calibration, using the programmable keys, using the Operator Control Panel. 2 Using the Scanner This chapter provides the following operational procedures: • Turning on the Operator Control Panel, the scanner is Ready. A-61169 July 2003 2-1 See Chapter 3, ...Always power-up the host computer. Turning on the scanner To turn on the scanner: • Toggle the power switch to its Ready state before powering-up the scanner to the On position. can be performed using multi-feed detection, setting the elevator level, etc.
... Continuous and manual feeding Other functions, such as calibration, using the programmable keys, using the Operator Control Panel. 2 Using the Scanner This chapter provides the following operational procedures: • Turning on the Operator Control Panel, the scanner is Ready. A-61169 July 2003 2-1 See Chapter 3, ...Always power-up the host computer. Turning on the scanner To turn on the scanner: • Toggle the power switch to its Ready state before powering-up the scanner to the On position. can be performed using multi-feed detection, setting the elevator level, etc.
User Guide
Page 11
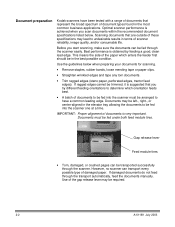
.... Gap release lever Feed module tires • Torn, damaged, or crushed pages can be fed into the scanner must be fed through the scanner easily. Use of scanner reliability, image quality, and/or consumable life. Document preparation Kodak scanners have a common leading edge. Before you scan documents within the recommended document specifications listed below when preparing...
.... Gap release lever Feed module tires • Torn, damaged, or crushed pages can be fed into the scanner must be fed through the scanner easily. Use of scanner reliability, image quality, and/or consumable life. Document preparation Kodak scanners have a common leading edge. Before you scan documents within the recommended document specifications listed below when preparing...
User Guide
Page 12
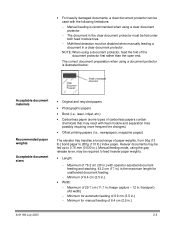
...Maximum of paper weights, from 50g (13 lb.) bond paper to 200g (110 lb.) index paper. Manual feeding mode, using a document protector is recommended when using a document protector, feed the fold of 29.7 cm (11.7 in./image capture - 12 in a clear document protector. NOTE: ... - Multi-feed detection must be fed under both feed module tires. - • For heavily damaged documents, a clear document protector can be used with operator-assisted document feeding and stacking. 43.2 cm (17 in the clear document protector must be disabled when manually feeding a document in ./transport...
...Maximum of paper weights, from 50g (13 lb.) bond paper to 200g (110 lb.) index paper. Manual feeding mode, using a document protector is recommended when using a document protector, feed the fold of 29.7 cm (11.7 in./image capture - 12 in a clear document protector. NOTE: ... - Multi-feed detection must be fed under both feed module tires. - • For heavily damaged documents, a clear document protector can be used with operator-assisted document feeding and stacking. 43.2 cm (17 in the clear document protector must be disabled when manually feeding a document in ./transport...
User Guide
Page 15
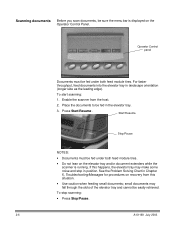
... Press Start/Resume . small documents may make some noise and stop scanning: • Press Stop/Pause. 2-6 A-61169 July 2003 If this situation. • Use caution when feeding small documents; Scanning documents Before you scan documents, be sure the menu bar is running. See the Problem Solving Chart in the...8226; Documents must be fed under both feed module tires. • Do not lean on the elevator tray and/or document extenders while the scanner is displayed on recovery from the host. 2. Operator Control panel Documents must be fed under both feed module tires.
... Press Start/Resume . small documents may make some noise and stop scanning: • Press Stop/Pause. 2-6 A-61169 July 2003 If this situation. • Use caution when feeding small documents; Scanning documents Before you scan documents, be sure the menu bar is running. See the Problem Solving Chart in the...8226; Documents must be fed under both feed module tires. • Do not lean on the elevator tray and/or document extenders while the scanner is displayed on recovery from the host. 2. Operator Control panel Documents must be fed under both feed module tires.
User Guide
Page 17
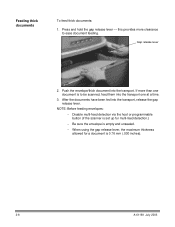
...: Before feeding envelopes: − Disable multi-feed detection via the host or programmable button (if the scanner is set up for multi-feed detection.) − Be sure the envelope is empty and unsealed. − When using the gap release lever, the maximum thickness allowed for a document is to ease document feeding. Feeding...
...: Before feeding envelopes: − Disable multi-feed detection via the host or programmable button (if the scanner is set up for multi-feed detection.) − Be sure the envelope is empty and unsealed. − When using the gap release lever, the maximum thickness allowed for a document is to ease document feeding. Feeding...
User Guide
Page 18
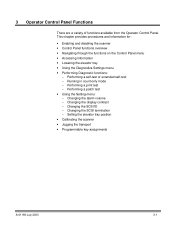
...of functions available from the Operator Control Panel. This chapter provides procedures and information for: • Enabling and disabling the scanner • Control Panel functions overview • Navigating through the functions on the Control Panel menu • Accessing information • Lowering the...self-test or extended self-test − Running in count-only mode − Performing a print test − Performing a patch test • Using the Setting menu: − Changing the alarm volume − Changing the display contrast − Changing the SCSI ID − Changing the SCSI ...
...of functions available from the Operator Control Panel. This chapter provides procedures and information for: • Enabling and disabling the scanner • Control Panel functions overview • Navigating through the functions on the Control Panel menu • Accessing information • Lowering the...self-test or extended self-test − Running in count-only mode − Performing a print test − Performing a patch test • Using the Setting menu: − Changing the alarm volume − Changing the display contrast − Changing the SCSI ID − Changing the SCSI ...
User Guide
Page 19
.... Performs the first programmable function. Depending on the image address level the icon may appear as follows: • No scanner functionality (default) • Scanner End-of-Job • Terminate Batch • Omit Multi-feed Detection on Next Document • Omit Printing on Next... Document • Omit Patch Reading on the Operator Control Panel will look like this: These functions can change the image address level, override the elevator setting and use...
.... Performs the first programmable function. Depending on the image address level the icon may appear as follows: • No scanner functionality (default) • Scanner End-of-Job • Terminate Batch • Omit Multi-feed Detection on Next Document • Omit Printing on Next... Document • Omit Patch Reading on the Operator Control Panel will look like this: These functions can change the image address level, override the elevator setting and use...
User Guide
Page 20
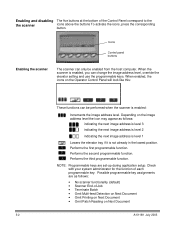
.... Displays the Diagnostics Settings menu, which allows you can display scanner information, lower the elevator tray, use the Diagnostics Settings menu, calibrate the scanner and jog the transport. Calibrates the scanner. When the Diagnostics Settings menu button functions are available: is ... selectable item (left arrow). Moves right to perform additional functions. Disabling the scanner The scanner can only be performed when the scanner is disabled. Disabled scanner functions When the scanner is disabled, you to the next selectable item (right arrow). Temporarily turns ...
.... Displays the Diagnostics Settings menu, which allows you can display scanner information, lower the elevator tray, use the Diagnostics Settings menu, calibrate the scanner and jog the transport. Calibrates the scanner. When the Diagnostics Settings menu button functions are available: is ... selectable item (left arrow). Moves right to perform additional functions. Disabling the scanner The scanner can only be performed when the scanner is disabled. Disabled scanner functions When the scanner is disabled, you to the next selectable item (right arrow). Temporarily turns ...
User Guide
Page 22
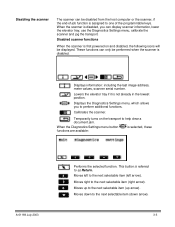
... is enabled from the Settings menu. The next time the scanner is configured for elevator position from the host the menu setting will display information including the last image address, meter values, and scanner serial number. • Select this icon to lower the elevator... tray to display information. Using the Diagnostics The Menu icon Settings menu displays the Diagnostics Settings menu. Accessing information ...
... is enabled from the Settings menu. The next time the scanner is configured for elevator position from the host the menu setting will display information including the last image address, meter values, and scanner serial number. • Select this icon to lower the elevator... tray to display information. Using the Diagnostics The Menu icon Settings menu displays the Diagnostics Settings menu. Accessing information ...

User Guide
Page 23
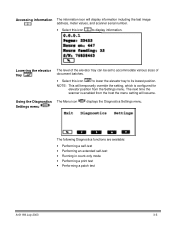
...3. Select Return. Select Return. To run the self-test and report the results on the scanner. Use the down arrow to count the number of documents entering the scanner without actually scanning. Use the right or left arrow to navigate to the Diagnostics function. 3. Select the Diagnostics Settings ...menu icon. 2. The message Counting Pages will be displayed. 6. Use the right or left arrow to navigate to select Run count only. 4. The self-test is the same test performed when the scanner is a more thorough test. Performing a self-test or extended self-test...
...3. Select Return. Select Return. To run the self-test and report the results on the scanner. Use the down arrow to count the number of documents entering the scanner without actually scanning. Use the right or left arrow to navigate to the Diagnostics function. 3. Select the Diagnostics Settings ...menu icon. 2. The message Counting Pages will be displayed. 6. Use the right or left arrow to navigate to select Run count only. 4. The self-test is the same test performed when the scanner is a more thorough test. Performing a self-test or extended self-test...

User Guide
Page 24
... output tray will display the results of the print test. 8. Select the Diagnostics Settings menu icon. 2. Select Return. 5. A-61169 July 2003 3-7 To perform a print test: 1. Use the right or left arrow to navigate to select Run print test. 4. Press Stop/Pause. Repeat the print test.... Use the down arrow to the Diagnostics function. 3. See Chapter 4, Document Printer and Patch Reader, for more information. − If the pattern is installed properly and ...
... output tray will display the results of the print test. 8. Select the Diagnostics Settings menu icon. 2. Select Return. 5. A-61169 July 2003 3-7 To perform a print test: 1. Use the right or left arrow to navigate to select Run print test. 4. Press Stop/Pause. Repeat the print test.... Use the down arrow to the Diagnostics function. 3. See Chapter 4, Document Printer and Patch Reader, for more information. − If the pattern is installed properly and ...
User Guide
Page 25
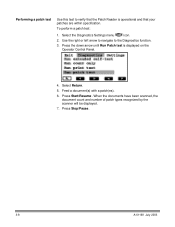
...arrow until Run Patch test is operational and that your patches are within specification. Feed a document(s) with a patch(es). 6. Use the right or left arrow to navigate to verify that the Patch Reader is displayed on the Operator Control Panel. 4. When the... documents have been scanned, the document count and number of patch types recognized by the scanner will be displayed. 7. Performing a patch test Use this test to the Diagnostics function. 3. Press Stop/Pause. 3-8 A-61169 July 2003 Press Start/Resume . Select the Diagnostics ...
...arrow until Run Patch test is operational and that your patches are within specification. Feed a document(s) with a patch(es). 6. Use the right or left arrow to navigate to verify that the Patch Reader is displayed on the Operator Control Panel. 4. When the... documents have been scanned, the document count and number of patch types recognized by the scanner will be displayed. 7. Performing a patch test Use this test to the Diagnostics function. 3. Press Stop/Pause. 3-8 A-61169 July 2003 Press Start/Resume . Select the Diagnostics ...
User Guide
Page 26
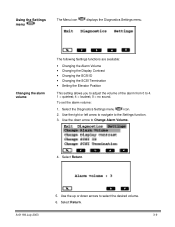
... Settings menu icon. 2. Select Return. 3-9 To set the alarm volume: 1. Use the right or left arrow to navigate to 4. 1 = quietest; 4 = loudest; 0 = no sound. Use the down arrows to Change Alarm Volume. 4. Use the up or down arrow to select the desired volume. 6. Using the Settings menu The Menu icon displays the Diagnostics Settings menu...
... Settings menu icon. 2. Select Return. 3-9 To set the alarm volume: 1. Use the right or left arrow to navigate to 4. 1 = quietest; 4 = loudest; 0 = no sound. Use the down arrows to Change Alarm Volume. 4. Use the up or down arrow to select the desired volume. 6. Using the Settings menu The Menu icon displays the Diagnostics Settings menu...
User Guide
Page 27
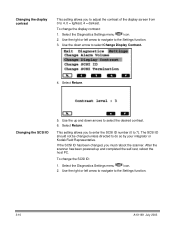
... 1. Select the Diagnostics Settings menu icon. 2. Use the up and completed the self-test, reboot the host PC. If the SCSI ID has been changed unless directed to do so by your integrator or Kodak Field Representative. Changing the SCSI ID 5. Use the right or left arrow to navigate to the... Settings function. 3-10 A-61169 July 2003 This setting allows you must reboot the scanner. To ...
... 1. Select the Diagnostics Settings menu icon. 2. Use the up and completed the self-test, reboot the host PC. If the SCSI ID has been changed unless directed to do so by your integrator or Kodak Field Representative. Changing the SCSI ID 5. Use the right or left arrow to navigate to the... Settings function. 3-10 A-61169 July 2003 This setting allows you must reboot the scanner. To ...
User Guide
Page 28
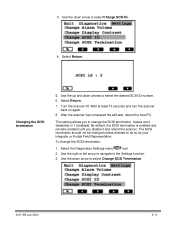
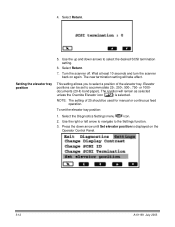
... Diagnostics Settings menu icon. 2. This setting allows you disable it and reboot the scanner. Select Return. 7. After the scanner has completed the self-test, reboot the host PC. A-61169 July 2003 3-11 Use the up and down arrow to select the desired SCSI ID number. 6. The ...to change the SCSI termination: 1. Use the down arrows to select Change SCSI Termination. Use the down arrow to the Settings function. 3. By default, the SCSI termination is enabled and remains enabled until you to do so by your integrator or Kodak Field Representative. Values are 0 (...
... Diagnostics Settings menu icon. 2. This setting allows you disable it and reboot the scanner. Select Return. 7. After the scanner has completed the self-test, reboot the host PC. A-61169 July 2003 3-11 Use the up and down arrow to select the desired SCSI ID number. 6. The ...to change the SCSI termination: 1. Use the down arrows to select Change SCSI Termination. Use the down arrow to the Settings function. 3. By default, the SCSI termination is enabled and remains enabled until you to do so by your integrator or Kodak Field Representative. Values are 0 (...
User Guide
Page 29
...elevator tray position This setting allows you to accommodate 25-, 250-, 500-, 750- or 1000documents (20-lb bond paper). 4. Turn the scanner off. The position will take effect. Use the up and down arrow until Set elevator position is selected. Select the Diagnostics Settings menu icon... be set the elevator tray position: 1. Wait at least 10 seconds and turn the scanner back on the Operator Control Panel. 3-12 A-61169 July 2003 Select Return. 5. Elevator positions can be used for manual or continuous feed operation. NOTE: The setting of the elevator tray. Press ...
...elevator tray position This setting allows you to accommodate 25-, 250-, 500-, 750- or 1000documents (20-lb bond paper). 4. Turn the scanner off. The position will take effect. Use the up and down arrow until Set elevator position is selected. Select the Diagnostics Settings menu icon... be set the elevator tray position: 1. Wait at least 10 seconds and turn the scanner back on the Operator Control Panel. 3-12 A-61169 July 2003 Select Return. 5. Elevator positions can be used for manual or continuous feed operation. NOTE: The setting of the elevator tray. Press ...


