
User Guide
Page 3
... feeding 3-9 Continuous feeding 3-10 Manual feeding 3-10 Feeding documents that require special handling 3-11 Calibrating the scanner 3-11 Image calibration 3-12 Ultrasonics calibration 3-15 4 The...parts 5-3 Cleaning procedures 5-4 Replacement procedures 5-12 Replacing the feed module or feed module tires 5-12 Replacing the separation roller or separation roller tires 5-16 Replacing the pre-separation pad 5-17 Replacing the imaging guides 5-17 6 Troubleshooting 6-1 Indicator lights 6-1 Accessing the Operator Log 6-3 i600 Series Scanners Message listing 6-6 i600 Series Scanners...
... feeding 3-9 Continuous feeding 3-10 Manual feeding 3-10 Feeding documents that require special handling 3-11 Calibrating the scanner 3-11 Image calibration 3-12 Ultrasonics calibration 3-15 4 The...parts 5-3 Cleaning procedures 5-4 Replacement procedures 5-12 Replacing the feed module or feed module tires 5-12 Replacing the separation roller or separation roller tires 5-16 Replacing the pre-separation pad 5-17 Replacing the imaging guides 5-17 6 Troubleshooting 6-1 Indicator lights 6-1 Accessing the Operator Log 6-3 i600 Series Scanners Message listing 6-6 i600 Series Scanners...
User Guide
Page 8
this installation information is available to support the Kodak i600/ i700 Series Scanners: • Scanning Setup Guide, A-61504 - Warning labels CAUTION: Moving parts, avoid contact. MSDS Material Safety Data Sheets (MSDS) are available on the Installation CD. • ...A-61511 - See Chapter 5, "Supplies and accessories" for basic scanner use the Ultra-Lightweight Feed Module. • Brightness and Contrast Control Reference Guide, A-61506 - Supporting documentation Safety information The following documentation is packed with the FireWire cable and should be used to make...
this installation information is available to support the Kodak i600/ i700 Series Scanners: • Scanning Setup Guide, A-61504 - Warning labels CAUTION: Moving parts, avoid contact. MSDS Material Safety Data Sheets (MSDS) are available on the Installation CD. • ...A-61511 - See Chapter 5, "Supplies and accessories" for basic scanner use the Ultra-Lightweight Feed Module. • Brightness and Contrast Control Reference Guide, A-61506 - Supporting documentation Safety information The following documentation is packed with the FireWire cable and should be used to make...
User Guide
Page 9
...in which case the user will be drawn into the machine. • Take sufficient breaks to Part 15 of the FCC rules. Operation of any mechanical device. Use appropriate precautions when relocating the scanner. • Do not wear loose clothing, unbuttoned sleeves, etc. • Do not wear loose... to the operation of this equipment is a Class A product based on the standard of the scanner or any machinery. This equipment has been tested and found to comply with the default time set to repair. • The Kodak i600/i700 Series Scanners contain lead in a commercial environment.
...in which case the user will be drawn into the machine. • Take sufficient breaks to Part 15 of the FCC rules. Operation of any mechanical device. Use appropriate precautions when relocating the scanner. • Do not wear loose clothing, unbuttoned sleeves, etc. • Do not wear loose... to the operation of this equipment is a Class A product based on the standard of the scanner or any machinery. This equipment has been tested and found to comply with the default time set to repair. • The Kodak i600/i700 Series Scanners contain lead in a commercial environment.
User Guide
Page 13
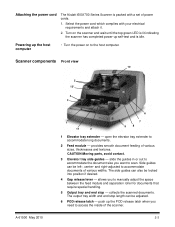
... Powering up the host computer • Turn the power on the scanner and wait until the top green LED is lit indicating the scanner has completed power-up the POD release latch when you to the host computer. CAUTION:Moving parts, avoid contact. 3 Elevator tray side guides - Select the power...or out to accommodate the document size you want to access the inside of various sizes, thicknesses and textures. The output tray width and end stop - Side guides can also be adjusted. 6 POD release latch - Attaching the power cord The Kodak i600/i700 Series Scanner is packed with your ...
... Powering up the host computer • Turn the power on the scanner and wait until the top green LED is lit indicating the scanner has completed power-up the POD release latch when you to the host computer. CAUTION:Moving parts, avoid contact. 3 Elevator tray side guides - Select the power...or out to accommodate the document size you want to access the inside of various sizes, thicknesses and textures. The output tray width and end stop - Side guides can also be adjusted. 6 POD release latch - Attaching the power cord The Kodak i600/i700 Series Scanner is packed with your ...

User Guide
Page 24
Slide the short document tray on the output tray. 2. Remove the end stop on the rail of the output tray and push it up to the desired position to accommodate your documents. 3. If you have a Kodak i600 Series Scanner, the short document tray can be ordered from Parts Services. See Chapter 5, "Supplies and Consumables" for scanning smaller documents. Adjusting the optional short document tray The short document tray is standard with the Kodak i700 Series Scanners. This tray is available for ordering information. 1. Adjust the side guides as necessary. 3-8 A-61500 May 2010
Slide the short document tray on the output tray. 2. Remove the end stop on the rail of the output tray and push it up to the desired position to accommodate your documents. 3. If you have a Kodak i600 Series Scanner, the short document tray can be ordered from Parts Services. See Chapter 5, "Supplies and Consumables" for scanning smaller documents. Adjusting the optional short document tray The short document tray is standard with the Kodak i700 Series Scanners. This tray is available for ordering information. 1. Adjust the side guides as necessary. 3-8 A-61500 May 2010

User Guide
Page 40
... mean that are worn or damaged. After cleaning, inspect the tires for parts that the tires are customer-replaceable IMPORTANT: Scanner components marked with a green tab indicate operator-accessible parts. Some document types generate more paper dust and debris and may require more frequent cleaning ... minutes. NOTES: • Follow the recommended Kodak cleaning procedures. Do not use air, liquid or gas spray cleaners. These cleaners only displace the dust, dirt or debris to another location within the scanner, which could cause the scanner to ensure the best possible image quality. ...
... mean that are worn or damaged. After cleaning, inspect the tires for parts that the tires are customer-replaceable IMPORTANT: Scanner components marked with a green tab indicate operator-accessible parts. Some document types generate more paper dust and debris and may require more frequent cleaning ... minutes. NOTES: • Follow the recommended Kodak cleaning procedures. Do not use air, liquid or gas spray cleaners. These cleaners only displace the dust, dirt or debris to another location within the scanner, which could cause the scanner to ensure the best possible image quality. ...
User Guide
Page 42
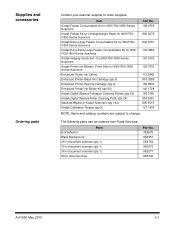
Supplies and accessories Ordering parts Contact your scanner supplier to change. The following parts can be ordered from Parts Services. Parts Exit deflector Black Background 26 in document extender (qty 1) 30 in document extender (qty 1) 34 in document extender (qty 1) Short document tray Part No. 3E9575 9E3357 5E4754 9E3216 9E5277 9E5746 A-61500 May 2010 5-3 Item Kodak Feeder Consumables Kit for i600/i700...
Supplies and accessories Ordering parts Contact your scanner supplier to change. The following parts can be ordered from Parts Services. Parts Exit deflector Black Background 26 in document extender (qty 1) 30 in document extender (qty 1) 34 in document extender (qty 1) Short document tray Part No. 3E9575 9E3357 5E4754 9E3216 9E5277 9E5746 A-61500 May 2010 5-3 Item Kodak Feeder Consumables Kit for i600/i700...
User Guide
Page 76
...documents, etc. • the sensors are clean. • the separation roller, feed module, and pre-separation pad are clean and properly installed. • the transport rollers are clean. • you are covering the paper present sensor on the elevator tray. • you may encounter when using the Kodak i600/i700 Series Scanners..., separation roller, and pre-separation pad for signs of wear and replace these parts if necessary. • a very dark document on the bottom of a stack, or curled document lead edges, can sometimes confuse the paper present sensor. Problem solving Use the ...
...documents, etc. • the sensors are clean. • the separation roller, feed module, and pre-separation pad are clean and properly installed. • the transport rollers are clean. • you are covering the paper present sensor on the elevator tray. • you may encounter when using the Kodak i600/i700 Series Scanners..., separation roller, and pre-separation pad for signs of wear and replace these parts if necessary. • a very dark document on the bottom of a stack, or curled document lead edges, can sometimes confuse the paper present sensor. Problem solving Use the ...


