User Guide
Page 2
... in the host computer 2-2 Installing the Kodak Driver software 2-2 Installing the FireWire cable 2-2 Attaching the power cord 2-3 Powering up the host computer 2-3 Scanner components 2-3 3 Using the Scanner 3-1 Turning the scanner on and off 3-1 Starting and stopping scanning 3-1 Manually pausing and resuming the scanner 3-2 Automatically pausing and resuming the scanner 3-2 Manually ending scanning 3-2 Document preparation 3-3 Adjusting the side guides...
... in the host computer 2-2 Installing the Kodak Driver software 2-2 Installing the FireWire cable 2-2 Attaching the power cord 2-3 Powering up the host computer 2-3 Scanner components 2-3 3 Using the Scanner 3-1 Turning the scanner on and off 3-1 Starting and stopping scanning 3-1 Manually pausing and resuming the scanner 3-2 Automatically pausing and resuming the scanner 3-2 Manually ending scanning 3-2 Document preparation 3-3 Adjusting the side guides...
User Guide
Page 11
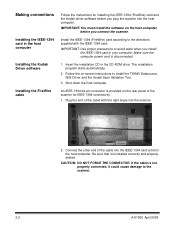
...in the host computer Installing the Kodak Driver software Installing the FireWire cable Follow the instructions for IEEE-1394 connectivity. 1. Plug the end of the cable into the host computer. IMPORTANT: You must install the software on the rear panel of the scanner for installing the IEEE-1394 (...FireWire) card and the Kodak driver software before you install the IEEE-1394 card in the host computer. An IEEE-1394 six...
...in the host computer Installing the Kodak Driver software Installing the FireWire cable Follow the instructions for IEEE-1394 connectivity. 1. Plug the end of the cable into the host computer. IMPORTANT: You must install the software on the rear panel of the scanner for installing the IEEE-1394 (...FireWire) card and the Kodak driver software before you install the IEEE-1394 card in the host computer. An IEEE-1394 six...
User Guide
Page 16
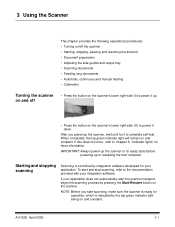
.... NOTE: Before you power up the scanner, wait until for operation, which is controlled by pressing the Start/Resume button on the scanner. If your integration software. To start and stop scanning, refer to the documentation provided with your application does not automatically start... scanning, make sure the scanner is ready for it down. When completed, the ...
.... NOTE: Before you power up the scanner, wait until for operation, which is controlled by pressing the Start/Resume button on the scanner. If your integration software. To start and stop scanning, refer to the documentation provided with your application does not automatically start... scanning, make sure the scanner is ready for it down. When completed, the ...

User Guide
Page 31
... that the software allows you to enter can be configured to include both literal (static) information (i.e., information that stays the same for each scan session. The printer operates at full scanner speed. NOTE: More detailed information on the scanner, or it could result in errors when printing is unique in that the document print...
... that the software allows you to enter can be configured to include both literal (static) information (i.e., information that stays the same for each scan session. The printer operates at full scanner speed. NOTE: More detailed information on the scanner, or it could result in errors when printing is unique in that the document print...
User Guide
Page 32
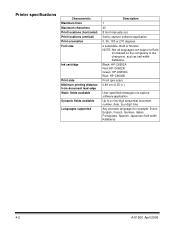
... Green: HP-C6602G Blue: HP-C6602B Front (pre-scan) 0.89 cm (0.35 in.) User-specified messages via capture software application Up to a nine-digit sequential document number, date, four-digit time Any phonetic language (for example: Dutch, English, French, German, Italian, Portuguese, Spanish... Print orientation Font size Ink cartridge Print side Minimum printing distance from document lead edge Static fields available Dynamic fields available Languages supported Description 1 40 8 front manually set, Set by capture software application 0, 90, 180 or 270 degrees 2 selectable, Bold or Normal...
... Green: HP-C6602G Blue: HP-C6602B Front (pre-scan) 0.89 cm (0.35 in.) User-specified messages via capture software application Up to a nine-digit sequential document number, date, four-digit time Any phonetic language (for example: Dutch, English, French, German, Italian, Portuguese, Spanish... Print orientation Font size Ink cartridge Print side Minimum printing distance from document lead edge Static fields available Dynamic fields available Languages supported Description 1 40 8 front manually set, Set by capture software application 0, 90, 180 or 270 degrees 2 selectable, Bold or Normal...

User Guide
Page 56
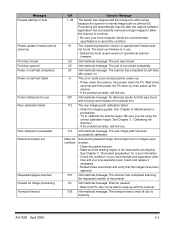
...8226; A description of the indicator lights located on the front of the scanner. • Information about accessing the Operator Log. • A problem solving chart. • A message listing of the scanner. Scanner is idle and a document jam or multi-feed has been detected. If the condition cannot be ... idle. To return to Ready state: • press the Start/Resume button on the scanner. See Operator Log for details. Scanner is idle and has detected a hardware/software error. Scanner is in sleep or lamp saver mode. See Operator Log for details. If the condition persists...
...8226; A description of the indicator lights located on the front of the scanner. • Information about accessing the Operator Log. • A problem solving chart. • A message listing of the scanner. Scanner is idle and a document jam or multi-feed has been detected. If the condition cannot be ... idle. To return to Ready state: • press the Start/Resume button on the scanner. See Operator Log for details. Scanner is idle and has detected a hardware/software error. Scanner is in sleep or lamp saver mode. See Operator Log for details. If the condition persists...
User Guide
Page 64
... but no images were created. • Clean document sensors. • Make sure the leading edges of documents. 63 Informational message. The scanner has completed scanning the requested number of the documents are using the correct calibration target. The scanner has completed its self-tests after the capture software application has successfully retrieved enough images to allow...
... but no images were created. • Clean document sensors. • Make sure the leading edges of documents. 63 Informational message. The scanner has completed scanning the requested number of the documents are using the correct calibration target. The scanner has completed its self-tests after the capture software application has successfully retrieved enough images to allow...

User Guide
Page 71
... door opened Power on self-test completed Power on . 6 This error could occur during scanner power-up firmware is in use . • Reload the most recent version of documents. 63 Informational message. Processing will automatically resume after power-on self-test failed Printer bitmap ... . 25 Informational message. The back-up . • Power-down the scanner, then power down the PC. The scanner has completed its self-tests after the capture software application has successfully retrieved enough images to allow the scanner to continue. • Be sure your pre-separation pad.
... door opened Power on self-test completed Power on . 6 This error could occur during scanner power-up firmware is in use . • Reload the most recent version of documents. 63 Informational message. Processing will automatically resume after power-on self-test failed Printer bitmap ... . 25 Informational message. The back-up . • Power-down the scanner, then power down the PC. The scanner has completed its self-tests after the capture software application has successfully retrieved enough images to allow the scanner to continue. • Be sure your pre-separation pad.
User Guide
Page 75
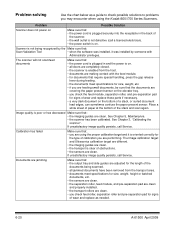
...; when the software was installed, it is clear of the stack and scan again. Documents are jamming Make sure that: • the output tray and side guides are adjusted for documents that : • the imaging guides are making contact with Administrator privileges. See Chapter 3, "Calibrating the scanner". The scanner will not scan/feed documents Make sure...
...; when the software was installed, it is clear of the stack and scan again. Documents are jamming Make sure that: • the output tray and side guides are adjusted for documents that : • the imaging guides are making contact with Administrator privileges. See Chapter 3, "Calibrating the scanner". The scanner will not scan/feed documents Make sure...


