User Guide
Page 2
... Introduction 4 Scanner features 4 2 Getting Started 5 What's in the box 5 System requirements 5 Installing the scanner 6 Installing the drivers 7 Windows 2000 7 Windows XP 13 Scanner components 19 3 Using the Scanner 21 Turning the scanner on and off 21 Document preparation 22 Scanning your documents 22 4 Maintenance 23 Supplies and consumables 23 Cleaning the scanner 23 Daily cleaning procedures 23 Weekly cleaning procedures 25 Replacing the ink cartridge 28 5 Troubleshooting 29 Indicator lights 29 Clearing a document jam 30 Problem solving 31 Image quality issues 32...
... Introduction 4 Scanner features 4 2 Getting Started 5 What's in the box 5 System requirements 5 Installing the scanner 6 Installing the drivers 7 Windows 2000 7 Windows XP 13 Scanner components 19 3 Using the Scanner 21 Turning the scanner on and off 21 Document preparation 22 Scanning your documents 22 4 Maintenance 23 Supplies and consumables 23 Cleaning the scanner 23 Daily cleaning procedures 23 Weekly cleaning procedures 25 Replacing the ink cartridge 28 5 Troubleshooting 29 Indicator lights 29 Clearing a document jam 30 Problem solving 31 Image quality issues 32...
User Guide
Page 3
... machine. • Follow the recommended Kodak cleaning procedures. Safety information User precautions • When placing the Check Scanner, make compliance with these precautions as a part of the job description for operation of the Kodak Check Scanner or any machinery. These include, but are not limited to the operation of the Check Scanner and is easily accessible. • Material Safety Data Sheets (MSDS) for chemical products are available...
... machine. • Follow the recommended Kodak cleaning procedures. Safety information User precautions • When placing the Check Scanner, make compliance with these precautions as a part of the job description for operation of the Kodak Check Scanner or any machinery. These include, but are not limited to the operation of the Check Scanner and is easily accessible. • Material Safety Data Sheets (MSDS) for chemical products are available...
User Guide
Page 4
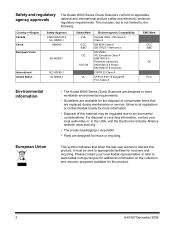
...programs available for recovery and recycling. This includes, but is recyclable. • Parts are replaced during maintenance or service; For disposal or recycling information, contact your local Kodak representative or refer to appropriate facilities for this product. 2 A-61557 December 2006 Safety and regulatory agency approvals The Kodak i6000 Series Check Scanners....2 No. 60950-1 GB4943 EN 60950-1 International United States IEC 60950-1 UL 60950-1 Safety Mark CUL CCC "S&E" CE TUV GS UL Electromagnetic Compatibility Canada ICES - 003 Issue 3 Class A GB 9254 Class A GB ...
...programs available for recovery and recycling. This includes, but is recyclable. • Parts are replaced during maintenance or service; For disposal or recycling information, contact your local Kodak representative or refer to appropriate facilities for this product. 2 A-61557 December 2006 Safety and regulatory agency approvals The Kodak i6000 Series Check Scanners....2 No. 60950-1 GB4943 EN 60950-1 International United States IEC 60950-1 UL 60950-1 Safety Mark CUL CCC "S&E" CE TUV GS UL Electromagnetic Compatibility Canada ICES - 003 Issue 3 Class A GB 9254 Class A GB ...
User Guide
Page 6
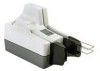
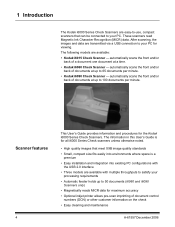
...; Kodak i6060 Check Scanner - These scanners read Magnetic Ink Character Recognition (MICR) data. automatically scans the front and/or back of document control numbers (DCN) or other customer information on the check • Easy cleaning and maintenance A-61557 December 2006 The following models are transmitted via a USB connection to your PC for viewing. After scanning, the images and data are available: • Kodak i6015 Check Scanner - 1 Introduction The Kodak i6000 Series Check Scanners are easy-to-use, compact scanners...
...; Kodak i6060 Check Scanner - These scanners read Magnetic Ink Character Recognition (MICR) data. automatically scans the front and/or back of document control numbers (DCN) or other customer information on the check • Easy cleaning and maintenance A-61557 December 2006 The following models are transmitted via a USB connection to your PC for viewing. After scanning, the images and data are available: • Kodak i6015 Check Scanner - 1 Introduction The Kodak i6000 Series Check Scanners are easy-to-use, compact scanners...
User Guide
Page 7
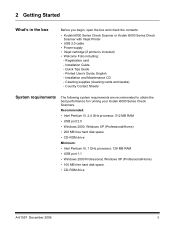
... MB free hard disk space • CD-ROM drive A-61557 December 2006 5 Installation and Maintenance CD - Registration card - Installation Guide - Country Contact Sheets System requirements The following system requirements are recommended to obtain the best performance for running your Kodak i6000 Series Check Scanners. 2 Getting Started What's in the box Before you begin, open the box and check the contents: • Kodak i6000 Series Check Scanner or Kodak i6000 Series Check Scanner with Inkjet Printer • USB 2.0 cable • Power supply •...
... MB free hard disk space • CD-ROM drive A-61557 December 2006 5 Installation and Maintenance CD - Registration card - Installation Guide - Country Contact Sheets System requirements The following system requirements are recommended to obtain the best performance for running your Kodak i6000 Series Check Scanners. 2 Getting Started What's in the box Before you begin, open the box and check the contents: • Kodak i6000 Series Check Scanner or Kodak i6000 Series Check Scanner with Inkjet Printer • USB 2.0 cable • Power supply •...
User Guide
Page 8
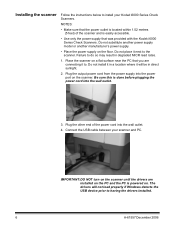
...; Use only the power supply that you are installed on a flat surface near the PC that was provided with the Kodak i6000 Series Check Scanners. IMPORTANT: DO NOT turn on the scanner until the drivers are connecting it to the scanner. Place the scanner on the PC and the PC is done before plugging the power cord into the wall outlet. 4. NOTES: • Make sure that the power...
...; Use only the power supply that you are installed on a flat surface near the PC that was provided with the Kodak i6000 Series Check Scanners. IMPORTANT: DO NOT turn on the scanner until the drivers are connecting it to the scanner. Place the scanner on the PC and the PC is done before plugging the power cord into the wall outlet. 4. NOTES: • Make sure that the power...
User Guide
Page 12
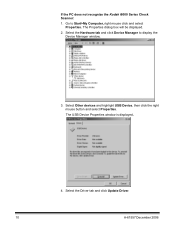
The Properties dialog box will be displayed. 2. Select the Hardware tab and click Device Manager to Start>My Computer, right mouse click and select Properties. The USB Device Properties window is displayed. 4. Select the Driver tab and click Update Driver. 10 A-61557 December 2006 Select Other devices and highlight USB Device, then click the right mouse button and select Properties. Go to display the Device Manager window. 3. If the PC does not recognize the Kodak i6000 Series Check Scanner: 1.
The Properties dialog box will be displayed. 2. Select the Hardware tab and click Device Manager to Start>My Computer, right mouse click and select Properties. The USB Device Properties window is displayed. 4. Select the Driver tab and click Update Driver. 10 A-61557 December 2006 Select Other devices and highlight USB Device, then click the right mouse button and select Properties. Go to display the Device Manager window. 3. If the PC does not recognize the Kodak i6000 Series Check Scanner: 1.
User Guide
Page 18
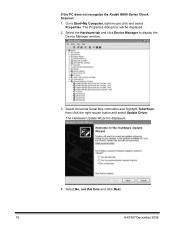
Select Universal Serial Bus controllers and highlight TellerScan then click the right mouse button and select Update Driver. Select No, not this time and click Next. 16 A-61557 December 2006 Go to display the Device Manager window. 3. The Properties dialog box will be displayed. 2. Select the Hardware tab and click Device Manager to Start>My Computer, right mouse click and select Properties. The Hardware Update Wizard is displayed. 4. If the PC does not recognize the Kodak i6000 Series Check Scanner: 1.
Select Universal Serial Bus controllers and highlight TellerScan then click the right mouse button and select Update Driver. Select No, not this time and click Next. 16 A-61557 December 2006 Go to display the Device Manager window. 3. The Properties dialog box will be displayed. 2. Select the Hardware tab and click Device Manager to Start>My Computer, right mouse click and select Properties. The Hardware Update Wizard is displayed. 4. If the PC does not recognize the Kodak i6000 Series Check Scanner: 1.

User Guide
Page 21
... Chapter 5, "Indicator lights" for maintenance or clearing document jams. Back view USB port Power port Power switch USB port - turns the scanner on the document thickness and condition, holds up to 50 documents. the scanner has three scanner covers (top, side and back covers) which can be removed for more information. Power switch - Scanner covers - Place documents in the input tray for scanning (i6060 and i6090 Scanners only). Exit tray/Exit stop wire Automatic feeder Exit tray Input tray Automatic feeder and input tray - connects the power cord to the...
... Chapter 5, "Indicator lights" for maintenance or clearing document jams. Back view USB port Power port Power switch USB port - turns the scanner on the document thickness and condition, holds up to 50 documents. the scanner has three scanner covers (top, side and back covers) which can be removed for more information. Power switch - Scanner covers - Place documents in the input tray for scanning (i6060 and i6090 Scanners only). Exit tray/Exit stop wire Automatic feeder Exit tray Input tray Automatic feeder and input tray - connects the power cord to the...
User Guide
Page 22
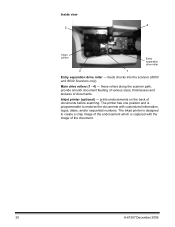
Inkjet printer (optional) - prints endorsements on the back of documents. these rollers along the scanner path, provide smooth document feeding of various sizes, thicknesses and textures of documents before scanning. Inside view 4 3 Inkjet printer Entry separation drive roller 2 1 Entry separation drive roller - Main drive rollers (1 - 4) - The printer has one position and is captured with customized information, logos, dates, and/or sequential numbers. feeds checks into the scanner (i6060 and i6090 Scanners only). The...
Inkjet printer (optional) - prints endorsements on the back of documents. these rollers along the scanner path, provide smooth document feeding of various sizes, thicknesses and textures of documents before scanning. Inside view 4 3 Inkjet printer Entry separation drive roller 2 1 Entry separation drive roller - Main drive rollers (1 - 4) - The printer has one position and is captured with customized information, logos, dates, and/or sequential numbers. feeds checks into the scanner (i6060 and i6090 Scanners only). The...
User Guide
Page 23
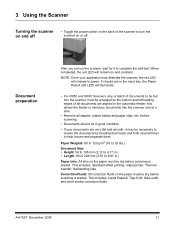
.... This includes: Standard offset printing, Inkjet printer, Thermal transfer, Handwriting inks. before scanning is started . Correction Fluids: All correction fluids on and constant. A batch of documents to turn on the paper must be fed into the scanner one at a time. • Remove all documents are aligned in the automatic feeder; Paper Weights: 60 to 120 g/m2 (16 to 32 lbs.) Document Size: • Height: 54...
.... This includes: Standard offset printing, Inkjet printer, Thermal transfer, Handwriting inks. before scanning is started . Correction Fluids: All correction fluids on and constant. A batch of documents to turn on the paper must be fed into the scanner one at a time. • Remove all documents are aligned in the automatic feeder; Paper Weights: 60 to 120 g/m2 (16 to 32 lbs.) Document Size: • Height: 54...
User Guide
Page 25
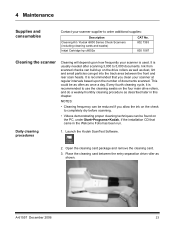
... main drive rollers, and do a weekly/monthly cleaning procedure as shown. 4 Maintenance Supplies and consumables Contact your scanner supplier to order additional supplies: Description Cleaning Kit / Kodak i6000 Series Check Scanners (including cleaning cards and swabs) Inkjet Cartridge hp c6602a CAT No. 802 7393 830 1087 Cleaning the scanner Cleaning will depend upon how frequently your scanner at regular intervals based upon the number of documents scanned. Launch the Kodak ScanTest Software. 2. This...
... main drive rollers, and do a weekly/monthly cleaning procedure as shown. 4 Maintenance Supplies and consumables Contact your scanner supplier to order additional supplies: Description Cleaning Kit / Kodak i6000 Series Check Scanners (including cleaning cards and swabs) Inkjet Cartridge hp c6602a CAT No. 802 7393 830 1087 Cleaning the scanner Cleaning will depend upon how frequently your scanner at regular intervals based upon the number of documents scanned. Launch the Kodak ScanTest Software. 2. This...

User Guide
Page 27
... section. 2. Weekly cleaning procedure A weekly cleaning should accidently remove it, when you reinsert it back into place. Remove the scanner top cover. 4. Turn the scanner off. 3. A-61557 December 2006 25 Before starting this procedure, perform the daily cleaning procedure as outlined in the scanner and wiggle it you will need to provide adequate clearance for removing the back cover. Pull the exit stop wire from...
... section. 2. Weekly cleaning procedure A weekly cleaning should accidently remove it, when you reinsert it back into place. Remove the scanner top cover. 4. Turn the scanner off. 3. A-61557 December 2006 25 Before starting this procedure, perform the daily cleaning procedure as outlined in the scanner and wiggle it you will need to provide adequate clearance for removing the back cover. Pull the exit stop wire from...

User Guide
Page 29
.... You may need to use several cleaning swabs if the rollers are turning, use an up-and-down motion to clean the entire roller. Take care not to transport freely through the scanner. The paper path should be clear to allow documents to install covers at an angle. NOTE: Be sure that the covers are installed in the proper positions. Launch the Kodak ScanTest Software. 13. Replace the top scanner cover.
.... You may need to use several cleaning swabs if the rollers are turning, use an up-and-down motion to clean the entire roller. Take care not to transport freely through the scanner. The paper path should be clear to allow documents to install covers at an angle. NOTE: Be sure that the covers are installed in the proper positions. Launch the Kodak ScanTest Software. 13. Replace the top scanner cover.

User Guide
Page 31
.... red Right LED on the current state of documents in this chapter to help you may encounter a situation with your check scanner where it may not function properly. A-61557 December 2006 29 green Left LED on - Scanner detects the presence of the scanner: LED Right LED on Flashing Scanner State Scanner is ready for operation and has detected the Kodak t6000 Client Software. 5 Troubleshooting...
.... red Right LED on the current state of documents in this chapter to help you may encounter a situation with your check scanner where it may not function properly. A-61557 December 2006 29 green Left LED on - Scanner detects the presence of the scanner: LED Right LED on Flashing Scanner State Scanner is ready for operation and has detected the Kodak t6000 Client Software. 5 Troubleshooting...
User Guide
Page 33
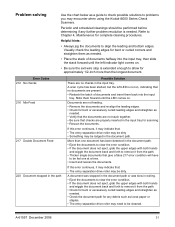
...; Be sure the exit wire stop is needed . • Place the stack of documents and insert them forward until the left LED is not on, indicating that : • The entry separation drive roller may encounter when using the Kodak i6000 Series Check Scanners. A scan cycle has been started, but the left indicator light comes on . If this error continues, it from the path...
...; Be sure the exit wire stop is needed . • Place the stack of documents and insert them forward until the left LED is not on, indicating that : • The entry separation drive roller may encounter when using the Kodak i6000 Series Check Scanners. A scan cycle has been started, but the left indicator light comes on . If this error continues, it from the path...
User Guide
Page 34
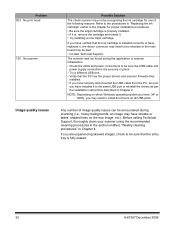
... scanner Image quality issues Possible Solution The check scanner may not be encountered during the application to scanner initialization. • Check the cable and power connections to be sure the USB cable and power supply connections are experiencing skewed images, check to install the drivers on all USB ports. If you have installed it to the procedures in "Replacing the ink cartridge" earlier in Chapter 4. Before calling Technical Support, thoroughly clean your scanner using the recommended cleaning...
... scanner Image quality issues Possible Solution The check scanner may not be encountered during the application to scanner initialization. • Check the cable and power connections to be sure the USB cable and power supply connections are experiencing skewed images, check to install the drivers on all USB ports. If you have installed it to the procedures in "Replacing the ink cartridge" earlier in Chapter 4. Before calling Technical Support, thoroughly clean your scanner using the recommended cleaning...

User Guide
Page 35
Appendix A Specifications Scanning device Light source Scanning method Document size Auto feeder capacity Output sort pockets Scanning capture speed Scan system throughput Scanner image format Grayscale image depth Color image depth Image resolution Image formats Image compression Image transmission Double feed device Double feed detection Perforation skipping Interface Operating system Minimum PC configuration Recommended PC configuration 2 x 850 cell, 108 mm Contact Image Sensor (CIS) Tri-color LED Concurrent, duplex (front and rear) Height: 56 to 106 mm (2.12 to 4.17 in.) Length: 99 to...
Appendix A Specifications Scanning device Light source Scanning method Document size Auto feeder capacity Output sort pockets Scanning capture speed Scan system throughput Scanner image format Grayscale image depth Color image depth Image resolution Image formats Image compression Image transmission Double feed device Double feed detection Perforation skipping Interface Operating system Minimum PC configuration Recommended PC configuration 2 x 850 cell, 108 mm Contact Image Sensor (CIS) Tri-color LED Concurrent, duplex (front and rear) Height: 56 to 106 mm (2.12 to 4.17 in.) Length: 99 to...
User Guide
Page 36
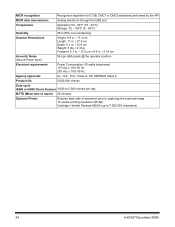
...USB port Temperature Operating: 60 - 90°F (15 - 32°C) Storage: 32 - 104°F (0 - 40°C) Humidity 35 to 85% non-condensing Scanner Dimensions Height: 6.8 in. / 17.3 cm Length: 11 in. / 27.9 cm Depth: 5.1 in. / 12.9 cm Weight: 5 lbs. / 2.3 kg Footprint: 5.1 in. / 12.9 cm x 8 6 in. / 21.8 cm Acoustic Noise (Sound Power... life 5,000,000 checks Duty cycle i6060 or i6090 Check Scanner 3,000 to 5,000 checks per day MTTR (Mean time to repair) 20 minutes Optional Printer Endorse back side of document prior to capturing the scanned image 12 nozzle printing resolution (96 dpi)...
...USB port Temperature Operating: 60 - 90°F (15 - 32°C) Storage: 32 - 104°F (0 - 40°C) Humidity 35 to 85% non-condensing Scanner Dimensions Height: 6.8 in. / 17.3 cm Length: 11 in. / 27.9 cm Depth: 5.1 in. / 12.9 cm Weight: 5 lbs. / 2.3 kg Footprint: 5.1 in. / 12.9 cm x 8 6 in. / 21.8 cm Acoustic Noise (Sound Power... life 5,000,000 checks Duty cycle i6060 or i6090 Check Scanner 3,000 to 5,000 checks per day MTTR (Mean time to repair) 20 minutes Optional Printer Endorse back side of document prior to capturing the scanned image 12 nozzle printing resolution (96 dpi)...

User Guide
Page 37
...USB port Temperature Operating: 60 - 90°F (15 - 32°C) Storage: 32 - 104°F (0 - 40°C) Humidity 35 to 85% non-condensing Scanner Dimensions Height: 6.8 in. / 17.3 cm Length: 11 in. / 27.9 cm Depth: 5.1 in. / 12.9 cm Weight: 5 lbs. / 2.3 kg Footprint: 5.1 in. / 12.9 cm x 8 6 in. / 21.8 cm Acoustic Noise (Sound Power... life 5,000,000 checks Duty cycle i6060 or i6090 Check Scanner 3,000 to 5,000 checks per day MTTR (Mean time to repair) 20 minutes Optional Printer Endorse back side of document prior to capturing the scanned image 12 nozzle printing resolution (96 dpi)...
...USB port Temperature Operating: 60 - 90°F (15 - 32°C) Storage: 32 - 104°F (0 - 40°C) Humidity 35 to 85% non-condensing Scanner Dimensions Height: 6.8 in. / 17.3 cm Length: 11 in. / 27.9 cm Depth: 5.1 in. / 12.9 cm Weight: 5 lbs. / 2.3 kg Footprint: 5.1 in. / 12.9 cm x 8 6 in. / 21.8 cm Acoustic Noise (Sound Power... life 5,000,000 checks Duty cycle i6060 or i6090 Check Scanner 3,000 to 5,000 checks per day MTTR (Mean time to repair) 20 minutes Optional Printer Endorse back side of document prior to capturing the scanned image 12 nozzle printing resolution (96 dpi)...


