

User Guide
Page 3
Contents Introduction 1 Features 2 Memory Requirements 3 ISIS Driver 5 Installation 5 Scanner Settings Dialog Box 6 Buttons in the Scanner Settings Dialog Box 6 Mode 7 Dither 8 Dots per inch (Resolution 9 Page Size 9 Brightness 10 Contrast 11 Region Selection 12 Area 12 Specifying an Area 13 Kodak Scanner Special Features Dialog Box 14 Buttons in the Kodak Scanner Special Features Dialog Box 16 Image Emphasis 17 Noise Reduction 17 Gamma 18 Lamp 18 A-63055 December 1999 i
Contents Introduction 1 Features 2 Memory Requirements 3 ISIS Driver 5 Installation 5 Scanner Settings Dialog Box 6 Buttons in the Scanner Settings Dialog Box 6 Mode 7 Dither 8 Dots per inch (Resolution 9 Page Size 9 Brightness 10 Contrast 11 Region Selection 12 Area 12 Specifying an Area 13 Kodak Scanner Special Features Dialog Box 14 Buttons in the Kodak Scanner Special Features Dialog Box 16 Image Emphasis 17 Noise Reduction 17 Gamma 18 Lamp 18 A-63055 December 1999 i
User Guide
Page 4
... Control 18 Long Paper 19 Detect Page Size 20 Read Deskew Data 21 Detect Double Feed 21 Slow Feeding 21 Mirror Image 22 Reverse Image 22 Remove Shadow 22 Fit to Page 22 White Level From Paper 23 Binary Mode Automatic Threshold 24 Halftone Mode Automatic Separation 24 Manual Feed Modes 25 Download From File 25 Scanner Information 26 Barcode 28 Setting up for Barcode Reading 28 Detecting Patch Codes 31 Document Printer (Imprinter 32 Printable Characters 32 Printing a Counter...
... Control 18 Long Paper 19 Detect Page Size 20 Read Deskew Data 21 Detect Double Feed 21 Slow Feeding 21 Mirror Image 22 Reverse Image 22 Remove Shadow 22 Fit to Page 22 White Level From Paper 23 Binary Mode Automatic Threshold 24 Halftone Mode Automatic Separation 24 Manual Feed Modes 25 Download From File 25 Scanner Information 26 Barcode 28 Setting up for Barcode Reading 28 Detecting Patch Codes 31 Document Printer (Imprinter 32 Printable Characters 32 Printing a Counter...

User Guide
Page 5
TWAIN Data Source 38 Installation 38 Kodak Twain Driver Dialog Box 39 Buttons in the Kodak Twain Driver Dialog Box 41 Side 42 Method 42 Page 42 Image Type 43 Resolution (DPI 43 Paper Size 44 Creating a Custom Paper Size 44 Detect Paper Size 45 Halftone (Dither 46 Brightness 47 Contrast 48 Area 48 Sub Area 49 Specifying an Area 50 More Settings Dialog Box 51 Buttons in the More Settings Dialog Box 53 Automatic Threshold 53 White Level 54 Gamma 55 Noise Reduction 55 Lamp 56 A-63055 December 1999 iii
TWAIN Data Source 38 Installation 38 Kodak Twain Driver Dialog Box 39 Buttons in the Kodak Twain Driver Dialog Box 41 Side 42 Method 42 Page 42 Image Type 43 Resolution (DPI 43 Paper Size 44 Creating a Custom Paper Size 44 Detect Paper Size 45 Halftone (Dither 46 Brightness 47 Contrast 48 Area 48 Sub Area 49 Specifying an Area 50 More Settings Dialog Box 51 Buttons in the More Settings Dialog Box 53 Automatic Threshold 53 White Level 54 Gamma 55 Noise Reduction 55 Lamp 56 A-63055 December 1999 iii

User Guide
Page 6
Image Emphasis 56 Scanner Status 57 Mirror Image 59 Reverse Image 59 Automatic Separation (Halftone Mode 60 Remove Shadow 60 Fit to Page 61 Slow Feeding 61 Detect Paper Size 61 Detect Double Feed 61 Stop at Skew 62 Manual Feed 62 Document Printer (Imprinter 63 Printable Characters 63 Printing a Counter, Date, Time, or Fixed String 64 Printing Start Position 65 Setting up for Document Printing 66 Counter 67 A-63055 December 1999 iv
Image Emphasis 56 Scanner Status 57 Mirror Image 59 Reverse Image 59 Automatic Separation (Halftone Mode 60 Remove Shadow 60 Fit to Page 61 Slow Feeding 61 Detect Paper Size 61 Detect Double Feed 61 Stop at Skew 62 Manual Feed 62 Document Printer (Imprinter 63 Printable Characters 63 Printing a Counter, Date, Time, or Fixed String 64 Printing Start Position 65 Setting up for Document Printing 66 Counter 67 A-63055 December 1999 iv

User Guide
Page 7
... are also compatible with the scanner) or Kodak Digital Science Low Volume Capture Software to the table on the CD that can use the ISIS driver or TWAIN Data Source (both are available for each driver. Refer to enable image processing. However, other scanning applications may not be able to the lowcontrast characteristics of the image processing options. Kodak Digital Science™ Scanner 1500 Kodak Digital Science™ Scanner 2500 You...
... are also compatible with the scanner) or Kodak Digital Science Low Volume Capture Software to the table on the CD that can use the ISIS driver or TWAIN Data Source (both are available for each driver. Refer to enable image processing. However, other scanning applications may not be able to the lowcontrast characteristics of the image processing options. Kodak Digital Science™ Scanner 1500 Kodak Digital Science™ Scanner 2500 You...

User Guide
Page 8
... Contrast Detect Double Feed Detect Page Size / Detect Paper Size Detecting Patch Codes Dither / Halftone Dots per inch / Resolution (DPI) Fit to Page Gamma Halftone Mode / Automatic Separation Image Emphasis Imprinter (Document Printer) Lamp (dropout lamp color) Length Control Long Paper Manual Feed Method Mirror Image Mode / Image Type Noise Reduction Page Page Size / Paper Size Read Deskew Data Region / Side Settings Remove Shadow Reverse Image Scanner Information / Scanner Status Side Slow Feeding Stop at Skew Sub Area White Level From Paper / White Level Scanner 1500 ISIS TWAIN ¥...
... Contrast Detect Double Feed Detect Page Size / Detect Paper Size Detecting Patch Codes Dither / Halftone Dots per inch / Resolution (DPI) Fit to Page Gamma Halftone Mode / Automatic Separation Image Emphasis Imprinter (Document Printer) Lamp (dropout lamp color) Length Control Long Paper Manual Feed Method Mirror Image Mode / Image Type Noise Reduction Page Page Size / Paper Size Read Deskew Data Region / Side Settings Remove Shadow Reverse Image Scanner Information / Scanner Status Side Slow Feeding Stop at Skew Sub Area White Level From Paper / White Level Scanner 1500 ISIS TWAIN ¥...
User Guide
Page 14
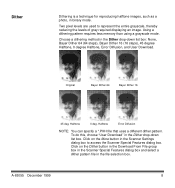
... do this, choose "User Download" in the Scanner Settings dialog box to represent the entire grayscale, thereby reducing the levels of gray required displaying an image. Using a dithering pattern requires less memory than using a grayscale mode. Halftone Error Diffusion NOTE: You can specify a *.PXH file that uses a different dither pattern. Click on the More button in the Dither drop-down list box: None, Bayer Dither 64...
... do this, choose "User Download" in the Scanner Settings dialog box to represent the entire grayscale, thereby reducing the levels of gray required displaying an image. Using a dithering pattern requires less memory than using a grayscale mode. Halftone Error Diffusion NOTE: You can specify a *.PXH file that uses a different dither pattern. Click on the More button in the Dither drop-down list box: None, Bayer Dither 64...

User Guide
Page 24
... specified, most red characters, lines, or illustrations will become a black image. NOTE: This feature is available only on a computer screen, select "CRT." By using Length Control, the scanner does not use excessive memory. The bottom half of the five gamma curves in the Lamp box to allow the scanner to perform red dropout color. The green lamp is automatically determined. Different length documents will be captured when a document is scanned. Choose...
... specified, most red characters, lines, or illustrations will become a black image. NOTE: This feature is available only on a computer screen, select "CRT." By using Length Control, the scanner does not use excessive memory. The bottom half of the five gamma curves in the Lamp box to allow the scanner to perform red dropout color. The green lamp is automatically determined. Different length documents will be captured when a document is scanned. Choose...

User Guide
Page 25
NOTE: This feature is available only on the next page for details. The scanned image is divided and filed in the size selected in the Page Size drop-down list box. Document Image Page 1 Page 2 Page 3 Page N A-63055 December 1999 19 Refer to the table on the Scanner 2500. The scannable length capability differs by the size of document, such as an oil drill chart or a cardiogram, can be captured. Long Paper When Long Paper is enabled, a lengthy type of available memory.
NOTE: This feature is available only on the next page for details. The scanned image is divided and filed in the size selected in the Page Size drop-down list box. Document Image Page 1 Page 2 Page 3 Page N A-63055 December 1999 19 Refer to the table on the Scanner 2500. The scannable length capability differs by the size of document, such as an oil drill chart or a cardiogram, can be captured. Long Paper When Long Paper is enabled, a lengthy type of available memory.

User Guide
Page 26
... to reconfigure the Paper Size function. NOTE: Long Paper is not available when Read Deskew Data or Detect Page Size is determined by paper width, not length. Size is enabled. Set documents of different sizes on the left side of the feeder. If a document jams during scanning, cancel the scan from the application or open the scanner door and stop scanning. Detect Page Size The length that can be scanned is determined by the memory size.
... to reconfigure the Paper Size function. NOTE: Long Paper is not available when Read Deskew Data or Detect Page Size is determined by paper width, not length. Size is enabled. Set documents of different sizes on the left side of the feeder. If a document jams during scanning, cancel the scan from the application or open the scanner door and stop scanning. Detect Page Size The length that can be scanned is determined by the memory size.

User Guide
Page 27
... sensitivities: • High-select this when you scan thick paper. • Low-select this when you scan thin paper. • Normal-select this when you enable Detect Double Feed, Sensitivity is selected. NOTES: The scanner uses an ultrasonic wave to verify that all documents have been scanned. When you to change the feeder speed in the automatic document feeder. Before scanning, straighten the document and select the Slow Feeding check box.
... sensitivities: • High-select this when you scan thick paper. • Low-select this when you scan thin paper. • Normal-select this when you enable Detect Double Feed, Sensitivity is selected. NOTES: The scanner uses an ultrasonic wave to verify that all documents have been scanned. When you to change the feeder speed in the automatic document feeder. Before scanning, straighten the document and select the Slow Feeding check box.

User Guide
Page 29
... may cause the noise level to "None," white level is set from a preset white color definition. • On-white level is detected. NOTE: The document color 3 mm from the upper edge is set from the first 3 mm of the scanned document becomes white. Original Auto On Off If you scan colored paper (such as red or blue), the scanned paper's background color may not work correctly.
... may cause the noise level to "None," white level is set from a preset white color definition. • On-white level is detected. NOTE: The document color 3 mm from the upper edge is set from the first 3 mm of the scanned document becomes white. Original Auto On Off If you scan colored paper (such as red or blue), the scanned paper's background color may not work correctly.

User Guide
Page 31
..., the scanner returns to automatic feeding mode. Manual Feed Modes Download From File The Manual Feed Modes group box allows you to configure the feeder in different ways, from 1-300 seconds. You can specify a time delay setting from a manual feed mode so you can insert documents one by one . When scanning is finished, the scanner waits for more documents in the feed tray. • Wait Until User Pushes Key-place documents in the feed tray and press the scanner's Stop/Start button to start scanning...
..., the scanner returns to automatic feeding mode. Manual Feed Modes Download From File The Manual Feed Modes group box allows you to configure the feeder in different ways, from 1-300 seconds. You can specify a time delay setting from a manual feed mode so you can insert documents one by one . When scanning is finished, the scanner waits for more documents in the feed tray. • Wait Until User Pushes Key-place documents in the feed tray and press the scanner's Stop/Start button to start scanning...

User Guide
Page 39
... Only the characters shown in the chart on a scanned document. Counter #:9999999 The first pound character (#) encountered in the string is specified. Printing a Counter, Date, Time, or Fixed String Use the following strings to 72 characters can be printed on the previous page may be printed. Extra spaces are padded with zeroes (0) when %0# is replaced with the value specified in the...
... Only the characters shown in the chart on a scanned document. Counter #:9999999 The first pound character (#) encountered in the string is specified. Printing a Counter, Date, Time, or Fixed String Use the following strings to 72 characters can be printed on the previous page may be printed. Extra spaces are padded with zeroes (0) when %0# is replaced with the value specified in the...

User Guide
Page 48
... you are using the automatic document feeder (ADF) or the flatbed when you to be scanned. Select the ADF or Flatbed radio button in the Side group box by selecting the Simplex or Duplex radio button. NOTES: If you are scanned at a same time in the text box to be scanned. If you select Number Of Pages, type a number in duplex scanning. The front side of pages to indicate the amount of the image/page is...
... you are using the automatic document feeder (ADF) or the flatbed when you to be scanned. Select the ADF or Flatbed radio button in the Side group box by selecting the Simplex or Duplex radio button. NOTES: If you are scanned at a same time in the text box to be scanned. If you select Number Of Pages, type a number in duplex scanning. The front side of pages to indicate the amount of the image/page is...

User Guide
Page 61
... for an OCR system (a system that can be specified only when a Halftone (Dither) pattern, an Error Diffusion pattern for normal scanning and computer screen viewing. A gamma setting can read text from an image produced by removing black spots, dust, or voids in the Gamma drop-down list box. Unwanted black speckles or splotches in a scanned document are standard and CRT levels in a scanned image, the...
... for an OCR system (a system that can be specified only when a Halftone (Dither) pattern, an Error Diffusion pattern for normal scanning and computer screen viewing. A gamma setting can read text from an image produced by removing black spots, dust, or voids in the Gamma drop-down list box. Unwanted black speckles or splotches in a scanned document are standard and CRT levels in a scanned image, the...

User Guide
Page 62
... the scanned image. When red dropout is specified, most red characters, lines, or illustrations will not be captured when a document is the normal setting. NOTE: This feature is Medium. Original Smooth High A-63055 December 1999 56 Lamp Image Emphasis Select Red in the Front Side Settings or Back Side Settings group boxes: High, Medium, Low, None, and Smooth. The default is available only on the Scanner 2500. Image Emphasis...
... the scanned image. When red dropout is specified, most red characters, lines, or illustrations will not be captured when a document is the normal setting. NOTE: This feature is Medium. Original Smooth High A-63055 December 1999 56 Lamp Image Emphasis Select Red in the Front Side Settings or Back Side Settings group boxes: High, Medium, Low, None, and Smooth. The default is available only on the Scanner 2500. Image Emphasis...

User Guide
Page 67
... by the document guide positions. The scanner detects the document size by paper width, not length. Select one of the following paper sizes: Legal, Letter, A3, A4, A5, A6, B4, B5, and B6. When you scan standard paper. Before scanning, straighten the document and select the Slow Feeding check box. Some of the data on the left side of the feeder. Set documents of different sizes on the edges of the page may...
... by the document guide positions. The scanner detects the document size by paper width, not length. Select one of the following paper sizes: Legal, Letter, A3, A4, A5, A6, B4, B5, and B6. When you scan standard paper. Before scanning, straighten the document and select the Slow Feeding check box. Some of the data on the left side of the feeder. Set documents of different sizes on the edges of the page may...

User Guide
Page 68
.... Check the Enable box and choose a Manual Feed mode: • All Pages-when documents are placed in the feed tray and press the scanner's Stop/Start button to a mode where you can scan pages one by one , to start scanning. Scanning starts again after you enable Manual Feed, Manual Timeout is detected. Insertion of a document starts scanning. If a document is 300 seconds (5 minutes). You can specify a time delay setting from a manual feed mode so you can insert documents one by one . The default...
.... Check the Enable box and choose a Manual Feed mode: • All Pages-when documents are placed in the feed tray and press the scanner's Stop/Start button to a mode where you can scan pages one by one , to start scanning. Scanning starts again after you enable Manual Feed, Manual Timeout is detected. Insertion of a document starts scanning. If a document is 300 seconds (5 minutes). You can specify a time delay setting from a manual feed mode so you can insert documents one by one . The default...

User Guide
Page 70
... be a fixed string that can be used in the chart on a scanned document. Up to print any variable information, such as #. This includes any combination of a counter, a date, a time, or a fixed string. Only the characters shown in a fixed string. Printing a Counter, Date, Time, or Fixed String Use the following strings to 72 characters can be printed on the previous page may be printed. A double pound character...
... be a fixed string that can be used in the chart on a scanned document. Up to print any variable information, such as #. This includes any combination of a counter, a date, a time, or a fixed string. Only the characters shown in a fixed string. Printing a Counter, Date, Time, or Fixed String Use the following strings to 72 characters can be printed on the previous page may be printed. A double pound character...


