User Manual
Page 4
...-based computer 28 Scanning multiple pictures with a MACINTOSH Computer 28 7 Maintaining Your Printer General care and cleaning...29 Cleaning the scanner glass ...30 Cleaning inside the scanner lid ...31 Replacing ink cartridges...32 Replacing the printhead ...35 Upgrading the printer software and firmware ...39 Upgrading software and firmware on a WINDOWS OS-based computer... ...44 Photo printing features ...44 Copy document features ...45 Copy photo features ...45 Scanning features ...45 Paper tray features...46 Ink cartridges ...46 iv www.kodak.com/go/aiosupport
...-based computer 28 Scanning multiple pictures with a MACINTOSH Computer 28 7 Maintaining Your Printer General care and cleaning...29 Cleaning the scanner glass ...30 Cleaning inside the scanner lid ...31 Replacing ink cartridges...32 Replacing the printhead ...35 Upgrading the printer software and firmware ...39 Upgrading software and firmware on a WINDOWS OS-based computer... ...44 Photo printing features ...44 Copy document features ...45 Copy photo features ...45 Scanning features ...45 Paper tray features...46 Ink cartridges ...46 iv www.kodak.com/go/aiosupport

User Manual
Page 6
... a wireless (Wi-Fi) network. In addition, this printer supports networking, letting you print, copy, and scan pictures and documents. Components 1 2 34 56 7 Rotate Back Home MS SD/HC MMC 15 14 13 Rotate ... MMC 8 12 11 10 9 1 Wi-Fi connectivity LED 2 Memory card slot 3 Control panel 4 LCD 5 USB port 6 Power cord connection port 7 Rear-access cleanout area 8 Printer access door 9 Printhead with ink cartridges installed 10 Right paper-edge guide 11 Paper tray 12 Paper tray extender / paper stop 13 Left paper-edge guide 14...
... a wireless (Wi-Fi) network. In addition, this printer supports networking, letting you print, copy, and scan pictures and documents. Components 1 2 34 56 7 Rotate Back Home MS SD/HC MMC 15 14 13 Rotate ... MMC 8 12 11 10 9 1 Wi-Fi connectivity LED 2 Memory card slot 3 Control panel 4 LCD 5 USB port 6 Power cord connection port 7 Rear-access cleanout area 8 Printer access door 9 Printhead with ink cartridges installed 10 Right paper-edge guide 11 Paper tray 12 Paper tray extender / paper stop 13 Left paper-edge guide 14...
User Manual
Page 8
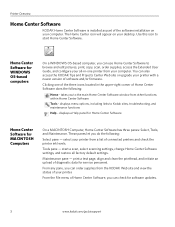
...one printer from other functions within Home Center Software Tools - These panes let you can use Home Center Software to browse and edit pictures, print, copy, scan, order supplies, access the Extended User Guide, and configure your all factory default settings. print a test page, align and clean the printhead...your desktop. Tools pane - displays a Help panel for Home Center Software Home Center Software for software updates. 3 www.kodak.com/go/aiosupport Home Center Software for WINDOWS OS-based computers On a WINDOWS OS-based computer, you can order supplies ...
...one printer from other functions within Home Center Software Tools - These panes let you can use Home Center Software to browse and edit pictures, print, copy, scan, order supplies, access the Extended User Guide, and configure your all factory default settings. print a test page, align and clean the printhead...your desktop. Tools pane - displays a Help panel for Home Center Software Home Center Software for software updates. 3 www.kodak.com/go/aiosupport Home Center Software for WINDOWS OS-based computers On a WINDOWS OS-based computer, you can order supplies ...
User Manual
Page 34
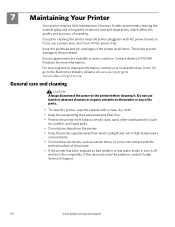
... and lid regularly to the printer before cleaning it off the power strip. In the US, go to the printhead. If this does not solve the problem, contact Kodak Service & Support. 29 www.kodak.com/go /recycle. Keep the printhead and ink cartridges in some ...countries. This helps prevent damage to www.kodak.com/go /aiosupport 7 Maintaining Your Printer Your printer requires little maintenance. Do...
... and lid regularly to the printer before cleaning it off the power strip. In the US, go to the printhead. If this does not solve the problem, contact Kodak Service & Support. 29 www.kodak.com/go /recycle. Keep the printhead and ink cartridges in some ...countries. This helps prevent damage to www.kodak.com/go /aiosupport 7 Maintaining Your Printer Your printer requires little maintenance. Do...
User Manual
Page 37
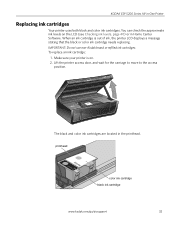
... black and color ink cartridges are located in -One Printer Replacing ink cartridges Your printer uses both black and color ink cartridges. printhead color ink cartridge black ink cartridge www.kodak.com/go/aiosupport 32 KODAK ESP 5200 Series All-in the printhead. Make sure your printer is out of ink, the printer LCD displays a message stating that the black...
... black and color ink cartridges are located in -One Printer Replacing ink cartridges Your printer uses both black and color ink cartridges. printhead color ink cartridge black ink cartridge www.kodak.com/go/aiosupport 32 KODAK ESP 5200 Series All-in the printhead. Make sure your printer is out of ink, the printer LCD displays a message stating that the black...
User Manual
Page 38
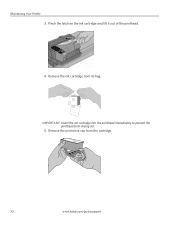
IMPORTANT: Insert the ink cartridge into the printhead immediately to prevent the printhead from its bag. Remove the ink cartridge from drying out. 5. Remove the protective cap from the cartridge. 10 33 www.kodak.com/go/aiosupport Pinch the latch on the ink cartridge and lift it out of the printhead. 4. Maintaining Your Printer 3.
IMPORTANT: Insert the ink cartridge into the printhead immediately to prevent the printhead from its bag. Remove the ink cartridge from drying out. 5. Remove the protective cap from the cartridge. 10 33 www.kodak.com/go/aiosupport Pinch the latch on the ink cartridge and lift it out of the printhead. 4. Maintaining Your Printer 3.
User Manual
Page 39
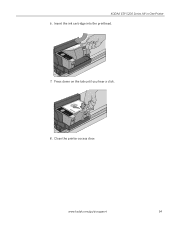
www.kodak.com/go/aiosupport 34 KODAK ESP 5200 Series All-in-One Printer 6. Press down on the tab until you hear a click. 8. Close the printer access door. Insert the ink cartridge into the printhead. 7.
www.kodak.com/go/aiosupport 34 KODAK ESP 5200 Series All-in-One Printer 6. Press down on the tab until you hear a click. 8. Close the printer access door. Insert the ink cartridge into the printhead. 7.
User Manual
Page 40
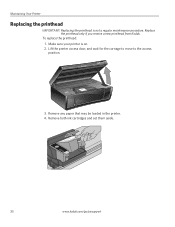
Make sure your printer is not a regular maintenance procedure. Lift the printer access door, and wait for the carriage to move to the access position. 3. Remove both ink cartridges and set them aside. 35 www.kodak.com/go/aiosupport To replace the printhead: 1. Remove any paper that may be loaded in the printer. 4. Replace the printhead only if you receive a new printhead from Kodak. Maintaining Your Printer Replacing the printhead IMPORTANT: Replacing the printhead is on. 2.
Make sure your printer is not a regular maintenance procedure. Lift the printer access door, and wait for the carriage to move to the access position. 3. Remove both ink cartridges and set them aside. 35 www.kodak.com/go/aiosupport To replace the printhead: 1. Remove any paper that may be loaded in the printer. 4. Replace the printhead only if you receive a new printhead from Kodak. Maintaining Your Printer Replacing the printhead IMPORTANT: Replacing the printhead is on. 2.
User Manual
Page 41
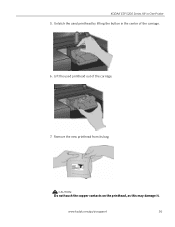
Lift the used printhead by lifting the button in -One Printer 5. CAUTION: Do not touch the copper contacts on the printhead, as this may damage it. KODAK ESP 5200 Series All-in the center of the carriage. 7. Remove the new printhead from its bag. Unlatch the used printhead out of the carriage. 6. www.kodak.com/go/aiosupport 36
Lift the used printhead by lifting the button in -One Printer 5. CAUTION: Do not touch the copper contacts on the printhead, as this may damage it. KODAK ESP 5200 Series All-in the center of the carriage. 7. Remove the new printhead from its bag. Unlatch the used printhead out of the carriage. 6. www.kodak.com/go/aiosupport 36

User Manual
Page 42
Insert it at the angle shown. 37 www.kodak.com/go/aiosupport Maintaining Your Printer 8. Remove the two plastic protective shields. 9. Place the new printhead into the carriage.
Insert it at the angle shown. 37 www.kodak.com/go/aiosupport Maintaining Your Printer 8. Remove the two plastic protective shields. 9. Place the new printhead into the carriage.
User Manual
Page 43
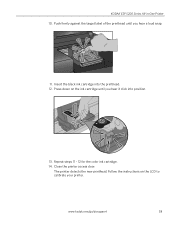
Close the printer access door. The printer detects the new printhead. www.kodak.com/go/aiosupport 38 Press down on the LCD to calibrate your printer. Repeat steps 11 - 12 for the color ink cartridge. 14. Follow the instructions on the ink cartridge until you hear it click into the printhead. 12. Insert the black ink cartridge into position. Cartouche d'encre noire 10 10 13. KODAK ESP 5200 Series All-in-One Printer 10. Push firmly against the target label of the printhead until you hear a loud snap. 11.
Close the printer access door. The printer detects the new printhead. www.kodak.com/go/aiosupport 38 Press down on the LCD to calibrate your printer. Repeat steps 11 - 12 for the color ink cartridge. 14. Follow the instructions on the ink cartridge until you hear it click into the printhead. 12. Insert the black ink cartridge into position. Cartouche d'encre noire 10 10 13. KODAK ESP 5200 Series All-in-One Printer 10. Push firmly against the target label of the printhead until you hear a loud snap. 11.
User Manual
Page 46
... (excluding WINDOWS Firewall) is transmitting data. - For additional information, go to www.kodak.com/go /aiosupport Printhead carriage jam • Open the printer access door and clear any obstructions. • Check that the printhead and ink cartridges are installed correctly. (The printhead and ink cartridges are using the power cord that the USB cable is...
... (excluding WINDOWS Firewall) is transmitting data. - For additional information, go to www.kodak.com/go /aiosupport Printhead carriage jam • Open the printer access door and clear any obstructions. • Check that the printhead and ink cartridges are installed correctly. (The printhead and ink cartridges are using the power cord that the USB cable is...

User Manual
Page 52
...to 30°C (86°F), and 20 to change without notice. x 11.7. ENERGY STAR® Qualified Warranty Product Printhead Warranty One year from purchase (with proof of purchase) One year from purchase (with proof of purchase) System requirements The following specifications are subject to 80 % RH. or 64...-bit processor 2 GHz 1024 MB RAM 500 MB available USB 2.0 CD-ROM Internet access capability 47 www.kodak.com/go/aiosupport WINDOWS...
...to 30°C (86°F), and 20 to change without notice. x 11.7. ENERGY STAR® Qualified Warranty Product Printhead Warranty One year from purchase (with proof of purchase) One year from purchase (with proof of purchase) System requirements The following specifications are subject to 80 % RH. or 64...-bit processor 2 GHz 1024 MB RAM 500 MB available USB 2.0 CD-ROM Internet access capability 47 www.kodak.com/go/aiosupport WINDOWS...
User Manual
Page 61
... LCD, 21 Reducing or enlarging a copy document, 25 photo, 25 Removing the printhead, 36 Replacing ink cartridges, 32 Right paper-edge guide, 1 Rotate button, 2, 21 S Scanner glass, 1 lid, 1 Scanning, 27 changing settings in -One printer LCD, 1, 2 LED, Wi-Fi connectivity, 1 Left paper-edge guide, 1... Lid, scanner, 1 Lightening copies, 26 Lights power status, 43 Wi-Fi status, 43 Loading paper envelopes, 15 photo, 14 plain, 13 M Maintenance, 29 Marked images, printing. KODAK ESP 5200 Series All-in ...
... LCD, 21 Reducing or enlarging a copy document, 25 photo, 25 Removing the printhead, 36 Replacing ink cartridges, 32 Right paper-edge guide, 1 Rotate button, 2, 21 S Scanner glass, 1 lid, 1 Scanning, 27 changing settings in -One printer LCD, 1, 2 LED, Wi-Fi connectivity, 1 Left paper-edge guide, 1... Lid, scanner, 1 Lightening copies, 26 Lights power status, 43 Wi-Fi status, 43 Loading paper envelopes, 15 photo, 14 plain, 13 M Maintenance, 29 Marked images, printing. KODAK ESP 5200 Series All-in ...


