User Manual
Page 3
... configuration...9 Printing the network configuration ...10 Installing your printer on additional computers on the network 10 Connecting to another KODAK All-in-One Printer 10 Adding a network connection to a USB-connected computer 11 For WINDOWS OS-based computers...11 For MACINTOSH Computers ...11 3 Handling Paper Paper types...12 Paper sizes...12 Envelope sizes...13 Loading paper ...13 Loading plain paper...13 Loading photo paper ...14 Loading envelopes...15 4 Printing Pictures Changing Print Photos Options / Defaults ...16 Printing pictures from a memory card ...17 Types of memory cards...
... configuration...9 Printing the network configuration ...10 Installing your printer on additional computers on the network 10 Connecting to another KODAK All-in-One Printer 10 Adding a network connection to a USB-connected computer 11 For WINDOWS OS-based computers...11 For MACINTOSH Computers ...11 3 Handling Paper Paper types...12 Paper sizes...12 Envelope sizes...13 Loading paper ...13 Loading plain paper...13 Loading photo paper ...14 Loading envelopes...15 4 Printing Pictures Changing Print Photos Options / Defaults ...16 Printing pictures from a memory card ...17 Types of memory cards...
User Manual
Page 4
... ...39 Upgrading software and firmware on a WINDOWS OS-based computer 39 Upgrading software and firmware on a MACINTOSH Computer 39 Monitoring and adjusting printer performance ...40 Checking ink levels...40 Resetting factory defaults ...40 8 Troubleshooting Basic troubleshooting ...41 Status lights...43 Power status light...43 Wi-Fi status light ...43 9 Product and Safety Specifications Specifications and features ...44 Print performance ...44 Photo printing features ...44 Copy document features ...45 Copy photo features ...45 Scanning features ...45 Paper tray features...46 Ink cartridges...
... ...39 Upgrading software and firmware on a WINDOWS OS-based computer 39 Upgrading software and firmware on a MACINTOSH Computer 39 Monitoring and adjusting printer performance ...40 Checking ink levels...40 Resetting factory defaults ...40 8 Troubleshooting Basic troubleshooting ...41 Status lights...43 Power status light...43 Wi-Fi status light ...43 9 Product and Safety Specifications Specifications and features ...44 Print performance ...44 Photo printing features ...44 Copy document features ...45 Copy photo features ...45 Scanning features ...45 Paper tray features...46 Ink cartridges...
User Manual
Page 8
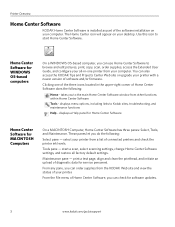
... : Home - print a test page, align and clean the printhead, and initiate an upload of Home Center Software does the following : Select pane - Use this icon to Kodak sites, troubleshooting, and maintenance functions Help - select your printer. Clicking one of the three icons located in -one printer from other functions within Home Center Software Tools - You can order supplies from the KODAK Web site and view the status of your printer from a list of connected printers and check the printer ink levels...
... : Home - print a test page, align and clean the printhead, and initiate an upload of Home Center Software does the following : Select pane - Use this icon to Kodak sites, troubleshooting, and maintenance functions Help - select your printer. Clicking one of the three icons located in -one printer from other functions within Home Center Software Tools - You can order supplies from the KODAK Web site and view the status of your printer from a list of connected printers and check the printer ink levels...
User Manual
Page 9
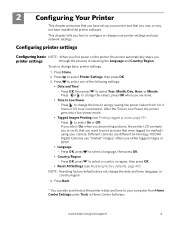
.... 3. KODAK Digital Cameras use either tagged images or DPOF. • Language - others use "marked" images; Press Back. * You can also synchronize the printer's date and time to your camera. Press to change the values; Press to change the date and time, language, or country/region. 4. Different cameras use different terminology; Press OK, press to Low Power, the printer goes into a low-power mode. • Tagged Images Printing (see Resetting factory defaults, page 40) NOTE: Resetting factory defaults does...
.... 3. KODAK Digital Cameras use either tagged images or DPOF. • Language - others use "marked" images; Press Back. * You can also synchronize the printer's date and time to your camera. Press to change the values; Press to change the date and time, language, or country/region. 4. Different cameras use different terminology; Press OK, press to Low Power, the printer goes into a low-power mode. • Tagged Images Printing (see Resetting factory defaults, page 40) NOTE: Resetting factory defaults does...
User Manual
Page 10
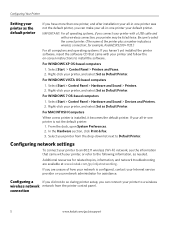
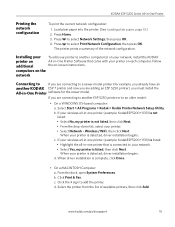
... configured, contact your Internet service provider or your network administrator for assistance. For WINDOWS 7 OS-based computers 1. If your all-in -one printer is installed, it becomes the default printer. Select your printer from the printer control panel. For WINDOWS XP OS-based computers 1. Be sure to Default Printer. Select Start > Control Panel > Printers and Faxes. 2. For MACINTOSH Computers When a new printer is not the default printer: 1. In the Hardware section, click Print & Fax. 3. If you connect your printer with a USB cable...
... configured, contact your Internet service provider or your network administrator for assistance. For WINDOWS 7 OS-based computers 1. If your all-in -one printer is installed, it becomes the default printer. Select your printer from the printer control panel. For WINDOWS XP OS-based computers 1. Be sure to Default Printer. Select Start > Control Panel > Printers and Faxes. 2. For MACINTOSH Computers When a new printer is not the default printer: 1. In the Hardware section, click Print & Fax. 3. If you connect your printer with a USB cable...
User Manual
Page 13
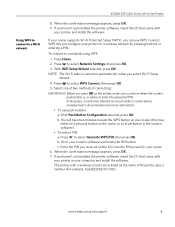
... select Network Settings, then press OK. 3. Enter the PIN you configure your printer for more information. • To use WPS Connect. Press to select Generate WPS PIN, then press OK. KODAK ESP 5200 Series All-in your computer and install the software. If you haven't yet installed the printer software, insert the CD that came with your router (this may either be a physical button on the printer, make...
... select Network Settings, then press OK. 3. Enter the PIN you configure your printer for more information. • To use WPS Connect. Press to select Generate WPS PIN, then press OK. KODAK ESP 5200 Series All-in your computer and install the software. If you haven't yet installed the printer software, insert the CD that came with your router (this may either be a physical button on the printer, make...
User Manual
Page 14
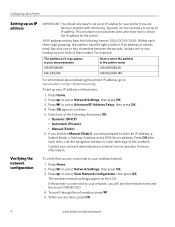
... one of the following format: 000.000.000.000. Press Home. 2. Press to select Network Settings, then press OK. 3. Consult your network administrator or Internet service provider for your network, you are connected to enter each three-digit grouping, the number must be right-justified. Press to continue. 5. Press OK again to select Advanced IP Address Setup, then press OK. 4. Use the navigation buttons...
... one of the following format: 000.000.000.000. Press Home. 2. Press to select Network Settings, then press OK. 3. Consult your network administrator or Internet service provider for your network, you are connected to enter each three-digit grouping, the number must be right-justified. Press to continue. 5. Press OK again to select Advanced IP Address Setup, then press OK. 4. Use the navigation buttons...
User Manual
Page 15
... connecting to an older model: • On a WINDOWS OS-based computer: a. If your wireless all-in-one printer (example: KodakESP5200+1133) is listed: • Highlight the all -in-one printer that came with your printer on each computer. c. When driver installation is detected, driver installation begins. From the dock, open System Preferences. Press Home. 3. Select Start > All Programs > Kodak > Kodak Printer Network Setup Utility. b. d. www.kodak.com/go/aiosupport 10 Press to select Print Network Configuration...
... connecting to an older model: • On a WINDOWS OS-based computer: a. If your wireless all-in-one printer (example: KodakESP5200+1133) is listed: • Highlight the all -in-one printer that came with your printer on each computer. c. When driver installation is detected, driver installation begins. From the dock, open System Preferences. Press Home. 3. Select Start > All Programs > Kodak > Kodak Printer Network Setup Utility. b. d. www.kodak.com/go/aiosupport 10 Press to select Print Network Configuration...
User Manual
Page 16
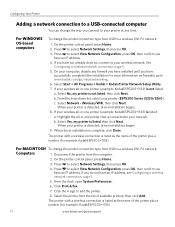
Press to a wireless (Wi-Fi) network: Computers 1. On your computer, disable any time. Select Start > All Programs > Kodak > Kodak Printer Network Setup Utility. 7. c. If your wireless network. b. For MACINTOSH To change the printer connection type from USB to select Network Settings, then press OK. 4. From the dock, open System Preferences. 6. For WINDOWS OS-based computers To change the printer connection type from USB to select Network Settings, then press OK. 3. If you have successfully completed the installation For more information on...
Press to a wireless (Wi-Fi) network: Computers 1. On your computer, disable any time. Select Start > All Programs > Kodak > Kodak Printer Network Setup Utility. 7. c. If your wireless network. b. For MACINTOSH To change the printer connection type from USB to select Network Settings, then press OK. 4. From the dock, open System Preferences. 6. For WINDOWS OS-based computers To change the printer connection type from USB to select Network Settings, then press OK. 3. If you have successfully completed the installation For more information on...
User Manual
Page 17
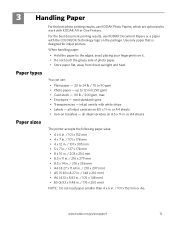
...: Do not load paper smaller than 4 x 6 in . up to 90 gsm • Photo paper - or A4 sheets • Iron-on 8.5 x 11-in . / 101 x 152 mm or A6. all inkjet varieties on transfers - most standard types • Transparencies - 3 Handling Paper Paper types Paper sizes For the best photo printing results, use KODAK Photo Papers, which are optimized to work with KODAK All-in . When handling paper: • Hold the paper by the...
...: Do not load paper smaller than 4 x 6 in . up to 90 gsm • Photo paper - or A4 sheets • Iron-on 8.5 x 11-in . / 101 x 152 mm or A6. all inkjet varieties on transfers - most standard types • Transparencies - 3 Handling Paper Paper types Paper sizes For the best photo printing results, use KODAK Photo Papers, which are optimized to work with KODAK All-in . When handling paper: • Hold the paper by the...

User Manual
Page 21
... be connected with a USB cable.) The number of pictures, or you edit and enhance your pictures using KODAK EASYSHARE Software, iPhoto, or another picture-editing program. Press or as the default. Changing Print Photos Options / Defaults You can change the settings below. Press Home. 2. The printer detects when you have a MACINTOSH Computer, print your pictures on -screen instructions. If the selected copy size is from a memory card inserted into the printer. The fastest print speed. Good quality output...
... be connected with a USB cable.) The number of pictures, or you edit and enhance your pictures using KODAK EASYSHARE Software, iPhoto, or another picture-editing program. Press or as the default. Changing Print Photos Options / Defaults You can change the settings below. Press Home. 2. The printer detects when you have a MACINTOSH Computer, print your pictures on -screen instructions. If the selected copy size is from a memory card inserted into the printer. The fastest print speed. Good quality output...
User Manual
Page 23
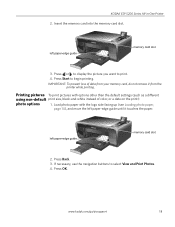
... printing. Press Start to print. 4. KODAK ESP 5200 Series All-in-One Printer 2. Printing pictures To print pictures with the logo side facing up (see Loading photo paper, page 14), and move the left paper-edge guide until it from your memory card, do not remove it touches the paper. IMPORTANT: To prevent loss of color, or a date on the print): photo options 1. Load photo paper with options other than the default settings (such as a different using non-default print size, black-and-white instead of data from the printer...
... printing. Press Start to print. 4. KODAK ESP 5200 Series All-in-One Printer 2. Printing pictures To print pictures with the logo side facing up (see Loading photo paper, page 14), and move the left paper-edge guide until it from your memory card, do not remove it touches the paper. IMPORTANT: To prevent loss of color, or a date on the print): photo options 1. Load photo paper with options other than the default settings (such as a different using non-default print size, black-and-white instead of data from the printer...

User Manual
Page 24
... done changing options, press to the default settings on the LCD indicates the picture is displayed, then press OK. 12. To print tagged pictures: 1. To select additional pictures, press or until it from your camera supports tagged (also "marked" or "DPOF") functionality. If you want to change (for example, Quantity, Print Size, Color, Scene Balance, or Add Date to change the selection. 7. Load photo paper with the logo side...
... done changing options, press to the default settings on the LCD indicates the picture is displayed, then press OK. 12. To print tagged pictures: 1. To select additional pictures, press or until it from your camera supports tagged (also "marked" or "DPOF") functionality. If you want to change (for example, Quantity, Print Size, Color, Scene Balance, or Add Date to change the selection. 7. Load photo paper with the logo side...
User Manual
Page 28
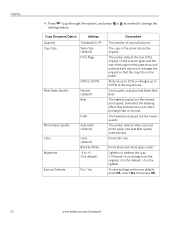
... no change the settings below: Copy Document Option Settings Quantity 1 (default) to 99 Copy Size Same Size (default) Fit to Page Plain Paper Quality 20% to 500% Normal (default) Best Photo Paper Quality Color Brightness Draft Automatic (default) Color (default) Black & White -3 to go /aiosupport Press to +3 (0 is the same size as Defaults No / Yes Description The number of the original size. The fastest print speed, but the slowest print speed; eliminates the banding effect that the copy fits on the scanner...
... no change the settings below: Copy Document Option Settings Quantity 1 (default) to 99 Copy Size Same Size (default) Fit to Page Plain Paper Quality 20% to 500% Normal (default) Best Photo Paper Quality Color Brightness Draft Automatic (default) Color (default) Black & White -3 to go /aiosupport Press to +3 (0 is the same size as Defaults No / Yes Description The number of the original size. The fastest print speed, but the slowest print speed; eliminates the banding effect that the copy fits on the scanner...
User Manual
Page 29
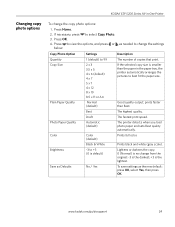
... the paper in -One Printer Changing copy photo options To change from the original; -3 is the darkest; +3 is no change the copy photo options: 1. If necessary, press 3. If the selected copy size is default) No / Yes Prints black and white (gray scale). Photo Paper Quality Color Draft Automatic (default) Color (default) The fastest print speed. The printer detects when you load photo paper and sets Best quality automatically. Brightness Save as the new default: press OK, select Yes, then press OK. To save settings as Defaults Black & White -3 to...
... the paper in -One Printer Changing copy photo options To change from the original; -3 is the darkest; +3 is no change the copy photo options: 1. If necessary, press 3. If the selected copy size is default) No / Yes Prints black and white (gray scale). Photo Paper Quality Color Draft Automatic (default) Color (default) The fastest print speed. The printer detects when you load photo paper and sets Best quality automatically. Brightness Save as the new default: press OK, select Yes, then press OK. To save settings as Defaults Black & White -3 to...
User Manual
Page 44
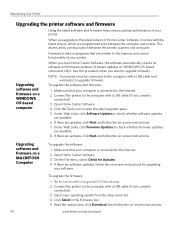
... the printer, scanner, and computer. Connect the printer to upgrade firmware. Select your computer is data or programs that your operating system from the drop-down list. 4. Connect the printer to check whether firmware updates are updates, click Next and follow the on WINDOWS OS-based computers only). On the File menu, select Check for software and firmware updates (firmware updates on -screen instructions. 39 www.kodak.com/go /esp5250downloads. 2. Open Home Center Software. 4. Under Web Links, click Firmware Updates to the computer with a USB cable...
... the printer, scanner, and computer. Connect the printer to upgrade firmware. Select your computer is data or programs that your operating system from the drop-down list. 4. Connect the printer to check whether firmware updates are updates, click Next and follow the on WINDOWS OS-based computers only). On the File menu, select Check for software and firmware updates (firmware updates on -screen instructions. 39 www.kodak.com/go /esp5250downloads. 2. Open Home Center Software. 4. Under Web Links, click Firmware Updates to the computer with a USB cable...
User Manual
Page 46
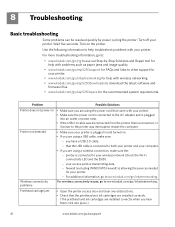
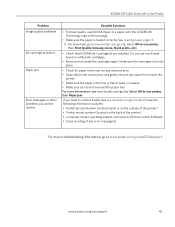
... USB cable is allowing the services needed for your printer. 8 Troubleshooting Basic troubleshooting Some problems can be resolved quickly by -Step Solutions and Repair tool for help with problems such as paper jams and image quality. • www.kodak.com/go/esp5250support for FAQs and links to other support for your printer. Wait five seconds. Problem Possible Solutions Printer does not power on the printer. Use the following information to help troubleshoot problems with your wireless network (check...
... USB cable is allowing the services needed for your printer. 8 Troubleshooting Basic troubleshooting Some problems can be resolved quickly by -Step Solutions and Repair tool for help with problems such as paper jams and image quality. • www.kodak.com/go/esp5250support for FAQs and links to other support for your printer. Wait five seconds. Problem Possible Solutions Printer does not power on the printer. Use the following information to help troubleshoot problems with your wireless network (check...
User Manual
Page 47
... KODAK Ink Cartridge(s) are installed. Select All-in -one printer, then Paper jam. If you need to contact Kodak (see www.kodak.com/go /contact), have the following information available: • Kodak Service Number (located inside the printer. • Make sure the paper in the tray is loaded correctly. See Loading paper, page 13 5. Make sure the cartridges click into place. • Check for paper in the rear-access cleanout area. • Open the printer access door and gently remove any error message...
... KODAK Ink Cartridge(s) are installed. Select All-in -one printer, then Paper jam. If you need to contact Kodak (see www.kodak.com/go /contact), have the following information available: • Kodak Service Number (located inside the printer. • Make sure the paper in the tray is loaded correctly. See Loading paper, page 13 5. Make sure the cartridges click into place. • Check for paper in the rear-access cleanout area. • Open the printer access door and gently remove any error message...
User Manual
Page 60
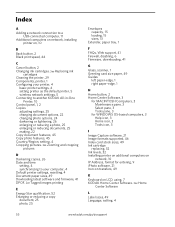
...Control panel, 1, 2 Copies adjusting settings, 25 changing document options, 22 changing photo options, 24 darkening or lightening, 26 enlarging or reducing a photo, 25 enlarging or reducing documents, 25 making, 22 Copy document features, 45 Copy photo features, 45 Country/Region, setting, 4 Cropping pictures. See Tagged images printing E Energy Star qualification, 52 Enlarging or reducing a copy document, 25 photo, 25 Envelopes capacity, 15 loading, 15 sizes, 13 Extender, paper tray, 1 F FAQs, Web support, 41 Firewall, disabling, 6 Firmware, downloading, 41 G Glass, scanner, 1 Greeting card...
...Control panel, 1, 2 Copies adjusting settings, 25 changing document options, 22 changing photo options, 24 darkening or lightening, 26 enlarging or reducing a photo, 25 enlarging or reducing documents, 25 making, 22 Copy document features, 45 Copy photo features, 45 Country/Region, setting, 4 Cropping pictures. See Tagged images printing E Energy Star qualification, 52 Enlarging or reducing a copy document, 25 photo, 25 Envelopes capacity, 15 loading, 15 sizes, 13 Extender, paper tray, 1 F FAQs, Web support, 41 Firewall, disabling, 6 Firmware, downloading, 41 G Glass, scanner, 1 Greeting card...
User Manual
Page 61
... a copy document, 25 photo, 25 Removing the printhead, 36 Replacing ink cartridges, 32 Right paper-edge guide, 1 Rotate button, 2, 21 S Scanner glass, 1 lid, 1 Scanning, 27 changing settings in -One printer LCD, 1, 2 LED, Wi-Fi connectivity, 1 Left paper-edge guide, 1 Lid, scanner, 1 Lightening copies, 26 Lights power status, 43 Wi-Fi status, 43 Loading paper envelopes, 15 photo, 14 plain, 13 M Maintenance, 29 Marked images, printing. KODAK ESP 5200 Series All-in Home Center Software, 27 multiple pictures simultaneously, 28 Service agreements, 29 Settings basic printer, 4 wireless network...
... a copy document, 25 photo, 25 Removing the printhead, 36 Replacing ink cartridges, 32 Right paper-edge guide, 1 Rotate button, 2, 21 S Scanner glass, 1 lid, 1 Scanning, 27 changing settings in -One printer LCD, 1, 2 LED, Wi-Fi connectivity, 1 Left paper-edge guide, 1 Lid, scanner, 1 Lightening copies, 26 Lights power status, 43 Wi-Fi status, 43 Loading paper envelopes, 15 photo, 14 plain, 13 M Maintenance, 29 Marked images, printing. KODAK ESP 5200 Series All-in Home Center Software, 27 multiple pictures simultaneously, 28 Service agreements, 29 Settings basic printer, 4 wireless network...


