
User Manual
Page 4
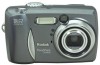
Back View Product Overview 12 3 45 6 14 7 13 8 12 11 10 9 1 Viewfinder 2 Ready light 3 Flash button 4 Mode dial 5 Shutter button 6 Zoom (Wide Angle and Telephoto) 7 Share button 8 Grip 9 Review button 10 Camera screen (LCD) 11Menu button 12 4-way control 13 OK button 14 Delete button ii
Back View Product Overview 12 3 45 6 14 7 13 8 12 11 10 9 1 Viewfinder 2 Ready light 3 Flash button 4 Mode dial 5 Shutter button 6 Zoom (Wide Angle and Telephoto) 7 Share button 8 Grip 9 Review button 10 Camera screen (LCD) 11Menu button 12 4-way control 13 OK button 14 Delete button ii

User Manual
Page 8
... Landscape Mode 18 Taking Pictures in Close-up Mode 19 Liveview-Framing with the Camera Screen 20 Quickview-Reviewing the Picture Just Taken 21 Using the Auto Focus Framing Marks 22 Using the Optical Zoom 23 Using the Digital Zoom 23 Using the Flash 24 Putting Yourself in the Picture 26 Setting Exposure...
... Landscape Mode 18 Taking Pictures in Close-up Mode 19 Liveview-Framing with the Camera Screen 20 Quickview-Reviewing the Picture Just Taken 21 Using the Auto Focus Framing Marks 22 Using the Optical Zoom 23 Using the Digital Zoom 23 Using the Flash 24 Putting Yourself in the Picture 26 Setting Exposure...

User Manual
Page 14
...camera functions (see page 60) Print pictures directly to your capabilities. Some Mac operating systems may support limited Kodak EasyShare software features. 2 Use Sport, Night, Landscape, and Close-up modes to your computer. Edit-Add special effects to expand your home printer or Kodak EasyShare printer dock 4000. Or purchase an optional Kodak secure digital... videos as Favorites). Order prints online from the Kodak EasyShare software CD, then: Transfer-Transfer pictures and videos to enjoy point-and-shoot operation. Review -Display, protect, and delete pictures and videos;...
...camera functions (see page 60) Print pictures directly to your capabilities. Some Mac operating systems may support limited Kodak EasyShare software features. 2 Use Sport, Night, Landscape, and Close-up modes to your computer. Edit-Add special effects to expand your home printer or Kodak EasyShare printer dock 4000. Or purchase an optional Kodak secure digital... videos as Favorites). Order prints online from the Kodak EasyShare software CD, then: Transfer-Transfer pictures and videos to enjoy point-and-shoot operation. Review -Display, protect, and delete pictures and videos;...
User Manual
Page 21
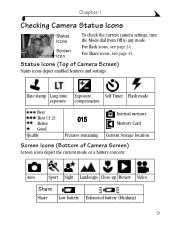
... Internal memory 015 Memory Card Pictures remaining Current Storage location Screen Icons (Bottom of Camera Screen) Screen icons depict the current mode or a battery concern: Auto Sport Night Landscape Close-up Review Video Share Share Low battery Exhausted battery (blinking) 9 For Share icons, see page... 24. Chapter 1 Checking Camera Status Icons Status Icons Screen Icon To check the current camera settings, turn the Mode dial from Off to ...
... Internal memory 015 Memory Card Pictures remaining Current Storage location Screen Icons (Bottom of Camera Screen) Screen icons depict the current mode or a battery concern: Auto Sport Night Landscape Close-up Review Video Share Share Low battery Exhausted battery (blinking) 9 For Share icons, see page... 24. Chapter 1 Checking Camera Status Icons Status Icons Screen Icon To check the current camera settings, turn the Mode dial from Off to ...
User Manual
Page 24
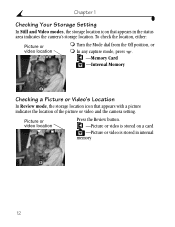
...Storage Setting In Still and Video modes, the storage location icon that appears with a picture indicates the location of the picture or video and the camera setting. To check the location, either: Picture or video location m Turn the Mode dial from the Off position, or m In any capture ...mode, press . -Memory Card -Internal Memory Checking a Picture or Video's Location In Review mode, the storage location icon that appears in internal memory 12 Picture or video location Press the Review button. -Picture or video is stored on a card -Picture or video is stored in the ...
...Storage Setting In Still and Video modes, the storage location icon that appears with a picture indicates the location of the picture or video and the camera setting. To check the location, either: Picture or video location m Turn the Mode dial from the Off position, or m In any capture ...mode, press . -Memory Card -Internal Memory Checking a Picture or Video's Location In Review mode, the storage location icon that appears in internal memory 12 Picture or video location Press the Review button. -Picture or video is stored on a card -Picture or video is stored in the ...

User Manual
Page 26
Reviewing your pictures on the battery contacts can affect battery life. Excessive use of the flash m Purchase an optional Kodak 3-volt AC adapter to power your camera, transfers pictures, and is also a battery charger for its included Kodak EasyShare Ni-MH rechargeable battery pack. Wipe the contacts with... become hot, or leak. when they return to touch metal objects, including coins. m Purchase an optional Kodak EasyShare camera dock II (see page 20) - m Dirt on the camera screen (see page 95). m Battery performance is reduced at www.rbrc.com. 14 Using Liveview (see ...
Reviewing your pictures on the battery contacts can affect battery life. Excessive use of the flash m Purchase an optional Kodak 3-volt AC adapter to power your camera, transfers pictures, and is also a battery charger for its included Kodak EasyShare Ni-MH rechargeable battery pack. Wipe the contacts with... become hot, or leak. when they return to touch metal objects, including coins. m Purchase an optional Kodak EasyShare camera dock II (see page 20) - m Dirt on the camera screen (see page 95). m Battery performance is reduced at www.rbrc.com. 14 Using Liveview (see ...

User Manual
Page 27
...while the picture is an auto-exposure or auto-focus error). Taking Pictures in Review, Share, or Setup. (In Video mode, the camera captures video.) Before you want it , press . 2 Use the viewfinder or camera screen to frame your picture storage location is set the exposure and focus. (... could be too dark, light, or blurry.) 4 When the ready light glows green, continue pressing the Shutter button completely down to . The camera screen displays a mode description. Exposure, focus, and flash are in Auto Mode Use Auto for general picture-taking. The ready light blinks orange ...
...while the picture is an auto-exposure or auto-focus error). Taking Pictures in Review, Share, or Setup. (In Video mode, the camera captures video.) Before you want it , press . 2 Use the viewfinder or camera screen to frame your picture storage location is set the exposure and focus. (... could be too dark, light, or blurry.) 4 When the ready light glows green, continue pressing the Shutter button completely down to . The camera screen displays a mode description. Exposure, focus, and flash are in Auto Mode Use Auto for general picture-taking. The ready light blinks orange ...

User Manual
Page 33
While the picture is saved. m Share it: Press the Share button to tag the picture for print, email, or as a Favorite. (See Tagging Pictures and Videos, page 45.) m Delete it : If you take a picture, the camera screen displays a Quickview of that picture for approximately 5 seconds. To save battery power, you can : Delete m Review it : Press the Delete button while the picture and are displayed. Chapter 2 Quickview-Reviewing the Picture Just Taken After you take no action, the picture Share is displayed, you can turn off the Quickview feature. (See page 50.) 21
While the picture is saved. m Share it: Press the Share button to tag the picture for print, email, or as a Favorite. (See Tagging Pictures and Videos, page 45.) m Delete it : If you take a picture, the camera screen displays a Quickview of that picture for approximately 5 seconds. To save battery power, you can : Delete m Review it : Press the Delete button while the picture and are displayed. Chapter 2 Quickview-Reviewing the Picture Just Taken After you take no action, the picture Share is displayed, you can turn off the Quickview feature. (See page 50.) 21

User Manual
Page 43
... as the default. NOTE: When your subject is displayed correct side up during Quickview and Review. This setting remains until you change it off the Orientation Sensor so that it is above or below you rotate the camera to exit the menu. Chapter 2 Setting the Orientation Sensor If you (such as pictures...
... as the default. NOTE: When your subject is displayed correct side up during Quickview and Review. This setting remains until you change it off the Orientation Sensor so that it is above or below you rotate the camera to exit the menu. Chapter 2 Setting the Orientation Sensor If you (such as pictures...

User Manual
Page 46
... the video for approximately 5 seconds. Wide Angle 1 Use the viewfinder or camera screen to the subject. The viewfinder or camera screen displays the zoomed image. 3 Press the Shutter button to adjust the volume. Chapter 3 Quickview-Reviewing the Video Just Taken After you take the video. 34 m Delete it... : Press the OK button. Press OK again to zoom out. Press to take a video, the camera screen displays the first frame of the video for email...
... the video for approximately 5 seconds. Wide Angle 1 Use the viewfinder or camera screen to the subject. The viewfinder or camera screen displays the zoomed image. 3 Press the Shutter button to adjust the volume. Chapter 3 Quickview-Reviewing the Video Just Taken After you take the video. 34 m Delete it... : Press the OK button. Press OK again to zoom out. Press to take a video, the camera screen displays the first frame of the video for email...

User Manual
Page 49
...hold . Fast-scrolling images appear in the center of the screen. 37 Viewing Pictures and Videos 1 Review Press the Review button. See Checking Camera Status Icons, page 9. 2 Press to exit Review. NOTE: Pictures taken at the Best (3:2) quality setting are stored in internal memory or on a card.... 4 Reviewing Pictures and Videos Press the Review button to take a picture anytime, even in Review. The camera screen displays the last picture or video taken. Remember, press the Shutter button to view ...
...hold . Fast-scrolling images appear in the center of the screen. 37 Viewing Pictures and Videos 1 Review Press the Review button. See Checking Camera Status Icons, page 9. 2 Press to exit Review. NOTE: Pictures taken at the Best (3:2) quality setting are stored in internal memory or on a card.... 4 Reviewing Pictures and Videos Press the Review button to take a picture anytime, even in Review. The camera screen displays the last picture or video taken. Remember, press the Shutter button to view ...

User Manual
Page 50
... scroll to highlight an option, then press the OK button: PICTURE or VIDEO-deletes the displayed picture or video. Deleting Pictures and Videos 1 Press the Review button. 2 Press to locate a picture or video, then press the Delete button. 3 Press to different pictures and videos. ALL-deletes all pictures and videos from...
... scroll to highlight an option, then press the OK button: PICTURE or VIDEO-deletes the displayed picture or video. Deleting Pictures and Videos 1 Press the Review button. 2 Press to locate a picture or video, then press the Delete button. 3 Press to different pictures and videos. ALL-deletes all pictures and videos from...

User Manual
Page 51
...Video Date Display (page 44) Picture Info(page 44) Setup Menu (page 49) Magnifying Pictures Use the Magnify feature to zoom in to exit Review mode. 39 The Magnify icon and the magnification value are displayed. 3 Press to navigate to different parts of the picture. 4 Press the OK... button to redisplay the picture at the 1X (original) size. 5 Press to locate a different picture, or press the Review button to different areas of a picture. 1 Press the Review button, then locate a picture. 2 To magnify at 2X, press the OK button. (Or press the Menu button, highlight Magnify,...
...Video Date Display (page 44) Picture Info(page 44) Setup Menu (page 49) Magnifying Pictures Use the Magnify feature to zoom in to exit Review mode. 39 The Magnify icon and the magnification value are displayed. 3 Press to navigate to different parts of the picture. 4 Press the OK... button to redisplay the picture at the 1X (original) size. 5 Press to locate a different picture, or press the Review button to different areas of a picture. 1 Press the Review button, then locate a picture. 2 To magnify at 2X, press the OK button. (Or press the Menu button, highlight Magnify,...

User Manual
Page 52
Chapter 4 Protecting Pictures and Videos From Deletion 1 Press the Review button, then locate the picture or video to exit the menu. The Protect icon appears with the protected picture or video. 4 To remove protection, press the OK button again. 5 Press the Menu button to protect. 2 Press the Menu button. CAUTION: Formatting internal memory or SD/MMC card deletes all (including protected) pictures, videos, and email addresses. 40 Protect icon 3 Press to highlight Protect , then press the OK button. The picture or video is protected and cannot be deleted.
Chapter 4 Protecting Pictures and Videos From Deletion 1 Press the Review button, then locate the picture or video to exit the menu. The Protect icon appears with the protected picture or video. 4 To remove protection, press the OK button again. 5 Press the Menu button to protect. 2 Press the Menu button. CAUTION: Formatting internal memory or SD/MMC card deletes all (including protected) pictures, videos, and email addresses. 40 Protect icon 3 Press to highlight Protect , then press the OK button. The picture or video is protected and cannot be deleted.

User Manual
Page 53
...the OK button. Chapter 4 Running a Slide Show Use the Slide Show to the menu. 4 To cancel the Slide Show, press the OK button. Then the camera returns to display your pictures and videos on any external device, see page 42. Each picture and video is displayed once, in the order in... up to 60 seconds. 1 On the Slide Show menu, press to highlight Begin Show, then press the OK button. Starting the Slide Show 1 Press the Review button, then press the Menu button. 2 Press to highlight Slide Show , then press the OK button. 3 Press to highlight Interval, then press the OK button...
...the OK button. Chapter 4 Running a Slide Show Use the Slide Show to the menu. 4 To cancel the Slide Show, press the OK button. Then the camera returns to display your pictures and videos on any external device, see page 42. Each picture and video is displayed once, in the order in... up to 60 seconds. 1 On the Slide Show menu, press to highlight Begin Show, then press the OK button. Starting the Slide Show 1 Press the Review button, then press the Menu button. 2 Press to highlight Slide Show , then press the OK button. 3 Press to highlight Interval, then press the OK button...

User Manual
Page 54
Video out 1 Connect the audio/video cable (included) from the camera video-out port to highlight On, then press the OK button. the television screen acts as on the television screen. Chapter 4 Running a Continuous Slide Show ... and videos on a television, computer monitor, or any device equipped with a video input. (Image quality on a television screen may not be as good as the camera display. 2 Review pictures and videos on a computer monitor or when printed.) NOTE: Ensure that the Video Out setting (NTSC or PAL) is exhausted. The...
Video out 1 Connect the audio/video cable (included) from the camera video-out port to highlight On, then press the OK button. the television screen acts as on the television screen. Chapter 4 Running a Continuous Slide Show ... and videos on a television, computer monitor, or any device equipped with a video input. (Image quality on a television screen may not be as good as the camera display. 2 Review pictures and videos on a computer monitor or when printed.) NOTE: Ensure that the Video Out setting (NTSC or PAL) is exhausted. The...

User Manual
Page 55
m Tags that you copy, make sure that: m A card is inserted in the camera. Copy pictures or videos: 1 Press the Review button, then press the Menu button. 2 Press to highlight Copy , then press the OK button. 3 Press to the other location. 4 Press the OK button. ALL-... applied for print, email, and Favorites are copied, not moved. To remove pictures and videos from the original location after they are not copied. m The camera's picture storage location is complete. (For information on picture numbering, see page 40. 43
m Tags that you copy, make sure that: m A card is inserted in the camera. Copy pictures or videos: 1 Press the Review button, then press the Menu button. 2 Press to highlight Copy , then press the OK button. 3 Press to the other location. 4 Press the OK button. ALL-... applied for print, email, and Favorites are copied, not moved. To remove pictures and videos from the original location after they are not copied. m The camera's picture storage location is complete. (For information on picture numbering, see page 40. 43

User Manual
Page 56
... until you change it. Information about the picture or video is displayed. 3 To view information on the camera. The capture date and time appear during video playback on the camera): 1 Press the Review button, then press the Menu button. 2 Press to highlight Video Date Display, then press the OK button...button to exit the menu. Press the Menu button to highlight About, then press the OK button. Viewing Picture/Video Information 1 Press the Review button, then press the Menu button. 2 Press to exit the menu. 44 Chapter 4 Displaying Video Date To display the capture date and ...
... until you change it. Information about the picture or video is displayed. 3 To view information on the camera. The capture date and time appear during video playback on the camera): 1 Press the Review button, then press the Menu button. 2 Press to highlight Video Date Display, then press the OK button...button to exit the menu. Press the Menu button to highlight About, then press the OK button. Viewing Picture/Video Information 1 Press the Review button, then press the Menu button. 2 Press to exit the menu. 44 Chapter 4 Displaying Video Date To display the capture date and ...

User Manual
Page 57
... are transferred to tag pictures and videos: m Just after you take them, during Quickview (see page 21 and page 34) m After pressing the Review button (see page 37) NOTE: Tags remain until removed. Press the Share button to your computer, you can share: Tagged Pictures m By print ...m By email m As Favorites, for easy organization on organizing, printing, or emailing, click the Help button in the Kodak EasyShare software. 45 For details on your pictures and videos. 5 Tagging Pictures and Videos The Share button lets you "tag" your computer Tagged Videos m By...
... are transferred to tag pictures and videos: m Just after you take them, during Quickview (see page 21 and page 34) m After pressing the Review button (see page 37) NOTE: Tags remain until removed. Press the Share button to your computer, you can share: Tagged Pictures m By print ...m By email m As Favorites, for easy organization on organizing, printing, or emailing, click the Help button in the Kodak EasyShare software. 45 For details on your pictures and videos. 5 Tagging Pictures and Videos The Share button lets you "tag" your computer Tagged Videos m By...

User Manual
Page 58
... status bar. Print All is not available in the storage location, highlight Cancel Prints, then press the OK button. Printing Tagged Pictures To print digital pictures, see page 50.) * To tag all pictures in Quickview. Cancel Prints is one. (To change the default, see page 60. 46... Zero removes the tag for Printing Share 1 Press the Review button, then locate a picture. 2 Press the Share button. The default quantity is not available in the storage location, highlight Print All, press ...
... status bar. Print All is not available in the storage location, highlight Cancel Prints, then press the OK button. Printing Tagged Pictures To print digital pictures, see page 50.) * To tag all pictures in Quickview. Cancel Prints is one. (To change the default, see page 60. 46... Zero removes the tag for Printing Share 1 Press the Review button, then locate a picture. 2 Press the Share button. The default quantity is not available in the storage location, highlight Print All, press ...


